


Chapter 6: Using the Web Interface
305
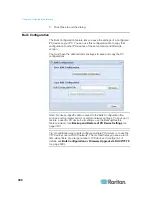
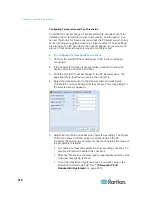
4. Type the location information in each location field if needed. Up to
63 characters are supported.
5. Select a resolution for the webcam.
If you connect two webcams to one USB-A port using a powered
USB hub, set the resolution to 352x288 or lower for optimal
performance.
6. Select the webcam mode. This can be changed as needed once the
webcam is configured.
a. Video - the webcam is in video mode. Set the Framerate (frames
per second) rate.
b. Snapshot - the webcam displays images from the webcam. Set
the "Time between Snapshots" rate as measured in seconds.
7. Click OK. The image or video from the webcam is now available in
the PX once you click on the webcam in the navigation tree.
To edit a webcam configuration:
1. In the navigation tree, click on the Webcam Management folder. The
Webcam Management page opens.
2. Double-click on the webcam you want to edit. The webcam image or
video opens in a new tab.
3. Click Setup
.
4. Edit the information as needed. Changes to the resolution do not
apply to existing, stored images - it applies only to images and
videos taken after the resolution is changed.
5. Click OK.
Adjusting Image Properties
If any snapshot or video properties, such as the brightness, contrast,
saturation, and gain settings, do not satisfy your needs, adjust them.
To adjust the image or video properties:
1. Select the webcam shown on the Webcam Management page or in
the navigation tree. See
Configuring Webcams
(on page 304).
2. Click Setup or
.
3. Click the Controls tab.
4. Adjust the desired property by adjusting the corresponding slide bar.
Or click "Set to webcam defaults" to restore all settings to this
webcam's factory defaults.
5. Click OK.
Summary of Contents for PX3-4000 series
Page 5: ......
Page 627: ...Appendix I RADIUS Configuration Illustration 606 Note If your PX uses PAP then select PAP...
Page 632: ...Appendix I RADIUS Configuration Illustration 611 14 The new attribute is added Click OK...
Page 633: ...Appendix I RADIUS Configuration Illustration 612 15 Click Next to continue...
Page 648: ...Appendix J Integration 627 3 Click OK...
Page 661: ...Appendix J Integration 640 2 Launch dcTrack to import the spreadsheet file...


