background image

PROGRAM EDITING       D-43

5-2-1

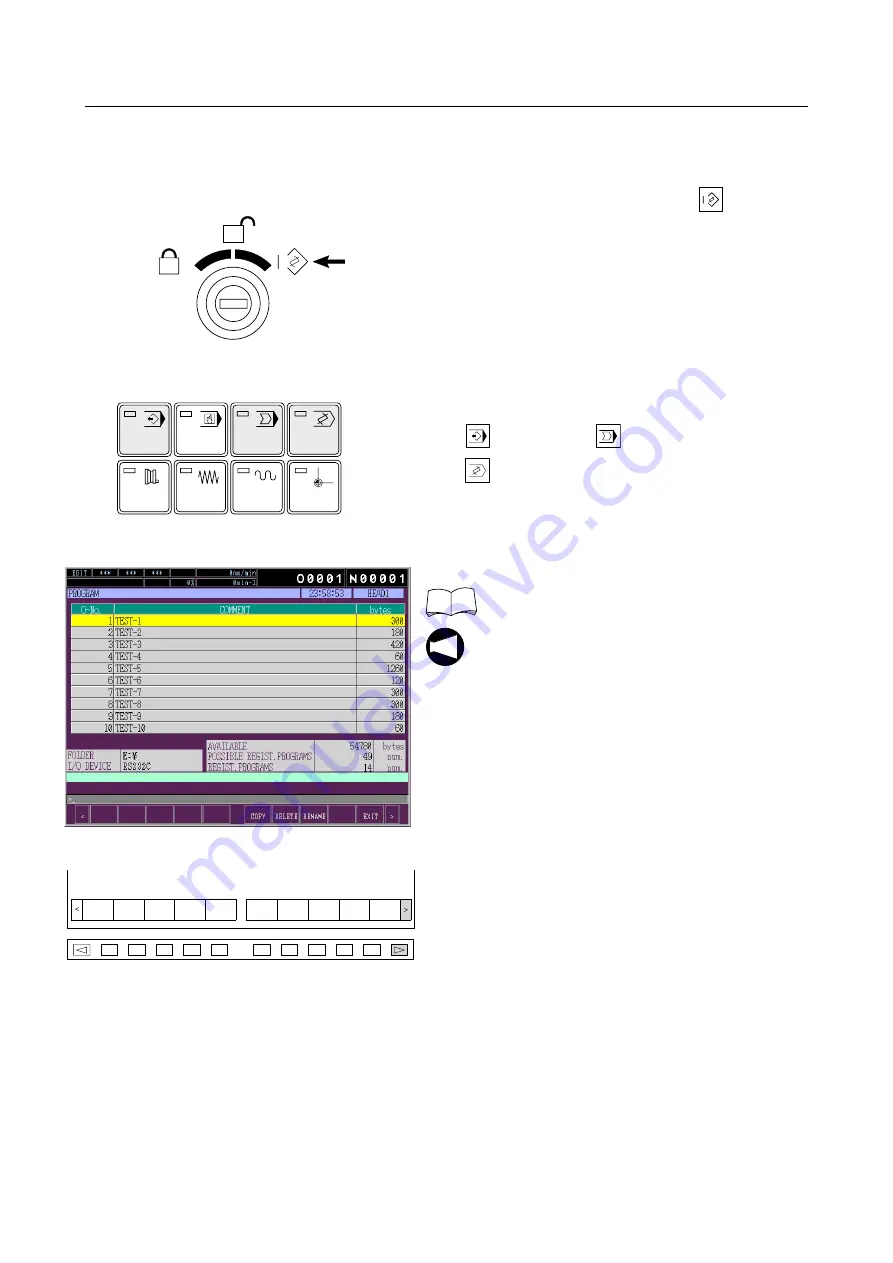
Program Input Operation Procedure

1)

Place the PANEL key-switch in the 

 (PANEL/

EDIT) position.

2)

Select any of the following modes with the MODE 

selection switch.

 (memory)

 (tape)

 (edit)

3)

Display the PROGRAM (directory) screen.

Page A-93 (7-2-2)

In background edit operation, display the 

PROGRAM directory screen after pressing the 

[BG EDIT]

 soft-key.

4)

Press the menu selection key 

[>]

.

ON

PANEL
/EDIT

OFF

PANEL

MODE

MEM

MDI

TAPE

EDIT

H

JOG

RPD

ZRN

NOTE

DELETE

COPY

RENAME

EXIT

1

F

10

F

2

F

3

F

4

F

5

F

6

F

7

F

8

F

9

F

Summary of Contents for ZL-153

Page 1: ...ZL 253SMC Before starting operation maintenance or programming carefully read the manuals supplied by Mori Seiki the NC unit manufacturer and equipment manufacturers so that you fully understand the...

Page 2: ...these points before using the machine Mori Seiki will not be liable for any damages occurring as a direct or indirect consequence of using the machine without clarifying these points All rights reserv...

Page 3: ...Machine Information Description of machine CNC lathe Model name Machine serial No Manufacturing date Representative Business hours 8 30 17 30...

Page 4: ...NG ON POWER PREFACE SIGNAL WORD DEFINITION FLOW UNTIL THE PRODUCT IS COMPLETED DOOR INTERLOCK FUNCTION A OPERATION PANELS B MANUAL OPERATION C CHUCKING D PROGRAM EDITING E SETTING OF COORDINATE SYSTEM...

Page 5: ...d with your CNC lathe 1 Safety Guidelines prepared by Mori Seiki 2 Instruction Manual prepared by Mori Seiki MAINTENANCE MANUAL OPERATION MANUAL PROGRAMMING MANUAL 3 NC unit Operation and Maintenance...

Page 6: ...onnel who maintain and inspect a machine tool or safety device or safety measures provided with it and the programmers who create programs used for machining who are engaged in operations which deal w...

Page 7: ...ng serious injuries Contact Mori Seiki the NC unit manufacturer or the relevant equipment manufacturer immediately if the protective cover or safety devices are damaged 4 Always lock out the power to...

Page 8: ...machine check the area where you will have to stand and walk to make sure you can operate the machine safely If you do not check your footing beforehand you could loose your balance while working and...

Page 9: ...8 Always observe the instructions in the caution labels stuck to the machine Carefully read the Safety Guidelines supplied with the machine so that you fully understand them If the writing on the lab...

Page 10: ...t other hazards For example each machine user will machine a variety of workpiece types and use a variety of workpiece holding fixtures cutting tools and cutting conditions you are still responsible f...

Page 11: ...k spindle center when the tailstock spindle is extended After making this adjustment clamp the tailstock body to the bed If the tailstock body is not clamped to the bed or if the position of the tails...

Page 12: ...ting any sense operates the machine he she will not be able to accurately confirm the machine status and surrounding conditions by eye ear touch Sensory confirmation is extremely important when operat...

Page 13: ...g may also damage the products workpieces causing defects 9 Keep the area around the machine clean remove chips and foreign matter near the machine If left chips and foreign matter may cause plant per...

Page 14: ...check that the workpiece is securely clamped Or if performing center work check that the tailstock spindle center securely supports the workpiece Applies only to machines equipped with a tailstock If...

Page 15: ...ause accidents involving serious injuries or damage to the machine personnel could be crushed by the moving parts of the machine or the moving parts could strike obstacles 10 For the machine equipped...

Page 16: ...th a tailstock is not set appropriately in accordance with the shape and material of the workpiece being machined and the cutting conditions the workpiece could fly out during machining causing seriou...

Page 17: ...aintenance or inspection apparatus or an external I O device whose current capacity exceeds the permissible current is connected to the outlet the breaker in the electrical cabinet could be tripped If...

Page 18: ...er loader robot etc make sure that the electric cables and hydraulic pneumatic pipes for this equipment are connected correctly Operating the external equipment or the machine with incorrect connectio...

Page 19: ...re of the chuck and cylinder repeat the chuck opening and closing operations several times check that the soft jaws or workpiece holding fixture are securely mounted and then break in the spindle If t...

Page 20: ...e breaker OFF If you turn the main switch OFF during machine operation without following the preliminary steps the machine will operate in an unexpected manner and this could cause damage to the machi...

Page 21: ...close by could be entangled in the machine and seriously injured 2 In order to ensure operator safety implement the following safety measures during setup while the door is shut and the door interlock...

Page 22: ...key switch to the operation disable position Applies to machines equipped with a flat type operation panel 3 When using a manually tightened chuck or fixture always remove the clamp handle or tighteni...

Page 23: ...spindle speed is inappropriate the workpiece could fly out causing serious injuries or damage to the machine 9 Be aware that the spindle will start rotating if the spindle normal rotation switch or sp...

Page 24: ...Be aware that the program will be updated if program editing operations are carried out with the WRITE PROTECT switch PROGRAM set OFF If the program is executed after being accidentally updated in th...

Page 25: ...stopper inside the spindle make sure that the adjusting shaft in the spindle does not protrude excessively from the rear of the spindle cylinder If there is excessive protrusion the adjusting shaft wi...

Page 26: ...ce This will cause damage to the tool and or machine 6 Do not turn the manual pulse generator dial any faster than 5 rotations per second If you do the axis will not stop immediately when the manual p...

Page 27: ...account Depending on these factors the cutting tool holder or turret head might interfere with the workpiece chuck fixture or tailstock if featured causing damage to the machine 15 If the workpiece i...

Page 28: ...switch is pressed at the background edit screen under the conditions that the automatic operation program cycle has completed and the memory mode is selected the program called in the foreground star...

Page 29: ...chine and a specially prepared fixture is used instead of the chuck to hold a workpiece remove the chuck cylinder and the connecting rod if they do not operate due to the mounting of the special fixtu...

Page 30: ...held by a second chuck or fixture mounted in this way it will not be held securely when the spindle rotates due to the centrifugal force acting on it and the chuck or fixture will fly out This could...

Page 31: ...use the workpiece to fly out while the spindle is rotating causing serious injuries or damage to the machine WARNING 1 A limit is imposed on chuck plunger thrust If the plunger thrust exceeds the allo...

Page 32: ...that your hands will not be trapped by the workpiece soft jaws or tailstock if featured If you work without sufficient care you could be seriously injured 7 When machining long workpieces always hold...

Page 33: ...Always use the T nuts specified by the chuck manufacturer If the bolts used to mount the top jaws cannot be screwed a sufficient depth into the T nuts the T nuts may break Conversely if the bolts pro...

Page 34: ...uck jaw wear and seizure will occur If machining is carried out under such conditions the workpiece will fly out causing serious injuries or damage to the machine Also note that the use of grease othe...

Page 35: ...Switch off the power before starting the deburring work If you do not switch the power off the machine could operate unexpectedly if someone carelessly interferes with the machine controls causing se...

Page 36: ...pindle through hole If the vibration cannot be eliminated by taking the measures listed above contact the bar feeder manufacturer or Mori Seiki If machining is carried out under vibration being genera...

Page 37: ...re removing the machined workpiece and setting a new workpiece Remember that the program execution does not stop when a cycle is completed and the machine could start operating and seriously injure yo...

Page 38: ...remove chips from inside the machine during machining operation make sure that the door interlock function is valid After removing the chips close the front door before restarting machine operation If...

Page 39: ...uries or damage to the machine 16 When carrying out unmanned operation over extended periods or machining using an inflammable coolant such as oil based coolant or an inflammable workpiece there is a...

Page 40: ...other and this could cause damage to the machine 5 Keep the chip conveyor operating all the time during automatic operation If chips accumulate on the conveyor it will not be possible to expel them an...

Page 41: ...ig cutting tool workpiece material etc change the machining conditions to proper values If machining is continued forcibly under the machining conditions with improper values it will bring critical pr...

Page 42: ...by the tailstock applies only to machines equipped with a tailstock If the workpiece flies out of the chuck during machining it could cause serious injuries or damage to the machine 2 If the center of...

Page 43: ...starting work and prior to machining break in the spindle and each controlled axis Using the machine without breaking it in first will cause thermal displacement which will adversely affect machining...

Page 44: ...tents when power is turned on The contents of the displayed message may vary depending on NC models Operation procedure Before pressing the OK soft key read the message carefully 1 Read and understand...

Page 45: ...the power is not required in order to set the machine in the ready status to allow a cycle start initiated by the weekly timer In this case cycle start by using the automatic operation switch cycle st...

Page 46: ...R D PROGRAM EDITING This chapter explains the procedure used to input programs to the NC and to edit the program stored in the NC memory The procedure for inputting outputting NC program using an exte...

Page 47: ...symbol must be strictly observed Other symbols Indicates the items that must be taken into consideration Indicates useful guidance relating to operations Indicates the page number or manual to be ref...

Page 48: ...y 16 Check the machining condition by carrying out test cutting Correct the program if necessary Input the tool wear offset value if necessary 7 Create the program using the conversational programming...

Page 49: ...6 above should be skipped when a program is created using the conversational programming function 2 Operation step 7 above should be skipped when the conversational programming function is not used f...

Page 50: ...s the result of erroneous operation If the door interlock function is released single block operation MDI operation and all manual mode operations are permitted even when the door is open and if the d...

Page 51: ...bot P 19 5 DOOR LOCK AND UNLOCK P 24 5 1 Lock and Unlock of Manual Door P 24 5 1 1 Door Unlock Switch Manual Door Type P 25 5 1 2 Interlock when the Door Is Unlocked Manual Door Type P 25 5 1 3 Releas...

Page 52: ...red and the electronic buzzer beeps while the door interlock function is released This indicator and buzzer indication is given until the door interlock function is made valid again The operators must...

Page 53: ...i Seiki recommends to set the door interlock function to VALID when the machine is operated Anticipated danger and possible accidents which exist or will likely occur are described below 1 The operato...

Page 54: ...e chuck caused by centrifugal force As described above a workpiece or a chuck jaw disengaged from the chuck due to some reason flies out to hit the operator or a person standing near resulting in seri...

Page 55: ...ols related with the door interlock function and the door lock device as well as the functions of the controls Installation positions The switches and other controls for the door interlock function ar...

Page 56: ...will vary according to the machine model and specification Never operate without safety door interlock switch in NORMAL position Failure to do so could cause serious injury or death DOOR INTERLOCK NO...

Page 57: ...lly made invalid Under such condition there are potential hazards in operating the machine To warn this state the status indicator INTERLOCK RELEASED blinks in red and the electronic buzzer beeps Pay...

Page 58: ...e DOOR INTERLOCK key switch into the NORMAL position After that turn on power again 3 Electronic buzzer Part No E36013 The electronic buzzer beeps under any of the following conditions to give warning...

Page 59: ...eeps might not be recognized during interlock release or abnormal state constituting hazards 5 WARNING label Part No Japanese H45417 English H45418 German H45419 French H45420 Italian H45421 Spanish H...

Page 60: ...Mori Seiki s OPERATION MANUALs all operation procedures are explained assuming that the door interlock function is valid and the door is closed WARNING If the door interlock function is released the m...

Page 61: ...a very dangerous situation since the following operations are permitted which may lead to injuries 1 Even when the door is open automatic operation with the single block function valid single block o...

Page 62: ...permitted 1 Inching and IN OUT operation of the tailstock spindle tailstock specification When holding a workpiece using the tailstock do not move the tailstock spindle out in the tailstock spindle ou...

Page 63: ...or jog and manual pulse generator feed operation no such restriction is provided If the DOOR INTERLOCK key switch is placed in the RELEASE position while the door is open automatic operation is permit...

Page 64: ...movement is stopped by releasing the axis feed switch 2 With the door opened it is possible to check the program or carry out test cutting in the memory tape mode by making the single block function v...

Page 65: ...possible accidents which exist or will likely occur are described below 1 The operator becomes entangled in the rotating parts of the machine because the spindle starts rotating while the operator is...

Page 66: ...valid Automatic operation door interlock function valid If the DOOR INTERLOCK key switch is placed in the NORMAL position while the door is open only the following manual operations are permitted 1 I...

Page 67: ...or jog and manual pulse generator feed operation no such restriction is provided If the DOOR INTERLOCK key switch is placed in the RELEASE position while the door is open automatic operation is permit...

Page 68: ...movement is stopped by releasing the axis feed switch 2 With the door opened it is possible to check the program or carry out test cutting in the memory tape mode by making the single block function v...

Page 69: ...re must be paid Anticipated danger and possible accidents which exist or will likely occur are described below 1 The operator becomes entangled in the rotating parts of the machine because the spindle...

Page 70: ...al operations are permitted 1 Inching and IN OUT operation of the tailstock spindle tailstock specification When holding a workpiece using the tailstock do not move the tailstock spindle out in the ta...

Page 71: ...ration includes MDI mode operation can be executed while the machine door is open under the following restrictions a Spindle start command M03 M04 cannot be executed b Rotary tool spindle start comman...

Page 72: ...uch restriction is provided If the DOOR INTERLOCK key switch is placed in the RELEASE position while the machine door is open automatic operation is permitted conditionally In manual operations there...

Page 73: ...ced in the NORMAL position after axis movement is stopped by releasing the axis feed switch 2 With the machine door opened it is possible to check the program or carry out test cutting in the memory t...

Page 74: ...ufficient care must be paid Anticipated danger and possible accidents which exist or will likely occur are described below 1 The operator becomes entangled in the rotating parts of the machine because...

Page 75: ...power is turned on the NC checks the functions of the door lock device and those of the contactor for spindle axis drive motors After turning on the power open the door once and close it again The ma...

Page 76: ...cification 5 While the spindle mode is being changed to the C axis milling specification 6 While the spindle range is being changed transmission specification Door Function Unlock When the DOOR UNLOCK...

Page 77: ...ll machine operations stop 6 After completing the necessary work set the door interlock function ON a Place the DOOR INTERLOCK key switch in the NORMAL position b Return the single block function to i...

Page 78: ...door is closed when the door is closed and locked Even if the door is closed the machine does not recognize it closed unless it is locked Such status is recognized as the door is open In the manuals...

Page 79: ...ually The AUTOMATIC DOOR OPEN CLOSE switch is not operative when the PANEL key switch is placed in the OFF position Door Command Function Unlock Door open M85 When this command is executed the door is...

Page 80: ...ck the program or carry out test cutting 4 Carry out necessary work If the DOOR INTERLOCK key switch is placed in the NORMAL position while carrying out operation in the door interlock released state...

Page 81: ...the machine models the door lock prevention key may not be provided Turn the key counterclockwise and the door is not locked When the door is closed with the door lock prevention key turned countercl...

Page 82: ...lows the door to be opened and the operator to leave the machine 5 4 Door Unlock Lever When the door is closed with a person being inside the machine the door is locked To make the door lock invalid f...

Page 83: ...re not always available with your machine according to its delivery Also please note that some of these accessories and functions cannot be installed after the installation of the machine For details...

Page 84: ...top Button EMERGENCY STOP A 13 4 2 6 2nd O T Release Button 2nd O T RELEASE ZL 253 A 13 4 2 7 RS232C Interface Connector A 14 4 2 8 100 VAC Service Outlet Option A 14 4 2 9 Memory Card Interface A 15...

Page 85: ...ction of the Chuck Opening Closing Footswitch A 49 5 9 Spindle Switches SPINDLE A 50 5 9 1 Spindle Speed Setting Switches A 52 5 9 2 Spindle Override Meter OVERRIDE A 53 5 9 3 Spindle Neutral Gear Swi...

Page 86: ...justment Handle Steady Rest Specification A 72 6 NC OPERATION PANEL A 73 6 1 Soft Keys A 74 6 2 Page Selection Keys A 75 6 3 Cursor Control Keys A 76 6 4 Program Edit Keys A 76 6 5 Key Input Buffer Ar...

Page 87: ...on Key SYSTEM A 104 7 5 1 Input Output Screen A 105 7 5 2 CAP Parameter Screen A 106 7 5 3 NC System Screens A 107 7 5 4 System Composition Screen A 115 7 5 5 File Maintenance Screen A 116 7 6 Functio...

Page 88: ...7 7 9 Communication Parameter Screen A 135 7 7 10 Parts Catcher Setting Operation Screen A 136 7 8 Function Selection Key NETWORK A 136 7 9 Help Key HELP A 136...

Page 89: ...hine such as setup work or cleaning the inside of the machine and before carrying out inspections repairs or maintenance work In addition set the main switch to the OFF position and lock it and place...

Page 90: ...ating or programming the machine or performing maintenance work carefully read the instruction manuals provided by Mori Seiki and the equipment manufacturers so that you fully understand the informati...

Page 91: ...eters without consultation the machine may operate in an unexpected manner causing accidents involving serious injuries or damage to the machine 1 READ THE INSTRUCTION MANUAL carefully before installi...

Page 92: ...ble running on the floor with rigid insulated plates 5 Do not leave service tools inside the machine 6 Secure adequate space and passages to carry out the intended work safely 7 Keep the floor area ar...

Page 93: ...uck or workpiece DOOR INTERLOCK FUNCTION Chuck interlock The chuck interlock function disables spindle rotation and the cycle start of automatic operation while the chuck is unclamped If the spindle i...

Page 94: ...d power cannot be turned ON while the electrical cabinet door is open The electrical cabinet door interlock function protects the operator from sustaining an electrical shock by touching a live device...

Page 95: ...t procedures for major machine units NC operation and maintenance manual prepared by NC manufacturer Contains detailed information on programming and NC unit maintenance 1 READ THE INSTRUCTION MANUAL...

Page 96: ...he machine model and specifications ON OFF NC operation panel 4 2 4 NC Power ON OFF Switches ON OFF Machine Front 4 2 5 Emergency Stop Button EMERGENCY STOP 4 2 9 Memory Card Interface 4 2 7 RS232C In...

Page 97: ...o the main switch the main switch will be damaged OFF Power to the machine is turned off when the main switch is placed in this position TRIP The switch functions as a non fused circuit breaker and re...

Page 98: ...t door interlock function is valid when this key switch is placed in this position The power supply cannot be turned on while the electrical cabinet door is open Normally the CONTROL BOX DOOR INTERLOC...

Page 99: ...power distribution board the lamp may have failed In this case replace the lamp using the following procedure Replacing the lamp bulb 1 Turn off the power supply at the shop power distribution board...

Page 100: ...e arrangement and shapes of the NC power ON and OFF switches may vary according to the machine model and specifications Power Supply to NC Switch Function ON Power is supplied to the NC when this swit...

Page 101: ...d and locked position 4 2 6 2nd O T Release Button 2nd O T RELEASE ZL 253 The 2nd O T RELEASE button is used to clear the hard overtravel alarm state Hold down this button while moving an axis from th...

Page 102: ...ice outlet is used to connect the power supply cord of an external I O device to be connected to the NC The service outlet on the operation panel option is provided for connection of external I O devi...

Page 103: ...grams offset data parameters and other data using a memory card 1 A memory card is optional 2 For a memory card an ATA flash memory card or an SRAM card should be used When placing an order please spe...

Page 104: ...TAPE MDI MEM MODE TRCL MRDY M00 M01 M02 M30 ERR X Z CHCL FUNCTION STATUS SBK OSP BDT DRN PST PSM CHIP CONVEYOR FOR BACK STOP LIGHT COOLANT ON OFF 100 SPINDLE NOR REV SPJ STOP OVERRIDE GEAR OVERRIDE R...

Page 105: ...UNLOCK PANEL 5 20 Door Unlock Switch DOOR UNLOCK 5 3 Panel Key Switch PANEL NOTE X Z STATUS 2 ERR TRCL M00 M01 M02 M30 100 OVERRIDE 0 150 50 FUNCTION COOLANT ON OFF OSP BDT 5 11 Feedrate Override Dia...

Page 106: ...Y 1 AXIS DIRECTION STATUS MILLING SP MIL UCL CL 5 10 Axis Feed Switches AXIS DIRECTION 5 19 Milling Switches MILLING MC Type 5 7 Status Indicators STATUS B B PARTS CATCHER IN PARTS CATCHER OUT HEADSTO...

Page 107: ...r which the data information is displayed on the screen These switches are not operative when the PANEL key switch is placed in the OFF position 5 2 1 In the Memory Mode Both turrets are selected when...

Page 108: ...ret 2 turret 2 screen and spindle 2 Pressing the HEAD CHANGE switches head 1 and head 2 simultaneously has no effect The currently selected turret number is displayed in the upper or lower right area...

Page 109: ...switches on the machine operation panel will not be used carelessly during automatic operation The key can be removed when the PANEL key switch is placed in this position When this position is select...

Page 110: ...ode Edit mode Handle mode Jog mode Rapid traverse mode Zero return mode Switch Function When this switch is pressed the indicator in the switch is lit and the edit mode is selected In the edit mode th...

Page 111: ...ting A program that is not currently being executed can be edited by displaying it on the screen while executing another program in the automatic mode When this switch is pressed the indicator in the...

Page 112: ...e is selected In the handle mode the axis selected with the axis selection switch is moved as the manual pulse generator is turned The axis feed amount per pulse conforms to the setting of the axis fe...

Page 113: ...automatic operation in the memory MDI or tape mode The indicator above this switch is lit during automatic operation The automatic operation start signal is output when this switch is released after b...

Page 114: ...The NC functions are made valid or invalid either by using the switches or by making settings on the OPERATION PANEL screen Make sure you thoroughly understand the NC functions explained below before...

Page 115: ...utting etc A block refers to one line of the program ending with the EOB code displayed on the screen Before starting mass production always check the program and perform test cutting in the single bl...

Page 116: ...serious injuries or damage to the machine 2 If the door interlock function is released while the single block function is valid it constitutes very danger situation since the door is unlocked permitti...

Page 117: ...al stop function makes the M01 optional stop command written in a program valid This function is used to check the conditions of the cutting tool or to remove chips from the machine during automatic o...

Page 118: ...invalid status of the block delete function changes simultaneously when either of the block delete switches provided for turret 1 and turret 2 respectively is pressed to change valid invalid status B...

Page 119: ...n function is valid In the dry run mode the cutting feedrates specified in the program are adjusted by the feedrate set with the OVERRIDE dial The OVERRIDE dial setting can be changed in 15 steps Sett...

Page 120: ...s function is used to check a program without axis movement operation When the machine lock function is valid Manual axis movement operation and programmed axis movement commands are ignored The displ...

Page 121: ...the operation procedure of the in machine tool presetter refer to page E 29 7 Presetter mode switch This switch is pressed to use the in machine tool presetter When it is pressed the tool presetter mo...

Page 122: ...When O D is selected for the chuck clamp direction the STATUS indicator CHCL HEADSTOCK 2 CHUCK CLAMP is lit when the chuck clamps the workpiece on its periphery Spindle rotation is permitted in this s...

Page 123: ...work operation In other words to ensure safety the memory tape operation can be started only when the workpiece is held by the tailstock spindle center If the cycle of the memory tape operation were...

Page 124: ...an optional PC work counter or external work counter to set the response for the count up the M89 command is read as many times as the number set for the work counter Selection is possible from two c...

Page 125: ...n lock function The auxiliary function lock function is used to select whether or not the M S and T auxiliary function commands are executed in a program during automatic operation It is used to check...

Page 126: ...ootswitch interlock function is valid The chuck is opened closed when the footswitch is stepped on When the chuck footswitch interlock function is invalid The chuck is not opened closed when the foots...

Page 127: ...mounting a workpiece etc require the spindle to be rotated with no workpiece mounted in the chuck For the chuck jaw stroke end detection function refer to page C 32 5 1 The chuck jaw stroke end detec...

Page 128: ...mounted in the chuck WARNING If the chuck jaw stroke end detection function is INVALID the spindle starts even if a workpiece is clamped in the chuck near the master jaw stroke end thereby allowing t...

Page 129: ...ition under the condition that the present position data has been lost and axis movement disabled When the zero point adjustment function is valid When the zero point adjustment function is valid axis...

Page 130: ...k joint position For the tailstock joint position adjustment procedure refer to page B 68 13 6 When the tailstock position adjustment function is valid When the tailstock position adjustment function...

Page 131: ...iece in the machine M Code Function M03 Spindle start normal M04 Spindle start reverse M08 Coolant supply M13 Rotary tool spindle start normal MC type M14 Rotary tool spindle start reverse MC type M19...

Page 132: ...mands are executed the axes are moved at the feedrate set by the OVERRIDE dial since the dry run function is valid 1 It is not possible to execute automatic operation with a workpiece clamped in the s...

Page 133: ...ERR blinks when a machine error occurs If an alarm occurs the corresponding alarm message is displayed on the screen The STATUS indicator M00 M01 is lit and the machine stops in the following cases 1...

Page 134: ...ter turning on of the power supply the lamp lights when the conditions necessary for machine operation are arranged Machine operation is impossible unless this indicator is lit The fact that this indi...

Page 135: ...o the zero point This indicator is used to check if the axis has returned to the zero point 1 Since this machine has no Y axis specification the STATUS indicator Y is not used 2 The STATUS indicators...

Page 136: ...direction setting between I D and O D so that the STATUS indicator CHCL the status indicator HEADSTOCK 2 CHUCK CLAMP is lit when the chuck operates in the direction the workpiece is clamped in it Pag...

Page 137: ...causing machine damage 2 Take care not to stumble over the footswitch since you may be injured Construction of the footswitch By pushing the lock release plate forward the lock is released and the foo...

Page 138: ...ully check the workpiece chucking conditions the chucking pressure and the spindle speed If spindle rotation is started when the workpiece is grasped unstably or when the chucking pressure or spindle...

Page 139: ...y The spindle rotates in the counterclockwise direction viewing a workpiece from the spindle when this switch is pressed 1 The spindle start signal is output when the switch is released Therefore the...

Page 140: ...he spindle speed to 100 2 Spindle speed setting switch decrease Each press and release decreases the spindle speed by 1 Holding the switch down decreases the spindle speed continuously in 2 decrements...

Page 141: ...sed to manually select the neutral position of the spindle Switch operation is impossible with the PANEL key switch placed in the OFF position 1 When pressing this switch while the spindle is stopped...

Page 142: ...selected gear range For spindle drive gear selection M codes are used 0 M40 neutral 1 M41 1st range 2 M42 2nd range 3 M43 3rd range 1 The number of spindle gear ranges varies depending on the machine...

Page 143: ...irection and initiate axis feed with these switches Standard B axis S type The axis feed switches for the B axis are provided on the option panel MC type With the MC type machine the C and C switches...

Page 144: ...suspended using the SP switch the status of the machine can be recognized since the indicator above the switch is lit Furthermore if the dial is quickly operated repeatedly to suspend axis feed it co...

Page 145: ...s feedrate when executing positioning while checking axis feed operation Switch operation is impossible with the PANEL key switch placed in the OFF position The rapid traverse rate is adjusted in thre...

Page 146: ...the display unit Switch Function The switch is used to select the Z axis 1 With the MC type machines when this switch is pressed the axis is selected in the order of X Z and C 2 With the S type machin...

Page 147: ...enerator is used to move an axis in the handle mode The amount of axis feed per graduation of the manual pulse generator is set with the axis feed amount selection switches The feed direction is deter...

Page 148: ...the target station number is increased by one 2 When the turret station setting switch decrease is pressed and released the target station number is decreased by one 1 Selection of turret 1 and turre...

Page 149: ...mode the indicator in the ON switch is lit and coolant is automatically supplied When this switch is pressed while coolant is being supplied the coolant supply stops and the indicator in the ON switc...

Page 150: ...ff Pressing this switch while the machine light is lit turns off the machine light The indicator in the switch also goes off Switch Function When this switch is pressed the indicator in the switch is...

Page 151: ...le moves out and the indicator in the switch is lit When this switch is pressed the tailstock spindle moves in and the indicator in the switch is lit The tailstock spindle extends from the tailstock b...

Page 152: ...select the rotary tool spindle The indicator in the switch is lit when the rotary tool spindle is selected Depending on the machine model and specifications the spindle may rotate when the C axis is c...

Page 153: ...details refer to page P 24 5 1 in Chapter DOOR INTERLOCK FUNCTION Front Door Function Unlock When the DOOR UNLOCK switch is pressed the indicator at the left side of the switch is lit and the door loc...

Page 154: ...r in the switch blinks Pressing the switch again causes the indicator to go off and the joint mode is canceled After selecting the joint mode by pressing the switch move the saddle to the tailstock jo...

Page 155: ...the indicator to go off and the steady rest manual mode is canceled When this switch is pressed in the seady rest manual mode the steady rest is opened and the indicator in the switch is lit When thi...

Page 156: ...S CATCHER OUT PARTS CATCHER IN switches close the front door Switch Function When this switch is pressed the parts catcher moves out The indicator in the switch is lit at the completion of parts catch...

Page 157: ...longer the oil film on the slideways may be lost If the machine is started in this condition the slideways and ball screws will be worn and might seize Hold down the pushbutton to supply lubricating o...

Page 158: ...g pressure After adjusting the chucking pressure to the required value tighten the lock nut to secure the chucking pressure adjustment handle The type and installation position of the chucking pressur...

Page 159: ...dle thrust adjustment handle lock nut and turn the handle to adjust the tailstock spindle thrust After adjusting the tailstock spindle thrust to the required value tighten the lock nut to secure the t...

Page 160: ...ure adjustment handle lock nut and turn the handle to adjust the steady rest pressure After adjusting the steady rest pressure to the required value tighten the lock nut CCW rotation Pressure decrease...

Page 161: ...3 F CAPS CAPS J W U R Q P N O SP F K I L S M V H Y D G E T B C Z X 7 8 2 4 5 1 A 0 EOB RESET DELETE SETTING OFFSET POS SYSTEM PROG MESSAGE NETWORK INSERT INPUT ALTER HELP SHIFT 9 3 6 CAN 6 6 Data Entr...

Page 162: ...n 1 Soft keys F1 to F5 If the display is changed by pressing a function selection key soft keys are displayed to select the screen accessible in the selected mode 2 Soft keys F6 to F10 Soft keys F6 to...

Page 163: ...ted with the called function If the function has the information to be displayed on two or more pages use these keys to change the display page There are two page selection keys Page Key Function Retu...

Page 164: ...e Forward large unit This key moves the cursor down by the large unit forward Reverse large unit This key moves the cursor up by the large unit reverse Program edit Key Function Alteration This key is...

Page 165: ...ss the SHIFT key 2 Move the data entry position using the cursor control keys and The underline cursor is displayed at the data entry position If the cursor control key is pressed the data entry posit...

Page 166: ...he INPUT key is pressed the information entered to the key input buffer is set to a memory area such as the offset register 6 8 Reset Key RESET The RESET key is used to reset the NC for example in ord...

Page 167: ...sed to delete the data entered in the key input buffer displayed above the soft keys character by character from right to left Example If the CAN key is pressed while the key input buffer data current...

Page 168: ...creen that displays NC alarm PLC alarm OFFSET Used to access the screen for display and setting of offset data work coordinate system etc SETTING Used to access the screen that displays operation pane...

Page 169: ...his KEY NAME 3 indicates the procedure used for displaying the required screen The MC type machines are equipped with the C axis Therefore the coordinate value of the C axis is displayed on the screen...

Page 170: ...ption function is selected 7 1 1 Actual Position ABSOLUTE Screen Function selection key POS ABS This screen displays the position in reference to the workpiece zero point This position data includes t...

Page 171: ...sition data is to be reset to 0 by pressing the HEAD CHANGE switch head 1 or head 2 2 Press the address key X or Z corresponding to the axis for which the actual incremental position data is to be res...

Page 172: ...f the C axis is also reset to 0 if the TOTAL AXIS soft key is pressed Procedure to preset the actual incremental position data 1 Select the turret for which the position data should be preset by press...

Page 173: ...y pressing the HEAD CHANGE switch head 1 or head 2 2 Press the menu selection key 3 Press the WORK 0 or RUN 0 soft key The PART COUNT data or the RUN TIME data is reset to 0 respectively 1 2 PRESET OR...

Page 174: ...TO GO The remaining distance is only displayed when the machine is operating in the memory MDI or tape mode 1 The remaining distance is only displayed when the machine is operating in the memory MDI...

Page 175: ...ast Load display X1 X axis servo motor Z1 Z axis servo motor B B axis servo motor turret 2 S type S Spindle drive motor Transition of soft keys Procedure for clearing the max load value 1 Press the MA...

Page 176: ...e moved by turning the manual pulse generator when the optional handle interruption function is selected The axis movement distance value is cleared to 0 when an axis reaches the zero point Transition...

Page 177: ...ding on the selected mode MODE Screen Refer to Edit Program edit screen 7 2 1 Program directory and memory used size screen 7 2 2 Background program edit screen 7 2 1 Memory Tape Program display scree...

Page 178: ...ea 1 During program editing in the edit mode Program number of the program presently being edited Sequence number of the program block immediately preceding the cursor 2 Other than program editing in...

Page 179: ...dit screen the functions of the soft keys change as shown below Transition of soft keys 1 The background edit screen ends when the BG END soft key is pressed 2 The PROG SELECT soft key is displayed on...

Page 180: ...ed Pressing the O SEARCH soft key after inputting the program number of the program to be displayed Selecting the program to be displayed in the PROGRAM directory screen after pressing the PROG LIST s...

Page 181: ...ursor control keys and 2 Press the INPUT key The contents of the selected program is displayed The display items are explained below 1 AVAILABLE byte m Allowable size of programs that can be additiona...

Page 182: ...The unit byte m of the program size stored in memory is allowed to change by setting the parameters Transition of soft keys COPY DELETE RENAME EXIT PUNCH READ F1 F2 F3 F4 F5 F6 F7 F8 F9 F10 F1 F2 F3...

Page 183: ...oft key During the execution of a program the block presently executed is highlighted This feature is used for checking the contents of a program Selecting the display information by pressing a soft k...

Page 184: ...unction is invalid Input operation for tool geometry offset data tool wear offset data and work offset data is valid 1 Input operation for tool geometry offset data is invalid 2 Input operation for to...

Page 185: ...et CAP parameters No 141 Contents of the interlock function is determined by the value set to the parameter as shown below 11 Input operation for tool geometry offset data tool wear offset data or wor...

Page 186: ...r offset number to be set using the page selection keys and the cursor control keys Transition of soft keys Press the CHANGE soft key and the coordinate system name displayed on the screen changes in...

Page 187: ...ng function If the absolute offset value input to WEAR OFFSET exceeds the value set as the limit the message OUT OF RANGE is displayed CAP parameter No 330 Max input value 0 No limits 1 1000 mm No 331...

Page 188: ...number NO to be set using the page selection keys and the cursor control keys Make sure to set 0 at the DATA coordinate system shift data column of the work coordinate system NO 00 EXT on the WORK CO...

Page 189: ...cursor control keys and Use the program number search function To select the program using the program number search function press the O SEARCH soft key input the program number O No then press the O...

Page 190: ...haping program is automatically generated For details of soft jaw cutting conditions refer to page C 27 4 Select the head turret head 1 or turret 2 head 2 to be used for machining by pressing the HEAD...

Page 191: ...ve the turret to the desired tool change position Press the POS READ soft key and the present turret position is set as the tool change position Select the turret turret 1 or turret 2 to be used for s...

Page 192: ...refer to the OPERATION MANUAL FOR CONVERSATIONAL PROGRAMMING 7 5 Function Selection Key SYSTEM The function selection key SYSTEM is used to input output the data to check or set parameters to display...

Page 193: ...e DIALOG display is not available Outputting the data 1 Insert a memory card to the card slot 2 On the IN OUT screen move the cursor to the data kind to be output using the cursor control keys and 3 P...

Page 194: ...played This screen is used to check the setting of the CAP parameters by displaying them Use the following procedure for parameter search operation 1 Key in the parameter number using the data entry k...

Page 195: ...LL IO screen or the operation history screen press the ALL IO or OPEHIS soft key after pressing the continuous menu key two times Pressing the ALL IO soft key has no effect To display the periodical m...

Page 196: ...screen Function selection key SYSTEM NC SYSTEM DGNOS This screen is used to check the internal state of the NC unit Use the following procedure for self diagnosis data search operation 1 Key in the r...

Page 197: ...PMCPRM The setting screen for the timer counter keep relay and data table for the PMC is displayed System configuration screen Function selection key SYSTEM NC SYSTEM SYSTEM This screen is used to che...

Page 198: ...d to compensate the pitch error when the error occurs to machine feed Servo data setting screen Function selection key SYSTEM NC SYSTEM SV PRM The servo setting and servomotor tuning screens are used...

Page 199: ...als selected signals only 3 Details of alarms 4 Time date and hour of operation date and hour of occurrence Function selection key SYSTEM NC SYSTEM Operation history screen This screen displays a hist...

Page 200: ...oiling inspection and replacing parts consumable parts Function selection key SYSTEM NC SYSTEM MAINTE 1 OPRT CHANGE 2 1 PERIODICAL MAINTENANCE STATUS screen 2 PERIODICAL MAINTENANCE SETTING screen The...

Page 201: ...using the data entry keys and press the INPUT soft key 5 Move the cursor to the COUNT TYPE data of the item to be set using the cursor control keys 6 Press the ENTRY soft key The soft keys used for s...

Page 202: ...sed at this screen For details refer to the instruction manuals prepared by the NC manufacturer FSSB setting screen These screens are used to change or confirm the setting related to the amplifier and...

Page 203: ...ting the axis related information are displayed when the OPRT soft key is pressed Amplifier maintenance screen The screen displays the amplifier maintenance information 7 5 4 System Composition Screen...

Page 204: ...nto the card slot Transition of soft keys 1 Insert a memory card to the card slot 2 Press the LIST soft key The FILE MAINTENANCE screen that shows the list of files is displayed SYSTEM PUNCH READ IN O...

Page 205: ...ry keys To copy a file to the presently displayed folder simply key in a file name Designation of a full path is allowed To copy the file to the route of drive E E ABC DEF To copy the file to the pres...

Page 206: ...oft key The file is deleted To cancel the operation to delete a file press the CANCEL soft key Once deleted the file cannot be restored Formatting a memory card 1 Press the CARD FORMAT soft key 2 Pres...

Page 207: ...isplayed The NC ALARM screen is also displayed by pressing the soft key as indicated above A red blinking box is displayed at the upper right area of the screen if a PLC alarm occurs while the NC ALAR...

Page 208: ...the ALARM HISTORY screen is displayed the information on the ALARM HISTORY screen is not updated To update the displayed alarm history information change the screen to any other screen once then chan...

Page 209: ...S changes to ALM when the PLC judges that the life has been expired Option STATUS Indicates the counter status 1 OFF Immediately after the setting for ITEM LIFE or TYPE is changed 2 ON The counter is...

Page 210: ...he COUNT STOP soft key 3 Input the counter name using the data entry keys 4 Press the EXEC soft key or the INPUT key To stop data setting press the EXIT soft key 5 Move the cursor to the LIFE column o...

Page 211: ...ting should be stopped using the cursor control keys 2 Press the COUNT STOP soft key 3 Press the EXEC soft key The counter stops counting time and the STATUS changes as follows Type 1 or 5 OFF Type 2...

Page 212: ...red using the cursor control keys 2 Press the STATUS CLEAR soft key 3 Press the EXEC soft key The counter is reset and starts counting time The counter cannot be cleared if it is operating Stop the co...

Page 213: ...screen On the SETTING menu the menu is displayed to call following screens SETTING screen TIMER screen WEEKLY TIMER screen IN OUT PARAMETER screen To change the screen press the soft key correspondin...

Page 214: ...7 5 50 SETTING SETTING 7 7 6 51 TIMER TIMER 7 7 7 52 WEEKLY TIMER WEEKLY TIMER 7 7 8 53 IN OUT PARAMETER IN OUT 7 7 9 NC Function Refer to CHUCK DIRECTION 5 6 7 Chuck Clamp Direction page A 34 TAILST...

Page 215: ...red item using the cursor control keys and 2 Select and set the required status using the cursor control keys and The BDT soft key is displayed for some optional specifications When the BDT soft key i...

Page 216: ...procedure used for setting refer to page B 77 14 1 7 7 3 PC Work Counter Screen option Function selection key CUSTOM WORK COUNT This screen is used to set or reset the work counter function The PC WOR...

Page 217: ...ION PANEL screen 1 When the start interlock is selected If the ST switch is pressed again an alarm message is displayed on the screen and cycle start is disabled 2 When the block delete BDT function i...

Page 218: ...the tool life management data The tool type preset value current value selected tool and remaining time are displayed for eight groups on each page For details of the tool life management function ref...

Page 219: ...tion screen When the SET soft key is pressed while selecting the setting area on the right side of the TOOL DETAIL screen the TOOL LIFE MANAGEMENT FUNCTION SELECT screen is displayed This screen is us...

Page 220: ...e next automatic operation and if the actual load exceeds the alarm level the function places the CNC in the feed hold state For details of the load monitor function B refer to page F 31 9 Function se...

Page 221: ...p and mirror image When changing the CAP parameters or NC parameters be sure to return the setting for CAP PARAMETER WRITE and NC PARAMETER WRITE to 0 INVALID after changing them Setting of the CAP pa...

Page 222: ...entry keys 3 Press the INPUT key For WORK COUNT M the M codes to be counted varies as follows depending on its setting 0 M02 M30 Positive value Specified M code only Negative value Specified M code M0...

Page 223: ...tion parameters If the IO device is a memory card no setting items are displayed below the port Setting procedure 1 Move the cursor to the required item using the cursor control keys and 2 Move the cu...

Page 224: ...S 1 CLAMP POS 2 and RETURN POS 2 For the procedure used for setting refer to page B 100 16 1 Manual independent parts catcher operation screen This screen is used to check and set the load information...

Page 225: ...pter also provides the procedure to feed the axes or to start stop the spindle manually WARNING Before using a switch button or key check visually that it is the one you intend to use and then press o...

Page 226: ...Handle Feed Operation B 25 6 5 Releasing the Soft overtravel Alarm B 27 6 6 Releasing the Hard overtravel Alarm ZL 253 B 29 7 SPINDLE OPERATION B 31 7 1 Conditions for Starting Spindle Rotation B 31...

Page 227: ...tock Joint Position Adjustment ZL 253 B 68 13 7 Turret 1 Z axis Zero Point Adjustment ZL 253 B 70 13 8 PC Parameters Related with Tailstock B 74 13 9 Alarms Related with Tailstock B 75 14 ROTARY TOOLS...

Page 228: ...est B 99 16 SETTING AND OPERATION OF PARTS CATCHER S TYPE B 100 16 1 Setting Parts Catcher Positions B 100 16 2 Parts Catcher Operation B 102 16 3 Cautions when Operating the Parts Catcher B 103 16 4...

Page 229: ...and transformers If work has to be done while the power is switched on it must be carried out by a qualified electrical engineer taking the proper precautions there is a danger of electric shock DANG...

Page 230: ...nd inspection work Or if it is absolutely necessary to carry out the work with the power ON exercise due caution since there is a danger of serious injury you could receive an electric shock be entang...

Page 231: ...ly injured by being entangled in the rotating parts of the machine or crushed by its moving parts Always wear safety shoes eye protectors and a helmet WARNING The emergency stop buttons are used to st...

Page 232: ...that all of the doors to the NC unit and the electrical cabinet are closed If any door is opened find out why Close the doors after making sure that closing them will not create any problems 2 Make s...

Page 233: ...ions For details refer to the MAINTENANCE INFORMATION 4 Turn on the main switch 5 Check the main pressure of the hydraulic unit with the pressure gage in the main hydraulic line For the procedure used...

Page 234: ...N is used in combination with some of the keys on the operation panel for purposes related to maintenance and special operations If you accidentally use one of these combinations the machine will oper...

Page 235: ...ready state is not established until the front door is opened and then closed before this neither automatic nor manual operation is possible The front door is locked and the STATUS indicator MRDY is...

Page 236: ...ff 2 Depending on the machine model and specifications there may be an EMERGENCY STOP button at more than one location Press the RESET key All machine operation stops The power is not turned off Press...

Page 237: ...ne during a threading operation or a hole machining operation especially a tapping operation MC type carefully move the axes after checking the workpiece and cutting tool carefully for damage If you m...

Page 238: ...SE In this case close the front door When the machine is restored to the operation ready condition the STATUS indicator MRDY is lit An alarm number is displayed on the screen If the alarm cannot be cl...

Page 239: ...age the machine To restart operation 1 Select the memory mode with the MODE selection switch 2 Press the function selection key PROG The PROGRAM memory screen is displayed WARNING When restarting the...

Page 240: ...ON 3 Press the TOP soft key and locate the head of the program The cursor moves to the head of the program 4 Close the front door 5 Carry out the zero return operation Page B 19 6 1 MODE MEM MDI TAPE...

Page 241: ...a thread is being cut the cutting tool retracts from the thread immediately in chamfering operation Then it returns to the thread cutting start point in the order X axis then Z axis and axis movement...

Page 242: ...tor above the SP switch on the operation panel are not lit If the indicator is lit press the RESET key on the NC operation panel 2 Make sure that the machine is stopped 3 If an external I O device is...

Page 243: ...f the machine is used with destroyed data it could lead to accidents involving damage to the machine WARNING The machine cannot operate correctly unless the specified power is supplied If the power su...

Page 244: ...the HEAD CHANGE switch head 1 is pressed the indicator in the switch is lit and turret 1 and spindle 1 are selected When the HEAD CHANGE switch head 2 is pressed the indicator in the switch is lit and...

Page 245: ...ve directions of the X axis are the reverse of those of conventional specification machines Axis Unit and Direction X Turret 1 direction up viewing from machine front Turret 2 direction down viewing f...

Page 246: ...and Direction X Turret 1 direction up viewing from machine front Turret 2 direction down viewing from machine front Z Turret 1 direction right viewing from machine front Turret 2 C MC type Headstock...

Page 247: ...door 3 Place the PANEL key switch in one of the positions indicated below ON PANEL EDIT 4 Press the HEAD CHANGE switch head 1 or head 2 to select the required turret WARNING Never stand near the movi...

Page 248: ...zero point it decelerates automatically and is positioned at the zero point If an AXIS DIRECTION switch that moves the axis in the opposite direction of the zero point is pressed the axis does not mo...

Page 249: ...G Never stand near the moving parts of the machine during a rapid traverse operation since each axis is fed at the rapid traverse rate Before starting a rapid traverse operation always make sure that...

Page 250: ...d the actual override value is fixed at 50 7 Press and hold down the AXIS DIRECTION switch for the axis to be fed The axis is fed at the rapid traverse rate while the switch is held down To stop axis...

Page 251: ...witch WARNING Never stand near the moving parts of the machine during a jog feed operation since each axis is fed at the jog feedrate set with the OVERRIDE dial Before starting jog feed operation alwa...

Page 252: ...dial is placed in the 0 position the axis is not fed even when an AXIS DIRECTION switch is pressed 7 Press and hold down the AXIS DIRECTION switch for the axis to be fed The axis is fed at a jog feed...

Page 253: ...ey switch in one of the positions indicated below ON PANEL EDIT 4 Press the HEAD CHANGE switch head 1 or head 2 to select the required turret 5 Select the handle mode with the MODE selection switch 6...

Page 254: ...ed operation refer to page B 89 14 8 MC type Do not turn the manual pulse generator any faster than 5 rotations per second If you do the axis will not stop immediately when the manual pulse generator...

Page 255: ...stroke limit 1 in the negative direction Alarm 500 The Z axis has been moved beyond stored stroke limit 1 in the positive direction Alarm 501 The Z axis has been moved beyond stored stroke limit 1 in...

Page 256: ...posite direction away from its limit For this operation use handle feed jog feed or rapid traverse mode 7 Press the RESET key The alarm state is cleared MODE MEM MDI TAPE EDIT H JOG RPD ZRN CAPS CAPS...

Page 257: ...below to release the alarm state To release the alarm state 1 Place the DOOR INTERLOCK key switch in the NORMAL position 2 Close the front door 3 Open the cover under the operation panel 4 Press and...

Page 258: ...manual pulse generator in the negative direction When a hard overtravel alarm has occurred the axis movement interlock can be released by pressing the 2nd O T RELEASE button Be very careful not to mo...

Page 259: ...l spindle MC type is not rotating 10 The spindle or rotary tool spindle MC type is not jogging 11 The spindle OFF mode function is invalid 12 The spindle gear range is in any of the 1st to 4th positio...

Page 260: ...peration are described here Starting spindle rotation 1 Place the DOOR INTERLOCK key switch in the NORMAL position 2 Check the chucking pressure with a pressure gage If it is incorrect adjust the pres...

Page 261: ...machines Example When changing the spindle gear to the first gear range a Select the MDI mode with the MODE selection switch b Display the PROGRAM MDI screen Page A 95 7 2 4 c Input M41 using the data...

Page 262: ...Normal direction Press the NOR switch Reverse direction Press the REV switch WARNING Before starting the spindle in manual operation set the lowest available spindle speed using the spindle speed set...

Page 263: ...tch increase The override value increases in units of 1 Page A 52 5 9 1 Stopping spindle rotation 1 Decrease the spindle speed gradually to the lowest speed with the spindle speed setting switch decre...

Page 264: ...pped on mistakenly the chuck will be unclamped and the workpiece will fall causing machine damage 1 The footswitch is provided for chuck 1 and chuck 2 independently Use the footswitch for the chuck to...

Page 265: ...ay the OPERATION PANEL screen Page A 126 7 7 1 b Set INVALID for the CHUCK STROKE END chuck jaw stroke end detection function by using the cursor control keys For the selection of valid invalid of chu...

Page 266: ...ual and automatic operation only when the STATUS indicator CHCL the status indicator HEADSTOCK 2 CHUCK CLAMP is lit 2 If the setting for CHUCK STROKE END chuck jaw stroke end detection function is VAL...

Page 267: ...irection page 2 of the OPERATION PANEL screen is used S type For O D chucking Press the cursor control key For I D chucking Press the cursor control key 3 Press the EXIT soft key 4 Manually perform th...

Page 268: ...s clamped in the chuck 1 Place the DOOR INTERLOCK key switch in the NORMAL position 2 Close the front door 3 Place the PANEL key switch in one of the positions indicated below ON PANEL EDIT 4 Press th...

Page 269: ...xis protector cover or tailstock etc Before rotating the turret head make sure that the tools in the turret head do not interfere with the protector cover or tailstock since interference will damage t...

Page 270: ...of the positions indicated below ON PANEL EDIT 3 A manual mode handle jog rapid traverse zero return is selected 4 The STATUS indicator MRDY is lit 5 Turret head indexing has been completed normally T...

Page 271: ...ions indicated below ON PANEL EDIT 4 Press the HEAD CHANGE switch head 1 or head 2 to select the required turret 5 Select any of the following modes with the MODE selection switch handle jog rapid tra...

Page 272: ...the turret head to the next or previous station The following procedure can be used to index the turret one station at a time 1 Press the turret station setting switch increase and the turret indexin...

Page 273: ...pindle as shown below 1 Turret 1 for spindle 1 T0100 T1200 M03 M04 M13 M14 MC type 2 Turret 2 for spindle 1 T0100 T1200 M03 M04 M13 M14 MC type 3 Turret 1 for spindle 2 T3100 T4200 M203 M204 M13 M14 M...

Page 274: ...on operators could be injured while working inside the machine The lamp is consumable and is not covered by the warranty For the procedure for changing the lamp refer to the MAINTENANCE INFORMATION pu...

Page 275: ...lant ON Press the ON switch The indicator in the ON switch is lit and the coolant supply starts Coolant OFF Press the OFF switch while coolant is being supplied The indicator in the ON switch goes off...

Page 276: ...n of the PANEL key switch and the selected mode 1 Press the FOR switch and the chip conveyor operates in the forward direction The indicator in the switch is lit 2 Press the STOP switch while the chip...

Page 277: ...moving the tailstock spindle in or retracting the tailstock body ensure that the workpiece is held securely by a crane or other appropriate means WARNING Adjust the position of the tailstock body so...

Page 278: ...ught by the tailstock spindle If the tailstock spindle is moved out without taking adequate care there is a danger that your hand will be caught between the tailstock spindle and the workpiece 1 Stop...

Page 279: ...released The indicator in the switch is lit 1 The spindle or rotary tool spindle will not rotate while the tailstock spindle is moving out in the inching operation 2 After positioning of the tailstock...

Page 280: ...the cursor to TAILSTOCK ILK using the cursor control key or 3 Set the tailstock interlock function ON OFF using the cursor control key or For interlock ON Press the cursor control key For interlock OF...

Page 281: ...rotated with a workpiece held between the centers the center will seize damaging the machine 1 Clean the tapered hole in the tailstock spindle 2 Clean the tapered face of the center 3 Fit the center i...

Page 282: ...ailstock body during machining Do not operate the machine without the extraction bar fitted inside the tailstock body since this could cause damage to the machine 1 Insert a proper bar into the piston...

Page 283: ...the front door Then open the front door With the automatic door type machine open the front door by pressing the AUTOMATIC DOOR OPEN switch 3 Press the TSINC switch to move the tailstock spindle out t...

Page 284: ...clockwise until the bolt touches the piston end 7 Press the TSINC switch to move the tailstock spindle out to the proper position 8 Turn the piston stroke adjustment bolt clockwise to advance it to th...

Page 285: ...n the TSI switch is lit 5 The Z axis is not moving 6 The protection cover of the tool presetter arm is mounted to the base 7 The tailstock and saddle 1 are at the joint position Other Conditions 1 The...

Page 286: ...d cause damage to the machine 1 Place the DOOR INTERLOCK key switch in the NORMAL position 2 Close the front door 3 Place the PANEL key switch in one of the positions indicated below ON PANEL EDIT 4 P...

Page 287: ...it decelerates and stops The indicator in the TSTMOD switch turns to lighting from blinking when the saddle 1 stops If the indicator in the TSTMOD switch is not lit after the saddle 1 has stopped fol...

Page 288: ...k to the required position by moving the Z axis with zero return rapid traverse jog feed or handle feed operation When moving the tailstock to the required position its motion direction for positionin...

Page 289: ...xis to the programmed target position The tailstock body is carried to the position specified by a V command position defined in the machine coordinate system 4 The M78 command clamp of tailstock body...

Page 290: ...specified G479 In this case only the positioning of the saddle 1 Z axis is executed to the position where the tailstock can be connected with the saddle 1 Therefore separate program is necessary for...

Page 291: ...Alarm 501 Overtravel exceeding the stored stroke limit in the Z direction Alarm 506 Overtravel exceeding the stored stroke limit in the Z direction Alarm 507 Overtravel exceeding the stored stroke li...

Page 292: ...the overtravel alarm has occurred using the AXIS DIRECTION switch or the manual pulse generator 7 Press the RESET key The alarm state is cleared 2 1 HEAD CHANGE 1 MODE MEM MDI TAPE EDIT H JOG RPD ZRN...

Page 293: ...position data must be set correctly If the setting is incorrect the tailstock cannot be connected with the saddle 2 correctly 13 5 1 Resetting the Clamp Position Data The procedure to set the clamp po...

Page 294: ...n TSUCLP switch in order The tailstock is unclamped and the joint pin extends from the tailstock so that it is connected to the saddle 2 The indicator in the TSUCLP switch is lit If the indicator in t...

Page 295: ...should be only in the negative direction If positioning is made in the positive direction the tailstock may not operate normally after it is clamped 10 Press the TSCLP switch The tailstock is clamped...

Page 296: ...ANGE switch head 1 to select turret 1 3 Display the OPERATION PANEL screen Page A 126 7 7 1 4 Set VALID for TLSTCK POS ADJ using the cursor control keys If VALID is set for TLSTCK POS ADJ interlocks r...

Page 297: ...h the front edge of the saddle right side cover of turret 1 the tailstock is positioned at the joint position 7 Press the TSUCLP switch The tailstock is unclamped and the joint pin extends from the ta...

Page 298: ...joint position by following the procedure indicated below If an axis is moved before establishing the tailstock joint position the tailstock might be hit against the turret causing damage to the machi...

Page 299: ...are all canceled Therefore move an axis very carefully If an axis is moved carelessly the turret or carriage might be hit against the tailstock or the cover causing damage to the machine 9 Select the...

Page 300: ...1 Z axis until the marker at the moving side is correctly aligned with the marker at the fixed side which indicates the near zero point The marker is provided for each of the axes 15 Move the turret 1...

Page 301: ...NEL screen is automatically returned to INVALID The markers give only approximate zero point position Check to be sure that the zero point is at the correct position after the completion of zero retur...

Page 302: ...mode 0 Clamp is disabled after turret 1 Z axis movement in the positive direction manual mode Standard setting is 0 Rapid override while tailstock is unclamped 1 Rapid override is 25 or lower while t...

Page 303: ...tailstock is clamped EX0396 TAILSTOCK DECELERATION SW ERROR The tailstock feed deceleration switch is not turned on although the tailstock has reached the joint position EX0398 Z AXIS POSITION IMPERFE...

Page 304: ...pindle 2 side C axis clamp M68 spindle 1 side spindle brake clamp M268 spindle 2 side spindle brake clamp Since the chuck interlock is invalid for the spindle related with other specified M codes the...

Page 305: ...s pressed X is displayed in the DIREC column in the screen and the rotary tool for O D cutting is registered With the rotary tool offset holder for O D cutting rotating direction is reversed from ordi...

Page 306: ...the spindle mode 1 Place the DOOR INTERLOCK key switch in the NORMAL position 2 Close the front door 3 Place the PANEL key switch in one of the positions indicated below ON PANEL EDIT Setting Face Mil...

Page 307: ...select spindle 1 or spindle 2 by the HEAD CHANGE switch head 1 or head 2 5 Select any of the following modes with the MODE selection switch handle jog rapid traverse zero return 6 Select the main spi...

Page 308: ...d below ON PANEL EDIT 4 Select the spindle spindle 1 side or spindle 2 side to be operated by the HEAD CHANGE switch head 1 or head 2 S type 5 Select any of the following modes with the MODE selection...

Page 309: ...fer to the MAINTENANCE INFORMATION for the maximum rotary tool spindle speed of your machine WARNING Before starting the rotary tool spindle in manual operation set the lowest available rotary tool sp...

Page 310: ...of 1 Page A 52 5 9 1 Stopping the rotary tool spindle 1 Decrease the rotary tool spindle speed gradually to the lowest speed with the spindle speed setting switch decrease 2 Press the STOP switch 1 T...

Page 311: ...ed below ON PANEL EDIT 4 Select the spindle spindle 1 side or spindle 2 side to be operated by the HEAD CHANGE switch head 1 or head 2 S type It is not possible to select spindle 1 or spindle 2 in the...

Page 312: ...clamp the spindle Clamp Press the CL switch The spindle is clamped The indicator in the switch is lit Unclamp Press the UCL switch The spindle is unclamped The indicator in the switch is lit MILLING S...

Page 313: ...the PANEL key switch in one of the positions indicated below ON PANEL EDIT 4 Select the spindle spindle 1 side or spindle 2 side to be operated by the HEAD CHANGE switch head 1 or head 2 S type 5 Sele...

Page 314: ...cted the C axis can be fed with set rapid traverse rate 1 Place the DOOR INTERLOCK key switch in the NORMAL position 2 Close the front door 3 Place the PANEL key switch in one of the positions indicat...

Page 315: ...ration using the RAPID OVERRIDE switches varies depending on the machine model and specifications 8 Move the C axis Counterclockwise rotation viewing the workpiece from the spindle side Press the C sw...

Page 316: ...e spindle 1 side or spindle 2 side to be operated by the HEAD CHANGE switch head 1 or head 2 S type 5 Select the jog mode with the MODE selection switch 6 Press the UCL switch The spindle is unclamped...

Page 317: ...t the set jog feedrate 14 8 C axis Handle Feed Operation While the rotary tool spindle is selected the C axis can be fed with set feedrate using the manual pulse generator 1 Place the DOOR INTERLOCK k...

Page 318: ...t 0 001 1 0 001 10 0 01 100 0 1 9 Turn the manual pulse generator in the direction in which the selected axis is to be fed Counterclockwise rotation viewing the workpiece from the spindle side Turn th...

Page 319: ...nt door 3 Place the PANEL key switch in one of the positions indicated below ON PANEL EDIT 4 Select the spindle spindle 1 side or spindle 2 side to be operated by the HEAD CHANGE switch head 1 or head...

Page 320: ...to the zero point The STATUS indicator C is lit when the C axis has been returned to the zero point CAPS CAPS J W U R Q P N O SP F K I L S M V H Y D G E T B C Z X 7 8 2 4 5 1 A 0 EOB RESET DELETE SETT...

Page 321: ...averse operation using the RAPID OVERRIDE switches The feedrate set for rapid traverse operation using the RAPID OVERRIDE switches varies depending on the machine model and specifications 7 Set the ra...

Page 322: ...Place the PANEL key switch in one of the positions indicated below ON PANEL EDIT 4 Select the spindle spindle 1 side or spindle 2 side to be operated by the HEAD CHANGE switch head 1 or head 2 S type...

Page 323: ...Press the INSERT key 12 Press the ST switch The C axis moves at the set cutting feedrate CAPS CAPS J W U R Q P N O SP F K I L S M V H Y D G E T B C Z X 7 8 2 4 5 1 A 0 EOB RESET DELETE SETTING OFFSET...

Page 324: ...or rotary tool spindle MC type is not rotating 4 The turret head is not being indexed 15 2 Interlocks for Using the Steady Rest For using the steady rest the following interlocks are provided 1 To pre...

Page 325: ...ODE selection switch handle jog rapid traverse zero return 5 Press the STEADY REST MANUAL MODE switch to place the steady rest in the manual mode 6 Press the STEADY REST 1 OPEN switch The steady rest...

Page 326: ...f the following modes with the MODE selection switch handle jog rapid traverse zero return 5 Press the STEADY REST MANUAL MODE switch to place the steady rest in the manual mode 6 Press the STEADY RES...

Page 327: ...en the specified measures are taken contact Mori Seiki Error Code Error Message Description EX1302 TURRET ROTATING The turret head indexing command and M340 M341 command are specified in the same bloc...

Page 328: ...arts catcher IN end position At a spindle 1 side screen press the function selection key SYSTEM then press the menu selection key several times and the PMM soft key is displayed Press the PMM soft key...

Page 329: ...the values shown in the example screen in the left Their values are DESCENT POS 1 1844000 and DESCENT POS 2 1520000 7 Input the desired setting value using the data entry keys 8 Press the SET INPUT s...

Page 330: ...tcher moves to the workpiece receiving position Arm moves down Parts catcher IN Arm moves up Parts catcher moves to the workpiece ejection position Bucket turns down Bucket returns to the home positio...

Page 331: ...to the zero point 6 The 2nd X axis is returned to the zero point Conditions required for parts catcher OUT operation 1 The 2nd Z axis is at the position indicated below Bucket specification Other Con...

Page 332: ...e to be operated by the HEAD CHANGE switch head 1 or head 2 5 Select any of the following modes with the MODE selection switch handle jog rapid traverse zero return 6 When moving the parts catcher OUT...

Page 333: ...nts By manual independent operation a series of parts catcher operation can be performed Manual independent operation of the parts catcher is valid only in the MDI mode 1 Place the DOOR INTERLOCK key...

Page 334: ...tion the machine may operate in an unexpected manner and this could cause damage to the machine 9 Press the EXEC soft key The parts catcher carries out the selected step 10 After completing manual ind...

Page 335: ...11 1 12 5 IN cycle spindle 2 side 13 2 7 6 This screen consists of two pages The page can be changed using the page selection keys No Operation Status 1 ARM DOWN The parts catcher is at either TRAY C...

Page 336: ...CENT POS 2 2 ARM UP This operation is always enabled 5 HAND CLOSE The parts catcher is at any of TRAY DROP POS CLAMP POS 1 and CLAMP POS 2 6 HAND OPEN The parts catcher is at any of TRAY DROP POS CLAM...

Page 337: ...t jaw shaping procedure Since the workpiece material shape and machining methods differ largely among the customers this manual cannot cover all kinds of workpieces Since the procedure and the numeric...

Page 338: ...usting the Tailstock Spindle Thrust C 8 3 SHAPING SOFT JAWS FOR FINISHING C 9 3 1 Cautions on Shaping the Soft Jaws C 9 3 2 Shaping Soft Jaws C 11 3 3 Check Items When Mounting Tools and Shaping Soft...

Page 339: ...ents Mori Seiki is not responsible for accidents caused by the use of a fixture prepared by the customer without consulting Mori Seiki 3 If the chuck supplied with the machine is removed from the mach...

Page 340: ...cannot predict the chucking pressure spindle speed feedrate depth of cut etc that will be required in each case and it is therefore the user s responsibility to determine the appropriate settings Not...

Page 341: ...chuck Apply grease to the chuck every day If chips or coolant enter the chuck or if the grease runs out the chuck gripping force will be reduced If the spindle is rotated in this condition the workpie...

Page 342: ...the chuck and the inside of the machine If chips are allowed to accumulate in the machine over long periods it will lead to machine faults 4 Make sure that the connection rod draw bar tube between the...

Page 343: ...For the allowable cylinder thrust refer to the instruction manuals prepared by the chuck and cylinder manufacturers 3 Take the height of the jaws mounted in the chuck into consideration when determin...

Page 344: ...ou cannot determine the appropriate tailstock spindle thrust force applies only to machines equipped with a tailstock contact Mori Seiki If the chucking pressure or tailstock spindle thrust force appl...

Page 345: ...1 Loosen the chucking pressure adjustment handle lock nut by turning it counterclockwise 2 While reading the pressure gage adjust the chucking pressure by turning the chucking pressure adjustment han...

Page 346: ...stock spindle thrust adjustment handle lock nut by turning it counterclockwise 2 While reading the pressure gage adjust the tailstock spindle thrust by turning the tailstock spindle thrust adjustment...

Page 347: ...e starting the deburring work If you do not switch the power off the machine could operate unexpectedly if someone carelessly interferes with the machine controls causing serious injuries or damage to...

Page 348: ...to be chucked 5 The jaw surface which comes into contact with the workpiece must be clean A rough surface causes rapid wear of the jaws In addition the surface finished in the 1st process will be dam...

Page 349: ...by the jaws the jaws contact the workpiece at 6 points The chuck clamp force is concentrated at these 6 contact points to hold the workpiece securely The jaws bite the workpiece and this prevents sli...

Page 350: ...unting angle correct 7 Are mounting bolts tightened securely and evenly 8 Is the tool nose center height correct Check Items Check Column 1 Are the soft jaws and master jaws cleaned before mounting 2...

Page 351: ...ress the HEAD CHANGE switch head 1 or head 2 to select the required spindle S type 4 Mount the soft jaws to the chuck 5 Mount the I D cutting tool used to cut the soft jaws 6 Adjust the chucking press...

Page 352: ...dicator CHCL is lit For chuck 2 the status indicator HEADSTOCK 2 CHUCK CLAMP on the option panel is lit 13 Bring the tool close to the soft jaw manually while observing the clearance between the soft...

Page 353: ...jaw stroke 19 With the manual door type machine press the DOOR UNLOCK switch to unlock the front door Then open the front door With the automatic door type machine open the front door by pressing the...

Page 354: ...lit 25 Check for interference by following steps 13 to 15 26 After making sure that the spindle can be rotated without interference close the front door 27 Start the spindle manually Page B 32 7 2 28...

Page 355: ...t into contact with the inside face of the soft jaw Ensure that the tool does not strike the soft jaw or plug 33 Move the I D cutting tool in the Z direction by handle feed operation Never move the cu...

Page 356: ...h cutting leaving a 0 1 to 0 2 mm finishing allowance After finishing rough cutting chamfer the edges and remove burrs using a file or similar tool 38 Carry out finishing a Use a new tip b Slightly in...

Page 357: ...CHUCKING C 19 40 Unclamp the chuck and remove the plug When removing the plug for shaping the soft jaws ensure that your fingers will not be caught 41 Chuck a workpiece check the jaw stroke CAUTION...

Page 358: ...ng the AUTOMATIC DOOR OPEN switch 3 Press the HEAD CHANGE switch head 1 or head 2 to select the required spindle S type 4 Mount the soft jaws to the chuck 5 Mount the O D cutting tool used to cut the...

Page 359: ...n using the cursor control keys For the selection of valid invalid of chuck 2 confirmation switch page 2 of the OPERATION PANEL screen is used The STATUS indicator CHCL is lit For chuck 2 the status i...

Page 360: ...ront door 17 Start the spindle manually and adjust the spindle speed as appropriate Page B 32 7 2 18 Machine the jaws that clamp the ring Shaping the jaws to ring diameter Max jaw stroke 1 2 allows th...

Page 361: ...huck jaw stroke end detection function using the cursor control keys For the selection of valid invalid of chuck 2 confirmation switch page 2 of the OPERATION PANEL screen is used The STATUS indicator...

Page 362: ...st be larger than the finishing diameter 30 Display the POSITION INCREMENTAL screen Page A 83 7 1 2 31 Reset the Z coordinate value on the POSITION INCREMENTAL screen to 0 a Press the key b Press the...

Page 363: ...put X150 0 using the data entry keys b Press the PRESET soft key 36 Cut the soft jaws while checking the diameter and depth of cut by referring to the relative coordinate values on the POSITION INCREM...

Page 364: ...mm on the periphery 39 With the manual door type machine press the DOOR UNLOCK switch to unlock the front door Then open the front door With the automatic door type machine open the front door by pres...

Page 365: ...rk offset data If automatic soft jaw shaping cycle is executed without setting the offset data the tool will interfere with the soft jaw or the chuck to cause damage to the tool or the machine For the...

Page 366: ...ION 1 CW 2 CCW ROUGH TOOL T CODE ROUGH CUTTING SPD ROUGH FEED FINISH TOOL T CODE FINISH CUTTING SPD FINISH FEED 4 Select any of the following modes with the MODE selection switch handle jog rapid trav...

Page 367: ...ft key The automatic soft jaw shaping program is generated according to the input soft jaw cutting shape data under the O number set for CAP parameter 310 Rough cutting only To carry out only rough cu...

Page 368: ...3 G50 S1200 for example follow the steps indicated below 11 Move the cursor to S1000 using the cursor control keys 12 Input S1200 using the data entry keys 13 Press the ALTER key CAPS CAPS J W U R Q P...

Page 369: ...moves to the head of the program 15 Select the memory mode with the MODE selection switch 16 Press the ST switch Soft jaw shaping cycle starts During soft jaw shaping or in the soft jaw cutting mode i...

Page 370: ...en the machine is shipped with the chuck and cylinder recommended by Mori Seiki 2 Depending on the chuck and cylinder specification optional chuck clamp unclamp detecting switches may be equipped as a...

Page 371: ...nd close end positions it is not necessary to adjust the switch positions even when the workpiece type is changed However it is necessary to check the switches at regular intervals to determine whethe...

Page 372: ...chuck use the optional holding detection function Other checking methods Some chuck manufacturers supply the chuck with a stroke mark engraved so that the master jaw stroke can be visually checked If...

Page 373: ...is changed to INVALID the chuck clamp operation is completed in response to the chuck clamp operation disregarding of the signals from the chuck jaw stroke end detecting switches The chuck jaw stroke...

Page 374: ...following procedure 1 Storing a program to the NC memory 2 Editing a program stored in the NC memory 3 Inputting outputting a program to or from the NC memory using an external I O device 4 Editing a...

Page 375: ...mmand Change Example D 20 4 2 Command Insertion Example D 21 4 3 Deletion Examples D 23 4 3 1 Deleting a Word D 23 4 3 2 Deleting a Block D 24 4 4 Copying a Block of Commands D 26 4 5 Copying a Progra...

Page 376: ...ckground area so it can be edited during automatic operation Program editing and program input output to from the background area are possible regardless of the selected operation mode 3 A program inp...

Page 377: ...is could damage the machine 2 When finishing background editing always press the BG END soft key If the BG END soft key is not pressed the program edited in the background area cannot be stored in the...

Page 378: ...ing Indicates the start and end of operation Indicates an operation of a switch button or key on the operation panel Also indicates what is to be referred to on the page indicated by Indicates the dis...

Page 379: ...the RESET key is not pressed the program input cannot be registered to the memory 3 After inputting a program in the background edit mode press the BG END soft key to end the background edit mode If t...

Page 380: ...B EOB Insertion key INSERT INSERT Continue inputting program Soft key BG END Function selection key PROG PROG Soft key BG EDIT Data entry key O Insertion key INSERT INSERT No Background edit Foregroun...

Page 381: ...FUNCTION To edit a program or start a program from a block locate the program block or word with the search function Three different search functions are available 1 Program number search 2 Sequence...

Page 382: ...number the message PROGRAM NUMBER NOT FOUND is displayed 1 The program number search operation is also possible for background edit operation 2 The program already called in foreground cannot be call...

Page 383: ...g the sequence number search function for starting automatic operation from the searched block WARNING Coordinate values and M S T G and F codes in the blocks skipped during sequence number search ope...

Page 384: ...uence number is not found in the main program an alarm occurs Sequence number search operation procedure NOTE Start of Operation End of Operation Selection of operation mode Memory mode Edit mode MODE...

Page 385: ...on keys 3 Searching for a word using the data entry keys and the soft keys Cautions on word search using data entry keys and soft keys 1 If the searched word appears more than once in the program the...

Page 386: ...the first word of the page The next page is displayed The cursor will be located on the first word of the page Start of Operation End of Operation Selection of word search method Data entry keys and s...

Page 387: ...unction selection key PROG PROG Soft key TOP Program search Page D 8 3 2 MODE selection switch EDIT Function selection key PROG PROG The cursor moves to the head of the program and the program number...

Page 388: ...of a program when editing a program Start of Operation Soft key BOTTOM MODE selection switch EDIT Function selection key PROG PROG The cursor moves to the bottom of the program and the last word is hi...

Page 389: ...fore editing a program select foreground or background editing Page D 1 1 1 for foreground editing Page D 2 1 2 for background editing 2 Program editing is possible only when the PANEL key switch is p...

Page 390: ...possible to delete a comment with the cursor positioned at or Use either of following procedures to delete a comment Move the cursor to and press the EOB key then the DELETE key After selecting the co...

Page 391: ...selection keys and the cursor control keys Contents of edit Function selection key PROG PROG Soft key BG EDIT Sequential Background edit Foreground edit Yes No Program to be edited Search for the prog...

Page 392: ...E End of Operation Alteration key ALTER ALTER Data to be altered A Another alteration End of edit Background edit Yes Yes No D Foreground edit Alteration No Soft key BG END Reset key RESET RESET PANE...

Page 393: ...tion End of edit Yes No D Insertion No End of Operation Soft key BG END Background edit E Foreground edit Data to be inserted Insertion key INSERT INSERT Data entry key EOB EOB Soft key LINE EDIT The...

Page 394: ...ey 9 9 9 9 Program number of the program to be deleted Search for the first word of the block to be deleted Page D 10 3 3 Search for the word to be deleted Page D 10 3 3 Search for the first word of t...

Page 395: ...ord S180 a Input S180 using the data entry keys b Press the SEARCH soft key 4 Input S150 using the data entry keys 5 Press the ALTER key The word S180 is changed to the new word S150 CAPS CAPS J W U R...

Page 396: ...rted a Input X10 0 using the data entry keys b Press the SEARCH soft key The word X10 0 is searched for 4 Input F0 15 using the data entry keys 5 Press the INSERT key Press the CAN key if an error is...

Page 397: ...The word F0 15 is inserted after the word X10 0 To insert a block of data move the cursor to position where the block is to be inserted Key in the new block and press the EOB key Then press the INSERT...

Page 398: ...A 90 7 2 1 2 Search the program O1234 Page D 7 3 1 3 Search for the word M08 a Input M08 using the data entry keys b Press the SEARCH soft key The word M08 is searched for 4 Press the DELETE key CAPS...

Page 399: ...program O1234 Page A 90 7 2 1 To delete the block A 3 Search for the word G01 which is the first word of the block to be deleted a Input G01 using the data entry keys b Press the SEARCH soft key CAPS...

Page 400: ...PROGRAM EDITING D 25 The word G01 is searched for 4 Press the EOB key 5 Press the DELETE key The block A is deleted EOB DELETE...

Page 401: ...same program 1 Display the PROGRAM edit screen Page A 90 7 2 1 2 Search the program O1234 Page D 7 3 1 3 Move the cursor to the first word in the block to be copied 4 Press the menu selection key 5 Pr...

Page 402: ...ately before the position where the block of commands written in the input buffer should be inserted 7 Press the INSERT key The block of commands written into the input buffer in step 5 is inserted Th...

Page 403: ...the source program The copied program is completely the same as the copy source program excluding the program number When creating a new program by copying an existing program the new program number...

Page 404: ...y PROG PROG Soft key BG EDIT PROGRAM background edit screen PROGRAM edit screen PROGRAM directory screen Reset key RESET RESET Background edit Foreground edit A No End of Operation Soft key BG END Bac...

Page 405: ...ed below Program number O is changed to O The renamed program is completely the same as the original program excluding the program number When changing a program number the new program number must be...

Page 406: ...PROG PROG Soft key BG EDIT PROGRAM background edit screen PROGRAM edit screen PROGRAM directory screen Reset key RESET RESET Background edit Foreground edit A No End of Operation Soft key BG END Backg...

Page 407: ...d below Program can be deleted in either of the following manners 1 Deleting a specified program 2 Deleting all programs Before deleting programs make sure that the programs going to be deleted are th...

Page 408: ...ound edit Foreground edit A No End of Operation Soft key BG END Background edit Foreground edit Program number A Yes Data entry key O Contents of deletion Soft key DELETE Message DELETE OK is displaye...

Page 409: ...ed in this area it is retained until another copy or cut operation is carried out or the power is switched off 2 Before cutting a part of a program ensure that it may be cut Once a part of a program i...

Page 410: ...the same program Move the program from the move start block to the move end block The contents of the cut blocks of the program are not changed by the move function Cutting a part of a program and pa...

Page 411: ...RAM background edit screen PROGRAM edit screen Soft key SELECT Background edit Foreground edit B No Move the cursor to the last word of the part of program to be copied or moved using the page selecti...

Page 412: ...stination Page D 10 3 3 Search for the word of copy destination Page D 10 3 3 Search for the word of copy destination Page D 10 3 3 Move destination Search for the program of move destination Page D 1...

Page 413: ...operation is performed for all the words and blocks in the selected program CAP parameter No 87 1 Replacement operation is performed for the words and blocks after the cursor position in the selected...

Page 414: ...a word should be replaced Function selection key PROG PROG Soft key BG EDIT PROGRAM background edit screen PROGRAM edit screen Background edit Foreground edit B No Search the program where a word sho...

Page 415: ...ment multiple words may not be specified Message INPUT CONVERT WORD AND PRESS SET is displayed Word after replacement multiple words may be specified Soft key SET Soft key ALL Soft key YES Soft key NO...

Page 416: ...o be used must be set first This I O device setting procedure is explained in 5 1 Preparation After that program input procedure and program output procedure are explained in the following order 1 Inp...

Page 417: ...er preceded by O or An input error occurs if a program number is not designated 5 The NC data not containing an O number may be input by designating a program number 6 If the data to be input has mult...

Page 418: ...e MODE selection switch memory tape edit 3 Display the PROGRAM directory screen Page A 93 7 2 2 In background edit operation display the PROGRAM directory screen after pressing the BG EDIT soft key 4...

Page 419: ...s stored in the memory card is displayed b Move the cursor to the program name of the program to be input using the cursor control keys and c To select the folder to be input press the FOLDER soft key...

Page 420: ...ation has been made in the background edit mode press the BG END soft key 9 Place the PANEL key switch in one of the positions indicated below ON OFF FOLDER EXEC CANCEL 1 F 10 F 2 F 3 F 4 F 5 F 6 F 7...

Page 421: ...modes with the MODE selection switch memory tape edit 3 Display the PROGRAM directory screen Page A 93 7 2 2 In background edit operation display the PROGRAM directory screen after pressing the BG ED...

Page 422: ...on of a range the range may contain up to 100 programs To output the designated programs a Input OOO using the data entry keys b Press the PUNCH soft key If the operation explained above is selected p...

Page 423: ...he data input keys If the EXEC soft key is pressed without inputting a file name the O number is input as the file name 8 Press the EXEC soft key The selected program is output to the external output...

Page 424: ...PROGRAM EDITING D 49 11 Place the PANEL key switch in one of the positions indicated below ON OFF ON PANEL EDIT OFF PANEL...

Page 425: ...following three kinds of coordinate system settings The coordinate system set using the tool geometry offset function G00 T_ The coordinate system set using the coordinate system setting function G50...

Page 426: ...9 7 1 Setting the Work Coordinate System E 30 7 1 1 Setting the Work Coordinate System Using the Data Entry Keys E 30 7 1 2 Setting the Work Coordinate System Using the MEASURE Soft Key E 31 8 SETTING...

Page 427: ...ated in the program in the following manner 1 G00 T__ The coordinate system is set using the tool geometry offset function 2 G50 X____ Z____ The coordinate system is set by directly designating the co...

Page 428: ...on of the cutting tool mounted in the turret in these coordinate systems in the NC Because a diametral command is used for the X axis the value to be set is twice the actual distance Positive Directio...

Page 429: ...oordinate system for headstock 2 X0 Spindle center Z0 Left end face of the workpiece Coordinate system plus minus sign X axis For the X axis reversed JIS specification machine positive and negative di...

Page 430: ...e Positive Direction in which the turret moves away from the workpiece Negative Direction in which the turret moves toward the workpiece Negative Direction in which the turret moves away from the work...

Page 431: ...use a diametral command is used for the X axis the value to be set is twice the actual distance Negative The direction in which the headstock 2 moves closer to headstock 1 Positive The direction in wh...

Page 432: ...selection appropriate 4 Is the measured dimension correct 5 Is the calculation for offset data correct 6 Is the offset direction correct 7 Is the tool offset number correct 8 Are the tool geometry off...

Page 433: ...inate system must be reset to 0 because the G54 work coordinate system is read automatically when power is turned on 2 Carry out the zero return operation 3 Machine the datum plane end face external i...

Page 434: ...the cursor to the data field of X and use the steps d and e above to reset it to 0 2 If a value other than 0 is displayed for X and Z of any work coordinate systems G54 G59 move the cursor to the data...

Page 435: ...key e Press the key f Press the ORIGIN soft key 8 Select any of the following modes with the MODE selection switch handle jog 9 Index the tool used to cut end face O D or I D Page B 41 8 If workpiece...

Page 436: ...e machine open the front door by pressing the AUTOMATIC DOOR OPEN switch 12 Check for possible interference when the spindle is rotated Example Interference between the adjacent tools and chuck workpi...

Page 437: ...ock the front door Then open the front door With the automatic door type machine open the front door by pressing the AUTOMATIC DOOR OPEN switch 19 Measure and record the O D and I D of the workpiece E...

Page 438: ...the steps explained in 3 PREPARATION FOR SETTING THE COORDINATE SYSTEM For the standard specification the values to be input for geometry offset are all negative values 4 1 Example for Setting the Too...

Page 439: ...ret to the station 2 in which the O D cutting tool is mounted Page B 41 8 6 Display the GEOMETRY OFFSET screen a Press the function selection key OFFSET b Press the GEOM soft key The GEOMETRY OFFSET s...

Page 440: ...e 8 Bring the tool close to the workpiece manually while observing the clearance between the workpiece and the tool through the window in the front door When the DOOR INTERLOCK key switch is placed in...

Page 441: ...nt Z axis position to 0 15 Press the MEASURE soft key 16 Make sure that the value displayed for Z of MACHINE is input Example 282 360 is input 17 Move the cursor to the setting column of No 2 X of the...

Page 442: ...ta entry keys 20 Press the MEASURE soft key 21 Make sure that the difference between the value displayed for X of MACHINE and the measured value is input Example 129 280 50 0 179 280 is input MACHINE...

Page 443: ...ntrol keys 26 Bring the tool close to the workpiece manually while observing the clearance between the workpiece and the tool through the window in the front door When the DOOR INTERLOCK key switch is...

Page 444: ...nto light contact with the workpiece end face in the handle feed operation Do not move the tool in the Z axis direction after the contact If moved it could cause the tool to interfere with the workpie...

Page 445: ...ere with the workpiece damaging the tool and machine 37 Enter the measured I D value 1 Be sure to input the decimal point 2 For the X axis reversed JIS specification machine input 30 0 using the data...

Page 446: ...X of MACHINE and the measured value is input Example 195 210 30 0 225 210 is input Input the tool geometry offset data for all the tools used for machining MACHINE X1 Z1 195 210 241 290 Make sure tha...

Page 447: ...rret 2 Display the WORK OFFSET screen a Press the function selection key OFFSET b Press the WORK soft key The WORK OFFSET screen is displayed 3 Move the cursor to COMMON Z1 using the cursor control ke...

Page 448: ...for the work shift offset data Z axis Therefore make sure to press the INPUT soft key 2 When inputting a numeric value pay attention to the sign and a decimal point to be input 3 To elongate the work...

Page 449: ...e in the chuck 3 Close the front door 4 Place the PANEL key switch in one of the positions indicated below ON PANEL EDIT 5 Press the HEAD CHANGE switch head 1 or head 2 to select the required turret 6...

Page 450: ...orkpiece manually while observing the clearance between the workpiece and the tool through the window in the front door When the DOOR INTERLOCK key switch is placed in the RELEASE position axis moveme...

Page 451: ...art the spindle manually and adjust the spindle speed as appropriate Page B 32 7 2 14 Lightly cut the end of the workpiece in the handle feed operation Move the tool only in the X axis direction not i...

Page 452: ...ion steps 9 to 15 16 Retract the turret to the position where the cutting tool will not interfere with the workpiece when the turret head is rotated 17 Press the STOP switch to stop the spindle 18 Wit...

Page 453: ...s c Press the INPUT soft key 1 If the INPUT key is pressed the value having been input with data entry keys is input for the work shift offset data Z axis Therefore make sure to press the INPUT soft k...

Page 454: ...PUT soft key Make sure to set 0 for COMMON Z1 on the WORK OFFSET screen If the work coordinate system shift data is set for COMMON Z1 the work coordinate system is shifted in the same direction disreg...

Page 455: ...etween the workpiece type and the G code G54 to G59 on the WORK OFFSET screen Simply specify a program such as G54 X___ Z___ and positioning is carried out in the required work coordinate system Examp...

Page 456: ...e with the workpiece resulting in machine damage Among the coordinate system numbers from 01 G54 to 06 G59 set those used for spindle 1 and those for spindle 2 on the WORK COORDINATES screen beforehan...

Page 457: ...EL EDIT 5 Press the HEAD CHANGE switch head 1 or head 2 to select the required turret 6 Display the WORK OFFSET screen a Press the function selection key OFFSET b Press the WORK soft key The WORK OFFS...

Page 458: ...is direction after the contact If moved it could cause the tool to interfere with the workpiece damaging the tool and machine 9 Input Z0 using the data entry keys to set the current Z axis position to...

Page 459: ...hich is used as the reference point for absolute programming to the programmed tool start point of each tool It is also possible to specify the clamp speed of the spindle for individual processes Befo...

Page 460: ...ol shape and tool holder difference among the tools and tool holders being used When setting the coordinate system using the machine coordinate system setting function any mistake in specifying the X...

Page 461: ...eration The spindle speed clamp function is not valid in the G97 mode 2 The coordinate system setting command G50 X___Z___ must be set for all tools The start point of the turret must be in the same p...

Page 462: ...ted 6 Set 0 for the tool geometry offset a Press the function selection key OFFSET b Press the GEOM soft key The GEOMETRY OFFSET screen is displayed c Move the cursor to the number for which the data...

Page 463: ...achine open the front door by pressing the AUTOMATIC DOOR OPEN switch 10 Check for possible interference when the spindle is rotated Example Interference between the adjacent tools and chuck workpiece...

Page 464: ...et indexing operation Page B 41 8 17 Repeat steps 8 to 10 and check interference 18 After making sure that the spindle can be rotated without interference close the front door 19 Start the spindle man...

Page 465: ...act with workpiece O D for O D cutting tool or the workpiece I D for I D cutting tool in the handle feed operation Example Bring the O D cutting tool to the workpiece O D 50 mm in diameter in the hand...

Page 466: ...t mounted to the presetter base 2 Axis movement is precluded unless the presetter mode switch is turned ON after the installation of presetter arm 3 Cover close state is checked from the installation...

Page 467: ...s lit If attempted the tool geometry offset data could be changed depending on the contact conditions of the connection part at the base and the presetter arm If machining is executed although the too...

Page 468: ...f the connection parts If this occurs the tool presetter cannot be used 3 Keep the connection part of protection cover away of chips dust and other foreign matter and also protect it from splashing of...

Page 469: ...ally to the sensor If shocks are applied to the sensor or presetter arm the sensor may be damaged or the presetter arm may be distorted making it impossible to set the appropriate tool geometry offset...

Page 470: ...r arm in the container 4 Make sure that the connection parts of the base and the protection cover are free of chips and foreign matter When cleaning the base with rag pay attention so that chips and f...

Page 471: ...EM E 45 9 4 Operation Procedure of Manual In machine Tool Presetter This section describes the procedure used for setting the tool geometry offset and Z axis work shift offset data by using the manual...

Page 472: ...ET screen is displayed Index the tool to be measured Page B 41 8 After making sure that the machine is stopped open the front door Check the gap and positional relationship between the stylus and the...

Page 473: ...the same level as the stylus face 3 Open the front door Press the stylus by your finger 4 5 Close the front door D X axis direction Yes No No Yes B C No Yes Thread cutting tools straight tools Input...

Page 474: ...Page E 43 9 3 Display the WORK OFFSET screen Close the front door 2 1 Is there a next tool to be measured Yes Make sure that the presetter arm can be removed without causing interference with the cut...

Page 475: ...turn it ON Open the front door Press the presetter mode switch to turn it OFF Open the front door End face cutting allowance setting necessary Carry out manual zero return X Z axis Page B 19 6 1 Yes...

Page 476: ...axis direction after cutting the workpiece end face If moved it could cause the tool to interfere with the workpiece damaging the tool and machine 7 Make sure to set 0 for COMMON Z1 on the WORK OFFSE...

Page 477: ...in diameter where the sensor is turned when the tool tip comes into contact with face A of the stylus No 5017 Z1 Z2 NC parameter Set the distance between the two points where the sensor is turned on...

Page 478: ...ram zero Z0 The tool geometry offset data is set in reference to the stylus by bringing the tool tip into contact with the stylus for which the coordinate values are set with NC parameters No 5015 to...

Page 479: ...ing of parameter settings without consultation 1 NC parameter Data number 1202 Data number 5004 Data number 5005 7 6 5 4 3 2 1 0 WZS Data Type Bit Type WZS 0 Direction of the offset data set to COMMON...

Page 480: ...0 The presetter measurement switch is valid regardless of the chucking condition 1 The presetter measurement switch is invalid while the chuck is unclamped PSMOK 0 The in machine tool presetter functi...

Page 481: ...dicated on the axis travel diagram For drilling or reaming operation start machining only after making sure that the cutting tool drill reamer is positioned at the center of the spindle JIS specificat...

Page 482: ...TING MASS PRODUCTION This chapter explains the procedures for checking a program and finishing a workpiece within the specified tolerance before starting mass production The checkups before starting m...

Page 483: ...PROGRAM WITH A WORKPIECE CLAMPED IN THE CHUCK F 18 8 TO FINISH A WORKPIECE WITHIN THE SPECIFIED TOLERANCE WITH THE TOOL WEAR OFFSET FUNCTION TEST CUTTING F 25 9 LOAD MONITORING FUNCTION B F 31 9 1 Gen...

Page 484: ...ous Operation Command F 48 13 3 Synchronous Operation M34 M234 M35 M235 F 49 13 3 1 Starting Synchronous Operation in the State Both Spindles Stopped F 50 13 3 2 Starting Synchronous Operation in the...

Page 485: ...S indicator ERR is not lit 6 Both the turret 1 and turret 2 are indexed to the correct position The STATUS indicator TRCL is lit 7 If the spindle is rotating the spindle speed attained signal has been...

Page 486: ...than that required to hold the workpiece safely change machining conditions such as the chucking pressure spindle speed feedrate and depth of cut Periodically measure the chuck gripping force with a g...

Page 487: ...rapid traverse override and spindle speed override correct 13 Can the machine be stopped immediately when necessary 14 Is the front door closed Check Items Check Column 1 Is the measuring instrument f...

Page 488: ...s could be fed in an unexpected manner and the spindle could be rotated at an unexpected speed leading to accidents involving serious injuries or damage to the machine Check the interlock setting Chec...

Page 489: ...r lamps Check Items Check Column 1 Chuck clamp CHCL Lit 2 Turret index completion TRCL Lit 3 Machine ready MRDY Lit 4 Zero return completed X Z Lit Check the tool offset data Record the work shift dat...

Page 490: ...tside chucking etc It is necessary to shape the soft jaws so that the workpiece can be clamped in the chuck stably Chapter C SHAPING SOFT JAWS FOR FINISHING 2 Mount the tools and the workpiece in the...

Page 491: ...on the screen is updated as the program is executed When using the NC functions refer to page A 26 5 6 to find the details of them 1 Carry out the procedure explained in 4 1 Preparations for Checking...

Page 492: ...make the single block function valid 10 Press the dry run switch to make the dry run function valid 11 If there is an M08 coolant ON command in the program press the OFF switch for 1 second or more to...

Page 493: ...h the automatic door type machine open the front door by pressing the AUTOMATIC DOOR OPEN switch 17 Operate the chuck to clamp a workpiece Page B 36 7 3 18 Close the front door Make sure that you can...

Page 494: ...ng order Spindle speed 3 If the coolant OFF mode is currently valid coolant will not be supplied even if an M08 coolant ON command in the program is carried out WARNING Before switching the machine lo...

Page 495: ...Code Function M03 Spindle start normal M04 Spindle start reverse M08 Coolant supply M13 Rotary tool spindle start normal MC type M14 Rotary tool spindle start reverse MC type M19 Spindle orientation o...

Page 496: ...tion is valid an alarm EX4014 occurs when the ST switch is pressed if a workpiece is clamped in the chuck the STATUS indicator CHCL is lit 7 The dry run function is automatically made valid when the s...

Page 497: ...NVALID for CHUCK STROKE END by displaying the OPERATION PANEL screen and place the chuck in the clamped state Page A 39 5 6 12 Make the dry run function invalid and coolant off mode valid if considere...

Page 498: ...run function should be made invalid for example to check a milling operation program press the dry run switch to turn the indicator in the switch off For programs in which the cutting feedrate is exp...

Page 499: ...a on the PROGRAM screen Check the interference between the tool chuck and workpiece 1 The program stops at each block since the single block function is valid However press the SP switch if the X or Z...

Page 500: ...ressing the AUTOMATIC DOOR OPEN switch 22 Check the distance between the tools and the distance between the tool or the fixture to the chuck using a scale Measure the distance for all the tools to che...

Page 501: ...ARATION BEFORE STARTING MASS PRODUCTION F 17 24 Select the memory mode with the MODE selection switch 25 Press the ST switch The dry run operation restarts MODE MEM MDI TAPE EDIT H JOG RPD ZRN CYCLE S...

Page 502: ...tool nose and the end face used for obtaining the tool offset data is Shift amount 100 mm Z coordinate specified in the program allowance on end face 1 Make sure to set 0 for the work coordinate syste...

Page 503: ...input the shift amount in positive value for spindle 2 4 Correct the program after program check if necessary Page D 14 4 5 After finishing the program check always reset the shift amount to its orig...

Page 504: ...he INPUT soft key 11 Press the single block switch to make the single block function valid For items 12 and 13 below determine whether or not the corresponding function should be used 12 Press the opt...

Page 505: ...y screen Page A 95 7 2 3 19 Search for the program to be used for machining a Key in the program number to be searched for using the data entry keys It is not necessary to press the key b Press the O...

Page 506: ...he interference between the tool and the workpiece or the chuck 1 The program stops at each block as the single block function is valid However press the SP switch if the X or Z axis starts moving 2 I...

Page 507: ...ure the distance for all the tools to check for possible interference When automatic operation has been suspended and the manual mode selected never move an axis or index the turret manually If it is...

Page 508: ...e cursor control keys c Input 100 0 using the data entry keys To reset the shift amount for spindle 2 to 0 press the following keys in order S type d Press the INPUT soft key If the INPUT key is press...

Page 509: ...specified tolerance Input the amount by which the tool path should be shifted as the tool wear offset data When machining the first workpiece in test cutting exercise due care to ensure safety Offset...

Page 510: ...ffset number of each tool b For tools used for O D cutting enlarge the diameter position by 0 3 mm by inputting tool wear offset data of 0 3 Input 0 3 using the data entry keys c Press the INPUT soft...

Page 511: ...necessary to press the key b Press the O SEARCH soft key 14 Press the single block switch to make the single block function valid 15 Press the optional stop switch to make the optional stop function v...

Page 512: ...ess the DOOR UNLOCK switch to unlock the front door Then open the front door 1 With the automatic door type machine when the program stops after executing the M01 optional stop command open the front...

Page 513: ...follow the steps indicated below Assume that the tool command used for this machining is T0101 tool wear offset number 1 a Move the cursor to the X axis offset data field for the wear offset number 1...

Page 514: ...28 Close the front door 29 Press the ST switch to finish the workpiece 30 After finishing the workpiece measure the workpiece dimensions again and input the tool wear offset data 31 Start automatic c...

Page 515: ...ring can be set and displayed on the LOAD MONITOR SETTING screen 3 Load meter display The load of the spindle or feed axis is displayed on the LOAD MONITOR screen Display mode Bar graph and numeric va...

Page 516: ...chine model and specifications Monitoring groups Max 24 groups 24 intervals Programming M code Start of teaching or monitoring M92 End of teaching or monitoring M93 Operation modes Teaching mode and m...

Page 517: ...ected during cutting in the specified group intervals to the preset warning and alarm detection threshold level values of the same group intervals The following processing is executed if the detected...

Page 518: ...onitoring Create the program for load monitoring Page F 35 9 4 Select the TEACHING mode on the LOAD MONITOR screen Page F 37 9 5 The reference data for load monitoring is stored Execute monitoring Set...

Page 519: ...or load monitoring Specify M92 in a block independently without other commands F_ Sets group number 1 to 24 M93 End of teaching or load monitoring O1234 N00001 M92 F3 Machining program M93 N00002 M92...

Page 520: ...g or monitoring of load is executed for cutting carried out in blocks B C D and E For the monitoring data in group 3 is used 1 Select the TEACHING mode and execute the program indicated above The teac...

Page 521: ...ide column Group information display area The information of the group for which teaching or monitoring is presently executed is displayed It is not possible to set or change the values of WRN and ALM...

Page 522: ...layed when this soft key is pressed EXIT The screen returns to the PCMDI MENU screen when this soft key is pressed Item Description GROUP The group number of the data presently displayed is displayed...

Page 523: ...t threshold level value 1 is set for macro variable 1001 1 Macro variable 1001 returns to 0 when M93 is executed or the RESET key is pressed Specify M93 only after necessary processing for macro varia...

Page 524: ...hibit the entry of a cutting tool into the zone defined using the stored stroke limit function If the cutting tool is going to be moved in the zone the related alarm message is displayed on the screen...

Page 525: ...hining make sure that the workpiece is supported not to fall from the chuck if the tailstock spindle center retracts from the workpiece WARNING 1 Always stop the machine before removing chips inside i...

Page 526: ...restarting the program If the program is restarted from a position different from the previously located position an interference will occur between the tool and the workpiece or between the tool and...

Page 527: ...dicator CHCL is lit Check the workpiece to see if it is correctly clamped in the chuck 5 Close the front door 6 Display the PROGRAM memory screen and make sure that the cursor is at the head of the pr...

Page 528: ...ate 9 Display the PROGRAM memory screen and make sure that the cursor is at the head of the program 10 Check the setting of the switches MODE selection switches OVERRIDE dial etc 11 Close the front do...

Page 529: ...At the same time the program must be written by using these interlock functions fully and with operation safety taken into consideration For interlock functions refer to page A 5 2 INTERLOCK FUNCTION...

Page 530: ...red while both spindles are rotating When a workpiece is to be transferred while both spindles are rotating the spindle speed of both spindles must be synchronized If a workpiece is such as a hexagona...

Page 531: ...When positioning headstock 2 to the workpiece transfer position using the G53 command this coordinate value is used as the target position for B axis positioning 4 Return headstock 2 B axis to the ze...

Page 532: ...n This command is valid for all of M34 M234 M35 and M235 commands The spindle that has been synchronized with the other spindle is stopped S codes during synchronous operation The S code presently spe...

Page 533: ...ronous operation in the state spindle 1 is rotating with spindle 2 stopped 3 To start the synchronous operation in the state spindle 1 is stopped with spindle 2 rotating 4 To start the synchronous ope...

Page 534: ...either of the programs Spindle 1 keeps rotating at S while spindle 2 stops Pattern 2 1 Specify M34 M35 in both of the programs 2 Specify M03 M04 S in the program for turret 2 Both spindles rotate in...

Page 535: ...1 Specify M34 M35 in both of the programs 2 Specify M204 M203 S in the program for turret 2 Both spindles rotate in synchronization at the speed specified at turret 1 3 Specify M36 in either of the p...

Page 536: ...es rotate in synchronization at the specified speed S 3 Specify M36 in either of the programs Spindle 1 keeps rotating at S while spindle 2 stops Pattern 2 1 Specify M03 M04 S in the program for turre...

Page 537: ...keeps rotating at S while spindle 2 stops Pattern 2 1 Specify M204 M203 S in the program for turret 2 2 Specify M34 M35 in both of the programs Both spindles rotate in synchronization at the speed spe...

Page 538: ...essage is displayed on the screen EX0035 CUT OFF INCOMPLETE 1 If the M80 command is executed for spindle 1 while in synchronous mode operation the synchronous mode is canceled After the completion of...

Page 539: ...ce will not be finished accurately if it is not securely pushed against the chuck 2 reference surface To avoid such a problem workpiece pushing is detected using G38 If the load current of the B axis...

Page 540: ...culating servo motor error In B axis return controlled by the K command positioning mode is not one direction positioning F Skip feedrate for checking the pushing of workpiece If the F command is omit...

Page 541: ...he B axis servo motor fails to rotate due to torque limit and only servo error increases When the error reaches the value set for the parameter the servo motor stops 3 If the stop position is within 0...

Page 542: ...SITION ERROR The position obtained in the pushing detection process is outside the tolerance range 3003 B J AND V SPECIFIED Two or more coordinate values are specified 3005 B POSITION NOT SPECIFIED No...

Page 543: ...MONITORING FUNCTION B F 39 Alarms Related with Steady Rest B 99 Alarms Related with Tailstock B 75 Arrangement and Names of Switches and Keys on Machine Operation Panel A 16 Arrangement of Power Supp...

Page 544: ...Shaping Soft Jaws C 12 Checking a Program by Using the Spindle OFF Mode Function F 13 CHECKING A PROGRAM USING MACHINE LOCK FUNCTION F 7 CHECKING A PROGRAM WITHOUT CHUCKING A WORKPIECE F 11 CHECKING T...

Page 545: ...les D 23 Designating the Load Monitor Program F 35 Designating the Spindle and Turret Combinations B 45 Distance from Spindle Center Line to X axis Zero Point I D Tool Holders and Rotary Tools E 55 DO...

Page 546: ...ction Key CAPS A 104 Function Selection Key MESSAGE A 119 Function Selection Key NETWORK A 136 Function Selection Key OFFSET A 96 Function Selection Key POS A 82 Function Selection Key PROG A 89 Funct...

Page 547: ...D 42 Installing and Removing the Presetter Arm E 43 Interference Check B 63 INTERLOCK FUNCTIONS THAT ENSURE SAFE OPERATION A 5 Interlock when the Door Is Unlocked Manual Door Type P 25 Interlocks for...

Page 548: ...A 12 NC System Screens A 107 O O D Chucking C 13 Opening the Steady Rest B 97 Opening Closing the Door Automatic Door Type P 28 Operating Monitor Screen A 87 Operation F 57 Operation Flow F 34 Operati...

Page 549: ...or Checking a Program F 6 Presently Executed Program Screen A 95 Presetter Switches PSM PST A 33 Program Bottom Search D 13 PROGRAM CHECK F 6 Program Directory Screen A 93 Program Edit Keys A 76 Progr...

Page 550: ...USING G50 E 33 SETTING THE INHIBITED TOOL ENTRY ZONE F 40 SETTING THE TOOL COORDINATE SYSTEM WITH GEOMETRY OFFSET E 12 Setting the Work Coordinate System E 30 SETTING THE WORK COORDINATE SYSTEM USING...

Page 551: ...A 72 Steady Rest Switches Steady Rest Specification A 67 Store the Clamp Position Data ZL 153 203 B 65 STORING A PROGRAM TO NC MEMORY D 4 SWITCHES FOR POWER SUPPLY A 8 Symbols Used in Flowchart D 3 SY...

Page 552: ...NG OFF THE POWER B 14 TURNING ON THE MACHINE LIGHT B 46 TURNING ON THE POWER B 4 Turning On the Power B 5 Turret 1 Z axis Zero Point Adjustment ZL 253 B 70 Turret Indexing Switches TURRET A 60 U USING...

Page 553: ...TION A 55 Axis Selection Switches A 58 B BACK Chip Conveyor Switch A 62 B AXIS ZERO POINT Status indicator A 46 BDT Block Delete Switch A 30 Block Delete Switch BDT A 30 C C Status Indicators A 47 CAN...

Page 554: ...65 DRN Dry Run Switch A 31 Dry Run Switch DRN A 31 E EDIT Mode Selection Switch A 22 Electrical Cabinet Door Interlock Key Switch CONTROL BOX DOOR INTERLOCK A 10 Electronic buzzer DOOR INTERLOCK FUNC...

Page 555: ...ANDLE A 58 HEAD CHANGE Head Selection Switches A 19 Head Selection Switches HEAD CHANGE A 19 HEADSTOCK 2 CHUCK CLAMP Status indicator A 46 status indicator A 46 HELP Help Key A 136 Help Key HELP A 136...

Page 556: ...FF A 12 NETWORK Function Selection Key A 136 NOR Spindle Normal Rotation Switch A 51 O OFF Coolant Off Switch A 61 OFFSET Function Selection Key A 96 ON Coolant On Switch A 61 ON OFF NC Power ON OFF S...

Page 557: ...ode Selection Switch A 24 RS232C Interface Connector A 14 S SBK Single Block Switch A 27 SETTING Function Selection Key A 125 SHIFT Shift Key A 79 Shift Key SHIFT A 79 Single Block Switch SBK A 27 Sof...

Page 558: ...STOP Chip Conveyor Switch A 62 STOP Spindle Stop Switch A 51 SYSTEM Function Selection Key A 104 T TAILSTOCK Tailstock Spindle Switches Tailstock Specification A 63 Tailstock Spindle Interlock Tailsto...

Page 559: ...e adjusting knob DOOR INTERLOCK FUNCTION P 8 W WARNING label DOOR INTERLOCK FUNCTION P 8 Work Counter Option A 36 X X Status Indicator A 46 Y Y Status Indicators A 47 Z Z Status Indicator A 46 ZRN Mod...

Page 560: ...hink we can make this manual better Please restrict your comments to those concerning this manual only Name of manual ZL SERIES OPERATION MANUAL Number of revisions OM ZLFMSG501 A0E 2002 8 Name Compan...

Page 561: ...355 Hamburg Germany Phone 40 37 644 508 Fax 40 37 644 631 Istanbul Abdi Ipekci Caddesi No 129 Kat 5 Bayrampasa Istanbul Phone 212 613 4141 Fax 212 612 4603 Representative Office Dusseldorf MORI SEIKI...

Reviews: