4. HOW TO MONITOR REDUNTANT SYSTEM
4.2 Direct CPU Connection
4 - 11
1
P
R
EP
ARA
T
OR
Y
P
R
OCEDURES FOR
MONIT
O
R
ING
2
DE
VICE RA
NGE
THA
T
C
A
N
B
E
SET
3
ACCESS
RANGE
F
O
R MONIT
O
RING
4
HOW T
O
MONIT
O
R
REDUNT
ANT
SYS
TE
M
5
BUS CONNECTION
6
DIRE
CT
CONNECTION T
O
CPU
7
COMP
U
T
E
R
LINK
CONNECTION
8
ETHERNE
T
CONNE
C
T
ION
4.2 Direct CPU Connection
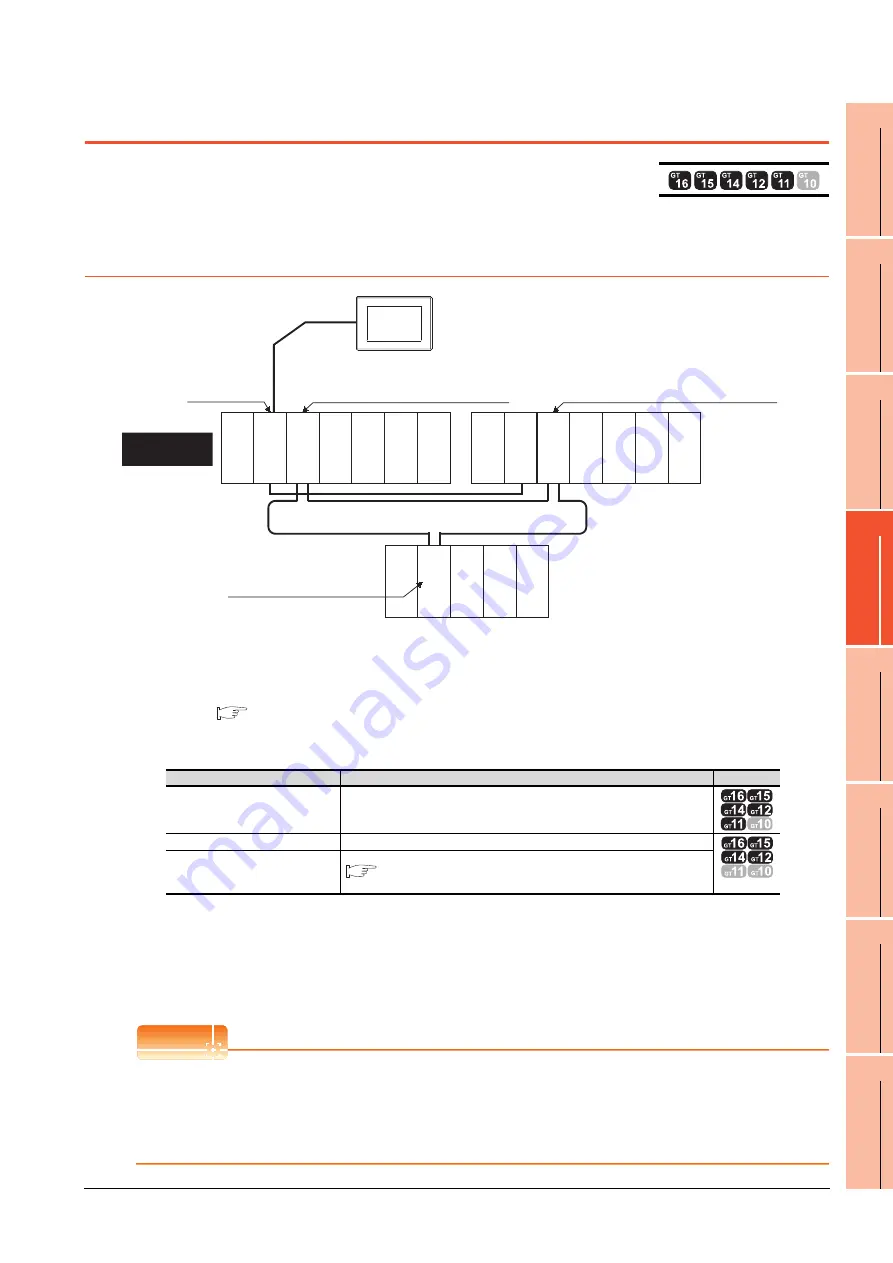
This section describes the direct CPU connection by which a GOT is connected to a PLC CPU in the redundant system.
Two methods for the CPU direct connection, using one or two GOTs, are available.
4.2.1
When using one GOT
(1) Connection method
Connect the GOT to the RS-232 interface of the control system CPU module (Q12PRHCPU, Q25PRHCPU) of
the redundant system.
For details, refer to the following.
(2) GT Designer3 setting
Set GT Designer3 as follows.
*1
GT14 and GT11 are not compatible with MELSEC-QS.
*2
Only the CPU which is connected to GT11 directly can be monitored on GT11. The setting of GT Designer3 is not necessary.
(3) Monitoring target change when system switching occurs in a redundant system
When the system switching occurs, the PLC CPU (other station) of the control system after system switching
takes over the host station operation.
Since the GOT monitors the control system, the monitoring target is automatically changed to other station.
POINT
POINT
POINT
To monitor the control system without Q redundant setting
If the system switching occurs when the Q redundant setting is not made, the GOT cannot change the monitoring
target at the occurrence of system switching since it monitors the connected PLC CPU (host station).
As a countermeasure, change the cable connection from the PLC CPU in the previous control system to the control
system after system switching.
Setting item
Settings
Model
Controller Type
GT16, GT15, GT12: MELSEC-QnA/Q/QS, MELDAS C6*
GT14, GT11: MELSEC-QnA/Q, MELDAS C6*
*1
Device setting (Network setting)
Host
*2
Q Redundant Setting
Monitor target
MELSECNET/H remote I/O network
CPU direct connection
GOT
Network No. 1, Station No. 0
(Multiplexed remote master station)
Control system
(System A)
Q25PRHCPU
Power
supply module
QJ71LP21-25
QJ71BR11
QJ71E71-100
QJ61BT11N
Empty
Power
supply module
Empty
Power
supply module
Empty
Empty
Network No. 1, Station No. 1
(Multiplexed remote sub master station)
Standby system
(System B)
QJ72LP25-25
QJ71C24N
Network No. 1, Station No. 2
(remote I/O station)
Q25PRHCPU
QJ71LP21-25
QJ71BR11
QJ71E71-100
QJ61BT11N
Summary of Contents for GT15
Page 2: ......
Page 34: ...A 32 ...
Page 92: ......
Page 110: ...2 18 2 DEVICE RANGE THAT CAN BE SET 2 9 MELSEC WS ...
Page 186: ...5 10 5 BUS CONNECTION 5 2 System Configuration ...
Page 218: ...5 42 5 BUS CONNECTION 5 4 Precautions ...
Page 254: ...6 36 6 DIRECT CONNECTION TO CPU 6 6 Precautions ...
Page 286: ...7 32 7 COMPUTER LINK CONNECTION 7 6 Precautions ...
Page 350: ...8 64 8 ETHERNET CONNECTION 8 5 Precautions ...
Page 368: ...9 18 9 MELSECNET H CONNECTION PLC TO PLC NETWORK 9 5 Precautions ...
Page 420: ...11 26 11 CC Link IE CONTROLLER NETWORK CONNECTION 11 5 Precautions ...
Page 440: ...12 20 12 CC Link IE FIELD NETWORK CONNECTION 12 5 Precautions ...
Page 490: ...13 50 13 CC Link CONNECTION INTELLIGENT DEVICE STATION 13 5 Precautions ...
Page 510: ......
Page 564: ...15 54 15 INVERTER CONNECTION 15 7 Precautions ...
Page 668: ......
Page 712: ...21 12 21 MULTIPLE GT14 GT12 GT11 GT10 CONNECTION FUNCTION 21 5 Precautions ...
Page 713: ...MULTI CHANNEL FUNCTION 22 MULTI CHANNEL FUNCTION 22 1 ...
Page 714: ......
Page 760: ...22 46 22 MULTI CHANNEL FUNCTION 22 5 Multi channel Function Check Sheet ...
Page 761: ...FA TRANSPARENT FUNCTION 23 FA TRANSPARENT FUNCTION 23 1 ...
Page 762: ......
Page 860: ...REVISIONS 4 ...
Page 863: ......


