100/180 mm PAPERLESS GRAPHIC RECORDER: USER GUIDE
HA028910
Issue 13 Sep 16
User Guide
Page 190
4.3.21 ETHERNET/IP OPTION (Cont.)
INSTALLATION
1. Install the PLC software according to the instructions supplied with the PLC. For this particular PLC,
once installation is complete, the ‘RSLinx Classic’ and ‘RSLogix 5000’ software items (AMONGST
OTHERS) must be present. RSLinx classic is used to provide a link between the PLC network and
Windows, and RSLogix 5000 is confi guration and programming software for the PLC.
2. Use a cross-over type serial cable to connect one of the pc ports to the serial port (typically a 9-way
D-Type connector) of the PLC
3. Connect an Ethernet cable between the Ethernet port on the PLC (typically an RJ45 socket) and
the recorder. If a direct connection is used, the cable must be a cross-over type; if connecting via a
switch, then non cross-over cable must be used.
4. Power up the PLC and the Recorder. Switch the PLC to ‘Programmer’ mode.
SETTING UP THE LINK BETWEEN WINDOWS AND THE PLC NETWORK
1. Click on Start/All Programs/Rockwell
software/RSLinx/RSLinx Classic. The
‘RSLinx Classic’ window opens.
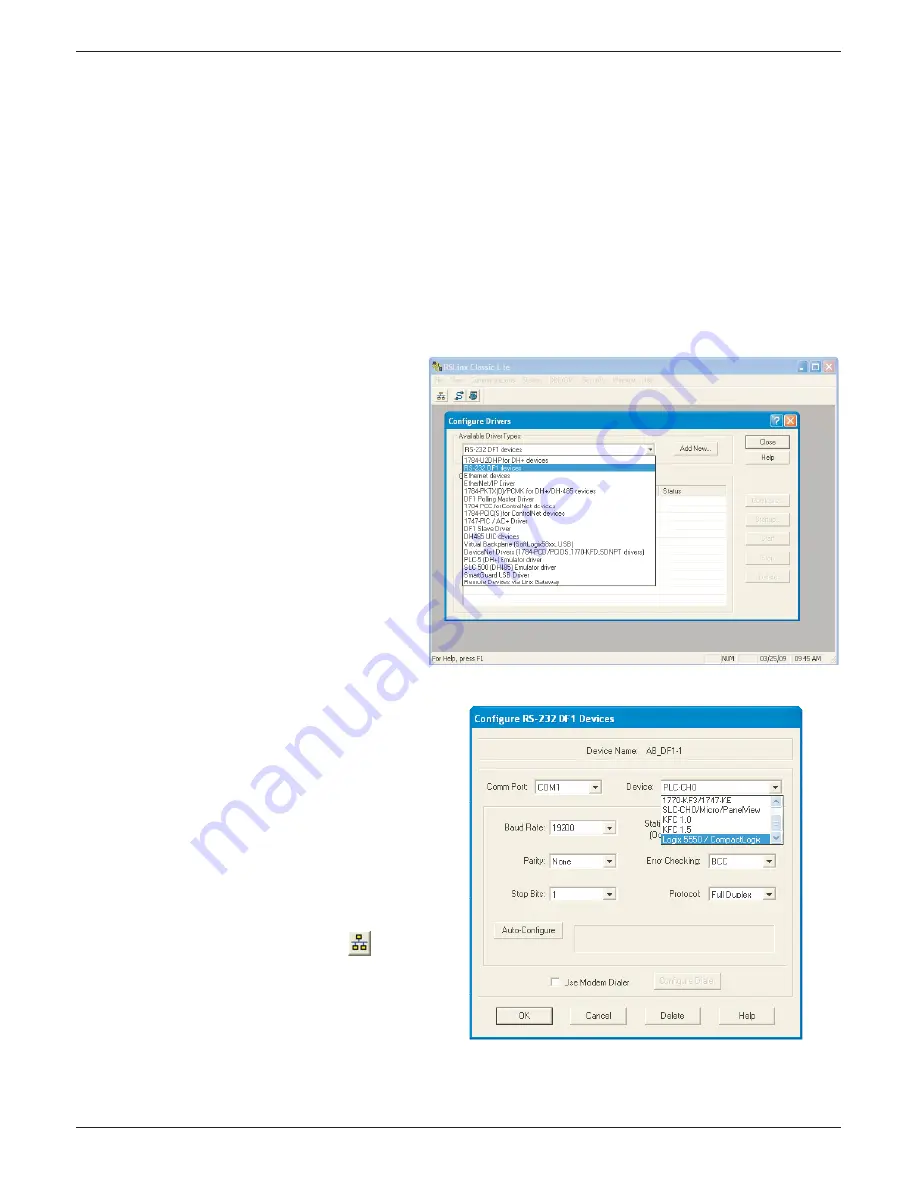
2. Click on ‘Communications’ and select
‘Confi gure Drivers’. When the ‘Con-
fi gure Drivers’ window opens, select
‘RS232 DF1 devices’ in the ‘Available
Drive Types’ pull down menu (fi gure
4.3.21d).
3. Click on ‘Add New’ and enter a
suitable Driver Name in the pop-up
window that then appears. Click on
‘OK’. The ‘Confi gure RS-232 DF1
devices’ window opens (fi gure
4.3.21e).
4. In the ‘Device:’ fi eld pull-down menu,
select the relevant device name.
Select the PC COM port, and the rel-
evant Baud Rate, Parity etc. (normally
the defaults are acceptable). Click on
‘Auto-Confi gure’.
5. When the Auto-Confi gure process is com-
plete, click on ‘OK’, to close the ‘Confi gure
Drivers’ window, and then minimise the
‘RSLinx Classic window.
6. Start the RSLogix 5000 program (from
‘Start/All programs/... /RSLogix 5000).
When the ‘Quick Start’ window opens,
close it.
7. At the top of the RSLogix 5000 window,
click on the ‘Who active’ icon
or click
on ‘Who Active’ in the ‘Communications’
drop down menu. The ‘Who Active’ win-
dow opens.
Figure 4.3.21d Confi gure drivers.
Figure 4.3.21e Confi gure RS-232 DF1 Devices


