


81
•
Do not change the order of the hard drives in the TeraStation. For example, pulling out drive 1 and replacing
it with drive 2 may cause data to be corrupted or lost.
•
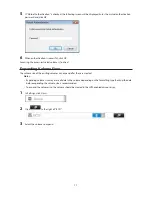
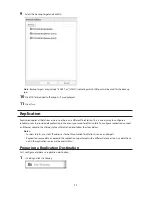
If the LCD display does not change after a new drive is installed, click
Rediscover Disk
in Settings.
Hard Drive Replacement Examples
Drive Replacement (using JBOD or a redundant RAID mode such as RAID 1, 5, or 6
with auto-shutdown disabled)
This section describes replacing a drive with
the TeraStation on
.
1
Open the front cover with the included key.
2
The failed drive's status LED will be glowing red. Push its unlock button and swing the lock mechanism out.
1
2
1
2
Hard drives without red status LEDs lit are still on. Do not unplug or remove them.
Summary of Contents for TeraStation WSS 5000
Page 10: ...9 Chapter 1 Installation Diagrams TS5800D TS5800DN TS5800DWR µ µ µ µ TS5600D TS5600DN µ µ µ µ ...
Page 60: ...59 6 Click Edit under NAS Volume 7 Click Create Volume ...
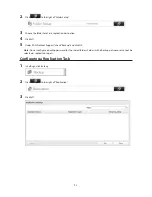
Page 88: ...87 2 Click to the right of Backup 3 Click List of LinkStations and TeraStations ...
Page 90: ...89 3 Click Create New Job Note Up to 8 backup jobs can be configured ...
Page 104: ...103 18Click Time Machine ...
Page 105: ...104 19Click Select Backup Disk 20Select the TeraStation then click Use Disk ...
Page 116: ...115 3 Click Create New Job ...
Page 131: ...130 9 Click Open Squeezebox The Squeezebox s settings will open ...
Page 136: ...135 4 Open the License tab then click Activate Free License To deactivate the license click ...
Page 138: ...137 3 Click Next 4 Click Find Cameras ...
Page 144: ...143 2 Select the search criteria on the left side of the search screen then click Search ...
Page 145: ...144 3 The search results are displayed Click a thumbnail to start the media viewer ...