


176
8
Configure the desired settings, then
OK
.
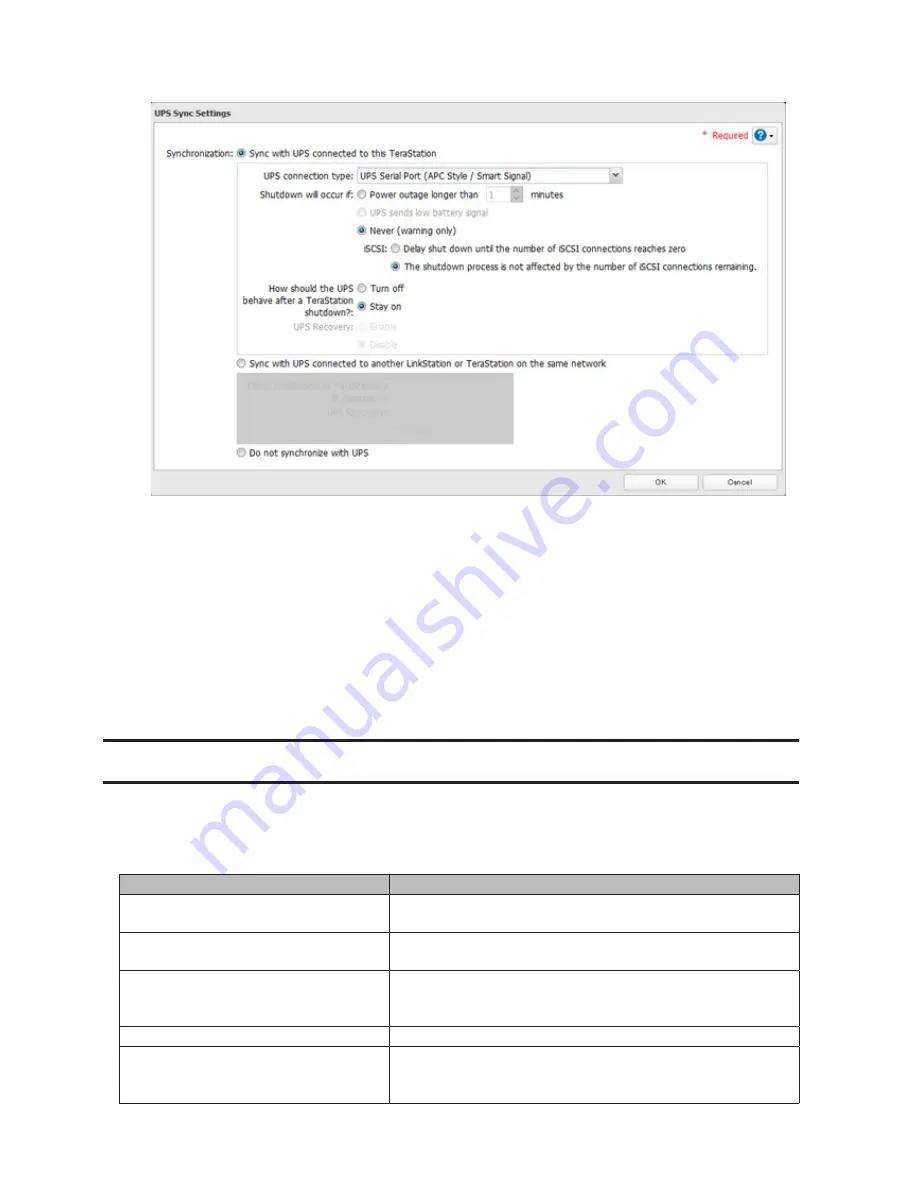
Notes:
•
If the TeraStation is connected directly to a UPS, select "Sync with UPS connected to this TeraStation". If a
different TeraStation is connected to the UPS, select "Sync with UPS connected to another LinkStation or
TeraStation on the same network". After making this selection, enter the IP address of the TeraStation that will
be the sync source in "Other LinkStation or TeraStation's IP Address".
•
When the TeraStation is rebooted after an automatic shutdown (such as from a power outage or power
supply problem), verify that the power supply has been restored. If the TeraStation is turned on while it is
still running on the UPS and without the power supply restored, automatic shutdown is not performed, even
after the specified time has elapsed.
•
If the power supply from the UPS to the TeraStation is stopped and restarted when UPS recovery is enabled,
the TeraStation is automatically restarted.
Port Trunking
Two Ethernet cables can be used to establish two separate communication routes providing LAN port redundancy
and improving communication reliability. The use of two Ethernet cables enables access to the TeraStation even if
one of the cables is disconnected.
The port trunking modes that can be set in the TeraStation are shown below.
Trunking Mode
Characteristics
Round-robin
*
Network packets are transmitted in sequential order from the first
available NIC slave through the last.
Active-backup
Only one NIC slave in the bond is active. A different slave becomes
active if and only if the active slave fails.
XOR
*
Transmits network packets based on [(source MAC address XOR'd
with destination MAC address) modulo NIC slave count]. This
selects the same NIC slave for each destination MAC address.
Broadcast
Transmits network packets on all slave network interfaces.
Dynamic link aggregation
**
Creates aggregation groups that share the network speed and
duplex settings. Utilizes all slave network interfaces in the active
aggregator group according to the 802.3ad specification.
Summary of Contents for TeraStation WSS 5000
Page 10: ...9 Chapter 1 Installation Diagrams TS5800D TS5800DN TS5800DWR µ µ µ µ TS5600D TS5600DN µ µ µ µ ...
Page 60: ...59 6 Click Edit under NAS Volume 7 Click Create Volume ...
Page 88: ...87 2 Click to the right of Backup 3 Click List of LinkStations and TeraStations ...
Page 90: ...89 3 Click Create New Job Note Up to 8 backup jobs can be configured ...
Page 104: ...103 18Click Time Machine ...
Page 105: ...104 19Click Select Backup Disk 20Select the TeraStation then click Use Disk ...
Page 116: ...115 3 Click Create New Job ...
Page 131: ...130 9 Click Open Squeezebox The Squeezebox s settings will open ...
Page 136: ...135 4 Open the License tab then click Activate Free License To deactivate the license click ...
Page 138: ...137 3 Click Next 4 Click Find Cameras ...
Page 144: ...143 2 Select the search criteria on the left side of the search screen then click Search ...
Page 145: ...144 3 The search results are displayed Click a thumbnail to start the media viewer ...