


70
Specifying the size by entering numerical values.
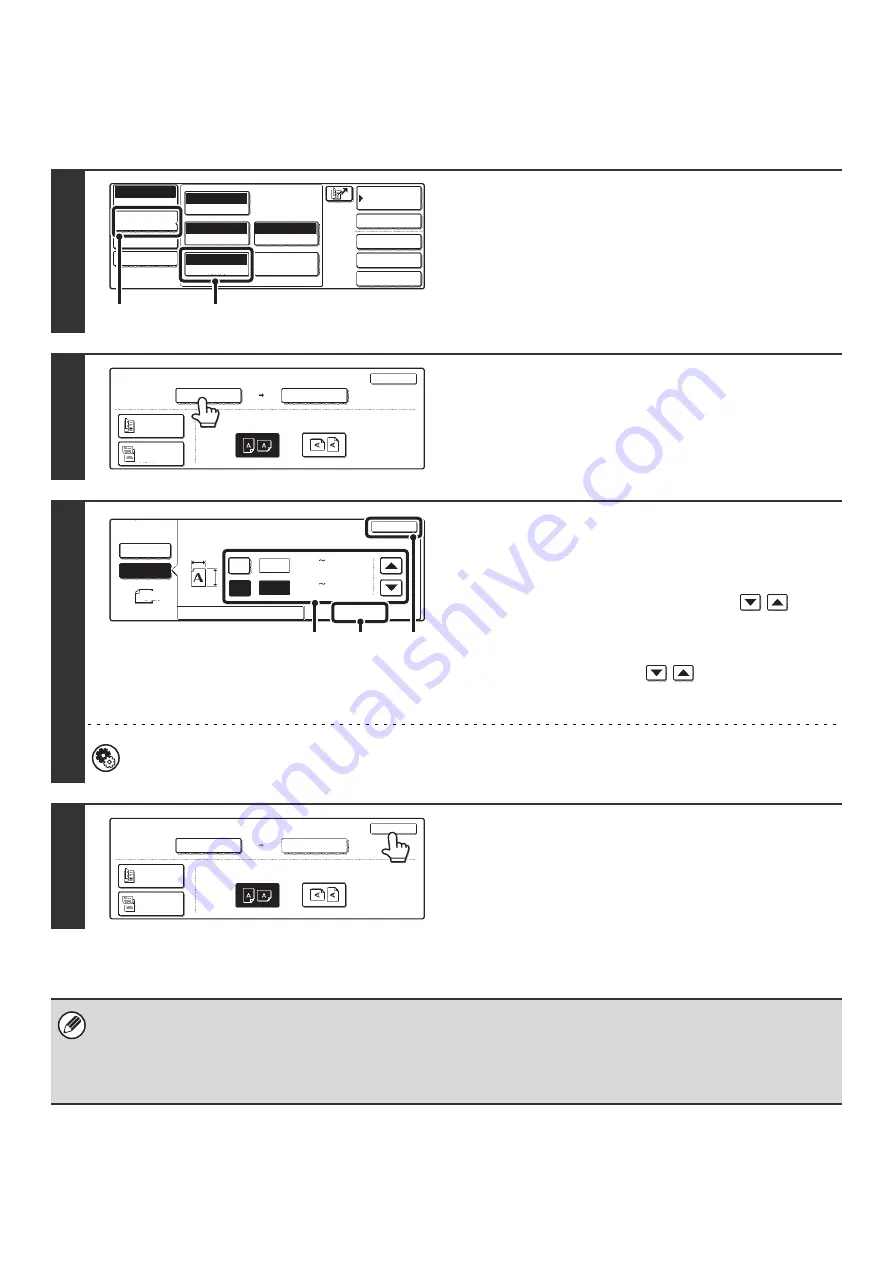
When scanning a non-standard size original such as a postcard or card, follow these steps to specify the original size.
The width can be from 2-1/2" to 17" (64 mm to 432 mm), and the length can be from 2-1/2" to 11-5/8" (64 mm to 297 mm).
1
Display the original settings screen.
(1) Touch the [Image Settings] key.
(2) Touch the [Original] key.
The automatically detected size appears at the top of the
[Original] key.
2
Touch the [Scan Size] key.
3
Enter the scan size.
(1) Touch the [Size Input] tab.
(2) Touch the [X] key and enter the X
(horizontal) dimension with the
keys.
(3) Touch the [Y] key and enter the Y (vertical)
dimension with the
keys.
(4) Touch the [OK] key.
System Settings (Administrator): Original Size Detector Setting
This is used to set the size entry screen to "inch units" or "mm units".
4
Touch the [OK] key.
The specified size appears in the [Scan Size] key.
• When the scan size is specified by numerical values, the send size cannot be specified.
• When the automatic document feeder is used, an original longer that 17" (432 mm) can be scanned (maximum length
31-1/2" (800 mm)). To scan a long original, touch the [Standard Size] tab in the screen of step 3 and then touch the [Long
Size] key.
Specifying the size using paper sizes
(page 69)
Quick File
File
Special Modes
Address Entry
Address Book
Internet Fax
Mode Switch
Image
Settings
Send Settings
Manual RX
Auto
Exposure
200x100dpi
Resolution
TIFF-F
File Format
Special Modes
Original
Auto 8 x11
1
/
2
(1)
(2)
Internet Fax
Original
OK
Scan Size
Auto 8 x11
1
/
2
2-Sided
Booklet
2-Sided
Tablet
Send Size
Auto
Image Orientation
100%
Internet Fax
Original
OK
Size Input
Standard Size
X
Y
Auto
Manual
Manual
X
Y
11
17
(2_1/2 17)
inch
(2_1/2 11_5/8)
inch
(4)
(2), (3)
(1)
2-Sided
Booklet
2-Sided
Tablet
OK
Scan
Size
Send
Size
Auto
Image
Orientation
X64
Y64
Internet
Fax
Original
2-Sided
Booklet
2-Sided
Tablet
OK
Scan
Size
Send
Size
Auto
Image
Orientation
X17
Y11
Содержание MX-2300N Guide
Страница 1: ...User s Guide MX 2300N MX 2700N MODEL ...
Страница 67: ...System Settings Guide MX 2300N MX 2700N MODEL ...
Страница 192: ...Copier Guide MX 2300N MX 2700N MODEL ...
Страница 361: ...Printer Guide MX 2300N MX 2700N MODEL ...
Страница 376: ...15 2 Select 2 sided printing 1 Select 2 Sided Book or 2 Sided Tablet 2 Click the OK button 3 Start printing 2 1 ...
Страница 421: ...Scanner Guide MX 2300N MX 2700N MODEL ...
Страница 552: ...Facsimile Guide MX FXX1 MODEL ...
Страница 741: ...Document Filing Guide MX 2300N MX 2700N MODEL ...