


76
4
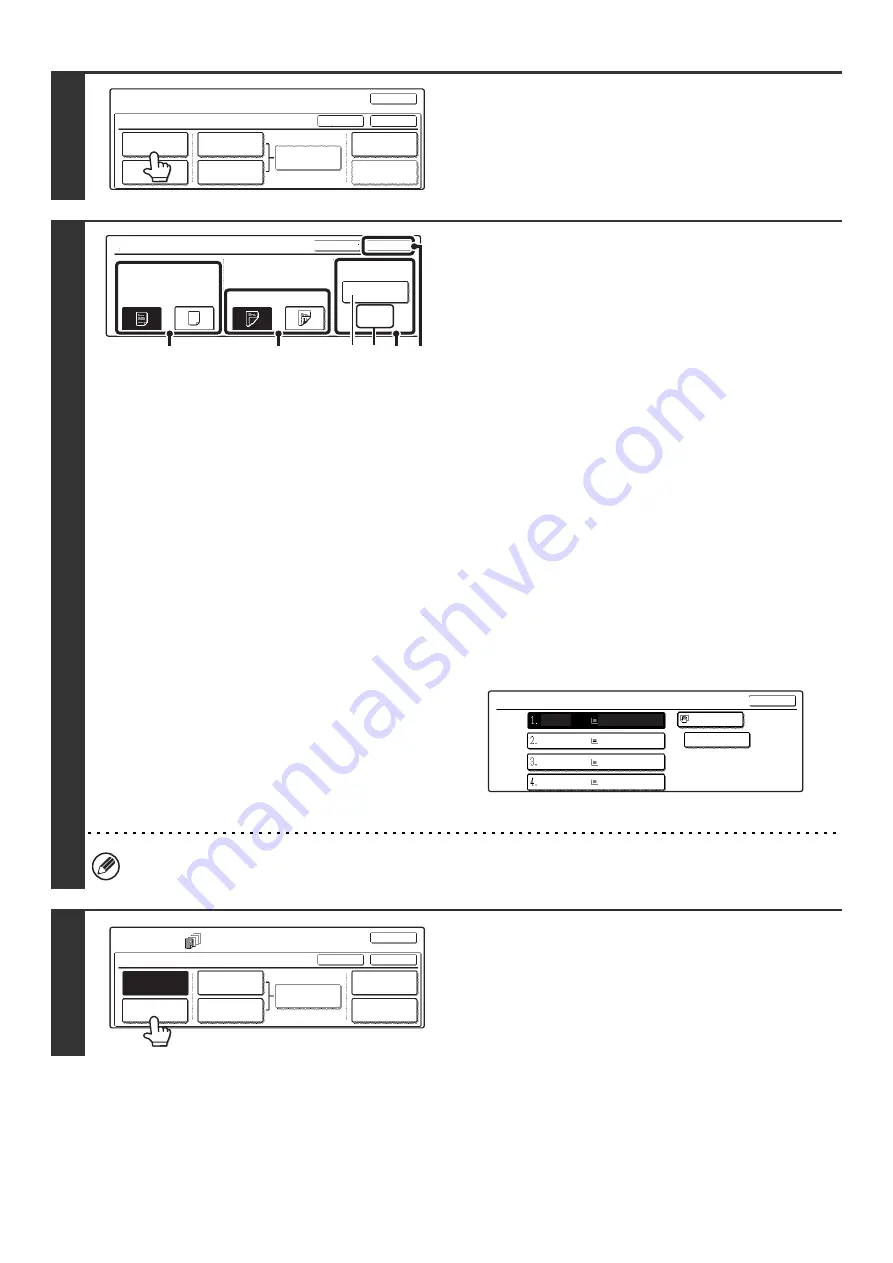
Touch the [Front Cover] key.
5
Select front cover settings.
In the example screen, 8-1/2" x 11" (A4) size plain paper in the
bypass tray is selected.
(1) If you wish to copy on the front cover, touch
the [Yes] key.
(2) If you touched [Yes] in (1), touch the
[1-Sided] key if copying will be 1-sided or
the [2-Sided] key if copying will be 2-sided.
(3) To change the paper tray used for the front
cover, touch the tray select key.
(A) The currently selected paper tray for the cover is
displayed.
(B) The size and type of paper in the currently selected
tray is displayed.
In the example screen, 8-1/2" x 11" (A4) size plain paper
is loaded in the bypass tray.
To change the paper tray for the cover, touch the tray
selection key. (In the screen example, the "Bypass Tray"
display is the tray selection key.)
The tray selection screen appears when the tray selection
key is touched. Select the paper tray for the cover in the
tray selection screen and touch the [OK] key.
(4) Touch the [OK] key.
If both sides of the cover will be copied on, label sheets, transparency film, and tab paper cannot be used.
6
If you wish to insert a back cover, touch
the [Back Cover] key.
The screen of step 5 appears. The procedures are the same as
for the front cover. Follow the procedures in step 5.
When following the procedures, substitute "Back Cover" for
"Front Cover".
Special Modes
Covers/Inserts
OK
OK
Cancel
Front Cover
Back Cover
Insertion
Type A Setting
Insertion
Type B Setting
Insertion
Settings
Page Layout
Paper Tray
Settings
Front Cover Setting
OK
Cancel
Paper Tray
8 x11
Plain
1
/
2
Bypass
Tray
No
Yes
2-Sided
1-Sided
Print on Front Cover
(1)
(2)
(3) (4)
(A) (B)
Front Cover
OK
Plain
Plain
Plain
Plain
Plain
8 x11
1
/
2
8 x11
1
/
2
8 x11R
1
/
2
8 x14
1
/
2
11x17
Special Modes
Covers/Inserts
OK
OK
Cancel
Front Cover
Back Cover
Insertion
Settings
Insertion
Type A Setting
Insertion
Type B Setting
Page Layout
Paper Tray
Settings
Содержание MX-2300N Guide
Страница 1: ...User s Guide MX 2300N MX 2700N MODEL ...
Страница 67: ...System Settings Guide MX 2300N MX 2700N MODEL ...
Страница 192: ...Copier Guide MX 2300N MX 2700N MODEL ...
Страница 361: ...Printer Guide MX 2300N MX 2700N MODEL ...
Страница 376: ...15 2 Select 2 sided printing 1 Select 2 Sided Book or 2 Sided Tablet 2 Click the OK button 3 Start printing 2 1 ...
Страница 421: ...Scanner Guide MX 2300N MX 2700N MODEL ...
Страница 552: ...Facsimile Guide MX FXX1 MODEL ...
Страница 741: ...Document Filing Guide MX 2300N MX 2700N MODEL ...