


Chapter 17
17-48
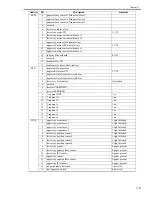
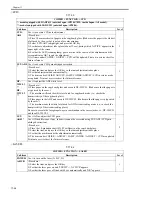
<CCD>
T-17-33
<LASER>
T-17-34
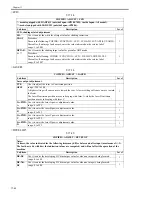
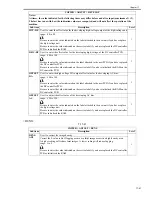
COPIER > FUNCTION > CCD
*: model equipped with DADF-Q1 (outside Japan: iR7105/7095; inside Japan: All model).
**: model equipped with DADF-M1 (outside Japan: iR7086).
Sub item
Description
Level
CCD-
ADJ
Use it to execute CCD auto adjustment.
1
<Procedure>
1) Place 10 or more sheets of paper on the copyboard glass. (Make sure the paper is the whitest
of all used by the user but is not one for color printing).
2) Select 'CCD-ADJ' to highlight, and press the OK key.
3) See that auto adjustment takes place (about 15 sec), during which 'ACTIVE' appears in the
upper right of the screen.
4) See that the LED (scanning lamp) goes on twice in the course of the adjustment and the
screen indicates 'OK!' to end the adjustment.
5) All items under COPIER > ADJUST > CCD will be updated. Print out a service sheet for
future reference.
LUT-ADJ
*
Use it to execute CCD gain abridged correction.
1
<Procedure>
1) Select the item, and press the OK key so that auto adjustment takes place.
2) See that adjustment ends automatically.
3) The items under COPIER>ADJUST>LAMP, COPIER>ADJUST>CCD in service mode
are updated. Print out a service sheet for future reference.
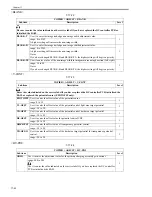
DF-
WLVL1
**
DF-
WLVL2
**
Use it to adjust the ADF white level.
1
<Procedure>
1) Place paper on the copyboard glass, and execute DF-WLVL1. (Make sure that the paper is
a type used by the user.)
-> The machine will read the white level used for copyboard mode (i.e., checks the
transmissivity of the copyboard glass).
2) Place paper in the ADF, and execute DF-WLVL2. (Make sure that the paper is a type used
by the user.)
-> The machine reads the white level used for ADF stream reading mode (i.e., to check the
transmissivity of the stream reading glass).
Be sure to execute the foregoing always in combination in the correct order, i.e., DF-WLVL1
and then DF-WLVL2.
LUT-
ADJ2 *
Use it to fine-adjust the CCD gain.
2
Use it if the difference, if any, in density cannot be corrected using LUT-ADJ (CCD gain
abridged correction).
<Procedure>
1) Place the 10-gradation chart (D-10 Test Sheet) on the copyboard glass.
2) Select the item, and press the OK key so that auto adjustment takes place.
3) See that the machine ends the adjustment automatically.
4) The items under COPIER > ADJUST > LAMP, COPIER > ADJUST > CCD are updated.
Print out a service sheet for future reference.
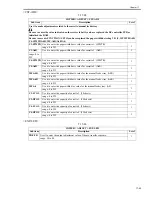
COPIER > FUNCTION > LASER
Sub item
Description
Level
POWER-
A/B/C/D
Use it to turn on the laser (A, B, C, D).
1
<Procedure>
1) Select the item, and press the OK key.
2) See that the laser goes on, and 'STRWT' -> 'ACTIVE' appears.
3) See that the laser goes off in about 60 sec automatically and 'OK!' appears.
Содержание IMAGERUNNER 7095 PRINTER
Страница 20: ...Chapter 1 Introduction...
Страница 46: ...Chapter 2 Installation...
Страница 88: ...Chapter 3 Basic Operation...
Страница 94: ...Chapter 4 Main Controller...
Страница 116: ...Chapter 5 Original Exposure System...
Страница 165: ...Laser Exposure Chapter 6...
Страница 175: ...Chapter 7 Image Formation...
Страница 180: ...Chapter 7 7 3 7 3 Basic Sequence 7 3 1 Basic Sequence 0010 8038 F 7 3 ON ON WMUPR WMUP STBY OFF 100msec...
Страница 231: ...Chapter 8 Pickup Feeding System...
Страница 287: ...Chapter 9 Fixing System...
Страница 312: ...Chapter 10 External and Controls...
Страница 346: ...Chapter 11 MEAP...
Страница 350: ...Chapter 12 RDS...
Страница 360: ...Chapter 13 Maintenance Inspection...
Страница 375: ...Chapter 14 Standards Adjustments...
Страница 407: ...Chapter 15 Correcting Faulty Images...
Страница 433: ...Chapter 16 Self Diagnosis...
Страница 460: ...Chapter 17 Service Mode...
Страница 559: ...Chapter 18 Upgrading...
Страница 583: ...Chapter 19 Service Tools...
Страница 584: ...Contents Contents 19 1 Service Tools 19 1 19 1 1 Special Tools Table 19 1 19 1 2 Solvents Oils 19 2...
Страница 588: ...APPENDIX...
Страница 615: ......


