


Chapter 7
7-52
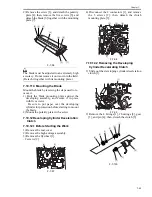
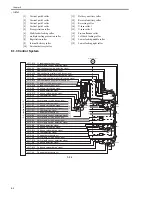
7.10.19.4 Stringing the Charging Wire
0010-8939
As a rule, the charging wire (except the grid wire)
may be strung in the same way for all charging as-
semblies. The following uses the primary charg-
ing assembly as an example:
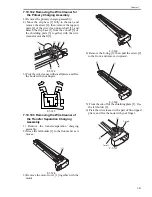
1) Remove the 2 screws [1], and detach the
shielding plate (left, right) [2] of the charging
assembly.
To prevent deformation (slack) of the primary
charging assembly, be sure to work on the left
and right shielding plates separately. (Do not
loosen the screw for the left/right shielding
plate.)
2) Remove the wire cleaner.
F-7-132
For other charging assemblies, remove the lid (2
pc.)
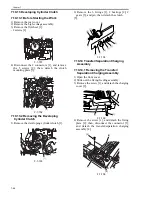
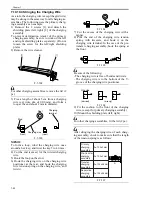
3) Free a length of about 5 cm from a charging
wire reel (wire dia. of 0.06 mm), and form a
loop at the end about 2 mm in diameter.
F-7-133
MEMO:
To form a loop, wind the charging wire once
around a hex key, and twist the key 3 to 4 times.
4) Cut the end (excess) for the twisted charging
wire.
5) Hook the loop on the stud.
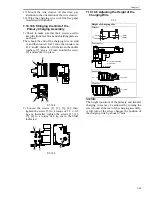
6) Hook the charging wire on the charging wire
positioner at the rear, and hook the charging
wire tension spring on the charging wire, and
twist it.
F-7-134
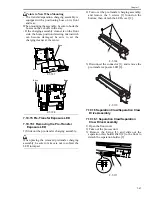
7) Cut the excess of the charging wire with a
nipper.
8) Pick the end of the charging wire tension
spring with tweezers, and hook it on the
charging wire terminal. In the case of the pre-
transfer charging assembly, hook the spring at
the front.
F-7-135
Be sure of the following:
- The charging wire is free of bends and twists.
- The charging wire is in the bottom of the V-
groove of the charging wire positioner.
F-7-136
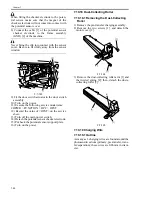
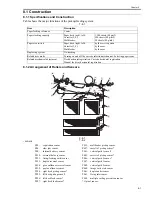
9) Fit the cushion to the front of the charging
wire. (except for primary charging assembly)
10) Mount the shielding plate (left, right).
For other charging assemblies, fit the lid (2 pc.).
After stringing the charging wire of each charg-
ing assembly, check to make sure that the length
of the tension spring is as follows:
F-7-137
[2]
[1]
[1]
Stud
Reel
Charging wire
Charging
terminal
(front)
(rear)
Grid side
(correct)
(wrong)
A
Primary
charging
assembly
Pre-transfer
charging
assembly
Transfer
charging
assembly
Separation
charging
assembly
A=12.0±1mm
A=12.0±1mm
A=12.0±0.5mm
A=12.0±0.5mm
Содержание IMAGERUNNER 7095 PRINTER
Страница 20: ...Chapter 1 Introduction...
Страница 46: ...Chapter 2 Installation...
Страница 88: ...Chapter 3 Basic Operation...
Страница 94: ...Chapter 4 Main Controller...
Страница 116: ...Chapter 5 Original Exposure System...
Страница 165: ...Laser Exposure Chapter 6...
Страница 175: ...Chapter 7 Image Formation...
Страница 180: ...Chapter 7 7 3 7 3 Basic Sequence 7 3 1 Basic Sequence 0010 8038 F 7 3 ON ON WMUPR WMUP STBY OFF 100msec...
Страница 231: ...Chapter 8 Pickup Feeding System...
Страница 287: ...Chapter 9 Fixing System...
Страница 312: ...Chapter 10 External and Controls...
Страница 346: ...Chapter 11 MEAP...
Страница 350: ...Chapter 12 RDS...
Страница 360: ...Chapter 13 Maintenance Inspection...
Страница 375: ...Chapter 14 Standards Adjustments...
Страница 407: ...Chapter 15 Correcting Faulty Images...
Страница 433: ...Chapter 16 Self Diagnosis...
Страница 460: ...Chapter 17 Service Mode...
Страница 559: ...Chapter 18 Upgrading...
Страница 583: ...Chapter 19 Service Tools...
Страница 584: ...Contents Contents 19 1 Service Tools 19 1 19 1 1 Special Tools Table 19 1 19 1 2 Solvents Oils 19 2...
Страница 588: ...APPENDIX...
Страница 615: ......


