


Chapter 14
14-11
14.2 Image Adjustments
14.2.1 Standards of Image Position
0010-9306
The image margin/non-image width of a print
made in direct must be as follows:
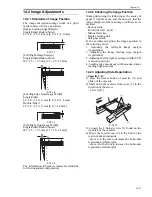
[Image Leading Edge Margin]
Single-Sided/Double-Sided
Lf= 4.0 +1.5/-1.0 mm [4.0 +1.5/-1.0 mm]
F-14-11
[Left/Right Image Margin]
Single-Sided/Double-Sided
Wl= 2.5 +/-1.5 mm [2.5 +1.5/-1.0 mm]
F-14-12
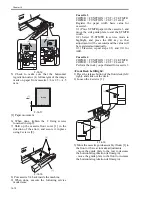
[Leading Edge Non-Image Width]
Single-Sided
Lf= 4.0 +1.5/-1.0 mm [4.0 +1.8/-1.4 mm]
Double-Sided
Lf= 4.0 +1.5/-1.0 mm [4.0 +/-1.8 mm]
F-14-13
[Left/Right Non-Image Width]
Single-Sided/Double-Sided
Wl= 2.5 +/-1.5 mm [2.5 +1.5/-1.8 mm]
F-14-14
The information in brackets represents standards
for the integrated configuration.
14.2.2 Checking the Image Position
0010-9307
Make prints using the following as the source of
paper (10 prints each), and check to see that the
image margin and the non-image width are as in-
dicated:
- Each cassette
- Front deck (left, right)
- Manual feed tray
- Duplex feeding unit
- Side paper deck
If not as indicated, adjust the image position in
the following order:
1. Adjusting the left/right image margin
(registration)
2. Adjusting the image leading edge margin
(registration)
3. Adjusting the left/right non-image width (CCD
read start position)
4. Leading edge non-image width (scanner image
leading edge position)
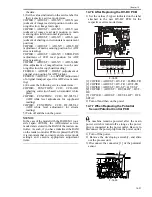
14.2.3 Adjusting Side Registration
0010-9310
<Cassette 3/4>
1) Press the release button of cassette 3/4, and
slide out the cassette.
2) Shift down the cassette front cover [1] in the
direction of the arrow.
- 2 screws [2]
F-14-15
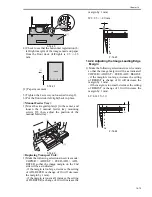
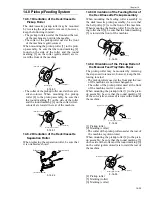
3) Loosen the 2 fixing screws [1] found on the
right/left of the cassette.
4) Move the cassette case [2] to the front or the
rear to make adjustments.
- move it to the rear to decrease the horizontal
registration (left margin).
- move it to the front to increase the horizontal
registration (left margin).
Lf
0
2
4
6
8
10
Wl
Lf
0
2
4
6
8
10
Wl
[1]
[2]
Содержание IMAGERUNNER 7095 PRINTER
Страница 20: ...Chapter 1 Introduction...
Страница 46: ...Chapter 2 Installation...
Страница 88: ...Chapter 3 Basic Operation...
Страница 94: ...Chapter 4 Main Controller...
Страница 116: ...Chapter 5 Original Exposure System...
Страница 165: ...Laser Exposure Chapter 6...
Страница 175: ...Chapter 7 Image Formation...
Страница 180: ...Chapter 7 7 3 7 3 Basic Sequence 7 3 1 Basic Sequence 0010 8038 F 7 3 ON ON WMUPR WMUP STBY OFF 100msec...
Страница 231: ...Chapter 8 Pickup Feeding System...
Страница 287: ...Chapter 9 Fixing System...
Страница 312: ...Chapter 10 External and Controls...
Страница 346: ...Chapter 11 MEAP...
Страница 350: ...Chapter 12 RDS...
Страница 360: ...Chapter 13 Maintenance Inspection...
Страница 375: ...Chapter 14 Standards Adjustments...
Страница 407: ...Chapter 15 Correcting Faulty Images...
Страница 433: ...Chapter 16 Self Diagnosis...
Страница 460: ...Chapter 17 Service Mode...
Страница 559: ...Chapter 18 Upgrading...
Страница 583: ...Chapter 19 Service Tools...
Страница 584: ...Contents Contents 19 1 Service Tools 19 1 19 1 1 Special Tools Table 19 1 19 1 2 Solvents Oils 19 2...
Страница 588: ...APPENDIX...
Страница 615: ......


