


Chapter 7
7-49
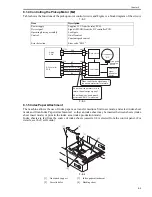
7.10.17.2 Removing the Potential Control
PCB
0011-7609
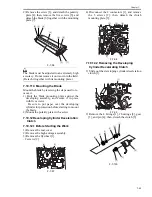
1) Remove the primary charging assembly cover.
2) Remove the process unit cover.
3) Remove the double-feed detection PCB
(receiving) if found.
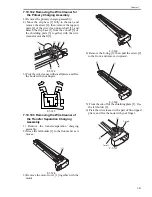
4) Remove the 2 screws [1], and disconnect the 2
connectors [2]; then, detach the pre-transfer
charging assembly fan [3].
F-7-117
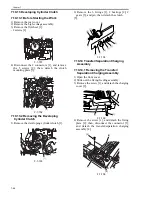
5) Disconnect the 3 connectors [1], and remove
the screw [2]; then, detach the potential control
PCB [3].
F-7-118
7.10.17.3 When Replacing the Potential
Sensor/Potential Control PCB
0011-8746
The machine remains powered after the main
power switch is turned off as long as the power
plug is connected to the power outlet. Be sure to
disconnect the power plug from the power outlet.
1) Turn off the power.
2) Remove the developing assembly, and slide
out the process unit.
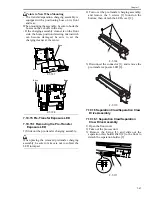
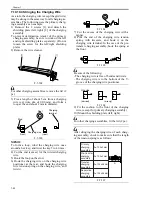
3) Disconnect the connector [1] of the potential
sensor.
F-7-119
4) Remove the 2 screws [1], and detach the
potential sensor support plate [2].
F-7-120
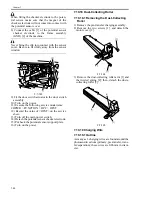
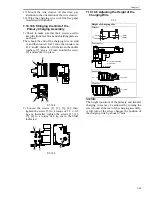
5) Put back the developing assembly and the
process unit.
6) Connect the connector [1] of the potential
sensor.
F-7-121
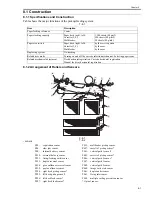
7) Fit the potential checker electrode (FY9-3041)
[2] to the potential sensor [1].
F-7-122
[1]
[3]
[2]
[3]
[2]
[1]
[1]
[1]
[2]
[1]
[1]
[1]
[2]
Содержание IMAGERUNNER 7095 PRINTER
Страница 20: ...Chapter 1 Introduction...
Страница 46: ...Chapter 2 Installation...
Страница 88: ...Chapter 3 Basic Operation...
Страница 94: ...Chapter 4 Main Controller...
Страница 116: ...Chapter 5 Original Exposure System...
Страница 165: ...Laser Exposure Chapter 6...
Страница 175: ...Chapter 7 Image Formation...
Страница 180: ...Chapter 7 7 3 7 3 Basic Sequence 7 3 1 Basic Sequence 0010 8038 F 7 3 ON ON WMUPR WMUP STBY OFF 100msec...
Страница 231: ...Chapter 8 Pickup Feeding System...
Страница 287: ...Chapter 9 Fixing System...
Страница 312: ...Chapter 10 External and Controls...
Страница 346: ...Chapter 11 MEAP...
Страница 350: ...Chapter 12 RDS...
Страница 360: ...Chapter 13 Maintenance Inspection...
Страница 375: ...Chapter 14 Standards Adjustments...
Страница 407: ...Chapter 15 Correcting Faulty Images...
Страница 433: ...Chapter 16 Self Diagnosis...
Страница 460: ...Chapter 17 Service Mode...
Страница 559: ...Chapter 18 Upgrading...
Страница 583: ...Chapter 19 Service Tools...
Страница 584: ...Contents Contents 19 1 Service Tools 19 1 19 1 1 Special Tools Table 19 1 19 1 2 Solvents Oils 19 2...
Страница 588: ...APPENDIX...
Страница 615: ......


