


Chapter 9
9-13
6) Open the fixing/delivery assembly, and
remove the screw [1]; then, holding the front
[3] and the rear [4] of the fixing assembly [2],
detach the fixing assembly from the main body.
F-9-18
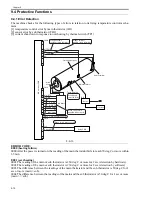
9.5.2 Upper Fixing Roller
9.5.2.1 Removing the Fixing Upper Roller
0010-9389
1) Remove the fixing assembly.
2) Remove the fixing web, and clean the oil pan.
3) Remove the 2 fixing heaters.
4) Remove the screw [1], and detach the pressure
support plate [2] at the front.
F-9-19
5) Remove the screw, and detach the pressure
support plate [2] at the rear.
F-9-20
6) Open the fixing upper unit [1].
F-9-21
When opened, the fixing upper unit becomes un-
stable. Be sure to use a screwdriver as shown to
support it.
7) Remove the stopper [1] from the front and the
rear.
F-9-22
F-9-23
[1]
[2]
[3]
[4]
[2]
[1]
[1]
[2]
[1]
[1]
[1]
Содержание IMAGERUNNER 7095 PRINTER
Страница 20: ...Chapter 1 Introduction...
Страница 46: ...Chapter 2 Installation...
Страница 88: ...Chapter 3 Basic Operation...
Страница 94: ...Chapter 4 Main Controller...
Страница 116: ...Chapter 5 Original Exposure System...
Страница 165: ...Laser Exposure Chapter 6...
Страница 175: ...Chapter 7 Image Formation...
Страница 180: ...Chapter 7 7 3 7 3 Basic Sequence 7 3 1 Basic Sequence 0010 8038 F 7 3 ON ON WMUPR WMUP STBY OFF 100msec...
Страница 231: ...Chapter 8 Pickup Feeding System...
Страница 287: ...Chapter 9 Fixing System...
Страница 312: ...Chapter 10 External and Controls...
Страница 346: ...Chapter 11 MEAP...
Страница 350: ...Chapter 12 RDS...
Страница 360: ...Chapter 13 Maintenance Inspection...
Страница 375: ...Chapter 14 Standards Adjustments...
Страница 407: ...Chapter 15 Correcting Faulty Images...
Страница 433: ...Chapter 16 Self Diagnosis...
Страница 460: ...Chapter 17 Service Mode...
Страница 559: ...Chapter 18 Upgrading...
Страница 583: ...Chapter 19 Service Tools...
Страница 584: ...Contents Contents 19 1 Service Tools 19 1 19 1 1 Special Tools Table 19 1 19 1 2 Solvents Oils 19 2...
Страница 588: ...APPENDIX...
Страница 615: ......