Chapter 3, Getting Started with Xgig TraceControl
PCIe Tuning Wizard
58
Xgig Analyzer User’s Guide
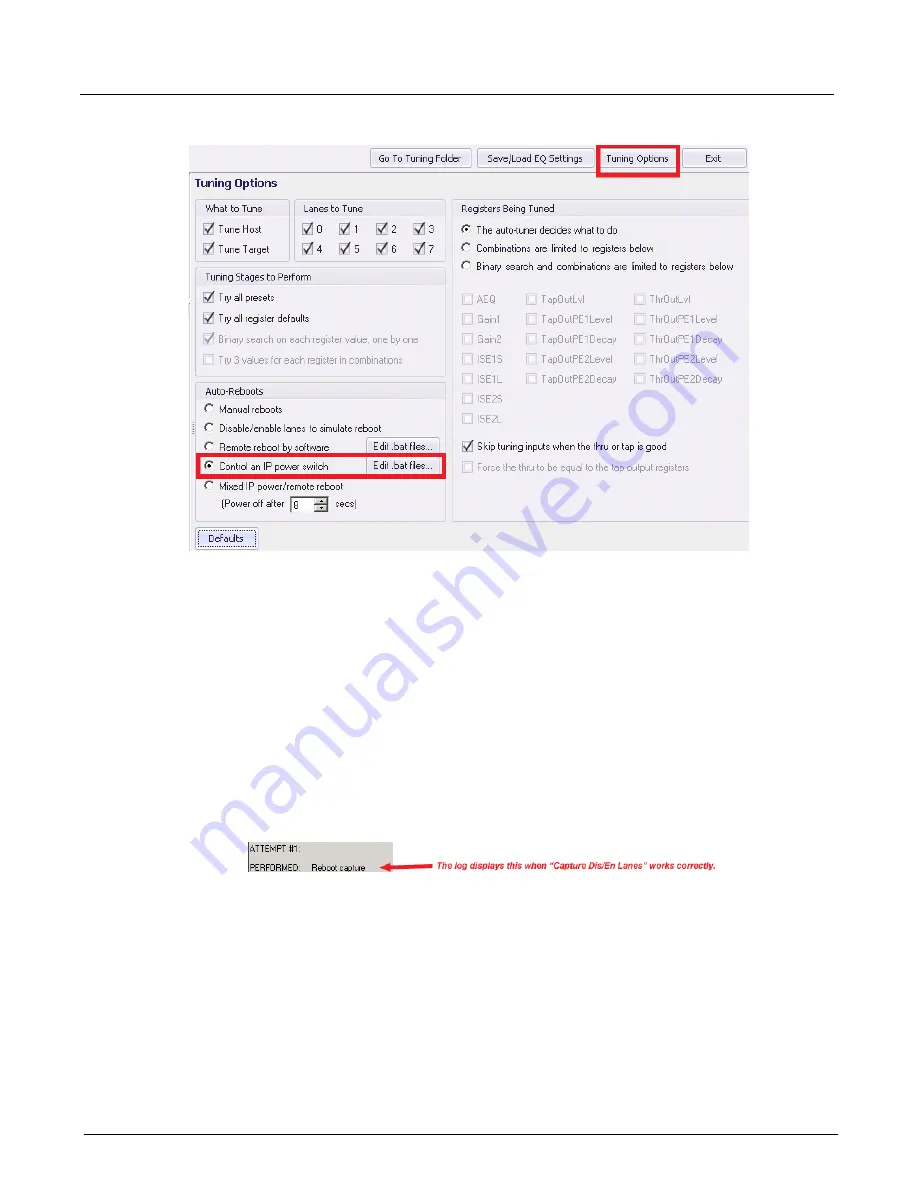
Figure 28: Auto-Reboot Options Window
There are 4 options to automatically reboot a system:
Disable/enable lanes to simulate reboot
- Instead of rebooting the DUT, this option
switches off/on all the interposer lanes for one second. Some host computers detect the
inadvertent Electrical Idle state and they re-initiate the full LTSSM state machine from the
Gen1 Configuration phase through the Gen3 Recovery.Equalization phase, which is what is
needed for tuning. This option is only useful for host computers capable of doing it, when L0s/
L1 power management is disabled and when the target drive is not the primary partition. You
can test if a host supports this by hitting the
Capture Dis/En Lanes
button on the wizard main
panel. If TraceControl triggers within a few seconds and goes to “PostFilling” in the State
column” (look at TraceControl’s main window for this), you can hit the
Stop Capture
button.
It is successful! The log will show “PERFORMED: Reboot capture” upon success. Redo this
test three times in a row to confirm that it works. From there you can select this Auto-Reboot
option in the “Tuning Options” panel and then hit the
Start Auto Tuning
button.
Remote reboot by software
- This option consists of sending a command over the LAN to
reboot the DUT. The wizard calls the batch file RemoteReboot.bat to do this. The file is
accessible by clicking the
Edit .bat files…
button. By default, that batch file calls
RebootWin.bat, capable of rebooting any Microsoft Windows DUT, given that you provide the
IP address, login information and you carefully follow all the steps described at the top of
RebootWin.bat to enable this feature on the DUT. This option will not work if the target drive
is the primary partition as the tuning process will transition into states that will prevent the
DUT from booting, and the DUT will not be able to act upon the remote reboot requests. Once
you finished editing the RemoteReboot.bat/RemoteWin.bat files, double-click on them three
times in a row to make sure they work. Once this works, you can select this Auto-Reboot
option in the “Tuning Options” panel and then hit the
Start Auto Tuning
button.
Summary of Contents for Xgig
Page 1: ...Xgig Analyzer Version 7 3 User s Guide ...
Page 2: ......
Page 3: ...Viavi Solutions 1 844 GO VIAVI www viavisolutions com Xgig Analyzer Version 7 3 User s Guide ...
Page 6: ...Xgig Analyzer User s Guide Page iv Version 7 3 December 2015 ...
Page 7: ...v CONTENTS ...
Page 15: ...1 PART ONE Using Xgig Analyzer ...
Page 16: ...PART ONE Using Xgig Analyzer 2 Xgig Analyzer User s Guide ...
Page 27: ...13 PART TWO Using Xgig TraceControl ...
Page 28: ...PART TWO Using Xgig TraceControl 14 Xgig Analyzer User s Guide ...
Page 29: ...15 Chapter 2 About Xgig TraceControl In this chapter Introduction to TraceControl ...
Page 176: ...Chapter 6 Xgig TraceControl Hints and Tips Keyboard Shortcuts 162 Xgig Analyzer User s Guide ...
Page 177: ...163 PART THREE Using Xgig Performance Monitor ...
Page 178: ...PART THREE Using Xgig Performance Monitor 164 Xgig Analyzer User s Guide ...
Page 223: ...209 PART FOUR Using Xgig TraceView ...
Page 224: ...PART FOUR Using Xgig TraceView 210 Xgig Analyzer User s Guide ...
Page 225: ...211 Chapter 11 About Xgig TraceView In this chapter Introducing Xgig TraceView ...
Page 382: ...Chapter 15 Xgig TraceView Histograms Histogram Controls 368 Xgig Analyzer User s Guide ...
Page 383: ...369 Chapter 16 Xgig TraceView Template Editor In this chapter Using Template Editor ...
Page 437: ...423 PART FIVE Using Xgig Expert ...
Page 438: ...PART FIVE Using Xgig Expert 424 Xgig Analyzer User s Guide ...
Page 442: ...Chapter 21 Xgig Expert 428 Xgig Analyzer User s Guide Figure 194 Xgig Expert Graph View ...
Page 443: ...429 PART SIX Appendices ...
Page 444: ...PART SIX Appendices 430 Xgig Analyzer User s Guide ...
Page 454: ...Appendix C Protocol Display Color Coding 440 Xgig Analyzer User s Guide ...
Page 461: ...447 INDEX ...
Page 467: ......


