8. Manual Updates
8-4
8.4
Using Manual Update Editor w/Orange Symbols
.
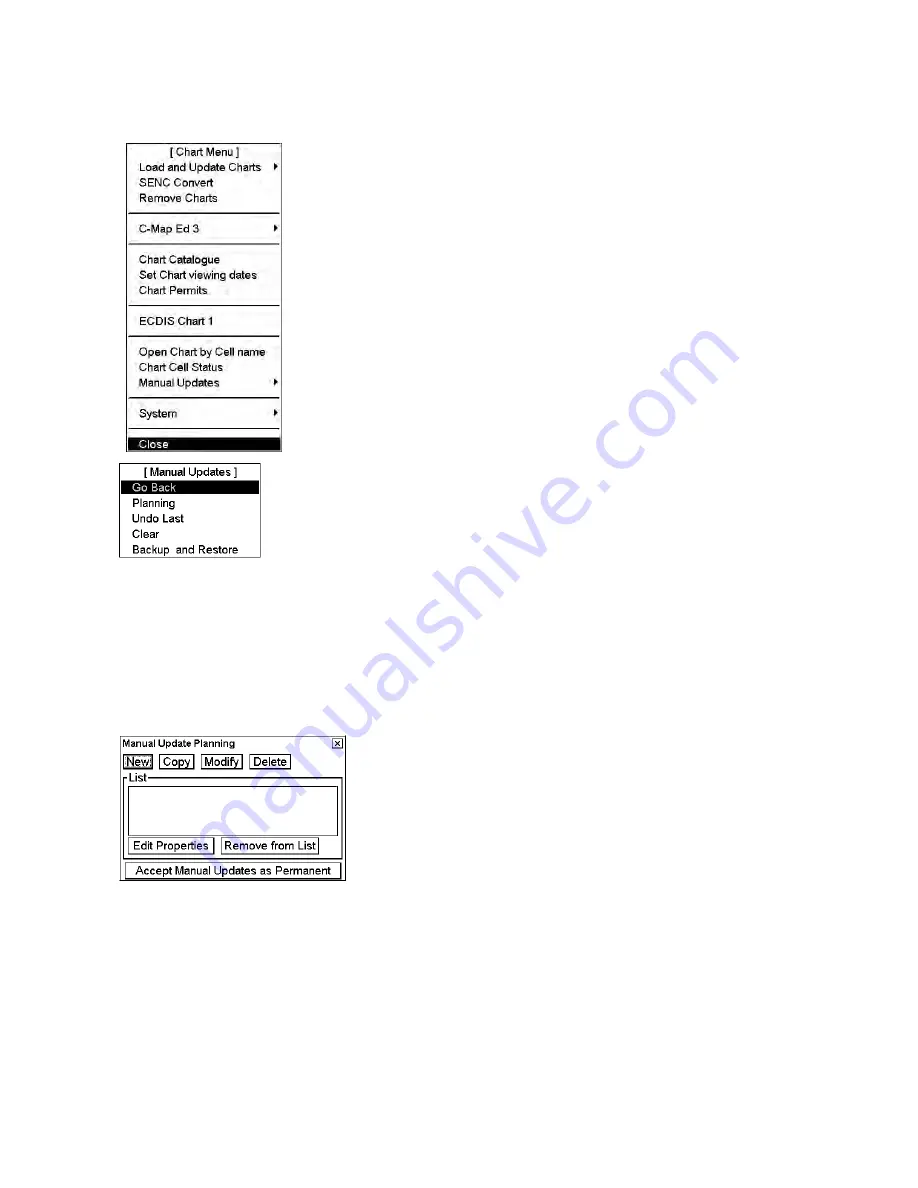
The manual update editor has the choices shown below and you can choose one
by choosing Manual Updates from the Chart menu.
•
Planning:
Operate with new manual updates.
•
Undo Last:
Remove last accepted manual update planning session. By
repeating Undo Last you can remove any amount of old manual update
planning sessions.
•
Clear:
Remove all manual updates in a single operation.
•
Backup and Restore:
Make a backup or recall already recorded backup.
8.4.1
Manual update planning
The manual update editor operates in sessions. You create a session when you activate the Manual Update Planning
dialog box, displayed by choosing Manual Update from the Chart menu followed by Planning from the sub menu.
You can freely delete, modify, copy or create chart objects until you feel finished with your session. Then, you
terminate your session by clicking the
Accept Manual Updates as Permanent
button then the chart radar stores
your manual updates permanently. If you need to leave your manual update session and discard all modifications
made during the current session, click X in upper right corner.
Note:
The manual update editor is only available in the North Up or Course Up orientation mode.
New
,
Copy
,
Modify
,
Delete:
These buttons are used to collect chart objects into a list shown in the Manual Update
Planning dialog box for further editing during current session of manual update planning.
New
creates an object
from scratch.
Copy
creates an object using an existing object as an example.
Modify
changes an existing object.
Delete
removes an existing object.
Remove from List:
If you made a manual update by mistake, you can remove it if you haven't accepted it yet as
permanent. You can remove it by choosing (highlighting) that chart object in the List then clicking the
Remove
from List
button.
Edit Properties:
You can edit properties of a chosen (highlighted) chart object by using the
Edit Properties
button.
Summary of Contents for FCR-2107 series
Page 42: ...1 Operational Overview 1 20 This page intentionally left blank...
Page 154: ...5 AIS Operation 5 28 This page intentionally left blank...
Page 255: ...7 Vector Chart Material 7 83 Recommended track defined by two beacons...
Page 256: ...7 Vector Chart Material 7 84 Recommended track defined by a building and a beacon...
Page 257: ...7 Vector Chart Material 7 85 Measurement mile tails tails...
Page 298: ...9 Chart Alerts 9 14 This page intentionally left blank...
Page 322: ...10 Route Planning 10 24 This page intentionally left blank...
Page 368: ...14 Backup Operations 14 6 This page intentionally left blank...
Page 404: ...16 Recording Functions 16 16 This page intentionally left blank...
Page 406: ...17 NAVTEX Messages 17 2 This page intentionally left blank...
Page 416: ...19 Parameters Setup 19 8 This page intentionally left blank...
Page 457: ...Appendix 2 IHO ECDIS Chart 1 AP 5 Nature and Man made features Port features...
Page 458: ...Appendix 2 IHO ECDIS Chart 1 AP 6 Depths Currents etc Seabed Obstructions Pipelines etc...
Page 459: ...Appendix 2 IHO ECDIS Chart 1 AP 7 Traffic routes Special areas...
Page 460: ...Appendix 2 IHO ECDIS Chart 1 AP 8 Aids and Services Buoys and Beacons...
Page 461: ...Appendix 2 IHO ECDIS Chart 1 AP 9 Topmarks Color test diagram...
Page 462: ...Appendix 2 IHO ECDIS Chart 1 AP 10 Mariners navigational symbols...
Page 469: ...Appendix 3 Interpreting S57 Charts AP 17 Fog signals Radars Services...
Page 476: ...Appendix 3 Interpreting S57 Charts AP 24 This page intentionally left blank...
Page 511: ...Appendix 5 Digital Interface AP 59 NRX NAVTEX received data...
Page 544: ...Appendix 6 Parts List and Parts Location AP 92 This page intentionally left blank...
Page 550: ...This page is intentionally left blank...
Page 556: ......


