COPYRIGHT © 2001 CANON INC. CANON CLC1000/1000S/3100 REV.2 MAY 2001 PRINTED IN JAPAN (IMPRIME AU JAPON)
vii
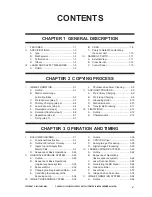
CHAPTER 5 INSTALLATION
I.
SELECTING THE SITE ........................... 5-1
II.
INSTALLATION ........................................ 5-3
A.
Unpacking ......................................... 5-3
B.
Removing the Fixings, Supplying
Fixing Oil, and Changing the
Voltage Rating (240V North
American Model) .............................. 5-5
C.
Supplying Toner ................................ 5-7
D.
Supplying Starter ............................ 5-15
E.
Preventing Deformation of
Externals ......................................... 5-19
F.
Mounting the Belt Retaining Members
........................................................ 5-20
G.
Mounting the Developing Bias
Assembly Protection Member ......... 5-21
H-1. Installing the Paper Deck for
CLC1000 ........................................ 5-24
H-2. Installing the Paper Deck-H1 .......... 5-31
H-3. Checking the Operation of the
Paper Deck ..................................... 5-33
I.
Checking Images and Operations .. 5-35
III.
RELOCATING THE MACHINE .............. 5-36
IV.
INSTALLING THE ORIGINAL TRAY ...... 5-38
V.
INSTALLING THE CONTROL
CARD V ................................................. 5-39
CHAPTER 6 MAINTENANCE AND SERVICING
I.
PERIODICALLY REPLACED PARTS ...... 6-2
II.
CONSUMABLES AND DURABLES ........ 6-5
A.
By the Copier’s Hard Counter ........... 6-5
B.
By the Soft Counter in Service
Mode (COUNTER) ............................ 6-7
III.
SCHEDULED SERVICING
PROCEDURE .......................................... 6-8
IV.
SCHEDULED MAINTENANCE CHART .. 6-9
CHAPTER 7 TROUBLESHOOTING IMAGE FAULTS/MALFUNCTIONS
GUIDE TO TABLES ......................................... 7-1
I.
MAINTENANCE AND SERVICING ......... 7-3
A. Image Adjustment Basic Procedure .... 7-3
B. Scheduled Servicing ............................ 7-5
II.
STANDARDS AND ADJUSTMENTS ....... 7-7
A.
Image-Related Parts ......................... 7-7
B.
Original Illuminating System ........... 7-13
C.
Photosensitive Drum-Related Parts 7-16
D.
Charging Assembly-Related Parts . 7-18
E.
Developing Assembly-Related
Parts ............................................... 7-19
F.
Transfer Belt Unit ............................ 7-23
G. When Replacing the Pick-Up/
Feeding-Related Parts .................... 7-25
H.
Laser Exposure System ................. 7-36
I.
Fixing Assembly-Related Parts ...... 7-41
J.
Electrical ADJUSTMENT ................ 7-42
III.
TROUBLESHOOTING IMAGE
PROBLEMS ........................................... 7-52
A.
Initial Checks .................................. 7-52
B.
Standard Image .............................. 7-53
C.
Test Prints ....................................... 7-56
D.
Troubleshooting Image Faults ......... 7-65
IV.
TROUBLESHOOTING ........................... 7-88
A.
Troubleshooting Malfunctions ......... 7-88
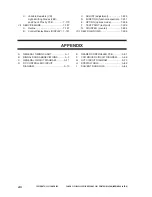
V.
TROUBLESHOOTING FEEDING
PROBLEMS ......................................... 7-140
A.
Jams ............................................. 7-140
B.
Feeding Faults .............................. 7-148
VI.
ARRANGEMENT AND FUNCTION
OF ELECTRICAL PARTS .................... 7-149
A.
Sensors ........................................ 7-150
B.
Lamps, Switches, Thermistors,
and Heaters .................................. 7-156
C.
Clutches ........................................ 7-160
D.
Solenoids ...................................... 7-162
E.
Fans .............................................. 7-164
F.
Motors ........................................... 7-166
G.
PCBs ............................................ 7-168
Summary of Contents for Vizcam 1000
Page 12: ......
Page 30: ......
Page 44: ......
Page 86: ......
Page 254: ......
Page 372: ......
Page 374: ......
Page 418: ......
Page 438: ......
Page 442: ......
Page 754: ......
Page 764: ......
Page 766: ......
Page 840: ...0501GR PRINTED IN JAPAN IMPRIME AU JAPON This publication is printed on 100 reprocessed paper...

