


SIMATIC manager and hardware configuration
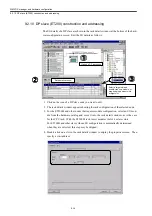
9.2.10 DP slave (ET200) construction and addressing
9-14
9.2.10 DP slave (ET200) construction and addressing
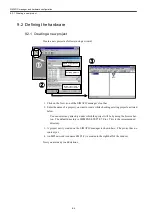
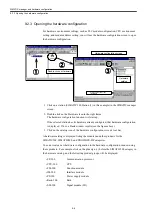
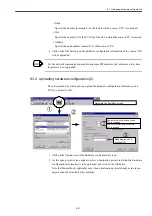
The I/O details of a DP slave are shown in the rack details window at the bottom of the hard-
ware configuration screen. Edit the I/O details as follows:
1. Click on the icon of a DP slave node you want to edit.
2. The rack details window appears showing the rack configuration of the selected node.
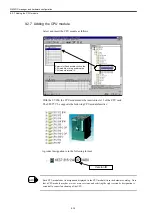
3. For the ET200M and other nodes that require module configuration, select an I/O mod-
ule from the hardware catalog and move it into the rack details window, as is the case
for the CPU rack. With the ET200M rack, insert modules in slot 4 or later slots.
For ET200B and other slaves whose I/O configuration is automatically determined
when they are selected, this step may be skipped.
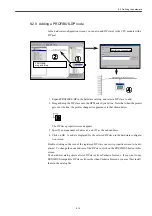
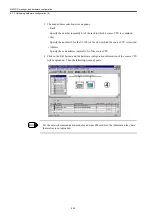
4. Double-click on a slot in the rack details window to display the properties screen. Then
specify a start address.
②
②
②
②
①
①
①
①
Click on a DP slave node
ラックの詳細ウィンドウのス
ロットを指定してモジュール
をダブルクリック、
あるいはモジュールを選択し
てドラッグアンドドロップ
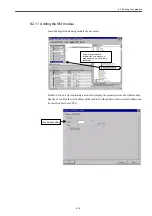
Select a target slot and
double-click on a module, or
drag and drop a module into
a target slot.
③
③
③
③
Rack details window
Содержание CNC Series
Страница 1: ...Maintenance Manual Serviceman Handbook MANUAL No NCSIE SP02 19 Yaskawa Siemens CNC Series...
Страница 26: ...Part 1 Hardware...
Страница 38: ...System Configuration 1 2 3 Spindle motor designations 1 12...
Страница 58: ...Installing the control panels 2 3 5 Installing lightning surge absorbers 2 20...
Страница 62: ...Installing the motors 3 4...
Страница 84: ...Connection method 4 3 2 Setting the rotary switches on the inverters and servo units 4 22...
Страница 96: ...Part 2 Software...
Страница 102: ...Software configuration 6 6...
Страница 103: ...7 1 Chapter 7 Backup 7 1 How to archive 7 2 7 2 Network settings 7 7 7 2 1 YS 840DI settings 7 7 7 2 2 PC settings 7 14...
Страница 105: ...7 1 How to archive 7 3 3 Select the Workpieces folder 4 Click on Archive File which is one of the right side keys...
Страница 113: ...7 2 Network settings 7 11 8 Click on the radio button to the left of Specify an IP address...
Страница 121: ...7 2 Network settings 7 19...
Страница 122: ...Part 3 PLC...
Страница 154: ...Part 4 Setting up and maintenance...
Страница 160: ...Overview of System 10 1 2 Basic operation 10 6...
Страница 204: ...How to use Digital Operation 12 2 9 Setting the password setting for write prohibit 12 32...
Страница 327: ...Error and Troubleshooting 15 4...
Страница 328: ...15 1 Errors without Alarm Display and Troubleshooting 15 5...
Страница 329: ...Error and Troubleshooting 15 6...
Страница 343: ...Maintenance and Check 16 3 3 Setting up Initializing Absolute encoder 16 14...


