


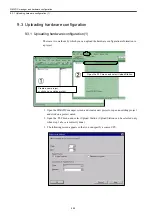


9.3 Uploading hardware configuration
9-21
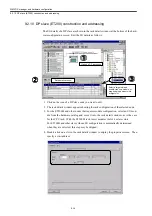
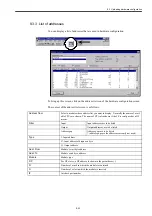
• Rack
Specify the number (normally 0) of the rack in which a source CPU is contained.
• Slot
Specify the number (2 for the S7-300) of the slot in which the source CPU is inserted.
• Address
Specify the node address (normally 2) of the source CPU.
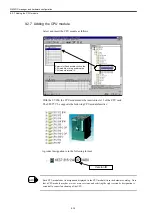
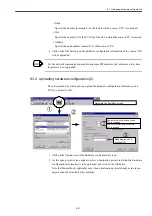
4. Click on the OK button, and the hardware configuration information of the source CPU
will be uploaded.
For the network communication module and some FM modules, the information they have
themselves is not uploaded.
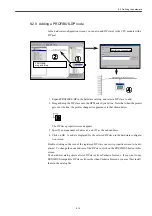
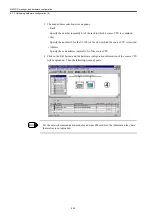
9.3.2 Uploading hardware configuration (2)
The other method by which you can upload the hardware configuration information of a
CPU to a project is this:
1. Click on the Upload icon of the hardware configuration screen.
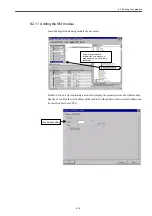
2. As the open project screen appears, select a destination project to which the hardware
configuration information is to be uploaded, and click on the OK button.
Note that this method is applicable only when a destination project already exists (a new
project cannot be created by this method).
INFO
アップロードする
CPU
のノードアドレス
Node address of a
source CPU
アップロードする
CPU
のラック番号
Number of the rack in which a source
CPU is contained
アップロードする
CPU
のスロット番号
Number of the slot in which a source
CPU is inserted
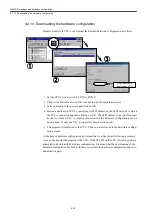
ハードウェアコンフィグレーション画面より
Hardware configuration screen
①
②
③
Содержание CNC Series
Страница 1: ...Maintenance Manual Serviceman Handbook MANUAL No NCSIE SP02 19 Yaskawa Siemens CNC Series...
Страница 26: ...Part 1 Hardware...
Страница 38: ...System Configuration 1 2 3 Spindle motor designations 1 12...
Страница 58: ...Installing the control panels 2 3 5 Installing lightning surge absorbers 2 20...
Страница 62: ...Installing the motors 3 4...
Страница 84: ...Connection method 4 3 2 Setting the rotary switches on the inverters and servo units 4 22...
Страница 96: ...Part 2 Software...
Страница 102: ...Software configuration 6 6...
Страница 103: ...7 1 Chapter 7 Backup 7 1 How to archive 7 2 7 2 Network settings 7 7 7 2 1 YS 840DI settings 7 7 7 2 2 PC settings 7 14...
Страница 105: ...7 1 How to archive 7 3 3 Select the Workpieces folder 4 Click on Archive File which is one of the right side keys...
Страница 113: ...7 2 Network settings 7 11 8 Click on the radio button to the left of Specify an IP address...
Страница 121: ...7 2 Network settings 7 19...
Страница 122: ...Part 3 PLC...
Страница 154: ...Part 4 Setting up and maintenance...
Страница 160: ...Overview of System 10 1 2 Basic operation 10 6...
Страница 204: ...How to use Digital Operation 12 2 9 Setting the password setting for write prohibit 12 32...
Страница 327: ...Error and Troubleshooting 15 4...
Страница 328: ...15 1 Errors without Alarm Display and Troubleshooting 15 5...
Страница 329: ...Error and Troubleshooting 15 6...
Страница 343: ...Maintenance and Check 16 3 3 Setting up Initializing Absolute encoder 16 14...


