


11.1 Drive Parameter Screen Operation
11-5
On the drive parameter screen, press the [INPUT] key after having input the data in order to write the
data into the drive.
Take notice that the method of data input on the drive parameter screen is different from that on the
other machine data setting screens.
Switching over the target axes
The axis-specific drive parameter can be displayed by switching over the target axes.
Use the following procedure;
• Press the [Drive + (F9)] key to display the drive parameter of the axis number that is the
current axis number plus one. If you click the "final page", there displays the axis num-
ber on the top page.
• Press the [Drive
−
(F10)] key to display the drive parameter with the axis number that is
the current axis number minus one. If you click the "top page", there displays the axis
number on the final page.
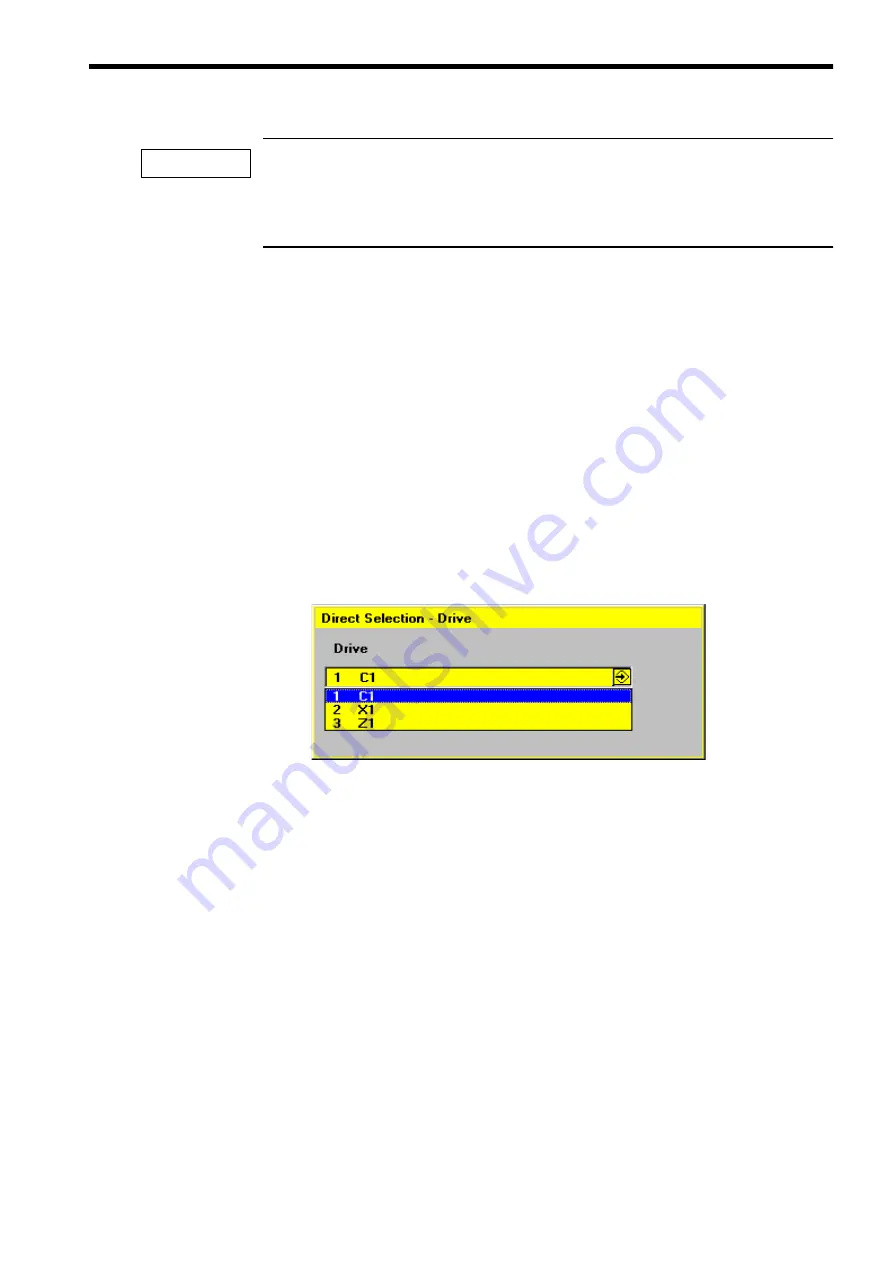
• Press the [Direct selection (F11)] key to display the dialog box for direct switching (see
the figure below). Press the [INSERT] key to display the list of drives you can switch
over. When selecting one from the list, there displays the screen of the selected drive
number.
Searching
There are two types of searching methods; the parameter number method and the parameter
name method.
The searching procedure is as followings.
1. Press [Search . . . (F14)] key.
2. There displays the search dialog box .(See the figure below)
3. Input the parameter number or the parameter name. Alternatively, by pressing the
[INSERT] key a list of the latest key input history (up to eight) is displayed. You can
select the search key from the list.
4. Press the [INPUT] key or [OK (F16)] key to execute the search. To cancel the search,
press the [Abort (F15)] key.
5. When the search key is sought out, the screen jumps to display the result. When the
search key is not found, the cursor remains standstill and the error message "7. Search
term not found." is output.
IMPORTANT
Содержание CNC Series
Страница 1: ...Maintenance Manual Serviceman Handbook MANUAL No NCSIE SP02 19 Yaskawa Siemens CNC Series...
Страница 26: ...Part 1 Hardware...
Страница 38: ...System Configuration 1 2 3 Spindle motor designations 1 12...
Страница 58: ...Installing the control panels 2 3 5 Installing lightning surge absorbers 2 20...
Страница 62: ...Installing the motors 3 4...
Страница 84: ...Connection method 4 3 2 Setting the rotary switches on the inverters and servo units 4 22...
Страница 96: ...Part 2 Software...
Страница 102: ...Software configuration 6 6...
Страница 103: ...7 1 Chapter 7 Backup 7 1 How to archive 7 2 7 2 Network settings 7 7 7 2 1 YS 840DI settings 7 7 7 2 2 PC settings 7 14...
Страница 105: ...7 1 How to archive 7 3 3 Select the Workpieces folder 4 Click on Archive File which is one of the right side keys...
Страница 113: ...7 2 Network settings 7 11 8 Click on the radio button to the left of Specify an IP address...
Страница 121: ...7 2 Network settings 7 19...
Страница 122: ...Part 3 PLC...
Страница 154: ...Part 4 Setting up and maintenance...
Страница 160: ...Overview of System 10 1 2 Basic operation 10 6...
Страница 204: ...How to use Digital Operation 12 2 9 Setting the password setting for write prohibit 12 32...
Страница 327: ...Error and Troubleshooting 15 4...
Страница 328: ...15 1 Errors without Alarm Display and Troubleshooting 15 5...
Страница 329: ...Error and Troubleshooting 15 6...
Страница 343: ...Maintenance and Check 16 3 3 Setting up Initializing Absolute encoder 16 14...


