


12.1 Basic operation
12-5
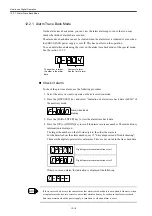
12.1.5 Axis selection mode
On the axis selection mode, select an axis you want to operate.
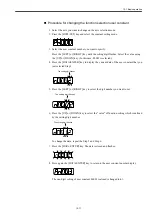
How to use the axis selection mode
Here is the procedure to select the second axis.
1. Turn on the power supply, the axis selection mode displays.
2. Select the axis number you want to operate.
Press the [UP] or [DOWN] key, and the axis number is changed.
(In this case you select "dr2".)
3. Press the [DATA/ENTER] key. The status display mode for the axis you selected on
Step 2 is displayed.
Now the second axis has selected.
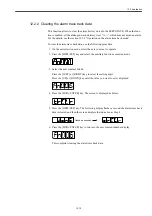
To return to the axis selection mode, press the [DATA/ENTER] key on the status display
mode.
The first axis of the 1-axis drive and 2-axis drive is the rotary switch number of each drive plus one.
The second axis number of the 2-axis drive is the rotary switch number plus two.
On the mode other than the axis selection mode, the LED of the drive which is selected flashes.
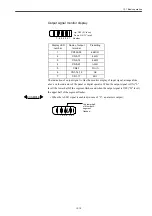
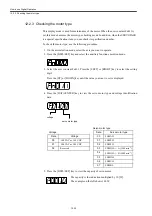
12.1.6 Status display mode
In the status display mode, bit data and codes are used to indicate the status of the SERVO-
PACK.
Indication on the status display mode
The indication of status display mode is different between the speed control mode and the
position control mode.
INFO
Содержание CNC Series
Страница 1: ...Maintenance Manual Serviceman Handbook MANUAL No NCSIE SP02 19 Yaskawa Siemens CNC Series...
Страница 26: ...Part 1 Hardware...
Страница 38: ...System Configuration 1 2 3 Spindle motor designations 1 12...
Страница 58: ...Installing the control panels 2 3 5 Installing lightning surge absorbers 2 20...
Страница 62: ...Installing the motors 3 4...
Страница 84: ...Connection method 4 3 2 Setting the rotary switches on the inverters and servo units 4 22...
Страница 96: ...Part 2 Software...
Страница 102: ...Software configuration 6 6...
Страница 103: ...7 1 Chapter 7 Backup 7 1 How to archive 7 2 7 2 Network settings 7 7 7 2 1 YS 840DI settings 7 7 7 2 2 PC settings 7 14...
Страница 105: ...7 1 How to archive 7 3 3 Select the Workpieces folder 4 Click on Archive File which is one of the right side keys...
Страница 113: ...7 2 Network settings 7 11 8 Click on the radio button to the left of Specify an IP address...
Страница 121: ...7 2 Network settings 7 19...
Страница 122: ...Part 3 PLC...
Страница 154: ...Part 4 Setting up and maintenance...
Страница 160: ...Overview of System 10 1 2 Basic operation 10 6...
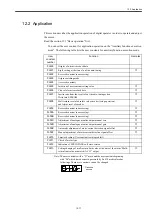
Страница 204: ...How to use Digital Operation 12 2 9 Setting the password setting for write prohibit 12 32...
Страница 327: ...Error and Troubleshooting 15 4...
Страница 328: ...15 1 Errors without Alarm Display and Troubleshooting 15 5...
Страница 329: ...Error and Troubleshooting 15 6...
Страница 343: ...Maintenance and Check 16 3 3 Setting up Initializing Absolute encoder 16 14...


