


9.1 Hardware configuration
9-3
9.1 Hardware configuration
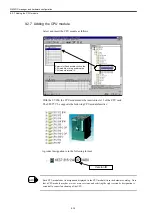
The hardware configuration function allows you to configure the PLC modules and set their
parameters on screen. You can set or modify the CPU operating environments, not by set-
ting various DIP switches but by simply downloading the configuration information to the
CPU.
The following settings can be done with the hardware configuration function:
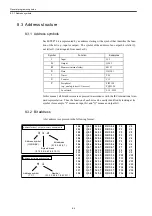
• Configuration of the PLC modules
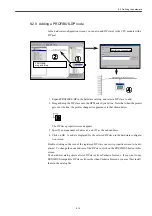
• Configuration and addressing of the PROFIBUS-DP
• Setting of the retention memory area, node address and other CPU properties
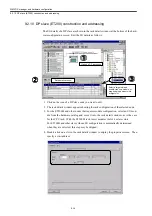
• Addressing of the I/O modules
• Setting of the range and addresses of the analog inputs
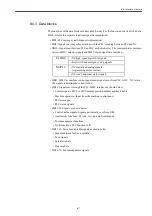
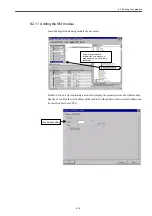
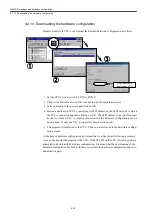
The hardware configuration screen consists of the following three windows:
• Station editing window
Shows how the PLC modules are configured.
• Hardware catalog window
Lists the components of the PLC modules available. The listed components include
racks, modules, and DP slave nodes, and are grouped into the PROFIBUS-DP and S7-
300 components (the S7-400 components are not available with the YS 840DI system).
• Rack details window
Shows the configuration, designation, address and other details of each module for a
rack or DP slave.
ウィンドウ
ラック詳細
ウィンドウ
Rack details
window
ハードウェアコンフィグレーション画面
Hardware configuration screen
Station editing
window
Hardware catalog window
Содержание CNC Series
Страница 1: ...Maintenance Manual Serviceman Handbook MANUAL No NCSIE SP02 19 Yaskawa Siemens CNC Series...
Страница 26: ...Part 1 Hardware...
Страница 38: ...System Configuration 1 2 3 Spindle motor designations 1 12...
Страница 58: ...Installing the control panels 2 3 5 Installing lightning surge absorbers 2 20...
Страница 62: ...Installing the motors 3 4...
Страница 84: ...Connection method 4 3 2 Setting the rotary switches on the inverters and servo units 4 22...
Страница 96: ...Part 2 Software...
Страница 102: ...Software configuration 6 6...
Страница 103: ...7 1 Chapter 7 Backup 7 1 How to archive 7 2 7 2 Network settings 7 7 7 2 1 YS 840DI settings 7 7 7 2 2 PC settings 7 14...
Страница 105: ...7 1 How to archive 7 3 3 Select the Workpieces folder 4 Click on Archive File which is one of the right side keys...
Страница 113: ...7 2 Network settings 7 11 8 Click on the radio button to the left of Specify an IP address...
Страница 121: ...7 2 Network settings 7 19...
Страница 122: ...Part 3 PLC...
Страница 154: ...Part 4 Setting up and maintenance...
Страница 160: ...Overview of System 10 1 2 Basic operation 10 6...
Страница 204: ...How to use Digital Operation 12 2 9 Setting the password setting for write prohibit 12 32...
Страница 327: ...Error and Troubleshooting 15 4...
Страница 328: ...15 1 Errors without Alarm Display and Troubleshooting 15 5...
Страница 329: ...Error and Troubleshooting 15 6...
Страница 343: ...Maintenance and Check 16 3 3 Setting up Initializing Absolute encoder 16 14...


