


1126800
SmartPAC 2 with WPC Integration
page 310
Chapter 5
SmartPAC 2 Program Mode
With ON-OFF settings, "ON-duration" decreases with press speed. Timed output settings are
recommended for functions such as controlling air and lubricators to ensure consistent "ON-
duration" regardless of press speed. Also, when you use the timed output setting, the channel
will turn off after the set time, even if the press stops at the "ON" angle. With "ON-OFF"
settings, the channel will stay on if the press stops within the "ON" setting for the channel.
Therefore, you could waste air or lube.
You can set up a maximum of four channels as
"timed.”
1. Select the channel you want to set from the list of cam channels. You will then see the
display for choosing an on/off output, timed output, or auto advance settings.
2. Select "Program timed output." You see a display which includes the tool number and
name of the channel you are setting shown at the top.
3. Use the RIGHT or LEFT cursor keys to set the degrees where the channel should turn
on. The letter "T" and the 0 next to it will move across the scale at the bottom of the
display as the key is pressed. Hold down the key until the "T" moves to the degrees you
want. If you overshoot your setting, press the left cursor key to go back. The degrees
setting is also shown in the box next to "angle."
NOTICE
The zero next to the "T" indicates the "ON-time" which is set next.
4. Use the UP or the DOWN cursor keys to set the time that the channel should be on in
milliseconds. (A millisecond is 1/1000th of a second.) Press these keys to increment (up)
or decrement (down) until you reach the right number. The number will change in
increments of 10 milliseconds. If you overshoot, use the DOWN cursor key to go back.
The number is shown in the box and next to the "T" on the scale. You can go up to 500
milliseconds (.5 seconds). When you are done with the setting, your display should look
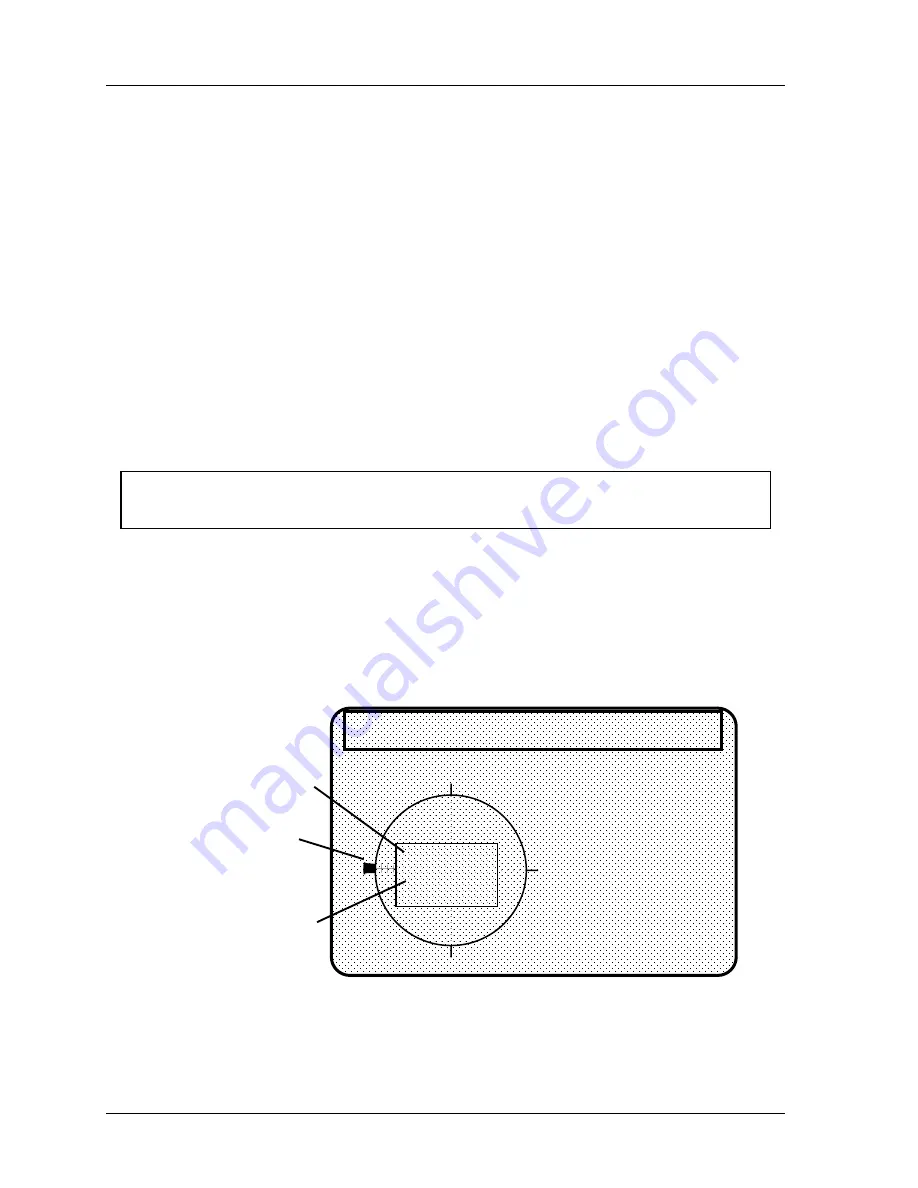
similar to the next illustration (the settings here are 270° on-angle, 250 ms on-time):
0
90
180
270
ANGLE 270
TIME 250
(Msec)
USE THE L/R CURSOR
KEYS TO SET THE
ON ANGLE. USE THE
U/D CURSOR KEYS TO
SET THE ON TIME.
PRESS THE RESET
WHEN DONE.
angle when
channel turns on
how long
(milliseconds)
channel stays on
Angle marker moves
around circle diagram
when you press
cursor keys
TOOL NUMBER 1234567
CHAIR BRACKET
CHANNEL 1
UNNAMED
Figure 5 - 35. A Timed Output Channel
5. Press RESET to go back to the list of channels.
Содержание SmartPAC 2
Страница 192: ...1126800 SmartPAC 2 with WPC Integration Page 170 Chapter 2 Installing SmartPAC 2 and WPC ...
Страница 222: ...1126800 SmartPAC 2 with WPC Integration Page 200 Chapter 3 SmartPAC 2 Keyboard Displays and Operating Modes ...
Страница 294: ...1126800 SmartPAC 2 with WPC Integration Page 272 Chapter 4 SmartPAC 2 Initialization Mode ...
Страница 342: ...1126800 SmartPAC 2 with WPC Integration page 320 Chapter 5 SmartPAC 2 Program Mode ...
Страница 404: ...1126800 SmartPAC 2 with WPC Integration Page 382 Chapter 6 SmartPAC 2 Run Mode ...
Страница 448: ...1126800 SmartPAC 2 with WPC Integration Page 426 Chapter 7 SmartPAC 2 Fault Messages ...
Страница 476: ...1126800 SmartPAC 2 with WPC Integration page 454 Appendix C Updating SmartPAC 2 Firmware ...
Страница 478: ...1126800 SmartPAC 2 with WPC Integration page 456 Appendix D SmartView Remote Viewing and E mail Setup ...
Страница 480: ...1126800 SmartPAC 2 with WPC Integration page 458 Appendix E Upgrade from Original SmartPAC to SmartPAC 2 ...
Страница 482: ...1126800 SmartPAC 2 with WPC Integration page 460 Appendix F Replacing SmartPAC 2 PC Board ...
Страница 492: ...1126800 SmartPAC 2 with WPC Integration page 470 Glossary ...