


SmartPAC 2 with WPC Integration
1126800
Installing SmartPAC 2 and WPC
Chapter 2
page 125
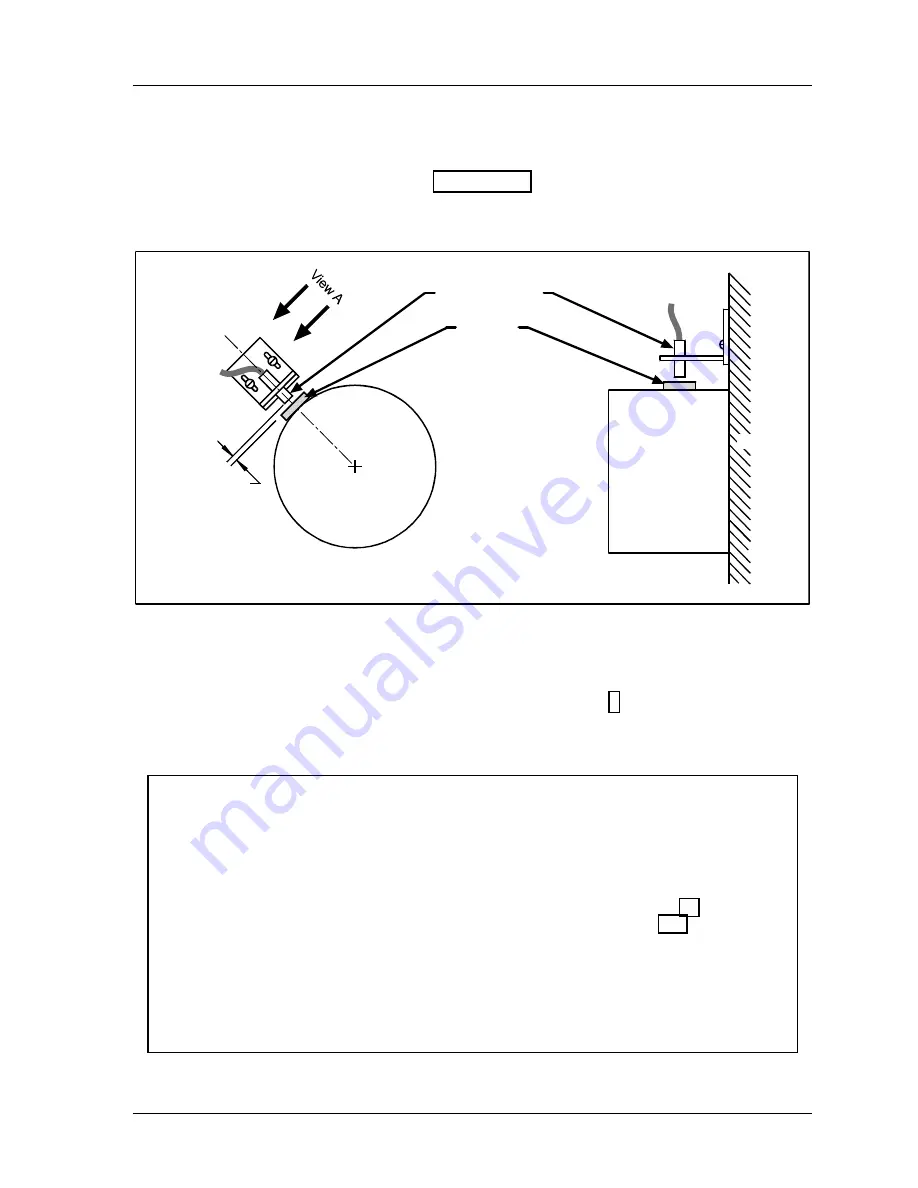
Install Magnet for Overrun Sensor
1.
Using double-sided foam tape or another means, temporarily install the blue magnet
under the overrun sensor as shown in Figure 2 - 35. On the WPC processor board, look
at the green LED in group #3, which should be on. This LED illuminates when the
magnetic switch senses the magnet.
Crankshaft
Gap between
magnet and
magnetic switch
1/8” to 3/16”
View A
Crankshaft
Press
Magnetic switch
Magnet
Mount temporarily
with tape.
Hard mount later.
Figure 2 - 35. Installing Magnet for Overrun Sensor
2.
Cycle the press several times in Inch, Single Stroke and Continuous modes.
•
If the press cycles in every mode without fault, go to step 3.
•
If the press will not cycle in all modes without fault, follow the instructions in the
notice below.
NOTICE
ERROR CODES WHEN RUNNING THE PRESS
•
The press may stop and an error message may appear on the first stroke after you install the
magnet. If this happens, push RESET and try another stroke.
••••
If the error code is between F80 and F89 (or H80 through H89), this indicates a problem with
the overrun sensor. Re-check your installation of the magnetic switch (page 44) and the
magnet (instructions above). Check the press option switch setting (page 242). Press
RESET and single stroke the press again for a few strokes. If the press stops and the same
error code shows, call Wintriss Tech Support.
•
If another error code shows on the display, look it up in Chapter 7. Follow the instructions
under the error message for solving the problem. After you correct the problem, press
RESET and run the press again for a few strokes, checking for error codes. If you need
assistance, contact Wintriss Tech Support.
Содержание SmartPAC 2
Страница 192: ...1126800 SmartPAC 2 with WPC Integration Page 170 Chapter 2 Installing SmartPAC 2 and WPC ...
Страница 222: ...1126800 SmartPAC 2 with WPC Integration Page 200 Chapter 3 SmartPAC 2 Keyboard Displays and Operating Modes ...
Страница 294: ...1126800 SmartPAC 2 with WPC Integration Page 272 Chapter 4 SmartPAC 2 Initialization Mode ...
Страница 342: ...1126800 SmartPAC 2 with WPC Integration page 320 Chapter 5 SmartPAC 2 Program Mode ...
Страница 404: ...1126800 SmartPAC 2 with WPC Integration Page 382 Chapter 6 SmartPAC 2 Run Mode ...
Страница 448: ...1126800 SmartPAC 2 with WPC Integration Page 426 Chapter 7 SmartPAC 2 Fault Messages ...
Страница 476: ...1126800 SmartPAC 2 with WPC Integration page 454 Appendix C Updating SmartPAC 2 Firmware ...
Страница 478: ...1126800 SmartPAC 2 with WPC Integration page 456 Appendix D SmartView Remote Viewing and E mail Setup ...
Страница 480: ...1126800 SmartPAC 2 with WPC Integration page 458 Appendix E Upgrade from Original SmartPAC to SmartPAC 2 ...
Страница 482: ...1126800 SmartPAC 2 with WPC Integration page 460 Appendix F Replacing SmartPAC 2 PC Board ...
Страница 492: ...1126800 SmartPAC 2 with WPC Integration page 470 Glossary ...