6
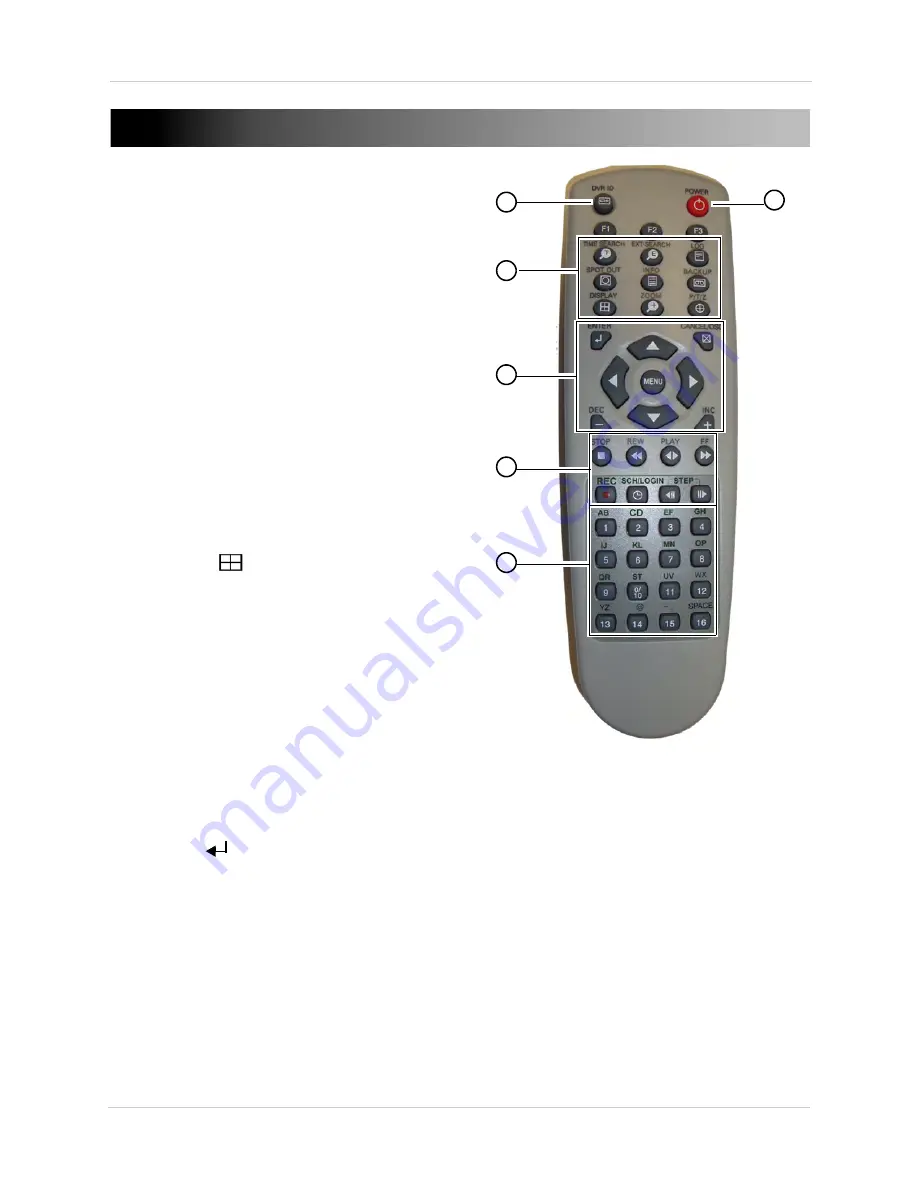
REMOTE CONTROL
1.
DVR ID:
Pairs the DVR with the remote
(optional).
For details, see “GENERAL” on
page 50.
2.
POWER:
Press to power the system ON/OFF
(password required).
3.
System configuration buttons:
•
TIME SEARCH:
Press to open the Time Search
menu.
•
EXTERNAL-SEARCH:
Press to open the
External Search menu. The External Search
menu allows you to browse for content on an
external hard drive connected to the DVR.
•
LOG:
Press to open the system log.
•
SPOT OUT:
Press to select SPOT OUT output.
•
INFO:
Press to view vital system information.
•
BACKUP:
Press to open the Backup Menu.
•
DISPLAY (
):
P
ress to switch between
single channel full-screen, quad, and
split-screen displays.
•
ZOOM:
Press to open the zoom field (live view,
single channel only). Press ENTER to zoom in.
•
P/T/Z:
Press to open the PTZ menu.
4.
Navigation/Menu:
•
: Press to move cursor up.
•
: Press to move cursor down.
•
: Press to move cursor left.
•
: Press to move cursor right.
•
MENU:
Press to open the Main Menu, and to
confirm menu selections.
•
ENTER (
):
P
ress to confirm menu
options/selections/enter sub-menu options.
•
CANCEL/OSD:
Press to close menu windows;
press to show/hide the on-screen display
(OSD); press to clear channel indicators (loss,
alarm, etc.).
•
+ / - :
Press to increase/decrease menu
options.
3
2
4
5
You can use the channel buttons on the
remote control to enter numbers, letters,
and other characters (for example, for
camera title or email setup).
1
6
Summary of Contents for DH200+R Series
Page 12: ...xii...
Page 119: ...107 iSMS Client Remote Viewing on the Mac PTZ Controls cont d...
Page 174: ......
Page 175: ......


