


M-6280A Instruction Book
4–34
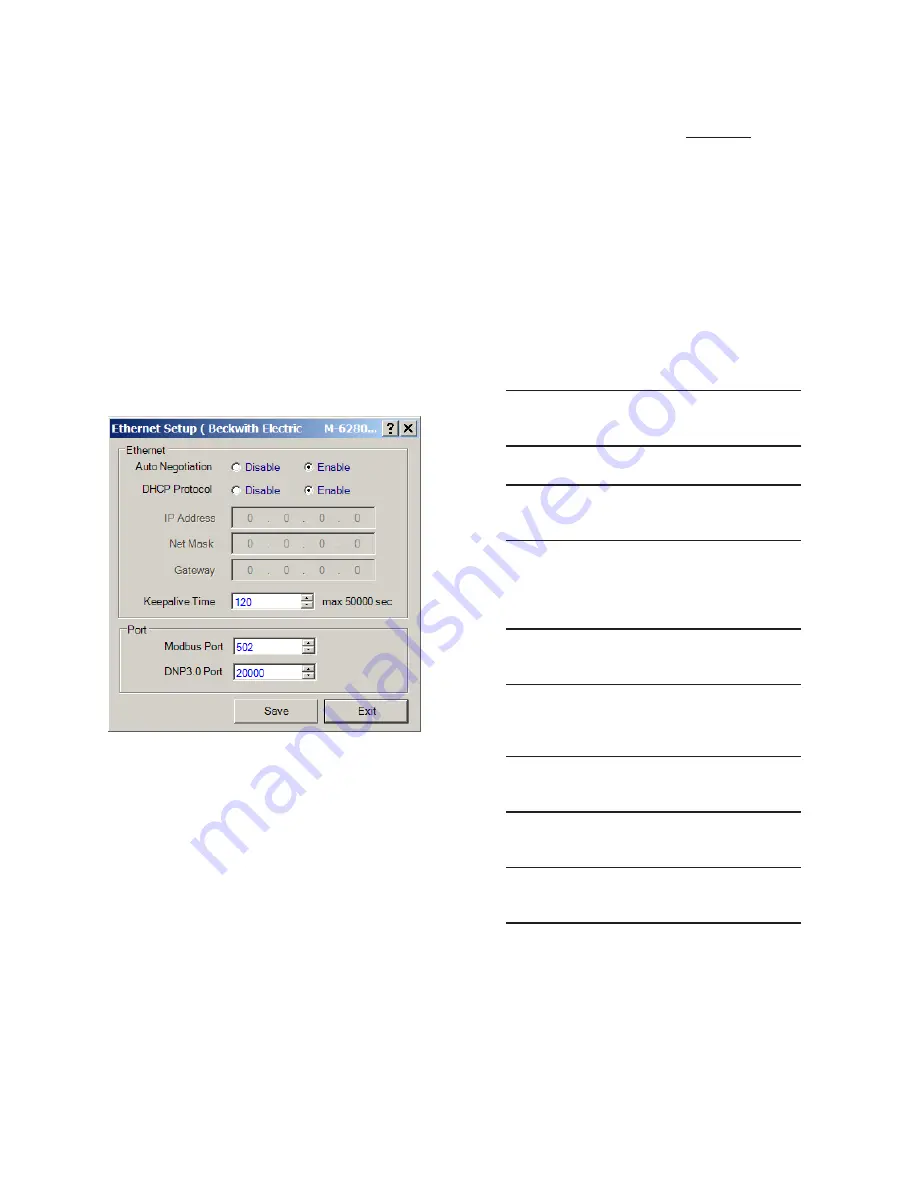
11.
If the Ethernet network that the target
control is connected to does not support
DHCP Protocol, or manual configuration
is desired, perform the following:
a. Select
DHCP Protocol "Disable".
b. Enter the IP Address, Net Mask,
Gateway and the applicable
MODBUS
®
or DNP3.0 Port settings.
c. Select the desired "Connection
Timeout" duration.
d. Select "Save" to save the settings
to the target control. CapTalk
®
will
display a "Setpoints Successfully
Written to Control" confirmation
screen (Figure 4-14).
Figure 4-30 Setup Ethernet Dialog Screen
12.
If the Network MODBUS Port address is
not "502" or the DNP Port address is not
"20000", set these parameters to match
the target network settings.
13.
Verify that removing power to the
control will not cause upset operation
conditions.
14.
Remove power to the control, and then
reapply power to the control.
The Ethernet option for the control is now enabled.
See
Communication Using Ethernet Connection
section of Chapter 3 to connect to the target control
through the Ethernet connection. If Source Address
Validation is desired, then see "Enabling Source
Address Validation" later in this section.
HMI Configuration of the Control’s Ethernet
Port for use on a network that
supports DHCP
Protocol
1.
Ensure the control is energized.
NOTE
: If Level Access is active on the control,
a valid Level 2 Access Code is required
to be entered to manually configure each
element of the Ethernet port.
2.
Press the Right Arrow (COMM Hot
Button) pushbutton to awaken the
unit. The menu will advance to either
"COMMUNICATION" or if a Memory
Card is present in the Smart Flash SD
CARD slot "Memory Card".
COMMUNICATION
CNFG
UTIL
OR
Memory Card
3.
If the "Communication" menu is
displayed, then press the Down Arrow
pushbutton once. The unit will display
the following:
Comm Settings
4.
Press the Right or Left arrow pushbutton,
as necessary, until "Ethernet" is
displayed.
ETHERNET
5.
Press the Down arrow pushbutton once.
The following will be displayed.
DHCP Enable
disable
Summary of Contents for M-6280A
Page 1: ...Instruction Book M 6280A Digital Capacitor Bank Control ...
Page 33: ...This Page Left Intentionally Blank ...
Page 53: ...xx M 6280A Instruction Book This Page Left Intentionally Blank ...
Page 56: ...Introduction 1 1 3 Figure 1 1 Functional Diagram ...
Page 59: ...1 6 M 6280A Instruction Book This Page Left Intentionally Blank ...
Page 66: ...2 7 Operation 2 Figure 2 1 M 6280A Front Panel ...
Page 137: ...3 14 M 6280A Instruction Book Figure 3 13 CapTalk Main Screen Connected Mode ...
Page 172: ...3 49 CapTalk 3 Figure 3 67 CBEMA Settings Dialog Screen ...
Page 179: ...3 56 M 6280A Instruction Book Figure 3 87 M 6280A DNP Configurator Dialog Screen ...
Page 184: ...3 61 CapTalk 3 Figure 3 98 CapPlot Window with Data Logging Data Example ...
Page 185: ...3 62 M 6280A Instruction Book Figure 3 99 CapPlot Window with Oscillograph Data Example ...
Page 191: ...3 68 M 6280A Instruction Book This Page Left Intentionally Blank ...
Page 313: ...M 6280A Instruction Book 4 122 Figure 4 63 Setpoints Dialog Screen VAr Control ...
Page 314: ...Configuration 4 4 123 Figure 4 64 Setpoints Dialog Screen Current Control ...
Page 451: ...D 4 M 6280 Instruction Book This Page Left Intentionally Blank ...


