background image

CHAPTER 1  SCREEN OPERATIONS 

2. Monitor (Operation) Screens 


I

 – 56 

2.5.3  Executing restart search 


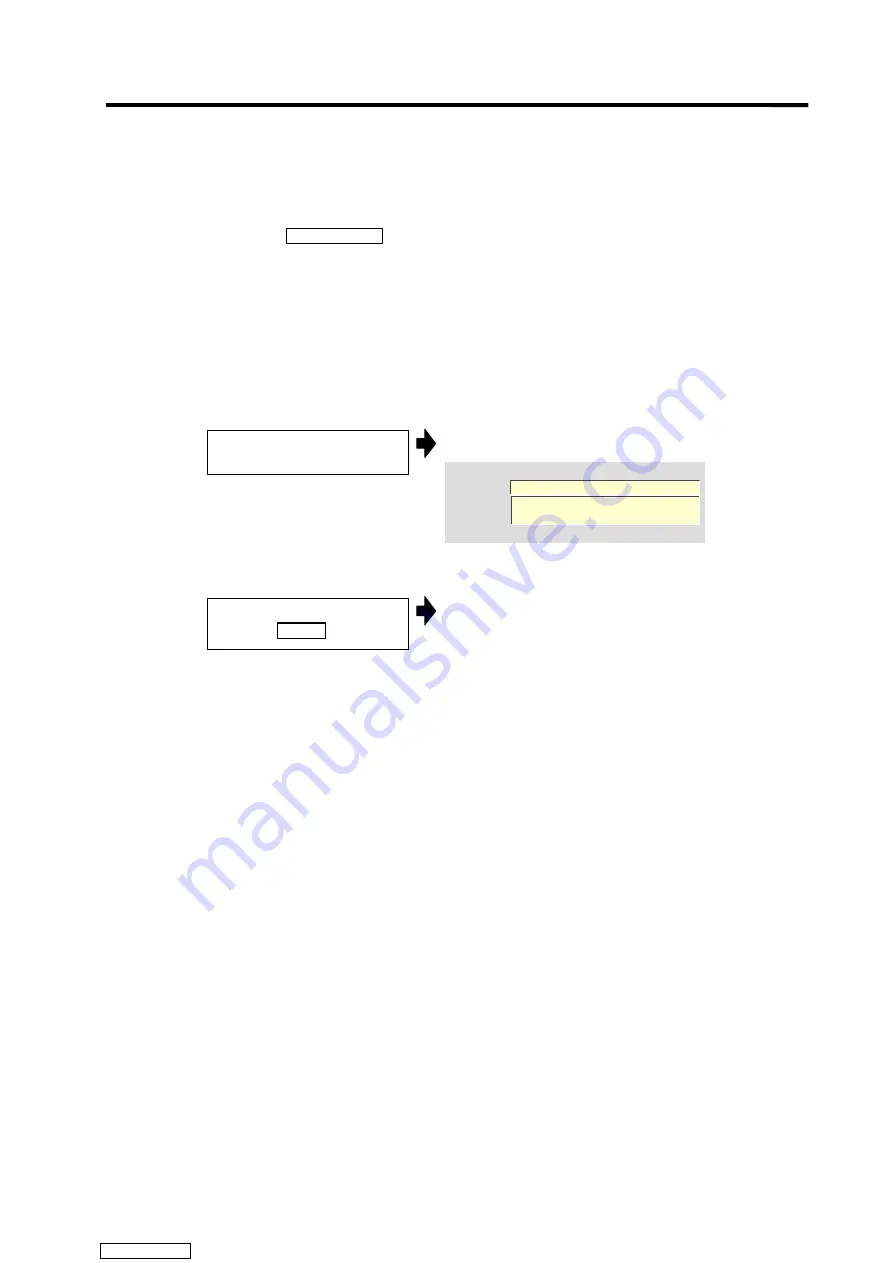
Restart search is used to designate the position to restart the program. 
The search completion position (position on the local coordinate system) is the setting value of the O, N, 
B and P items when the 

Restart search

 menu key is pressed. "Restart Pos" appears on the screen when 

completed. 
 
The modal information of the S, M, T and B (latest 16 Ms) in the program are sequentially updated and 
displayed so that the program up to the restart position is executed. 
Each modal information at the completion of the search is used at the next automatic start as the current 
modal values. 


(1) Operation 

method 


1) 

The selected device name and directory path appear in 
the setting column. 


Directory   /PROGRAM

Dev ice      HD


2) 

The set numbers appear in the setting column. 


(Note 1)

  Steps 1) and 2) are the same as for operation search and top search. Refer to "2.4.1 

Executing an operation search". 

(Note 2)

  Always set the program No. 

(Note 3)

  P sets the number of times that the block targeted for the search (or machining time 

calculation) appears.  


For example, if a block in a subprogram is searched, and the subprogram is called 
out several times, the block to be searched is also executed several times. Thus, 
which execution block to search must be set. (If "0" is set, it is handled in the same 
manner as "1".) 


To search the block that appears first, or to search for a block executed only once, 
this item does not need to be set. 


Set the program device and 
directory for restart search. 

Set the program No., and 
press the 

INPUT

 key. 

Set the sequence No. block No. and 
No. of block executions in the same 
manner in N, B and P respectively. 

The setting method is the 
same as that for an operation 
search. Refer to section "2.4.1
Executing an operation 
search". 

Downloaded from 

ManualsNet.com

 search engine

Содержание MELDAS 600M Series

Страница 1: ...CNC 600M Series INSTRUCTION MANUAL BNP B2237J ENG Downloaded from ManualsNet com search engine ...

Страница 2: ...ered trademark of Mitsubishi Electric Corporation Other company and product names that appear in this manual are trademarks or registered trademarks of the respective company Downloaded from ManualsNet com search engine ...

Страница 3: ... machine manufacturer takes precedence over this manual Items not described in this manual must be interpreted as Not Possible This manual is written on the assumption that all option functions are added Refer to the specifications issued by the machine manufacturer before using Refer to the manuals issued by the machine manufacturer for each machine tool explanation Some screens and functions may...

Страница 4: ...ormation described below in any case DANGER Not applicable in this manual WARNING Not applicable in this manual CAUTION 1 Items related to product and manual For items described as Restrictions or Usable State in this manual the instruction manual issued by the machine manufacturer takes precedence over this manual Items not described in this manual must be interpreted as Not Possible This manual ...

Страница 5: ...ut prior consent from the machine manufacturer 5 Items related to programming If there is no value after the G command the operation will be the G00 operation when the program is run due to key chattering etc during editing EOB and EOR are symbols used for explanation The actual codes are For ISO CR LF or LF and Programs created on the Edit screen are stored in the NC memory in a CR LF format but ...

Страница 6: ...n or damage Incorrect connections may damage the devices so connect the cables to the specified connectors Do not connect or disconnect the connection cables between each unit while the power is ON Do not connect or disconnect any PCB while the power is ON Do not replace the battery while the power is ON Do not short circuit charge overheat incinerate or disassemble the battery Dispose of the spen...

Страница 7: ... display axis I 32 2 2 Position Display 2 screen Position display2 screen I 33 2 2 1 Setting manual value commands I 34 2 2 2 Changing the counter display I 34 2 2 3 Correcting the buffer I 35 2 2 4 Changing the display axis I 38 2 3 Position Display 3 screen Position display3 screen I 39 2 3 1 Changing the counter display I 43 2 3 2 Setting the incremental time I 44 2 3 3 Changing the display sys...

Страница 8: ... 122 3 2 6 Changing the coordinate system display I 123 3 3 Data Input Output screen Input Output screen I 124 3 3 1 Selecting a device directory and file I 127 3 3 2 Transferring a file I 134 3 3 3 Comparing files Compare I 136 3 3 4 Erasing a file I 137 3 3 5 Changing a file name Rename I 138 3 3 6 Creating a directory I 139 3 3 7 Merging a file I 140 3 3 8 Formatting an FLD I 141 3 3 9 Formatti...

Страница 9: ... 12 1 Setting the machine parameters I 218 3 12 2 Setting the parameters I 219 3 13 Details of parameters per applications I 220 3 13 1 High precision common parameters I 220 3 13 2 High precision axis parameters I 225 4 Edit Screens I 230 4 1 Edit screen I 230 4 1 1 Creating a new machining program I 234 4 1 2 Editing a program I 235 4 1 3 Creating MDI data I 237 4 1 4 Playback editing I 238 4 1 ...

Страница 10: ... Setting a random telephone number I 298 5 9 4 Canceling the network service warning I 298 5 9 5 Message displays I 299 5 10 Details of the anshin net parameters I 302 5 10 1 Anshin net param 1 screen I 302 5 11 MTB net screen I 303 5 11 1 Transmitting diagnosis data to the machine manufacturer I 304 5 11 2 Canceling network service warnings I 304 5 11 3 Message displays I 304 6 Maintenance Screen...

Страница 11: ...start and feed hold II 19 5 8 Feed axis selection II 19 6 Operation Switch Functions and Other Functions II 20 6 1 All axes machine lock II 20 6 2 Display lock II 20 6 3 Cancel Z lock II 20 6 4 Miscellaneous function lock II 21 6 5 Single block II 21 6 6 Dry run II 21 6 7 Manual override II 21 6 8 Override cancel II 21 6 9 Optional stop II 21 6 10 Optional block skip II 22 6 11 Manual absolute II ...

Страница 12: ...od III 15 4 5 Procedures for the dogless type detection initializing with marked point alignment method III 18 4 6 Various settings for dogless type absolute position detection III 21 4 7 Recovering the absolute position III 23 4 8 Setting the auxiliary axis absolute position III 23 5 Operations Related to Auxiliary Axis III 24 5 1 Setting the auxiliary axis absolute position III 24 5 1 1 Initiali...

Страница 13: ...Operation messages related to pallet program registration IV 15 2 11 Editing related operation messages IV 16 2 12 Diagnosis related operation messages IV 17 2 13 Waveform related operation messages IV 17 2 14 Messages related to anshin net IV 18 2 15 Messages related to machine MTB net IV 21 2 16 Absolute position detection related operation messages IV 22 2 17 Maintenance related operation messa...

Страница 14: ...viii 4 8 Auxiliary axis system warnings AZW IV 64 4 9 Auxiliary axis operation warnings AMW IV 65 Downloaded from ManualsNet com search engine ...

Страница 15: ...CHAPTER 1 SCREEN OPERATIONS Downloaded from ManualsNet com search engine ...

Страница 16: ... n display key 8 Lower case input key System changeover The following keys are provided on the keyboard Key type Key Operation MONITOR This displays the menu of the screen related to operations Refer to 2 Monitor Screens SETUP This displays the menu of the screen related to setup Refer to 3 Setup Screens EDIT This displays the menu of the screen related to editing Refer to 4 Edit Screens DIAGN Thi...

Страница 17: ...bols A B C D E F G H I J K L M N O P Q R S T U V W X Y Z 0 1 2 3 4 5 6 7 8 9 etc These keys are pressed to set alphabetic characters numerals and operation symbols etc 6 Window operation key This displays a window Not used This changes the active window Not used This displays the menu for selecting operations on the window Not used Not used 7 Data correction key INSERT Data insert key This inputs ...

Страница 18: ...n 12 RESET key RESET This resets the NC 13 Menu keys This changes the screen and displays the data 2 Touch panel When the touch panel specifications are provided some key operations can be carried out by directly touching the screen In this case the menu keys are not provided on the setting and display unit The following operations can be carried out with the touch panel Selection of each menu men...

Страница 19: ...nu is hidden on the right side Indicates a menu that is hidden on the right side Shifts the menu to the right 1 The menus for selecting the screen are displayed 2 The operation menu is canceled This also changes between the submenu and main menu Displays the type of screen group The selected screen group is highlighted RDY MOD ALM Refer to 3 Operation status for details on the display contents Ala...

Страница 20: ...ic operation HLD Start stopped status feed hold or block skip This state is neither the READY state nor the emergency stop BST Block stop 2 MOD This displays the selected operation mode MEM Memory mode RMT RS 232C I F continuous operation mode JOG JOG mode STP Step ZRN Zero point return mode MDI MDI mode HDL Handle mode 3 This displays the MDI status when the MDI mode is selected as the operation ...

Страница 21: ...nosis Option display H W S W config S W config H W config Diagnosis Diagnos AUX test To Abs pos PLC stop Psswd input Ladder monitor Mainte nan ce Refer to 6 Maintenance Screens Maintenance Mainte Edit Refer to 4 Edit Screens Edit Option setting To param To In out Format HMI Quit SRAM backup Link param Zp rtn param Axis spec Analog I O BaseSys param BaseCom param Servo param Er comp param Er comp d...

Страница 22: ...tion method To display Input Output screen from the Setup group 1 The screen menus related to Setup appear Tool offset Coord offset Input Output Param Tool life Work measure 2 The Input Output screen appears Press the function key SETUP Press the menu key Input Output Downloaded from ManualsNet com search engine ...

Страница 23: ... 12345 678 12345 678 12345 678 12345 678 16 12345 678 12345 678 12345 678 12345 678 15 12345 678 12345 678 12345 678 12345 678 3 Cursor movement The cursor moves Tool offset amnt 11 12345 678 12345 678 12345 678 12345 678 12 12345 678 12345 678 12345 678 12345 678 13 12345 678 12345 678 12345 678 12345 678 14 12345 678 12345 678 12345 678 12345 678 17 12345 678 12345 678 12345 678 12345 678 16 123...

Страница 24: ...ursor may move to the right of the display item depending on the data type Note 4 If an illegal key is set an error occurs when INPUT is pressed Reset the correct data 2 Operations in the data setting area The key is input at the position where the cursor is displayed If a cursor is not displayed the key input is invalid When a key is input the data appears at the cursor position and the cursor mo...

Страница 25: ...on the screen If a cursor is displayed on the screen data is set in the data setting area and the INPUT key is pressed the data appears at the cursor position on the screen The cursor moves to the next position The following keys can be used to move the cursor with the cursor keys Moves the cursor to the previous line Moves the cursor to the next line Moves the cursor one item to the left Moves th...

Страница 26: ...32 Multiplication 12 3 4 49 200 Sine SIN SIN 30 0 5 Division 100 3 33 333 Cosine COS COS 15 0 966 Tangent TAN TAN 45 1 Function 1 2 2 5 SQRT 4 5 4 Atangent ATAN ATAN 1 3 52 431 2 Operation examples 1 The operation results appear in the data setting area 240 2 The contents of the data setting area are fixed the data setting is processed and the results appear on the screen The cursor moves to the n...

Страница 27: ...ion display2 screen 2 Conditions for manual value commands The manual value command option must be valid S M T or B command must not be in execution 3 Operation methods When executing T31 with a manual value command 1 The manual value command mode is entered The cursor appears and the menu is highlighted The command value executed last is displayed on the screen M 50 T 3 B 1000 S 100 2 The cursor ...

Страница 28: ...9 Note 1 When using the BCD output type or unsigned binary output type a value converted into a positive value is output Example Note 2 If a value exceeding the setting range is set the high order data is dropped Example Set 5 1 is dropped 5 Other notes 1 If the program command format is the MELDAS 600 Series standard format and a macro interruption command code M96 M97 or subprogram call code M98...

Страница 29: ...s After changing all operations such as data setting and cursor movement are valid in that area 1 To change with the menu keys If an Area change menu is provided such as on the Position display3 screen or Input output screen the area is changed with the menu keys 1 When left side of Position display3 screen is valid Refer to the screens above The right area is validated 2 To change with tab keys T...

Страница 30: ...screen Coord offset screen 2 Operation method To change the absolute value setting mode to the incremental value setting mode 1 The display on the screen changes to incremental value Following figure Settings can be made in the incremental value mode Inc Abs Abs Inc 3 Differences between the absolute value setting mode and incremental value setting mode Example 1 To change the G54 workpiece coordi...

Страница 31: ...000 123 100 101 102 103 104 105 106 40 000 Offset No Length L wea 0 000 0 0 000 0 0 000 0 0 000 0 0 000 0 0 000 0 123456 000 123 100 101 102 103 104 105 106 37 000 Abs Inc Inc Abs Length offset 40 0 Before setting After setting Length offset Absolute setting value 37 0 Incremental setting value 3 0 then setting value 37 0 then setting value 3 0 When When Downloaded from ManualsNet com search engin...

Страница 32: ... 1 1 Wk G54 1P96 X1 Y1 Z1 W1 V1 0 000 0 000 0 000 123456 000 0 000 1 1 1 1 1 A1 0 000 1 A1 0 000 1 0 000 C1 0 000 1 C1 0 000 1 Current pos Wk G54 1P96 3 Changing the Parameter screen display axis Changing the axis name on the Axis parameter screen 1 The axis name and data on the screen changes to the axis name and data for an axis currently not displayed 0 1 0 0 0 0 1 0 0 0 0 1 0 0 0 0 1 0 0 0 X Y...

Страница 33: ... the directory does not need to be designated 3 Menu keys used Main menu Menu Details Type Reference Device select This displays the menu where the machining program is stored Use this menu to select which program in which device to search If a device having a directory is selected the directory is set to the root A Submenu for Device menu Dir This enters the mode for inputting the directory name ...

Страница 34: ...s and to the provision of options Note 2 If the key is pressed when selecting the file name the file name at the data setting area is erased The file already selected on the screen may or may not be erased depending on the screen Note 3 When designating the directory or file name the designated is not fixed when the directory name or file name is just displayed at the data setting area Confirm tha...

Страница 35: ...he menu for the selection devices appears Memory RS232C HD IC card FLD 3 The selected device name appears in the device setting column The HD root directory appears 4 Device HD FLD and IC card The mode for inputting the directory name entered 5 Device HD FLD and IC card The set directory path appears The following two methods can be used to set the directory path Input the directory path full path...

Страница 36: ... target file name and press the INPUT key Note If the list contents differ from the actual device or directory press the List update menu 7 Each set No appears in the setting column Refer to the Operation search explanation for details 8 The search starts A message appears when the search is completed Designate the file name program No 1001 INPUT Set the sequence No and block No in N B respectivel...

Страница 37: ...pears at Directory The following menu appears When selecting a device other than the memory refer to the procedures for selecting the transfer destination FLD file Program Tool offset Variabl Tool life User param Machine param System param 6 The set directory path appears on the screen The following two methods can be used to set the directory path Set the directory path full path in the data sett...

Страница 38: ...ram file as the transfer destination 9 The B display area is validated and the cursor appears 10 The following menu appears Memory RS232C HC IC card Ethernet FLD 11 The selected device name appears 12 The mode for inputting the directory name is entered The following menu appears From list 13 The input directory path appears Press the menu File name Designate the file name 1001 INPUT Press Area ch...

Страница 39: ...t directory and press the INPUT key 14 The mode for inputting the file name is entered The following menu appears From list 15 The following two methods can be used to designate the file name Input the file name and press the INPUT key Press the menu key From list move the cursor to the target file name and press the INPUT key Press the menu File name Input the file name precut INPUT A Device FLD ...

Страница 40: ...o 1 system is selected when the power is turned ON When using a single system and when the screen is common for all systems the system cannot be changed 1 Operation method To change the left area of the Position display3 screen to the No 2 system 1 The right area is validated Note Refer to 1 5 2 Changing the valid area for how to change the area 2 The details displayed on the left is the No 2 syst...

Страница 41: ...right of the menu RDY MEM ALM Alarm warning Trace ON Program display Erase Program Check Display range Display mode Rotate Operate search PROGRAM CHECK COMPLETE Menu changeover key Menu keys Menu display RDY MEM ALM Menu keys Menu changeover key Area change Program tree Program modal Run out time Posn display Local variabl Common variabl When menu changeover key is pressed on Position display3 scr...

Страница 42: ...lighted C 1 5 2 Changing the valid area List update This updates the list The directory list selected in the currently valid file setting column A or B is updated C Trnsfr A B This copies the file in file setting column A transfer origin to the file setting column B transfer destination The transfer origin file is not changed A message appears during transfer and when the transfer is completed B 3...

Страница 43: ...on feed This displays the vector direction speed currently being moved in In each axis independent feed This displays the speed of the axis with highest speed The actual machine feedrate is displayed with the machine parameters Real fd 4 S M T B commands This displays the command value for the S spindle speed command value M miscellaneous function command value T tool command value and B 2nd misce...

Страница 44: ...seven axes or more in one system C 1 5 4 Changing the display axis Bklight OFF This turns off the entire screen to prevent deterioration of the LCD screen etc The screen reappears when any key is pressed C Origin cancel This cancels the origin The coordinate system is shifted so the zero point of the workpiece coordinate system matches the zero point of the basic machine coordinate system C 2 1 3 ...

Страница 45: ... executed during automatic start or automatic halt The remaining distance is the incremental distance from the current position to the end point of that block C Man int amt This displays the amount moved with the manual mode while the manual absolute switch was OFF If the control parameter Interrupt amt reset is ON the interrupt amount is cleared when the reset button is pressed C Next cmd This di...

Страница 46: ...rigin cancel Counter set Origin set Origin cancel Function A random value is set in the current position counter The coordinate system is shifted so the current position becomes the zero point of the workpiece coordinate system This is equivalent to G92 X0 When X is the target axis The coordinate system is shifted so the zero point of the workpiece coordinate system matches the zero point of the b...

Страница 47: ...ote 2 For axes that are not to be operated press the key and move the cursor Note 3 When setting or canceling the origin carry out the following operations instead of steps 2 and 3 in the operation above To set the origin Press the menu key Origin set and INPUT To cancel the origin Press the menu key Origin cancel and INPUT 2 1 4 Changing the display axis If many axes are being used and all axes c...

Страница 48: ...rea Using the user PLC the spindle load and Z axis load etc is displayed as bar graphs If not created with the user PLC this does not appear on the screen This function differs depending on the machine manufacturer 4 Counter 1 display Counter 2 display This displays the counter of the current position and workpiece coordinates positions etc The type of counter displayed can be selected with the me...

Страница 49: ...ing axes Note This is used when there are seven axes or more in one system C 1 5 4 Changing the display axis 2 2 1 Setting manual value commands Each value for S M T and B can be set and executed using the menu Manual value Four values each for the S command and M command two values for the T command and one value for the B command can be set The manual value command can also be set and executed b...

Страница 50: ...ontrol Buffer correction 2 Details 1 The next command can be corrected in the following two cases When single block stop is applied and there is a machining program containing a next command to be corrected During automatic operation there is an error program error in the next command s machining program and the program is stopped 2 During memory or MDI operation not only the displayed buffer data...

Страница 51: ...or can be moved freely within the buffer correction area using the cursor keys N121 G28 X10 Y10 N122 T1212 N124 G00 X68 Z201 N125 G01 X80 Z195 F50 N126 Z150 N127 G02 X100 Z185 R20 N123 S1230 M3 2 The buffer correction mode is entered 3 The buffer correction mode ends and the corrected data is written into to program If a program error has occurred the error display disappears 4 The program executi...

Страница 52: ... If there is no EOB at the data in the last block corrected when the INPUT key is pressed it is added automatically 2 When the buffer correction mode is entered the last block displayed in the buffer correction area may not fit in if the block is long etc To correct this type of block take care to the following points a If a EOB is added to the end of the displayed data the section following the i...

Страница 53: ...ay axis If many axes are being used and all axes cannot be displayed on the counter at once the menu key Next axis can be pressed to change the displayed axes and display the remaining axes Refer to 1 5 4 Changing the display axis for details Downloaded from ManualsNet com search engine ...

Страница 54: ...starting In the above screen the counter is selected for display area 1 the modal display for display area 2 and the display area 2 is valid 3 System display This displays the currently selected system 4 Actual feedrate This displays the actual feedrate 5 Counter 1 display Counter 2 display This displays the counter of the current position and workpiece coordinates positions etc The type of counte...

Страница 55: ...s and 7th and following axes Note This is used when there are seven axes or more in one system C Variabl No A random variable No can be selected When the variable No is set and the INPUT key is pressed the variables appear with that variable No at the top The cursor moves to the details of that variable No A 2 7 1 Setting common variables 2 8 1 Displaying local variables Display level A display le...

Страница 56: ...oordinate rotation angle Displays within a 360 range G41 D1 30 000 0 040 Tool length offset modal Offset No Shape offset amount in respect to tool radius Tool radius wear amount G43 Z H20 250 500 0 240 Tool length offset modal Offset axis name Offset No Offset amount Tool length wear amount G05 P0 High speed machining mode modal G07 1 OFF Cylindrical interpolation modal FA 200 00 FM 1200 00 F moda...

Страница 57: ...start button is pressed to feed hold stop block stop or to when reset button is pressed Ext time This differs depending on the user PLC Refer to the instruction manual issued by the machine manufacturer Posn display Upper line This displays the currently executed program No sequence No and block No Middle line This displays the counter and manual value command The details displayed in the counter ...

Страница 58: ...ll level in the user macros For each level 33 local variable data items are displayed These are configured from level 0 to level 4 in page order If a block containing a variable command is executed the details are rewritten Refer to 2 8 1 Displaying local variables for details on the display 2 3 1 Changing the counter display The details displayed in the counter 1 and counter 2 displays can be ran...

Страница 59: ...1234 59 59 4 Auto oper 1234 59 59 5 Auto oper 1234 59 59 6 Ext time1 1234 59 59 7 Ext time2 1234 59 59 1 Date 1997 07 03 2 Time 12 34 56 4 When the 7 Ext time2 setting is finished the cursor disappears and the time setting ends The menu highlight returns to normal Note If the Time setting menu is pressed again or the key is pressed during the time setting mode the time setting is canceled Select d...

Страница 60: ...ressing the key Select an area and press the key Refer to 1 5 6 Changing the display system for details on each item 2 3 4 Changing the display axis If all axis counters cannot be displayed when the counters are displayed in display area 1 or 2 the Next axis key can be pressed to display the remaining axes Downloaded from ManualsNet com search engine ...

Страница 61: ...e currently executed or searched machining program The block being executed is highlighted 5 Device name and directory setting columns This displays the device name and directory designated when the program was selected 6 Search position setting columns This sets the program No O sequence No N and block No B of the program to be searched 7 List of directories and files This displays a list of the ...

Страница 62: ... the automatic operation is not reset C 2 4 2 Executing verify stop Device select This displays the device menu Select which device program to search for from this menu If a device having a directory is selected the root is selected first A Dir change This enters the mode for inputting the directory name Note This menu does not change when the device is Memory A List update This updates the list c...

Страница 63: ...tory Device HD 3 Device HD FLD and IC card 4 Device HD FLD and IC card The set directory path appears Directory PROGRAM Device HD Select the device Menu Device select Select the device and press the menu key Example HD Select the directory Menu Dir change Input the directory path Example PROGRAM INPUT The mode for inputting the directory name is entered The selected device name appears in the devi...

Страница 64: ... differ from the actual device and directory press the List update menu 6 Device RS 232C 7 The search starts When the search is completed a message indicating the end of the search appears The device and directory after searching and the search position appear and the contents of the setting column on the right side of the screen are cleared Input the program No Example 1001 INPUT Enter the 1001 f...

Страница 65: ...search the state changes to that in which nothing is searched and operation is not possible Research in this case When the searched program is erased When the searched sequence No is erased When the block corresponding to the searched block No is erased 2 Even when the block is stopped operation search cannot be carried out with another mode during MDI multiple block operation Start the search aft...

Страница 66: ...d operation continues without executing compare stop Always set one of O N or B Note 2 If none of the numbers are set a setting error occurs Note 3 If one or two of O N and B Nos are set the other numbers not set are ignored during the search Note 4 Verify stop can also be registered during operation 2 Canceling the verify stop 1 The stop position displayed on the screen is cleared Note Verify sto...

Страница 67: ...f a subprogram is searched those numbers also display 3 Machining time calculation results This displays the machining time after calculation 4 Buffer display This displays the contents of the currently executed or restart searched machining program The block being executed is highlighted 5 Device name and directory setting columns If a device or directory is designated during program selection it...

Страница 68: ...ition when restart search is completed This displays the position on the local coordinate system when the restart search is completed 2 Menus Menu Details Type Reference Top search This executes a top search based on the device directory program No O sequence No N and block No B in the setting columns C 2 5 2 Executing top search Restart search This executes a restart search based on the device di...

Страница 69: ...ex the top of the tape Search for the program head Refer to 2 5 2 Executing top search Search for the block to be restarted Refer to 2 5 3 Executing restart search Turn the program restart switch ON In the manual mode move the axes to the restart return position Refer to 2 5 4 Returning to the restart position Issue the manual value commands S M T B Refer to 1 5 1 Setting a manual value command Tu...

Страница 70: ...n operation search 2 The set numbers appear in the setting column 3 Top search starts When top search is completed a message appears The setting column contents are cleared 2 Notes for top search 1 Always carry out a top search before restart search An operation error occurs if not carried out 2 O No program number cannot be omitted 3 If one or two N and B Nos are set the numbers that are not set ...

Страница 71: ...the setting column Note 1 Steps 1 and 2 are the same as for operation search and top search Refer to 2 4 1 Executing an operation search Note 2 Always set the program No Note 3 P sets the number of times that the block targeted for the search or machining time calculation appears For example if a block in a subprogram is searched and the subprogram is called out several times the block to be searc...

Страница 72: ...ms are displayed for M and the latest 3 items are displayed for S T and B respectively The restart position and restart remaining distance displays for each axis 4 Press the menu key Restart search Move the cursor to the value in the MSTB history display to be set as the current modal value Then press the INPUT key The selected item becomes the current modal value and is used for the next automati...

Страница 73: ...rt search will be completed However when restarting the modal in the blocks in the NURBS interpolation mode is used so an illegal operation will take place At this time the Research after NURBS invalid error will occur when starting and starting will be inhibited Restart search 1 A macro statement block cannot be searched To restart search a macro statement turn the control parameter Macro single ...

Страница 74: ...C1 5000 500 U1 10 001 V1 0 500 RP RP Restart pos Remain dist 4 Note 1 When the restart switch is ON move the axis in the same direction as the restart direction An operation error occurs if the axis is moved in the opposite direction Note 2 After restart position return is completed the axis cannot be moved if the restart switch is ON Note 3 During cycle start if there is even one axis that has no...

Страница 75: ...sition return the return position after restarting will be shifted by the amount the axis was moved manually In this case the restart remaining distance will not be 0 when automatic restart position return is completed 2 5 5 Setting the S M T and B current modal values After restart search is completed if the menu key MSTB history is pressed the modal values of S M T and B used in the machining pr...

Страница 76: ...tion procedure differs when the range for calculating the machining time is to be designated Refer to operation examples 1 to 2 for details on each operation The outline of operations required to designate each range is shown below Calculation target range Setting method Start position End position Start point End position setting Note Reference 1 Random position in machining program End of same m...

Страница 77: ...quence No and block No here Note 2 Always set the program No Note 3 If the program differs from the start and end of the machining calculation refer to Operation example 2 3 The machining time calculation starts When the machining time is calculated a message appears The calculation results appear in Mach time on the screen The setting column contents are cleared Press the menu key Calcul cancel t...

Страница 78: ...ime is calculated to the end of machining Note 3 Always set the program No 2 Note Always set the program No 3 The machining time calculation starts When the machining time is calculated a message appears The calculation results appear in Mach time on the screen The setting column contents are cleared Press the menu key Calcul cancel to cancel the calculation process Designate the start position To...

Страница 79: ... Second The value can be cumulated up to 1193 02 47 2 The S M T and B displays indicate the codes these commands are issued during the time calculation For M a list of up to 16 sets can be displayed in the commanded order Note 1 The calculated machining time data is held until the machining time calculation is carried out next Note 2 The S M T and B code data is erased at the top search and machin...

Страница 80: ...pt on the Time calcul menu and Calcul cancel menu Thus screen operations are not possible The time calculation can be stopped by pressing the Calcul cancel menu key 3 In the following cases the system will standby for the Calcul cancel menu key operation during the calculation of the machining time When a program error occurs while calculating the time and the system stops When the block correspon...

Страница 81: ...ime is obtained from the coordinate position an error may occur 6 For the skip commands such as G31 and G31 1 the machining time is calculated up to the end point 7 For synchronous feed such as G95 the S command is handled as a direct rotation command to determine the feedrate and calculate the machining time Thus the accurate time cannot be cumulated 8 The G33 thread cutting and G37 automatic too...

Страница 82: ...erpolation Same as left 07 1 00 Cylindrical interpolation Same as left 08 Spare 09 00 Exact stop check Same as left Note 1 10 00 Program parameter input compensation input Same as left Note 2 11 00 Program parameter input cancel Program tool offset input 12 00 Circle cutting cw Same as left 13 00 Circle cutting ccw Same as left 14 Spare 15 Spare 16 Spare 17 02 Plane selection X Y Same as left 18 0...

Страница 83: ...4 37 1 00 Special Fixed cycle grid Automatic tool length measurement Note 4 38 00 Tool radius compensation vector designation Same as left 39 00 Tool radius compensation corner arc Same as left 40 07 Tool radius compensation cancel Same as left 40 1 15 Normal control cancel Same as left 41 1 15 Normal control left Same as left 42 1 15 Normal control right Same as left 41 07 Tool radius compensatio...

Страница 84: ...s left 60 00 Uni directional positioning Same as left 61 13 Exact stop check mode Same as left Note 5 61 1 13 High accuracy control mode Same as left Note 6 61 2 13 High accuracy control for die machining CAM data Same as left 61 3 13 High accuracy control for die machining Height sensor data Same as left 61 5 13 High accuracy control for part machining Same as left 62 13 19 Automatic corner overr...

Страница 85: ...ot drilling Same as left 82 09 Fixed cycle drilling counter boring Same as left 83 09 Fixed cycle deep hole drilling Same as left 84 09 Fixed cycle tapping Same as left 85 09 Fixed cycle boring Same as left 86 09 Fixed cycle boring Same as left 87 09 Fixed cycle back boring Same as left 88 09 Fixed cycle boring Same as left 89 09 Fixed cycle boring Same as left 90 03 Absolute value command Same as...

Страница 86: ...t should be selected or that are selected in the initial state by the control parameters Note 1 The deceleration time in the exact stop check mode is not accumulated so this causes an error Note 2 If there is a program parameter input check the parameter after calculation Note 3 The thread cutting mode is not cumulated Note 4 The automatic tool length measurement is not cumulated Note 5 The decele...

Страница 87: ...If this mark is not within the display area it is assumed that the tool position is outside the screen s display range Thus the display range must be changed 3 Program display This displays the machining program being drawn The block being executed is displayed in blue 4 Machine position This displays the machine position counter and feedrate F The three axes set in the parameters are displayed 5 ...

Страница 88: ...he display scale and the display position The changes are selected from the menu The graphics displayed on the screen are erased A 2 6 3 Changing the display range Display mode This changes the display plane and system The axes corresponding to X Y and Z are set with operation parameters Parameter 370020 to 370025 1 2 X X1 X2 Axis for each system corresponding to X Y Y1 Y2 Axis for each system cor...

Страница 89: ...he trace mode 1 The trace mode is entered and the tool mark appears at the machine position The Trace ON menu is highlighted The message Executing trace appears Press the menu key Trace ON The path that the machine moves is drawn Downloaded from ManualsNet com search engine ...

Страница 90: ... to normal 4 Notes for tracing 1 When drawing in the trace mode the graphic shape easily deforms as the commanded speed increases Note that correct shapes are not drawn when using the machine lock high speed function 2 The program cannot be checked during the trace mode when Trace ON is highlighted Press the menu key Trace ON during the trace mode Downloaded from ManualsNet com search engine ...

Страница 91: ...ed C Program display This displays the machining program being drawn on the screen C Display range This changes the display scale and the display position Note When the display range is changed the displayed graphics are erased A 2 6 3 Changing the display range Display mode This changes the plane and system to be displayed The axes corresponding to X Y and Z are set in the operation parameters Pa...

Страница 92: ...ys to scroll the display list This list does not appear during screen changeover 2 Setting column for device names and directories This displays the device name and directory designated during program selection 3 Setting column for search positions This is used to set the program No O sequence No N and block No B of the program to be searched 1 List of directories and files 2 Setting column for de...

Страница 93: ...ils of the currently selected device and directory is displayed C From list Press this key to select a directory file name and program No from the list The selection cursor appears in the list and items can be randomly selected C 2 4 1 Executing an operation search 3 Checking continuously Check continu 1 The screen changes to that for check search 2 The check search is carried out and the screen r...

Страница 94: ...he menu key is highlighted 4 The message Program check completed appears and the check mode is canceled The menu highlight returns to normal Press the menu key Check continu When the continuous check is completed If Check step is pressed midway the program is checked block by block from the next block Downloaded from ManualsNet com search engine ...

Страница 95: ... returns to normal Program check completed Note 1 If Check continu is pressed midway the program is checked continuously to the end of the program Note 2 The workpiece coordinate position counter and G command modal Group 03 01 07 09 are displayed during the check step 5 Canceling the program check Check reset 1 The check mode is canceled and the menu highlight returns to normal The message such a...

Страница 96: ...ation Available with either program coordinate rotation or parameter coordinate rotation Pattern rotation Decimal point programming Available with either Type I or Type II Mirror image See item 9 Z axis command cancel A move path is drawn exactly as specified Interlock External deceleration Override Feed hold Cycle start If CYCLE START is pressed during checking alarm message PROG CHECK MODE is di...

Страница 97: ...d are valid but actual machine motion trace display is partially different from the drawing by program check As shown in the figure right when returning to the reference point via the intermediate point with the G28 or G30 command positioning to the intermediate point is done by a straight line and positioning from there to the reference point is done by individual axes independently With the G29 ...

Страница 98: ... If offset amount for more than 40 sets 160 types is updated original data is rewritten Caution If the parameter input command or tool offset amount change command 40 sets or more is issued by G10 during the graphic check the actual data will be overwritten 9 Notes for program check Check function 1 The check function draws while referring only to the NC internal operation results Thus the path is...

Страница 99: ...sets for details on handling the various data set in the program being checked 6 If an M00 M01 command is found Program stopped is applied However when an M01 command is executed the drawing stops regardless of the ON OFF state of the optional stop switch signal When various menu keys are pressed during continuous check or step check 1 If Check continu is pressed during the continuous check the pr...

Страница 100: ... point are erased 1 Menus used for changing the display range Menu Details Type Reference Std range This returns the scale to the standard scale C Scale This sets scale to be changed with a random value A 4 Randomly changing the display scale 2 Centering This moves the display position so that the current position is in the center C 2 Changing the display position 1 A white frame indicating the di...

Страница 101: ...u t i n g t r a c e Note 1 The amount that the center moves when the cursor shifts one space depends on the current display scale value Note 2 When displaying a solid cursor position is not the center position of the display This is because there is a deviation between the cursor movement amount two dimensional and the solid movement amount three dimensional Change the figure s display position Pr...

Страница 102: ...pears Drawing resumes from the current position Note 1 The scale value increments or decrements by approx 5 each time the key or key is pressed Note 2 The scale value can be changed within the range of 0 100 to 9999 999 Press the menu key Display range Change the size of the figure Press the or key to adjust the scale Press the INPUT key To reduce the figure Press the key The scale value increases...

Страница 103: ...y mode such as X Y Y Z the upper and lower areas change to the same display range position and scale value The operation method is the same as the one plane display mode Press the menu key Display range Press the menu key Scale Set a random value ex 270 and press the INPUT key The data setting cursor appears in the data input area To reduce the figure Set a value larger than the current value To e...

Страница 104: ...Z Note When the display mode is changed the graphics displayed up to that point are erased 1 Menus used for changing the display mode Menu Details Type Reference XY This changes to the one plane display mode configured of X Y C YZ This changes to the one plane display mode configured of Y Z C XZ This changes to the one plane display mode configured of Z X C XY XZ This changed the display mode to t...

Страница 105: ...angle is changed the graphics displayed up to that point are erased 1 Changing the display angle 1 2 The solid display at the lower right of the screen rotates according to the key operations Z X Y Z X Y 3 The new angle is reflected on the screen The graphics displayed up to that point are erased and drawing resumes from the current position Press the menu key Rotate Press the and keys to rotate t...

Страница 106: ...e subprogram is displayed 2 Variable No This displays the common variable No The number can be changed by pressing the page changeover keys If the number and variable details are set in the setting area and the INPUT key is pressed the page containing that number appears 3 Variable details and comment Variable details If the variable data is cleared the data display area is blank If the data has m...

Страница 107: ...This menu can be used when the Machine parameters Base com param 110049 Invld Continu menu is set to 0 C Copy This copies the contents only one line amount of the variable No at the cursor position to the clipboard The copied line is highlighted and returns to normal after pasted A 2 7 2 Copying pasting common variables Paste This pastes the copied contents only one line amount of the variable No ...

Страница 108: ...Comment 102 103 104 105 106 107 108 109 110 111 112 113 114 115 135 0000 0 0000 100 0000 10 0000 0 0005 123456 7890 1 2345 E 10 0 0000 0 0000 100 0000 10 0000 0 0005 123456 7890 1 2345 E 10 2 Setting the comment counter in variable No 509 1 The 509 variable appears at the head of the area and the cursor moves to the variable details 2 3 Press the menu key Variabl No Designate the variable No 102 I...

Страница 109: ... Using the cursor movement keys and move the cursor to the variable Press Variabl No set the variable No in the data setting area and press the INPUT key 2 3 The copied variable is pasted in the selected variable and the highlight returns to normal The copied variable is held until a variable is newly copied Select the variable to be copied Press the menu key Copy Select the variable to be pasted ...

Страница 110: ...ommon variable data is cleared when the power is turned ON 2 The variable at the cursor position will become the target of the erasing if the INPUT key is pressed without designating a variable No Press the menu key Varibl clear Set the No range of the variable to be erased in the data setting area and press the INPUT key 102 104 INPUT Press the Y key Press the menu key Comment clear Select the va...

Страница 111: ...vel of the subprogram control called by the user macro 0 Not in user macro call state 1 User macro call level 1 2 User macro call level 2 3 User macro call level 3 4 User macro call level 4 3 Display level This displays the nest level of the local variable displayed in the area 4 Variable No and details This displays the local variable No and its details The alphabetic character before the local v...

Страница 112: ... No at the head A 2 8 1 2 Changing the display level Continu This displays the variables following the variables displayed in the valid area area containing cursor in the area with no cursor currently displayed When cursor is in left area The following variable Nos are displayed in the right area When cursor is in right area The variables with numbers smaller than the variables displayed in the ri...

Страница 113: ... can also be displayed with the following methods Using the and keys move the cursor to the 23 position Change the display with the keys 2 Changing the display level 1 The cursor appears at the display level 2 The level 4 local variables display from the head The cursor moves to the head line Vrbl Details Disp lvl 4 A 1 B 2 C 3 I 4 J 4 K 5 123456 7890 1 2345 E 10 0 0000 0 0000 100 0000 10 0000 Pre...

Страница 114: ... B200 M99 1 10 0000 2 20 0000 3 30 0000 33 G65 P10A10 B20 C30 M02 1 1 0000 2 2 0000 3 3 0000 33 4 Notes for local variables The local variables are not erased when reset or when the power is turned OFF They are erased at macro call Main level 0 O1 level 1 O10 level 2 O100 level 3 O1000 level 4 Level 0 display Local variable Level 1 display Level 2 display Level 3 display Level 4 display Local vari...

Страница 115: ...tails 1 Display items Display item Details 1 Mark indicating switch ON This is displayed for switches that are turned ON 2 Switch name The switch names and highlight functions are created with the user PLC Max 32 sets Thus this differs according to the machine manufacturer 2 Menus Menu Details Type Reference Setting valid Setting of the PLC switch is started A 2 9 1 Turning PLC switches ON OFF ON ...

Страница 116: ...ns ON and a mark appears Name Auto restart Protect delete Manual Absolute Optional stop Handl interrupt Program restart 1 2 3 4 5 6 7 Note 1 If the Setting valid menu or key is pressed again during the PLC switch setting mode the PLC switch setting mode will be canceled Note 2 The PLC switch setting mode will be canceled when another screen is opened Note 3 The cursor will not appear in modes othe...

Страница 117: ... 2 10 1 Turning control parameters ON OFF ON This turns ON the parameter currently indicated by the cursor C 2 10 1 Turning control parameters ON OFF OFF This turns OFF the parameter currently indicated by the cursor C 2 10 1 Turning control parameters ON OFF Ctrl param 1 This changes the screen to the system common control parameter screen C 2 10 2 Control parameter 1 details Ctrl param 2 This ch...

Страница 118: ...me will be highlighted Note 1 If the Setting valid menu or key is pressed again during the parameter setting mode the parameter setting mode will be canceled Note 2 If another screen is opened including the Control parameter 1 and 2 screens the parameter setting mode will be canceled Note 3 The cursor will not appear in modes other than the parameter setting mode If the menu key ON or OFF is press...

Страница 119: ... end and the designated block is not found OFF During tape search the tape is not rewound when the program is read to program end and the designated block is not found Instead the program is stopped at that position 310003 Edit lock B ON Editing of the label No 8000 to 9999 machining program is locked OFF Editing of the label No 8000 to 9999 machining program is enabled 310004 Com var RST clear ON...

Страница 120: ...machine lock speed is set with the machine parameter s Base system param 120072 M_lock rapid feed OFF During machine lock the feedrate is the commanded speed and is the same process time as normal automatic operation 320005 G04 time fixed ON The G04 command is a time designation in both the synchronous feed mode G95 and asynchronous feed mode G94 OFF The G04 command is a time designation in the as...

Страница 121: ...are not targets for the intersecting point operation The offset vector in the command right angle direction is applied 320013 Ext deceleration OFF ON Even if the machine interface signal s external deceleration signal is input it is ignored The machine s rapid traverse rate is not decelerated OFF When the external deceleration signal is input the machine s feedrate decelerates to the speed set wit...

Страница 122: ...loating tap chuck 320025 ON The tool life management is controlled T life manage valid OFF The tool life control data is ignored 320026 ON The program tool command is handled as a tool No Tool command mthd 2 When tool life management is valid OFF The program tool command is handled as a group No 320027 Tool select mthd 2 ON The tool with the maximum remaining life is selected from the tools used o...

Страница 123: ...the host computer is established Host link OFF The off line state with the host computer is established ON F1 digit feed control becomes valid When an F1 to F9 command is issued the machine runs at the speed set in the machining parameters F1 to F9 When an F10 or higher command is issued the feedrate will be directly commanded This parameter cannot be selected when F1 digit feed specifications are...

Страница 124: ...can be used differs depending on the specifications Tool offset type I The combined amount of the shape offset and wear offset are set as the offset data with no distinction between shape offset memory and wear offset memory The tool offset data is the shape offset amount wear offset amount The offset data is used commonly for the tool length tool position offset tool radius and three dimensional ...

Страница 125: ...single block stop Use the following to set the compensation amount during automatic operation State during automatic operation To set the tool length compensation amount To set the tool radius compensation amount During single stop Whether the compensation amount is to be validated from the next block or from the next H No command can be selected with the parameter 110051 Op Tolcomp ofs valid The ...

Страница 126: ...amount of the shape offset and wear offset 99999 999 99999 999 Length dimen sion This sets the offset amount of the tool length 99999 999 99999 999 Length wear This sets the wear offset amount of the tool length 999 999 999 999 Radius dimen sion This sets the offset amount of the tool radius 99999 999 99999 999 Type II Radius wear This sets the wear offset amount of the tool radius 999 999 999 999...

Страница 127: ...te This writes in the line where the cursor is at the contents one line amount of the copied tool offset data If the copied line of data is changed after the menu key Line copy is pressed original data is written when pasted Once copied a line of data can be pasted any number of times until a new area is copied C 3 1 3 Copying pasting the tool offset data 1 Copy This copies one data item at the cu...

Страница 128: ...0 000 0 000 0 000 0 000 0 000 0 000 0 000 0 000 0 000 0 000 3 4 The set value appears Ofset No Length L wear Radius R wear 102 103 104 105 106 107 108 0 000 0 000 0 000 0 000 0 000 0 000 12345 000 10 000 0 000 0 000 0 000 0 000 0 000 123 000 0 000 0 000 0 000 0 000 0 000 0 000 12345 000 0 000 0 000 0 000 0 000 0 000 0 000 123 000 5 Press the menu key Offset No Designate the offset No 102 INPUT Usi...

Страница 129: ...the line to be selected Press the menu key Offset No set the offset No in the setting area and press the INPUT key 2 The menu is highlighted A message confirming the erasing appears 3 The selected line of data one line amount is cleared to zero Without the cursor moving that line becomes the first line of the display area 102 103 104 105 106 107 108 Ofset No Length L wear Radius R wear 0 000 130 0...

Страница 130: ... 124 125 126 127 128 Ofset No Length L wear Radius R wear 0 000 0 000 0 000 0 000 34 000 42 000 12345 000 0 000 0 000 0 000 0 000 10 000 8 000 123 000 0 000 0 000 0 000 0 000 7 000 10 000 12345 000 0 000 0 000 0 000 0 000 0 000 2 000 123 000 Note If the INPUT key is pressed without setting a offset No the line where the cursor is at is erased Press the menu key Line clear Set the erasing range by ...

Страница 131: ... 8 000 0 000 0 000 0 000 123 000 3 4 The copied data is written in the line where the cursor is at The highlight of the copied line returns to normal The copied data is held until another line is copied 107 108 109 110 111 112 113 Ofset No Length L wear Radius R wear 0 000 0 000 56 000 0 000 0 000 0 000 12345 000 0 000 0 000 19 000 0 000 0 000 0 000 123 000 0 000 0 000 10 000 0 000 0 000 0 000 123...

Страница 132: ... 0 000 0 000 123 000 0 000 0 000 10 000 0 000 0 000 0 000 12345 000 0 000 0 000 8 000 0 000 0 000 0 000 123 000 3 4 The copied data is written in the line where the cursor is at and the menu highlight returns to normal The copied data is held until another line is copied 100 101 102 103 104 105 106 Ofset No Length L wear Radius R wear 0 000 0 000 56 000 0 000 0 000 0 000 12345 000 0 000 0 000 19 0...

Страница 133: ...pansion coordinate system G54 1 Pn The size of the display area differs depending on the number of axes A maximum of eight axes can be displayed The workpiece coordinate offset data can be set with absolute values or incremental values Setting range 99999 999 to 99999 999 mm 2 Coordinate system EXT area This displays or sets the offset data for the external workpiece system 1 Coordinate system off...

Страница 134: ...n the G92 G52 area the display will change to the G92 display A Coord G92 G52 This displays the G92 or G52 coordinate system offset data The G92 offset data is also displayed when the cursor is not at the G54 to G59 offset data C Abs Inc This changes the setting mode to the absolute value mode or incremental value mode The absolute value setting mode is entered when the power is turned ON C 1 5 3 ...

Страница 135: ...system display 2 for details 4 5 The set data appears and the cursor moves to the next data item 6 Press the menu key Coord G54 G59 Using the tab keys move the cursor to the workpiece coordinate offset to be set Using and move the cursor to the axis where the data is to be set Set the offset data 122 INPUT Set other data in the same manner Confirm the setting mode absolute incremental in the upper...

Страница 136: ...stem excluding G92 indicated by the cursor for all axes 1 The menu is highlighted A message appears to confirm the erasing 2 All of the coordinate system indicated by the cursor is cleared to zero Including local coordinate data 2 Erasing all axis offset data of all coordinate systems excluding G92 and EXT 1 The menu is highlighted A message appears to confirm the erasing 2 All of the coordinate s...

Страница 137: ...stem having a characteristic position specified by the machine as a zero point C Program Z point This displays the machine position of the local coordinate zero point C Er comp amnt This displays the total compensation amount error compensation amount such as pitch error that does not appear in the counter C 3 2 5 Setting the manual value command Using the menu Manual value set each M and T value ...

Страница 138: ...The display will change as shown below when the page changeover keys are pressed This is valid when the expansion workpiece coordinate system specifications are provided Note The example shown below is for 48 additional sets G54 to G56 offset data First 6 expansion workpiece offset data items Next Page Previous Page Last 6 expansion workpiece offset data items Next 6 expansion workpiece offset dat...

Страница 139: ... can be registered When Memory is selected as the device the total of the number of programs registered and the remainder is the maximum number of registrations set in the specifications 2 Number of memory characters and remainder Note 1 This displays the number of characters of the machining program of the selected device Number of memory characters Character This displays the number of character...

Страница 140: ...tting 4 File setting column A This sets the device directory and file name of the target file for transfer compare erasing etc operations When transferring the file name of the transfer origin file is set When renaming the file name before renaming is set When erasing the erasing range is set 5 File setting column B This sets the device directory and file name of the target file for transfer compa...

Страница 141: ...ransfer destination The transfer origin file is not changed A message appears during transfer and when the transfer is completed B 3 3 2 Transferring a file Compare A B This compares the files in file setting column A transfer origin and file setting column B transfer destination C 3 3 3 Comparing files Erase A This erases the file in file setting column A Note Not possible for the Ethernet B 3 3 ...

Страница 142: ...C Ethrnet This selects Ethernet C FLD This selects the FLD C The list of recommended IC cards is given below Item Maker Type Specifications Remarks SDP3B 6 101 B4 6MB Recommended part SDP3B 20 101 B4 20MB Recommended part SDP3B 40 101 B4 40MB Recommended part ATA flash IC card SANDISK SDP3B 85 101 B4 85MB Recommended part 101 B4 given in the type on the left may be omitted from the type when sold ...

Страница 143: ...hat can be used will differ depending on the specifications One of the following methods can be used to designate the directory for devices other than the NC memory and file name Set the directory path full path or file name in the data setting area and press the INPUT key Press submenu Dir of the menu File name or From list Move the cursor to the target directory or file name and press the INPUT ...

Страница 144: ...ears in the list Program Char Comment 10015 80 93 01 20 13 43 10014 162 93 01 20 13 43 10012 130 93 01 20 13 43 10013 100 93 01 20 13 43 10011 518 93 01 20 13 43 4 2 The selected file name appears in the data setting area 10013 Device select Dir File name List update Trnsfr A B Compare A B 4 3 The selected file name appears Press the menu Device select Press the menu Memory Press the menu File nam...

Страница 145: ...ile other than a program 1 The following menu appears Memory RS232C HD IC card Ethernet FLD 2 Memory appears in the device name and the default Program appears in the directory 3 The following menu appears Program Tool offset Variabl Tool life User param Machine param System param 4 The directory and file name appear Note The file name for each directory is fixed Refer to 3 3 10 List of file names...

Страница 146: ...14 162 93 01 20 13 43 10012 130 93 01 20 13 43 10013 100 93 01 20 13 43 10011 518 93 01 20 13 43 4 2 The selected directory appears in the data setting column The contents of the selected directory appear in the list Press the menu Device select Select a device HD Designate the directory Select the menu Dir Input the directory path as a full path PRG PRECUT INPUT Press the menu From list Move the ...

Страница 147: ... 93 01 20 13 43 10014 162 93 01 20 13 43 10012 130 93 01 20 13 43 10013 100 93 01 20 13 43 10011 518 93 01 20 13 43 6 2 The selected file name appears in the data setting area 10013 Device select Dir File name List update Trnsfr A B Compare A B 6 3 The selected file name appears Designate the file name Press the menu File name Input the file name 10013 prg INPUT Press the menu From list Move the c...

Страница 148: ...submenu appears 2 To cancel the data input at this time press the key 3 When the key is pressed the details in the data setting area are erased and the main menu appears Main menu Dir File name Device select Submenu From list Memory RS232C The details in the data setting area are erased Downloaded from ManualsNet com search engine ...

Страница 149: ...y in a CR LF format but programs created with external devices such as the FLD or RS 232C may be stored in an LF format The actual codes for EIA are EOB End of Block and EOR End of Record To prevent the influence of data loss and data transformation over the line always carry out data comparison after transferring a machining program Press the menu Area change and select file setting column A Desi...

Страница 150: ... many registrations 3 The size of one block of the machining program should be 250 characters or less 4 When using tape carry out parity V adjustment to improve the reliability of the tape format Then use with the input output parameter Parity V validated 5 When the machine manufacturer macro and Fixed cycle program are input change the program type with the parameter Fix_P Also set in the Input O...

Страница 151: ...esignated file name appears 5 The file comparison starts The data being compared appears in the comparison data display column A message appears when the comparison is completed If a comparison error occurs the block with the error is displayed in the comparison data display column on the screen Note Comparison is not possible for blocks having 251 characters or more when files are compared on the...

Страница 152: ...d The number of programs registered number of memory characters and remainder reappear Press the List update menu to update the list 2 Erasing a file Erase B The operations are the same as method 1 above Set the target device directory and file name in the file setting column B and press the menu Erase B Note If the file to be erased is running an error will occur and the file will not be erased P...

Страница 153: ... Note 1 Make sure the original and new devices are the same Note 2 If the file to be renamed is running an error occurs and the name is not changed Note 3 If a file that does not exist is designated for the original file or if an existing file name is designated for the new file selection an error occurs and the name is not changed Press the menu Area change and select file setting column A Design...

Страница 154: ...rea B Note 1 Up to 223 files including the directory can be registered in the FLD s root directory Note 2 Up to 511 files including the directory can be registered in the IC card s root directory 512 files can be registered when volume labels are not used However if the File open error occurs when the 512th file is registered the operation message is not an File open error but a File entry over No...

Страница 155: ...he details of the file in file setting column A will be as follows when the merge is completed Details of file in file setting column A before merge Details of file in file setting column B before merge The details of the file in file setting column B do not change Note 1 If the merge destination file file in file setting column A is running an error will occur and the files will not be merged Not...

Страница 156: ...3 3 10 List of file names There is a directory for each type of data in the NC memory Each directory and file name fixed in the NC memory is shown below Do not change the extensions XXX when storing in a device other than the NC memory Data type NC memory directory path Fixed file name Machining program M01 PRG USR Program No Fixed cycle program M01 PRG FIX Program No Tool offset data M02 TOL OFFS...

Страница 157: ...ut Output screens are influenced by the edit lock setting An error will result if operations that are not possible are attempted When the edit lock is valid processing is executed except the edit lock target program by the input output function Operation possible Operation not possible Edit lock B Edit lock C Machining program Machining program Screen Operation A B C A B C Search Edit Edit MDI reg...

Страница 158: ... Operation Screen 1 Origin set Position display1 2 Tool offset amount setting erasing Tool offset amnt Tool measure 3 Tool registration data setting erasing Tool registration 4 Tool life data setting erasing Tool life 5 Workpiece coordinate offset amount setting erasing Coord offset Workpiece measure Rotate meas 6 Tool offset data tape input output Input Output 7 Tool offset amount input output In...

Страница 159: ...ect appears If the operations shown in Table 2 No 7 and 8 are attempted and the INPUT key is pressed the message Data protect appears and the input and output are disabled 3 Machining program protection KEY 3 The operations listed in Table 3 are prohibited when KEY 3 is OFF Table 3 Data protected by KEY3 No Operation Screen Expansion menu 1 MDI data memory entry MDI MDI entry 2 Machining program e...

Страница 160: ...r screens Refer to 3 5 User parameter details for the contents of each user parameter The configuration of all of the User Parameter screens follows that of either of the two screens shown below 1 This is the screen for setting the common parameters for the system axis device etc Process param etc 2 This is the screen for setting the parameters having an array structure for each system axis device...

Страница 161: ...isplay axes in the selected system The axis to be displayed is changed to the 1st to 5th axis and 6th to 8th axis This is used when there are six to eight axes in one system This is used in the screen for the parameters having an array structure for each system axis device etc C 1 5 4 Changing the display axis Axis param Process param Operate param I O param Ethernet param Link param This changes ...

Страница 162: ...ndle spec Spindle param PLC constnt PLC timer PLC counter Bit select Posn switch Open param 1 Open param 2 This changes the screen to the Machine parameter screen Note Normally the machine parameters can be referred to but cannot be set C Downloaded from ManualsNet com search engine ...

Страница 163: ...elect the data to be set with the cursor key 1 Setting 0 in 340011 Mirror image 1 2 The cursor moves to the position of the setting target data 3 The setting value appears and the cursor moves Parameters not having a mark are validated after setting 4 Parameters with a mark are valid Press the menu Axis param Input the value 0 INPUT Continue setting the values Lastly restart the computer Use the a...

Страница 164: ... range 1 2 The menu is highlighted 3 The copy target range is highlighted The menu highlight returns to normal Note 1 If the INPUT key is pressed without setting a number the parameter where the cursor is at is copied Note 2 The copy target range highlight returns to the normal display by pasting Move the cursor to the parameter to be copied Select area copy Menu Area copy INPUT Press the menu Are...

Страница 165: ...ata is written to the parameter with the same number as when copied in the area where the cursor is at The menu highlight returns to normal Move the cursor to the axis or displayed area where the data will be pasted Press the menu key Area paste Press Y or INPUT The copied data is not written in when the N key is pressed Downloaded from ManualsNet com search engine ...

Страница 166: ...cess param This changes the screen to the Process Param screen C 3 5 2 Machining Parameter screen Operate param This changes the screen to the Operation Param screen C 3 5 3 Operation Parameter screen I O param This changes the screen to the I O Param screen C 3 5 4 Input Output Parameter screen Ethrnet param This changes the screen to the Ethernet Param screen C 3 5 6 Ethernet Parameter screen Li...

Страница 167: ...G53 X_ Y_ Z_ a_ 0 Mirror image invalid 1 Mirror image valid 34 0002 Automatic dog type The first reference point return is always dog type but this selects either dog type or high speed memory type for the second and subsequent reference point returns 0 High speed return 1 Dog type return 34 0003 Manual dog type This sets the manual reference point return method for the function above 0 High speed...

Страница 168: ...bited range of stored stroke limit IIB When the stored stroke limit IIB function is selected the prohibited range will be between two points even when 340008 and 340009 are set in reverse When II is selected the entire range will be prohibited Soft limit outside Soft limit inside 340011 0 340011 1 Y M X Y X M 340008 Y 340009 Y 340009 X 340008 X Movable area 999999 999 to 999999 999 mm When the sam...

Страница 169: ...8 and 340009 prohibits entry from outside the designated range or entry from inside the range 0 Prohibited range is outside Stored stroke limit II is selected 1 Prohibited range is inside Stored stroke limit IIB is selected 34 0012 Rotation axis type This designates the type of rotation axis 0 Rotation axis 1 Linear type 2 Shortcut type Downloaded from ManualsNet com search engine ...

Страница 170: ...r Name Details Setting range units 33 0001 Base axis I 33 0002 Base axis J 33 0003 Base axis K 33 0004 Parallel axis 1I 33 0005 Parallel axis 1J 33 0006 Parallel axis 1K 33 0007 Parallel axis 2I 33 0008 Parallel axis 2J 33 0009 Parallel axis 2K This sets the control axis address corresponding to G17 G18 and G19 Axis name 33 0010 G73 return amount 33 0011 G83 return amount This sets the return amou...

Страница 171: ...three dimensional tool radius compensation P value in Vx i r p Vy j r p Vz k r p Vx Vy Vz XYZ axis or vector of parallel axes i j k Program command value r Compensation amount When the setting value is 0 P i2 j2 k2 0 to 999999 999 mm 33 0014 F cmnd mgf type min This multiplies the commanded F command value per minute using no decimal points 0 1 fold 1 1 10 fold 2 1 100 fold 33 0015 Normal C axis t...

Страница 172: ...erated at vector component setting but direct setting of the angle is possible When directly setting the angle 0 appears in both the horizontal axis and vertical axis of the vector components 180 000 to 180 000 33 0024 Scaling magnificat n This sets the reduction enlargement magnification for the machining program designated in G50 and G51 It is validated when the magnification is not designated i...

Страница 173: ...ion amount at the corner The maximum control error is displayed in Unit mm Theoretically the accuracy error becomes smaller as the setting value becomes larger but because the speed and arc clamp speed at the corner become lower the cycle time becomes longer 1000 to 100 Standard value 0 33 0039 Corner slow angle In the high accuracy mode this automatically judges the corner and realizes a smooth c...

Страница 174: ...rs 33 0053 Spline cancel angle If the angle created by two continuing blocks exceeds this setting value the high accuracy spline function will be temporarily canceled Set the angle for creating an edge 0 to 90 Standard value 60 33 0054 Minute line length This is valid during the high accuracy spline control Curve interpolation will be carried out on linear blocks of which the length of one block i...

Страница 175: ...ation coefficient to further reduce the radius reduction amount of a curve arc spline NURBS curve during the high accuracy control mode When 0 is set the precision coefficient is applied and when 1 is set the precision coefficient for curves is applied 0 Precision coefficient 1 Precision coefficient for curves Standard value 0 33 0079 prec coef curve This sets the compensation coefficient to furth...

Страница 176: ...his sets the feedrate when contacting again 1 to 80000 mm min 37 0007 Skip past amout H This sets the difference horizontal axis direction of the skip read value and actual skip position 999999 999 to 999999 999 mm 37 0008 Skip past amout V This sets the difference vertical axis direction of the skip read value and actual skip position 999999 999 to 999999 999 mm 37 0009 tlml X 37 0010 tlml Y 37 0...

Страница 177: ...sets the area of the point where the tool should stop 0 to 999999 999 mm 37 0040 Program save type This selects the method for saving the program in the Edit screen 0 Save program being edited with Save file menu 1 Save program being edited each time the INPUT key is pressed 0 1 37 0041 STN contrast This adjusts the contrast of STN display 0 to 15 37 0042 Space mode in Editor This selects the meth...

Страница 178: ...a output dev No This sets the I O port No and device No when each file of machining program tool data parameters etc is output from the NC memory to the external device Port M6A 1 to 2 M6B 1 to 2 1 Port 1 2 Port 2 Device 1 Device No 1 4 Device No 4 35 0005 NC oper port No 35 0006 NC oper dev No This sets the I O port No and device No when the RS 232C is operating Port M6A 1 to 2 M6B 1 to 2 Device ...

Страница 179: ...en parity 35 0106 Dev 1 char length This sets the data bit length The character length data bit is set matching the specifications of the I O device Refer to the item 350104 Parity valid 0 5 bit 1 6 bit 2 7 bit 3 8 bit 35 0107 Dev 1 termina type The code that terminates the data reading can be selected 0 No terminator 1 EOR or EOB 2 EOB 3 EOR 4 One random character 5 Two random characters 35 0108 ...

Страница 180: ... when the reading of one block or output time of 250 characters exceeds the designated time timeout time due to an I O device fault or an exchange in the transmission The timeout time setting must be changed depending on the baud rate 0 to 999 1 10s 35 0118 Dev 1 EIA code 1 0 to FF 35 0119 Dev 1 EIA code 2 35 0120 Dev 1 EIA code 3 35 0121 Dev 1 EIA code 4 35 0122 Dev 1 EIA code 5 35 0123 Dev 1 EIA...

Страница 181: ...ape reader device being used Note The tape will not rewind when 0 is set even if the rewinding command is executed 0 to FF 35 0201 to 0226 Device 2 parameters Same as device 1 Same as device 1 35 0301 to 0326 Device 3 parameters Same as device 1 Same as device 1 35 0401 to 0426 Device 4 parameters Same as device 1 Same as device 1 Downloaded from ManualsNet com search engine ...

Страница 182: ...0 Code 2 00 00 00 00 00 00 00 00 00 Rewind code 0 No rewind 1 Rewind 0 0 0 0 0 0 0 0 Handshake method 3 3 3 1 3 3 3 3 3 DC code parity 1 1 1 0 0 1 0 1 1 DC2 DC4 output 0 0 0 0 0 1 Puncher 1 0 1 CR output 0 0 0 0 1 0 0 0 0 0 EIA output 0 0 0 1 0 1 0 0 0 1 0 1 0 1 No of feeds 0 0 No of characters 0 0 0 No of characters 0 0 Parity 0 0 0 1 0 0 0 0 1 0 1 0 1 Timeout time 100 100 100 100 100 100 100 100...

Страница 183: ...re validated immediately after setting Number Name Details Setting range units 36 0001 Address This sets the internet address This sets the IP address of the TCP IP assigned to the NC Windows computer Contact the network controller for the address to be set 15 characters or less Dot notation numeric value train 36 0002 Gateway This sets the gateway of the TCP IP assigned to the NC Windows computer...

Страница 184: ...ry This sets the directory name of the host computer 15 characters alphanumeric or less 36 0105 Host1 address Not used 15 characters alphanumeric or less 36 0106 Host1 host type This sets the type of host computer 0 UNIX 1 PC DOS 36 0107 Host1 NOOP output Not used 0 36 0108 Host1 ABOR output Not used 0 36 0109 Host1 Word pos name This sets the file name display position nth word from left of the l...

Страница 185: ...113 Host1 Word num comnt This sets the number of words to be displayed as a comment Note One word designates a character string divided by one or more spaces 0 to 100 36 0114 Host1 no total char This sets whether to display the total number of characters registered in the machining programs of host1 when displaying the file list If there are many files in the directory to be referred to the list c...

Страница 186: ...at NcPrograms m6mmi exe 1916 1850880 DIR DIR Number of words 2 Comment DIR 3 Size 4 File name position 5 Word position 1 Comment 02 21 97 08 25 97 01 27 97 02 04 97 07 27PM 06 05PM 10 03AM 11 05AM 6 File name position 5 Size display position 4 DIR display position 3 Word position comment 1 No of words comment 2 7 Display on MS DOS window c windows Select the MS DOS prompt from the NC computer Task...

Страница 187: ...on Windows 3 1 1 1 2 2 Chameleon Windows 95 NT 1 4 3 3 1 2 Personal WEB Server UNIX format 0 0 0 0 0 0 DOS format 1 4 3 3 1 2 Windows NT3 51 ftp Server 1 4 3 3 1 2 Windows NT4 0 ftp Server UNIX format 0 0 0 0 0 0 DOS format 1 4 3 3 1 2 Close the MS DOS window Set each position confirmed in step 5 into the Ethernet parameters Downloaded from ManualsNet com search engine ...

Страница 188: ...200 38 0004 Stop bit This sets the stop bit length for the start stop method Refer to the item for 380005 Parity valid Set the bit length that matches the input output device s specifications 1 1 bit 2 1 5 3 2 38 0005 Parity valid This parameter is set to use a parity bit different from the data bit ON OFF b1 b2 b3 b4 b5 b6 bn One character Start bit Data bit Parity bit Stop bit Set this to match ...

Страница 189: ...ly when 3 is selected for 380008 Handshake method 0 Do not output DC1 code 1 Output DC1 code 38 0013 Buffer correction This selects whether to validate the buffer correction during operation 0 Buffer correction invalid 1 Buffer correction valid 38 0014 Reset validity This sets whether to validate the reset during computer link Normally this is set to 0 0 Computer link reset valid 1 Computer link r...

Страница 190: ...n the reception buffer Set a value less than 380026 DC 3 output size Normally 248 is set 248 to 380026 DC3 output size setting value byte 38 0025 DC1 output size The DC1 code is output when the number of data items in the reception buffer drops to below the number of bytes set in the DC1 output size Normally the same value as 380026 DC3 output size is set 248 to 380026 DC3 output size setting valu...

Страница 191: ...group No The spare tool is selected from the tools that match the group No in the tool registration data ON This selects the tool with the maximum remaining life from the tools in use and not in use in the same group When several tools have the same remaining life the tools are selected in order of registration No If there are no Tools in use or Tools not in use the tools are selected in order of ...

Страница 192: ...ays the group No registered as tool life management data Up to 60 group Nos can be displayed on one screen If the number of group Nos exceeds 60 change the page using the keys An asterisk will be added to the number of the group in which all tools have reached their lives 2 Menus Menu Details Type Reference Group regist This creates a new group and adds it to the group Nos on the screen A 3 Regist...

Страница 193: ...Life management data cannot be set in this screen Set that data in the screen for group unit display 4 Erasing a group 1 2 The designated group is erased and the next number is carried and displayed Press the menu Group regist Designate the group No to be registered 25 INPUT Press the menu Group delete Designate the group to be erased 72 INPUT Downloaded from ManualsNet com search engine ...

Страница 194: ...laying by group units 1 to 99999999 Tool No This is the number corresponding to each tool Depending on the specification configuration up to 1000 tools can be registered 1 to 99999999 ST Tool status Machine manufacturer release Tool status 0 Unused tool Normally set to 0 when the tool is replaced with a new tool 1 Used tool This becomes 1 when the cutting actually starts 2 Normal life tool This be...

Страница 195: ...tuting that number for the compensation No commanded in the machining program 1 Addition compensation method This treats the compensation data in the tool data as an addition compensation amount Compensation is carried out by adding that amount indicated by the compensation No commanded in the machining program 2 Direct compensation method This treats the compensation data in the tool data as a di...

Страница 196: ... to a cutting feed command G01 G02 G03 etc Note that rapid traverse or cutting feed commands with no movement are invalid G00 G01 G04 G00 G00 G01 G04 G01 Usage time 0 to 4000 min Number of mounting times 0 to 9999 times Number of uses 0 to 9999 times Wear Not used Used This displays the usage data of each tool following the method designated by the tool life management method Note This data is not...

Страница 197: ...Compensation No where erasing finishes Ex 1 E All compensation data is set to blank When the INPUT key is pressed without designating a line only the line where the cursor is currently at is erased After erasing the subsequent lines are carried and displayed A 3 6 1 7 Erasing one line of tool life management data 8 Designating and erasing a line Grp No change This changes a group No When a group N...

Страница 198: ...essage appears to confirm the creation of a new number A new group is created if Y or INPUT is pressed 4 Changing a group No 1 The cursor moves to the group No 2 The group No after changing appears Note An error occurs if the group No duplicates a preexisting group No Press the menu Group No Designate the group No to be displayed 12 INPUT Press the menu Grp No change Designate the group No after c...

Страница 199: ...is not set the other data cannot be set 6 Copying pasting the tool life data 1 2 The menu is highlighted The entire copy target line is highlighted 3 4 The copied data is written in the line where the cursor is Note Once copied an item of data is held until a new data item is copied Move the cursor to the data to be set The set value appears Input the value 20 INPUT Move the cursor to the line to ...

Страница 200: ...ible 1 The menu is highlighted 2 A message appears to confirm the erasing 3 The tool life data corresponding to the designated No is erased and the menu highlight returns to normal The next line after the erased range is carried Note If the INPUT key is pressed without setting a No the line at the cursor is erased Move the cursor to the line to be erased Select erase Menu Line clear INPUT Press th...

Страница 201: ... 186 3 6 3 Displaying the Help screen Tool life help screen This screen displays the meanings and setting methods of the display items ST and Mthd The Tool life grp screen appears if the key is pressed Downloaded from ManualsNet com search engine ...

Страница 202: ... changes between with the movement direction Width measurement counter Machine position when the skip signal is read Skip flow rate Note Center compensation amount Note The skip flow rate changes between with the movement direction 2 Measurement position counter Machine position Sensor radius Note Skip flow rate Center compensa tion amount Note The sensor radius changes between with the movement d...

Страница 203: ... Note that the cursor does not appear and setting is not possible Setting is carried out on the Coord write menu C 3 2 1 Setting the coordinate system offset data Coord G54 1 P_ When the P No is input this displays the expansion workpiece coordinates G54 1 Pn offset data in the counter display area Setting is carried out on the Coord write menu A 3 2 Coordinate System Offset screen Coord EXT This ...

Страница 204: ...nu appears only when the operation parameter 370015 Meas ext menu invld is set to 0 3 Details of the Measurement counter and Guide drawing display areas Menu Measurement counter Guide drawing Surface start Y 123456 789 Z 123456 789 Face meas X 123456 789 Hole M start X 123456 789 Y 123456 789 X 123456 789 X 123456 789 Y 123456 789 Y 123456 789 Hole meas A B C Width measure A 123456 789 123456 789 ...

Страница 205: ...g the measurement even if there is axis movement other than that of the measurement target axis 3 The measurement mode and measurement counter are held even when the screen changes during measurement 4 Only 1st system axes can be used as measurement target axes The measurement target axis is set in the operation parameters The axis names that can be set are those in 1st system 5 The measurement va...

Страница 206: ... Carry out an operation such as a reference point return to position the tool on the reference point Turn ON the measurement switch on the machine operation board Move the spindle near the workpiece using manual feed and manual handle feed Put the spindle in contact with the workpiece in the X direction Select the workpiece coordinate offset in which the measurement data will be set Example Press ...

Страница 207: ...lue is set in the workpiece coordinate offset G55 coordinate system selected in step 6 The measurement counter display becomes blank 8 The message On meas disappears Press the menu Hole M start Turn ON the measurement switch on the machine operation board Move the spindle into the hole using manual feed and manual handle feed Put the tool in contact with the inner walls of the hole Measure points ...

Страница 208: ...ter is measured and the value is set in the workpiece coordinate offset G55 coordinate system selected in step 6 The measurement counter display becomes blank 8 9 The message On meas disappears Press the menu Width meas Turn ON the measurement switch on the machine operation board Move the spindle into the groove using manual feed and manual handle feed Put the tool in contact with the inner walls...

Страница 209: ...n amount Note The sensor radius changes between with the movement direction 4 Coordinate rotation center and angle Center This displays the coordinates that are the center during coordinate rotation Angle This displays the rotation angle during coordinate rotation 5 Sensor length and diameter Sensor length This displays the length to the tip of the touch sensor Sensor diameter This displays the di...

Страница 210: ...he screen is input this displays the offset data of the expansion workpiece coordinates G 54 1 Pn in the workpiece offset area Setting is carried out on the Coord write menu A 3 2 Coordinate System Offset screen Coord EXT This displays the offset data of the external coordinate system Setting is carried out on the Coord write menu Note C SkipPos take in In simple measurement measurement without us...

Страница 211: ...e coordinate offset coordinate rotation center and coordinate rotation angle 6 An axis other than the measurement axis cannot be moved during the measurement operation after the skip signal is input 3 8 1 Carrying out rotation measurement 1 2 3 Note The measured value will not be set if these parameters are not set to 0 4 5 The message On meas appears 6 Turn ON the control parameter Coord rot para...

Страница 212: ...dinate offset G55 coordinates selected in step 9 the coordinate rotation center and coordinate rotation angle The measurement counter display becomes blank 11 The message On meas disappears Put the spindle in contact with the workpiece using the manual feed or manual handle feed Measure points B and C in the same way Select the workpiece coordinate offset in which the measurement data will be set ...

Страница 213: ...nt is completed designate the tool offset No Finish Tool length measurement II When the tool is at the reference point the distance from the reference point to the tool tip is measured and can be set as tool offset data Tool offset data internal computing tlml operation parameter Gauge block Reference surface height Reference point Movement amount Table Confirm the value of the operation parameter...

Страница 214: ...for the measurement 3 Manual value setting This displays each command value of M miscellaneous function command value and T tool command value 4 Guide drawing This plots the measurement location The drawing differs depending on the type I II of tool length measurement On meas at the upper left of the drawing appears while the measurement switch is ON 5 Tool offset data When tool life management is...

Страница 215: ... of M and T on the screen When the numeric value is input the selected M and T functions are executed A 1 5 1 Setting a manual value command Surface hight This sets the reference surface height data The cursor moves to the reference surface height When the data is set in the setting area and the INPUT key is pressed the reference surface height is set A Offset No When the offset No is set and the ...

Страница 216: ...t The wear amount is cleared to 0 for the tool offset type II Note 1 The measurement values are not written if the cursor is in a position other than Length or Radius Note 2 The axis returns and stops after contacting the sensor but be careful that the axis does not move after that If the axis moves after contacting the sensor the coordinate value that was actually moved will be displayed in the m...

Страница 217: ...ate during the second measurement If the skip signal is not input even after moving to the specified position a warning will appear and the status display will remain the same The On meas 0 state is shifted to when this state is reset On meas 5 This state is entered when the skip signal is input during the second measurement The On meas 6 state is shifted to after deceleration stop is confirmed On...

Страница 218: ...ual issued by the machine manufacturer for details 1 Display items Display item Details 1 Magazine No This displays the currently selected magazine No 2 Tool No D This displays the tool No Refer to the instruction manual issued by the manufacturer for D data functions and targets If the number display is blank the tool is probably not installed or does not match the spindle Check the tool If 0 is ...

Страница 219: ...in each data item of M and T on the screen When the numeric value is input the manual value mode is canceled A 1 5 1 Setting a manual value command Magazn clear This erases all of the magazine data tool Nos and D of the magazine displayed on the screen Only the magazine data displayed is erased Note The contents of the ladder display cannot be erased with this menu Input 0 when erasing B 3 10 4 Er...

Страница 220: ...to the tool No setting column D 2 1 2 2 2 3 2 4 2 5 1 2 3 4 5 2 26 50 32 42 36 Magaz No Pot Tool N o 2 The tool No appears and the cursor moves to the next tool No D 2 1 2 2 2 3 2 4 2 5 2 3 4 5 26 50 32 42 36 2 1 Magaz No Pot Tool N o Note To set D use the key to move the cursor Refer to the manual issued by the machine manufacturer for details on the D data functions and purpose Press the menu Ma...

Страница 221: ...nu highlight returns to normal and the setting is invalidated 2 The PLC command setting mode is released and the menu highlight returns to normal Press the menu key Spindle standby Set the value in the item to be changed and press the INPUT key Press the menu key Spindle standby Set 0 in the item to be erased and press the INPUT key Set the value after the menu PLC command 12 INPUT Press the menu ...

Страница 222: ...he screen are erased Spindle standby data is not erased 2 Erasing spindle standby tool registration data 1 The cursor appears in the Spnd standby tool No 2 3 The spindle standby data is erased Press the menu Magazn 2 Press the menu Magazn clear Press the Y or INPUT key Press the menu key Spindle standby Using and move the cursor to the item where the data is to be erased Set 0 and press the INPUT ...

Страница 223: ...tration screen Displayed when 1 is set for the base common parameter 110141 APC type Note 1 The Pallet 4 Page Registration screen is configured of the Pallet list screen and Pallet details screen Pallet list screen The program No machining validity and machining index plane for each pallet plane are displayed Pallet details screen The program No machining validity and external workpiece coordinate...

Страница 224: ... Program Search ON OFF The ON OFF state of search for the registered machining program is displayed 5 Program Start ON OFF The ON OFF state of continuous start for the registered machining program is displayed When set to ON the searched program will be restarted for the pallet in the machine This setting is valid only when Program Search is set to ON 6 Device Name file list The device names and a...

Страница 225: ... value A random value can be set for each S M T and B data on the screen When a value is set the selected S M T or B function will be executed A 1 5 1 Setting a manual value command Device select The device menu is displayed Designate the device of the program to be registered The selected device is registered as the device for the program indicated by the cursor A 3 11 1 Standard Pallet Registrat...

Страница 226: ...s can be registered However these programs must be in the root directory Up to two pallets can be registered Regardless of whether the program is running an error message may appear depending on the PLC device value The auxiliary setting range is 32768 to 32767 Using the and tab keys move the cursor to the area of the pallet for which a program is to be registered Press the menu key Device select ...

Страница 227: ...ordinate shift EXT Note that automatic restart is invalid in this case If automatic restart is turned ON with the PLC switch it will be turned OFF automatically 4 Program Start ON OFF The ON OFF state of continuous start for the registered machining program is displayed When set to ON the searched program will be restarted for the pallet in the machine This setting is valid only when Program Searc...

Страница 228: ...ete details The screen is shifted to the Pallet details screen The 0 or 90 data of the pallet displayed on the top line of the Pallet List screen is displayed C 3 11 3 Pallet Details screen 3 Setting pallet program search 1 The set details will appear at Program Search 4 Setting continuous start 1 The set details will appear at Program Start 5 Precautions Only decimal 1 to 99999999 programs can be...

Страница 229: ...le shift amount 0 90 180 270 Example Pallet 1 0 Expanded workpiece coordinate offset set 49 Pallet 1 90 Expanded workpiece coordinate offset set 50 Pallet 1 180 Expanded workpiece coordinate offset set 51 Pallet 1 270 Expanded workpiece coordinate offset set 52 Pallet 2 0 Expanded workpiece coordinate offset set 53 Pallet 12 270 Expanded workpiece coordinate offset set 96 The value set as the exte...

Страница 230: ...ect A random pallet can be selected When the pallet No is set and the INPUT is pressed the 0 or 90 pallet details data for that pallet will be displayed The cursor will move to the 0 processing program No A 3 Displaying each pallet index plane data 1 Device select The device menu is displayed Designate the device of the program to be registered The selected device is registered as the device for t...

Страница 231: ...0 and 90 data are currently displayed 1 The pallet 1 180 and 270 data will appear 2 The pallet 2 0 and 90 data will appear When the Next plane menu is pressed after this the screen will shift in the order of the pallet 2 180 270 data display and pallet 3 0 90 data display etc Press the Pallete select menu input the pallet No and then press the INPUT key 3 INPUT Press the Next plane menu Press the ...

Страница 232: ...NC memory the HD FLD and IC card programs can be registered However these programs must be in the root directory Up to twelve pallets can be registered Regardless of whether the program is running an error message may appear depending on the PLC device value The auxiliary setting range is 32768 to 32767 Press the Preve plane menu again Downloaded from ManualsNet com search engine ...

Страница 233: ...rameter screen will open Note The machine parameters can be referred to even if a password is not input but the parameters cannot be set B 3 13 1 High precision common parameters Hi prec axis The high precision axis parameter screen will open Note The machine parameters can be referred to even if a password is not input but the parameters cannot be set B 3 13 2 High precision axis parameters 3 12 ...

Страница 234: ...t menu will be highlighted and the system will wait for a password to be input 2 The cursor will move to the position of the data to be set When the cursor key is pressed and the cursor is moved to a display only data position the cursor will move downward 3 The setting value will appear and the cursor will move Parameters not indicated with an asterisk will be validated after setting Press the me...

Страница 235: ... accuracy mode The compensation coefficient is set when further reducing the control error of the roundness and arc radius reduction amount at the corner Theoretically the accuracy error becomes smaller as the setting value becomes larger but because the speed and arc clamp speed at the corner become lower the cycle time becomes longer 1000 to 100 Standard value 0 33 0039 Corner slow angle In the ...

Страница 236: ...slow angle 120037 Acc dclr std feed mm min 120038 Acc dclr std time ms 330038 Precision coefficien Display only mm min Theor 90deg dull amt The corner droop amount for a 90 angle outer angle is displayed θ is calculated as 90 Display only mm 90deg Cor dec speed The corner deceleration speed for a 90 angle outer angle is displayed θ is calculated as 90 Display only mm min 33 0078 Prec coef curve va...

Страница 237: ... vald is set to 0 330079 Prec coef curve When 330078 Prec coef curve vald is set to 1 R ra F rs Path after servo control Path after soft acceleration deceleration 2 Command path Theoretical radius reduction amount at arc center Display only mm R5mm arc dclr speed The value calculated with the following data is displayed for the arc deceleration speed Fci mm min for the radius 5 mm arc This data is...

Страница 238: ...applying speed clamp on a corner less than the corner deceleration angle The clamp speed will decrease as a larger value is set SS control speed clamp will be invalid when 0 is set 0 to 99 Standard value 0 33 0053 Spline cancel angle If the angle created by two continuing blocks exceeds this setting value the high accuracy spline function will be temporarily canceled Set the angle for creating an ...

Страница 239: ...tch frequency fn Hz in respect to the S pattern filter for the 120071 soft acceleration deceleration time constant T 16 9 ms fn 1000 T dt dt is 16 9 ms Display only Hz The number of digits displayed after the decimal point is fixed to three digits 12 0082 Prec soft time cnst 2 Set this to smooth the speed pattern of each axis during acceleration deceleration before interpolation This will not acti...

Страница 240: ... 200 13 0003 Max cutting feedrate Define maximum cutting feedrate for each axis 1 to 480000 mm min 13 0063 Clamp higt prec mod Set the maximum cutting feedrate for each axis in the high accuracy control mode When 0 is set 130003 Max cutting feedrate is used 0 to 480000 mm min 13 0002 Rapid feedrate Set rapid traverse rate for each axis Maximum setting value depends on machine system and so care is...

Страница 241: ...11 Reserved 2 upc Starting torque compensation invalid Starting torque compensation valid 3 4 vfct1 5 vfct2 00 Jitter compensation invalid 01 Jitter compensation 1 pulse 10 Jitter compensation 2 pulse 11 Jitter compensation 3 pulse 6 7 8 lmc1 9 lmc2 Set the compensation gain with SV016 LMC1 and SV041 LMC2 00 Lost motion compensation invalid 01 Lost motion compensation type 1 10 Lost motion compens...

Страница 242: ... with reverse direction in manual mode Note that G1back is used for the movement in the handle mode 99999 to 99999 Interpolation unit F E D C B A 9 8 aflt zrn2 ovs2 ovs1 lmc2 lmc1 7 6 5 4 3 2 1 0 vfct2 vfct1 bit Name Meaning when set to 0 Meaning when set to 1 0 1 2 3 4 vfct1 5 vfct2 00 Jitter compensation invalid 01 Jitter compensation 1 pulse 10 Jitter compensation 2 pulse 11 Jitter compensation...

Страница 243: ...a different value according to the command direction set this with SV041 LMC2 Set the value for changing the command speed from the to direction during command direction CW in SV016 LMC1 Set the value for changing the command speed from the to direction during command direction CW in SV041 LMC2 When 1 is set compensation will not be carried out when the command speed direction changes 16 0041 LMC ...

Страница 244: ...hen set to 0 2µm will actually be set Adjust upwards in increments of 1µm 16 0040 Current bias high order 8 bits This is used in combination with high order 8 bits of SV030 and SV045 32768 to 32767 Note The setting range of the low order 8 bits is 0 to 100 µm LMC non sensi band The value set for the low order 8 bits of the 160040 lost motion parameter is displayed Display only 0 to 100 µm Download...

Страница 245: ...t buffer or machining program list is displayed in each area These can be changed with the menu keys If operations on this screen are canceled and another screen is moved to the next time the Edit screen is selected the selected area cursor position and display area etc will be the same as before the Edit screen was previously left This allows editing operations to be continued If the operation pa...

Страница 246: ... area and Line No The contents of the program being edited are displayed in the editing area Numbers are assigned to each line of the program and the last two digits of that number are displayed If the line is long and line is fed a line No will not be assigned at the head of the next line 4 List display area When the menu key List is pressed a list of the currently registered machining programs w...

Страница 247: ...cycle programs will appear B 4 1 2 Editing a program Line desig When the line No is set and the INPUT key is pressed the program data for that No and following appear on the screen The cursor moves to the set No A 4 2 2 Designating a random line Line copy This copies a character string at a designated line multiple lines possible A 4 2 5 Copying pasting data Line paste This inserts the copied line...

Страница 248: ...le is deleted Note A wildcard can be used for the file name A Play back This displays the area to display the playback movement amount B 4 1 4 Playback editing To In out The screen changes to the Input output screen C 3 3 Data Input Output screen 3 Notes related to editing operation All operates such as editing new creation MDI area copy paste deletion line designation character string search and ...

Страница 249: ...an existing program No is set Note 2 The texts in parentheses at the top block of the program is the comment Note 3 If the operation parameter Program save type is set to 1 the program is saved each time the INPUT key is pressed Thus it is not necessary to press the File save menu Press the menu key Area change and select the usage area Press the menu key Newly create Input the program No 100 INPU...

Страница 250: ...Note 1 An error occurs if a nonexisting program No is set Note 2 If the selected program is running it can be displayed but not edited Even if data is set an error occurs when the INPUT key is pressed and the program is not saved Note 3 When changing to the Edit screen after operation search the searched program becomes the edit program Note 4 If the operation parameter Program save type is set to...

Страница 251: ...moves to the head character of the program The mode enters the overwrite mode Note 1 If basic common parameter Fix_P is set to 1 a list of the Fixed cycle programs will appear Note 2 If the selected program is running it can be displayed but not edited Even if data is set an error will occurs when the INPUT key is pressed and the data will not be saved Press the menu key List Move the cursor and s...

Страница 252: ...played the MDI operation cannot be started When the INPUT key is pressed the head block will be searched and the message MDI search complete will appear The setting will then be completed If the cursor is moved without editing the block indicated by the cursor will be searched for when the INPUT key is pressed 2 Registering an MDI program 1 The menu is highlighted and waits for the program No inpu...

Страница 253: ...he program position and manual interrupt amount is displayed as the playback movement amount For an incremental value the amount that the axis was moved in the manual mode is added to the current playback movement amount 5 The alphanumeric characters and keys are input in the area for playback editing Note 1 When the and keys are pressed the cursor in the left area will move Move the axis in the m...

Страница 254: ...emain as the playback movement amount 8 Playback editing will end The right area will be erased and the screen list etc displayed previously will appear 2 Notes for playback editing 1 Playback editing of a program in automatic operation is not possible 2 Up to 95 characters can be edited in the playback editing area 3 If the program to be edited is in the playback edit area and the Play back menu ...

Страница 255: ... movement amount Playback INC X 0 000 Regardless of the command value following G92 0 is inserted as the playback movement amount The playback movement amount after INPUT is pressed is calculated for each block that has been playback edited The following table shows the update results of the playback movement amount when there are multiple axis commands before INPUT is pressed once X axis playback...

Страница 256: ...ms 250 Format History type E Date Time Alarm No Parameter data 1 Parameter data 2 b Warning history Symbol W Number of history items 170 Format History type W Date Time Warning No Parameter data 1 Parameter data 2 c Signal history Symbol S Number of history items 426 Format History type S Date Time Device name ON OFF data for R239 Signal name or Power signal or Power signal d Key history Symbol K ...

Страница 257: ... The menu will be highlighted and the cursor will appear at the number setting field 3 The key history will appear Press the menu key Area change and select the working range Press the menu key Open Input M02 LOG ALLLOG LOG and press the INPUT key Press the menu key Area change and select the working range Press the menu key Open Input M02 LOG KEYLOG LOG and press the INPUT key Downloaded from Man...

Страница 258: ...Save file is pressed the file is saved in the memory The message Editing does not disappear when the INPUT key is pressed When the program save type is 1 The file is saved in the memory each time the INPUT key is pressed The message Editing disappears when the INPUT key is pressed The editing operations from when the file is actually opened or in other words the methods of changing the display and...

Страница 259: ...ngeover keys Previous Page Next Page This displays one page of data having the line before the current display top line as its top line When there is less than one page of data a page of data will be displayed including the data currently displayed The cursor moves to the last line of the screen This displays one page of data having the line after the current display bottom line as its bottom line...

Страница 260: ...en The cursor moves one space to the right as the data is set 3 EOB is added to the set data and the data is fixed When newly creating data the cursor moves to the head of the next line When changing existing data etc the cursor does not move Note 1 The data is not saved in the NC memory at this point It will be erased when the power is turned OFF To save the data in the NC memory press Save file ...

Страница 261: ...s to the overwrite mode and the message Editing disappears The message may not disappear depending on the Program save type Note 1 The data is not saved in the NC memory at this point It will be erased when the power is turned OFF To save the data in the NC memory press Save file The method for saving with the INPUT key can be selected with the operation parameter Program save type Note 2 Up to 25...

Страница 262: ... setting a line No the line where the cursor is at is copied 2 The highlight of the copy target lines disappears when editing operations are resumed 3 If the file is edited after the Line copy menu is pressed the data copied in the line is canceled 4 If the last line of the file is the range to be copied the last line can be designated as E Example From 8th line to last line 8 E INPUT Move the cur...

Страница 263: ... highlighted All lines targeted for deletion are highlighted A message confirming the deletion appears 3 The highlighted lines are deleted and the menu highlight returns to normal The lines following the cursor position are shifted upward The cursor position and top line No do not change Move the cursor to the line where the data is to be pasted Press the menu key Line paste Move the cursor to the...

Страница 264: ...thout setting a line No the line where the cursor is at is deleted Note 2 If the last line of the file is the range to be deleted the last line can be designated as E Example From 8th line to last line 8 E INPUT 4 Deleting several lines displayed on a screen one screen of data One screen of editing data machining program is deleted Press the menu key Line clear Designate the range to be copied For...

Страница 265: ...eturns to normal and the character string in the data setting area disappears The search mode is held until the menu key is pressed The character string remains in the setting area 2 Notes when searching 1 If the designated character string is not found a message appears 2 The character string containing the designated character string is searched for regardless of the previous and next characters...

Страница 266: ...g batch replacement the replacement is already completed so the process is not carried out 4 The menu highlight returns to normal and the character string in the data setting area disappears The replacement mode is held until the menu key is pressed The character string remains in the setting area Note 1 When batch replacing all in the program add G to the above setting Search character string rep...

Страница 267: ...S W config screen The hardware configuration card name and sub number and software configuration software number and sub number are displayed in this screen Software configuration screen Hardware configuration screen 1 Software list 3 Hardware card serial number 2 NC serial number Downloaded from ManualsNet com search engine ...

Страница 268: ... NC serial No This displays the NC serial No NC type and unit type 3 Hardware card serial No This displays the serial No of each hardware card 2 Menus Menu Details Type S W config This displays the software list Previous page upper screen C H W config This displays the hardware list Previous page lower screen C Downloaded from ManualsNet com search engine ...

Страница 269: ...d in this screen The option items are displayed by name If all of the options cannot be seen in one screen the rest of options can be displayed by pressing the page changeover key 1 Display items Display item Details 1 Option items The list of currently usable options are displayed 1 Option items Downloaded from ManualsNet com search engine ...

Страница 270: ...s and hexadecimal values Individual device Nos can be displayed separately in the left area and right area Select the valid area with the key when operations such as display changeover and data setting are carried out Each X Y M F L SM TI TO TS TA CI CO CS CA D and R data is the target data 2 Modal output This displays the data and device to carry out modal output The details to be defined are set...

Страница 271: ...ibly output one shot A 5 3 3 Carrying out one shot output 3 How to read the device No and display data A device is an address for classifying a signal handled in the PLC A device No is a series of numbers attached to that device 7 6 5 4 3 2 1 0 0 0 0 0 0 0 1 0 XF XE XD XC XB XA X9 X8 0 0 0 0 1 1 1 1 1 0 0 1 1 1 1 1 X0008 X0010 X0018 Signal status display corresponding to each device No 1 0 Device ...

Страница 272: ... 10ms unit timer setting value TS56 TS231 176 points 16 bit 100ms unit timer setting value TS232 TS255 24 points 16 bit 100ms incremented timer setting value TA TA0 TA55 56 points 16 bit 10ms unit timer current value TA56 TA231 176 points 16 bit 100ms unit timer current value TA232 TA255 24 points 16 bit 100ms incremented timer current value CI CI0 CI127 128 points 1 bit Counter coil CO CO0 CO127 ...

Страница 273: ...erences occur between the PLC signal change and the signal display there may be a delay in the display The machine may also not be able to correspond to extremely brief signal changes 1 Displaying the data of a random device No X0020 1 2 The device X0020 appears at the head of the valid display area Note When setting the device No an error will occur if a number exceeding the specifications or an ...

Страница 274: ...or position is overwritten by the input data and is invalidated The modal output mode is canceled by pressing the key Note The data of the modally output device is displayed in order in the selected area This modal output is held until the output is canceled or the power is turned OFF 3 Releasing the modal output 1 The modal output mode is entered and the cursor appears at the modal output area 2 ...

Страница 275: ...e shot output device is displayed in order in the selected area The one shot output mode is canceled by pressing the key Note Because the input signal X etc to the PLC is updated at the head of each PLC cycle the machine immediately returns to the normal state even if one shot type forced output is carried out Caution Pay close attention to the sequence operation when carrying out forced data sett...

Страница 276: ...unit and power supply unit information is displayed 1 Display items Display item Details 1 Monitoring items This displays each item being monitored The display is changed using the page changeover keys Refer to 5 4 1 to 5 4 5 for details 2 Data of each axis and unit This displays the data of each axis being monitored 1 Monitoring items 2 Data of each axis and unit Downloaded from ManualsNet com se...

Страница 277: ... 4 3 Display items for the power supply unit AUX unit This monitors the various data related to the auxiliary axis MR J2 CT servo control C 5 4 4 Display items for auxiliary axis unit Synchro error This displays the diagnosis information of the synchronous error in the data display area C 5 4 5 Display items for the synchronous error Next axis This displays the data for the next four axes Note The...

Страница 278: ...ntage The maximum value of the current FB peak sampled after the power was turned ON is constantly displayed Max current 2 This displays the rate of current FB to current limit as a percentage The maximum value of the current FB peak sampled in the last two seconds is constantly displayed Overload This is the data used to monitor motor overload Regen Load This is the data used to monitor the resis...

Страница 279: ...te value during NC power ON in the basic machine coordinate system mm Current posn This displays the current coordinate value in the basic machine coordinate system mm RO This displays the multi rotation counter value of the detector stored in the memory during reference point setting PO This displays the position within one rotation of the detector stored in the memory during reference point sett...

Страница 280: ... 1 Time 1 Alarm to 8 Alarm This displays servo alarms that occurred in latest order with the following formats Alarm No Number of the servo alarms that occurred Time Work time when the alarm occurred Maint hist 1 to 4 This displays the maintenance dates Year One digit Month 1 to 9 X Oct Y Nov Z Dec SYS This displays the NVRAM status Downloaded from ManualsNet com search engine ...

Страница 281: ...ne position to the command position is called droop This error is proportional to command speed value Command units Speed r min This displays the actual rotation speed of motor Load This displays the motor load Amp display This displays the 7 segment LED of the driver Alarm This displays the alarms and warnings other than the amplifier display Cycle counter p This displays the position within one ...

Страница 282: ...and 1 Servo ON command 2 3 4 5 Control input 1L 6 Parameter conversion command 1L 7 Servo alarm reset command 8 9 Torque limit mode A B C D E 1H F IN G1 modal Control input 1H This displays the control input signals from the NC Bit Details 0 1 2 3 4 5 Control input 2L 6 2L 7 8 9 A B C D E 2H F Control input 2H Downloaded from ManualsNet com search engine ...

Страница 283: ...ear 4 Fifth gear 7 Eighth gear 2 Third gear 5 Sixth gear 8 Forward run start command 9 Reverse run start command A Index forward run B Index reverse run C Orientation start D L winding selection command E 3H F Sub motor selection command 0 Main motor 2 Sub motor 2 1 Sub motor 1 3 Sub motor 3 Control input 3H This displays the control input signals from the NC Bit Details 0 1 2 3 4 5 Control input ...

Страница 284: ...In driver warning 5 Absolute position reference data setting completed Control output 1L 6 1L 7 In servo alarm 8 9 Torque limit mode A B C D Z phase passed E In position 1H F Control output 1H This displays the control output signals from the NC Bit Details 0 1 2 3 4 5 Control output 2L 6 2L 7 8 9 A B C D E 2H F Control output 2H Downloaded from ManualsNet com search engine ...

Страница 285: ...rse run start A In index forward run B In index reverse run C In orientation start D L winding selected E 3H F Sub motor selected 0 Main motor 2 Sub motor 2 1 Sub motor 1 3 Sub motor 3 Control output 3H This displays the control output signals from the NC Bit Details 0 Current detection 1 Speed detection 2 Speed reached 3 Zero speed detection 4 Orientation completed 5 Synchronous speed match Contr...

Страница 286: ...k time This displays the READY ON cumulative time Units 1hr Alarm hist 1 Time 1 Alarm to 8 Alarm This displays servo alarms that occurred in latest order with the following formats Alarm No Number of the servo alarms that occurred Time Work time when the alarm occurred Maint hist 1 to 4 This displays the maintenance dates Year One digit Month 1 to 9 X Oct Y Nov Z Dec SYS This displays the NVRAM st...

Страница 287: ...e version This displays the software version Connected drive This displays the driver connected to each power supply unit Work time This displays the READY ON cumulative time Units 1hr Alarm hist 1 Time 1 Alarm to 8 Alarm This displays servo alarms that occurred in latest order with the following formats Alarm No Number of the servo alarms that occurred Time Work time when the alarm occurred Maint...

Страница 288: ...lays the actual rotation speed of the motor Load current This displays the continuous non executable torque This is 100 when the constant torque is generated Max current 1 This displays the commanded torque Max current 2 This displays the maximum generation torque of the commanded torque Motor load This displays the rate of the load torque to the tolerable load torque as a percentage Regen load Th...

Страница 289: ...s rotor inertia Unit type This is the unit type Software version This is the servo amplifier software version Motor type This is the motor type Alarm hist 1 No Alarm history Alarm number 1 State Alarm history Alarm details information 2 No Alarm history Alarm number 2 State Alarm history Alarm details information 3 No Alarm history Alarm number 3 State Alarm history Alarm details information 4 No ...

Страница 290: ...ous axes are different Command error Command s command m Command s Slave axis command value Command m Master axis command value Command s command m at start of synchronous control FB error This is the deviation of the slave axis feedback value in respect to the feedback value from the master axis servomotor The error of the actual machine position is displayed The synchronous error check is carrie...

Страница 291: ...and a message appears to confirm the erasing 4 The alarm history data is cleared to zero Motor Work Time Alarm hist 1 Time 1 Alarm 2 Time 2 Alarm 3 Time 3 Alarm Y 7 0 0 0 0 0 0 0 Press the menu key Alarm his clr Press the Y key Press Servo unit Spindle unit or Power unit Using the tab keys and select the axis device from which to clear the alarm history Downloaded from ManualsNet com search engine...

Страница 292: ...dr This directly designates the NC memory address Note that when the NC data is designated the system No is designated System No When common for all systems set to 0 Note Set as a hexadecimal OBJ Item Data This is the Object No Item No and Data No of the data to be set and displayed This is set when carrying out an NC data designation The setting form is Object No Item No Data No Size This is the ...

Страница 293: ...at the cursor position The Data No highlight indicating data is being set is released and constant display is started After writing the cursor moves to Addr of the next line A 5 5 1 Writing reading the data using the NC data designation Continu display Based on the Addr and Size data of the line where the cursor is at the address contents are continuously displayed from the cursor line When NC dat...

Страница 294: ...is executed The Index No highlight returns to normal 2 Reading the data 1 2 The index No highlight is released and the normal display of the memory data starts The data format data size display format of the data displayed in the memory data differs according to the data type to be displayed Note The cursor is constantly displayed Using the cursor keys the cursor can be moved to the Addr area OBJ ...

Страница 295: ...ils NC message This displays the NC status and error messages etc caused by operator operation Up to 16 messages can be displayed by scrolling with the page key Alarm message Using the user PLC this displays messages such as details of machine abnormalities Operator message Using the user PLC this displays operator information messages Downloaded from ManualsNet com search engine ...

Страница 296: ... channel 2 are set Data can be selected from the menu For the conditions other than Data select the item with the cursor and input the value When the Next Page key is pressed the setting area will change from Channel 1 and 2 to Channel 3 and 4 The data for up to ten channels can be set Data Set the type of data to be sampled and the axis name Vert scale div This is the vertical axis scale Set how ...

Страница 297: ...s is valid only during continuous waveform sampling Stop level Set whether to stop the sampling at the rising edge or falling edge of the stop trigger signal 0 Falling edge 1 Rising edge Delay time Designate the time to stop the sampling after the trigger conditions are established The value multiple of 1 77 closest to the input value will be displayed Setting range 0 to 1000000ms 2 Menus Menu Det...

Страница 298: ...ition Note 1 Droop i Droop on Amp monitor screen Spindle unit Motor speed r min Rotation speed on Amp monitor screen Spindle unit Motor load Load on Amp monitor screen Spindle unit Cycle counter p Cycle counter on Amp monitor screen Spindle unit Current FB surv Actual measurement value of load current on Amp monitor screen Spindle unit Motor current when continuous current at stall is 100 Current ...

Страница 299: ...offset in channel 2 setting area 1 The cursor appears at the channel 2 area 10000 0 0 0 Ch2 Data V scale div Base line Offset Samp valid X Position command 2 The cursor moves to the Offset position 10000 0 0 Ch2 Data V scale div Base line Offset Samp valid X Position command 0 3 The set value displays 10000 0 Ch2 Data V scale div Base line Offset Samp valid X Position command 0 8 0 Press the menu ...

Страница 300: ... scale is set as the vertical axis zero position Offset 10000000 to 10000000 0 INPUT The 0mm offset value is added to the sample data Samp valid 0 1 1 INPUT Sampling is validated When setting common items Setting item Menu Setting range Setting example Operation Sample rate 0 to 1000 5 INPUT The value multiple of 1 77 closest to the input value is displayed for the sampling rate unit ms Horiz scal...

Страница 301: ...ms will appear on the submenu Menu Details Type Reference The menu of the data related to the servo axis appears C Posn command The servo position command of the designated axis is registered as the data A Droop The servo droop of the designated axis is registered as the data A FB posn The feedback position of the designated axis is registered as the data A Speed FB The speed feedback of the desig...

Страница 302: ... is registered as the data A 3 The menu of the data related to the auxiliary axis appears C Motor speed The motor speed of the auxiliary axis is registered as the data A Speed FB The speed feedback of the auxiliary axis is registered as the data A Command torque The command torque of the auxiliary axis is registered as the data A FB torque The FB torque of the auxiliary axis is registered as the d...

Страница 303: ... data related to the spindle such as the spindle droop and motor rotation speed is set with the following procedure As an example the motor rotation speed for 2nd spindle will be registered Setting format Setting example Spindle name S No No can be omitted for 1st spindle S S2 etc 1 2 The details set in Data will appear 10000 0 0 Ch2 Data V scale div Base line Offset Samp valid S2 Motor speed 0 No...

Страница 304: ...ing example File No Sub program ID Item No Data No 101 1 1 2 1 2 The details set in Data will appear 10000 0 0 Ch2 Data V scale div Base line Offset Samp valid 101 1 1 2 NC file 0 Note Only the data handled as the Long type can be set Move the cursor to the Data position and press the menu key NC file Set the file No subprogram ID item No and data No using a slash as the identifier 101 1 1 2 INPUT...

Страница 305: ...ed area will be erased This is the main menu of this screen 10000 0 Ch2 Data V scale div Base line Offset Samp valid X Position command 0 8 0 0 0 0 0 If the Ch1 or Ch2 area is valid the Data item in that area will be erased This is a submenu included below the main menu key Data type 10000 0 Ch2 Data V scale div Base line Offset Samp valid X Position command 0 8 0 10000 0 0 8 0 Clear Data clear Do...

Страница 306: ...t be changed while sampling 3 Horizontal scale The horizontal scale set on the setting screen is displayed When AUTO is set on the setting screen the automatically calculated horizontal scale will appear 4 Waveform display area The waveform is plotted Waveforms for up to three channels can be displayed 5 Vertical scale The vertical scale is displayed When there are more than seven digits an expone...

Страница 307: ...waveform is scrolled 1 4 of a screen to the left Note that this menu cannot be used during sampling C Scroll The area displaying the waveform is scrolled 1 4 of a screen to the right Note that this menu cannot be used during sampling C Wave clear The waveform displayed on the screen is erased Note that this menu cannot be used during sampling C Display mode Set the channel of the waveform to be di...

Страница 308: ... will return to normal and the sampling will stop 1 Carrying out continuous sampling 1 The V Anlyz condition screen will open After setting the conditions or data press the menu key To V Anlyz to display the Visual analyzer screen 2 3 The sampling and waveform display will start Press the menu key Display mode Input a value 1 3 9 INPUT Press the menu key To cond set to display the V Anlyz conditio...

Страница 309: ... not appear until the sampling is completed after the trigger conditions are established 3 Only data handled as Long type data can be registered as an NC file on the V Anlyz condition screen If data that cannot be handled as a Long type is set a Setting error will occur when the Continu samplng menu is selected 4 The sampling buffer is a 3072 point ring buffer 1536 points for 2 channel synchroniza...

Страница 310: ... sampling buffer is full The stop trigger conditions stop trigger signal stop signal level setting and delay time will be invalidated 3 Only data handled as Long type data can be registered as an NC file on the V Anlyz condition screen If data that cannot be handled as a Long type is set a Setting error will occur when the Single samplng menu is selected 4 The sampling buffer is a 3072 point ring ...

Страница 311: ...net Warning cancel 1 Display items Display item Details 1 Message Messages indicating the anshin net connection status etc are displayed 2 NC service message Messages from the NC service are displayed Note 1 If the message on one line exceeds 72 characters the excessive characters will be discarded Note 2 The message is held until the power is turned OFF or until another message is received from t...

Страница 312: ...telephone number A 5 9 3 Setting a random telephone number Warning cancel The warning displayed when an error occurs is canceled B 5 9 4 Canceling the network service warning Notice Ope The operator notification is turned ON or OFF B 5 9 1 Validating operator notification Call One touch calling is enabled B 5 9 2 Placing a one touch call 5 9 1 Validating operator notification 1 The menu will be hi...

Страница 313: ...t will turn OFF and the telephone number 012 345 6789 will appear at the cursor position The Notice tel num will change to the input number If the 1 shot No key is pressed again after setting a random telephone number the Notice tel num will change to the selected Notice tel num number 1 to 3 Note 1 If the No 1 No 2 or No 3 menu key is pressed after inputting a random number the displayed random t...

Страница 314: ...arts when an alarm occurs but the line is not connected yet in this state This state is also entered when standing by for transmission Connecting Do not turn the power OFF until the automatic alarm notification ends The line is connected with automatic alarm notification Sending Do not turn the power OFF until the automatic alarm notification ends The diagnosis data is being sent with automatic al...

Страница 315: ...o not turn the power OFF until the operator notification ends Redialing since the NC service is using the line for other communication Status of communication with NC service Connecting with NC service Wait for communication to end In connection standby state since line is being used by anshin net Status of communication with machine manufacturer Connecting with machine manufacturer Wait for commu...

Страница 316: ... be set as the telephone number to be notified to the NC service Hereafter the telephone number set with one touch call or operator notification will be notified to the NC service 6 Messages related to random number setting Message Display in message field Details None Input the new telephone number The input telephone number will be set as the telephone number to be notified to the NC service Her...

Страница 317: ...telephone number 1 used for one touch call and operator notification Hyphens can be used as a delimiting character Within 28 characters 37 9002 Comment 1 Set a comment such as the party s name for the notification party telephone number 1 Within 20 characters 37 9003 Notice tel num 2 Set the telephone number 2 used for one touch call and operator notification Hyphens can be used as a delimiting ch...

Страница 318: ...nection status are displayed 2 MTB message Messages from the machine manufacturer are displayed Note 1 If the message on one line exceeds 72 characters the excessive characters will be discarded Note 2 The message is held until the power is turned OFF or until another message is received from the machine manufacturer 3 Diagnosis information transmission status The status NE is displayed during tra...

Страница 319: ...e net communication state etc are displayed on the MTB net screen is displayed at the end of the message to indicate the transmission reception status during transmission reception of files Note 1 The asterisks increase by one each time the operation progresses Up to five asterisks will be displayed 1 Messages related to all MTB net screens Message Display in message field Details None Press the S...

Страница 320: ...as completed and the line has been disconnected Waiting for dialing Do not turn the power OFF until transmission of the diagnosis data is completed The machine manufacturer is using the line for other communication Status of communication with NC service Connecting with NC service Wait for communication to end In connection standby state since line is being used by anshin net Status of communicati...

Страница 321: ...age has completed and the line has been disconnected 5 Messages related to communication errors Message Display in message field Details Modem initial error Press the Send menu to transmit the diagnosis data to the machine manufacturer Do not turn the power OFF during transmission Communication is not possible because the modem is not connected etc Communication error Press the Send menu to transm...

Страница 322: ... PLC stop This forcible stops the PLC ladder process If this menu key is pressed in the stopped state the stop is canceled C 6 1 Maintenance screen 1 Display items 1 PLC stop state To Abs pos This changes the screen to that for setting the absolute position zero point C 6 2 Absolute Position Setting screen AUX test This changes the screen to that for testing the auxiliary axis operation C 6 3 AUX ...

Страница 323: ...use the transfer function to move all necessary data to another storage device before formatting 2 Backing up the NC SRAM information 1 A message appears to confirm the backup execution 2 The backup is executed The data is backed up into D SRAM DAT on the HD Press the menu Format Press Y or INPUT Press the menu SRAM backup Press Y or INPUT Press a key other than Y or INPUT to cancel the formatting...

Страница 324: ...ng absolute position parameter setting and SRAM backup can be carried out at the Maintenance screen 1 Display items Display item Details 1 PLC stop state The PLC state stopped stop canceled is displayed Stopped STOP is highlighted Stop canceled STOP is not highlighted 2 Explanation of menu operations A brief explanation of the menu operations is displayed 2 Explanation of menu operations 1 PLC sto...

Страница 325: ...ed according to the zero point initialization operations Meaning of display when using machine end stopper method 1 From after the 1 Ref position set is set to when the current limit is reached by pushing the table against the machine end 2 From when the stopper current limit is reached to when the absolute position reference point point on grid is detected The absolute position is established Mea...

Страница 326: ... absolute position setting Refer to 3 List of data related to absolute position setting for details on setting the absolute position 2 Menus Menu Details Type Axis select This changes the display of the axis name and corresponding data After pressing this menu set the axis name X Y S1 etc and press the INPUT key The axis information appears in the selected area A Abs pos set This changes between t...

Страница 327: ...99 999 mm Radius value setting 270003 Move amnt in pwr OFF This checks the difference of the machine positions when the power is turned OFF and turned ON again If excessive this outputs the axis error AX0022 Abs posn tolerance amnt over This will be invalid when 0 is set Set this to 0 when initializing the zero point and set the tolerable value after turning the power ON again 0 99999 999 mm Radiu...

Страница 328: ...tion are required 270002 For 270008 1 270002 For 270008 0 Absolute position origin point Machine basic position Grid point Machine end 0 Random point 1 Grid point 6 2 1 Selecting the axis 1 Operation method 1 The menu is highlighted The system stands by for the axis name input 2 The axis name and the various data details change 345677 601 456789 601 456789 601 345677 601 345677 601 Y Press the men...

Страница 329: ...osn set This displays the initialization method of the absolute position set with the auxiliary axis parameter 700120 ABS Type Dog Stopper Origin method Status abs posn set This displays the initialization state of the absolute position Refer to the table Position setting display item in CHAPTER 3 MAINTENANCE section 5 1 1 Initialization Current station No This displays the number of the currently...

Страница 330: ...is for which initialization or test operation is to be carried out After pressing this menu set the auxiliary axis number 1 to 6 and then press the INPUT key The information on that axis will appear in the selected area The default value is 1 A OpeTest mode This changes the designated axis to the operation adjustment mode Absolute position initialization and test operation are not possible in mode...

Страница 331: ...on adjustment mode is selected Handle Starting from the menu is not possible Manual and JOG When pressed again during reverse run the operation will stop When pressed during forward run the operation will stop once and then reverse run will start Incremental This key is invalid when operation has started When stopped the highlight will be automatically released C Note Refer to section 5 Operations...

Страница 332: ...rting the On board screen the specifications parameters and options are shown below Display screen Displayed screen Model 51 bit0 0 51 bit0 1 MELDAS 610 630 Customer Release screen On board screen MELDAS 615 635 On board screen Operations on On board screen On board function options Possible operations When valid When invalid Monitor function ladder monitor Editing function ROM writing function Wh...

Страница 333: ...CHAPTER 2 MACHINE OPERATIONS Downloaded from ManualsNet com search engine ...

Страница 334: ...TION RAPID TRAVERSE JOG REFERENCE POINT RETURN CYCLE START FEED HOLD EMERGENCY STOP MDI HANDLE INCREMENTAL MODE SELECT PROGRAM RUN SPINDLE OVERRIDE HANDLE mm min FEED AXIS SELECT RESET REFERENCE POINT MANUAL FEEDRATE FEEDRATE OVERRIDE RAPID TRAVERSE OVERRIDE OPTIONAL BLOCK SKIP HANDLE INTERRUPT TOOL LENGTH MEASUREMENT PLAYBACK MISCELLA NEOUS FUNCTION LOCK IN AUTO OPERATION OPTIONAL STOP MANUAL ABS...

Страница 335: ...s resolved Emergency stop Resolve problem that caused emergency stop Operations not ready state Reset operations In automatic operations Automatic operation is stopped Feed hold Automatic operation is started Automatic operation in progress Block stop Automatic operation is started Automatic operation is stopped Start Reset process Reset Finished processing Automatic operation not ready state Rese...

Страница 336: ... circuit and the system is ready to run The READY lamp on the setting and display unit is ON The state is furthermore classified into the following four 1 4 1 Reset The reset state means that the NC unit is reset 1 From not ready to ready transition 4 This state is also called initial state 2 From another ready state to reset transition 5 When the RESET key on the setting and display unit is turne...

Страница 337: ...n panel is turned ON or When automatic mode input is out 1 4 4 Automatic operation stop The automatic operation stop state means that execution of one block is completed and stopped during automatic operation start Both the AUTO START and AUTO PAUSE lamps on the machine operation panel are OFF 1 From automatic operation start to automatic operation stop transition 8 When the SINGLE BLOCK switch on...

Страница 338: ... operation pause busy state entered when the FEED HOLD switch is pressed or block completion stop block stop 2 4 Automatic operation pause busy The AUTO PAUSE lamp is on from FEED HOLD switch turning on to CYCLE START switch turning ON or when the mode selection switch is changed from the automatic to manual mode during the automatic operation 2 5 Return to reference point Output is executed when ...

Страница 339: ...ins the program error state is cleared and the ALARM lamp goes OFF 3 2 Emergency stop button The EMERGENCY STOP button is a red mushroom shape pushbutton The unready state is set by pressing the EMERGENCY STOP button During emergency stop the READY lamp goes OFF and auto operation and manual operation do not work The NC unit is reset If the EMERGENCY STOP button is pressed when a movement command ...

Страница 340: ...point manually Incremental mode Select the mode to move the controlled axis at a given distance Handle feed mode Select the mode to move the controlled axis by using the manual handle Program run mode Select to automatically run the machining program Select to carry out an operation search of the device memory RS 232C HD data server FLD IC Card stored in the machining program to be run MDI mode Se...

Страница 341: ...drate unit is the travel distance mm per minute mm min MANUAL FEED RATE 100 72 0 52 0 37 0 27 0 20 0 14 0 10 0 7 2 6 2 3 7 2 7 2 0 1 4 1 0 0 140 0 200 0 270 0 370 0 520 0 720 0 1000 0 1400 0 2000 0 2700 0 3700 0 5200 0 7200 0 10000 0 14000 0 To move the controlled axis turn on the FEED AXIS SELECT switch The controlled axis is moved while the switch is turned on When the switch is turned off the c...

Страница 342: ...tion procedure Using the MODE SELECT switch select the rapid traverse feed mode MDI MODE SELECT PROGRAM RUN HANDLE INCRE MENTAL RAPID TRAVERSE JOG REFERENCE POINT RETURN Using the RAPID TRAVERSE OVERRIDE switch set any desired override value 25 100 50 1 FEED RATE OVERRIDE To move the controlled axis turn ON the FEED AXIS SELECT switch The controlled axis is moved while the switch is turned ON When...

Страница 343: ...d with the parameters 1 The controlled axis is moved in the direction where the near point detection limit switch and dog approach each other in the reference point return mode 2 When the limit switch kicks the dog the controlled axis carries out a deceleration stop 3 Next the controlled axis moves to the reference point at the approach rate set in the parameter 4 When it arrives at the reference ...

Страница 344: ...D AXIS SELECT switch move the machine If the limit switch exists in the minus direction as illustrated above turn ON a plus FEED AXIS SELECT switch X X Y Y Z Z 4 4 FEED AXIS SELECT For dog mode reference point return turn ON the FEED AXIS SELECT switch or in the direction where the dog and limit switch approach each other For high speed reference point return turn ON the FEED AXIS SELECT switch or...

Страница 345: ... Using the MODE SELECT switch select the incremental feed mode MODE SELECT PROGRAM RUN MDI HANDLE INCRE MENTAL RAPID TRAVERSE JOG REFERENCE POINT RETURN Using the HANDLE INCREMENTAL MAGNIFICATION switch set a travel distance 10 10000 1 1 10 10 100 100 1000 1000 1 5000 100 50000 1000 100000 HANDLE INCREMENTAL MAGNIFICATION The controlled axis selected by turning ON the FEED AXIS SELECT switch once ...

Страница 346: ...UN MDI HANDLE INCRE MENTAL RAPID TRAVERSE JOG REFERENCE POINT RETURN Using the HANDLE FEED AXIS SELECT switch select the controlled axis to be moved X Y Z 4 HANDLE FEED AXIS SELECT Using the HANDLE INCREMENTAL MAGNIFICATION switch set the travel distance per graduation of the handle 10 10000 1 1 10 10 100 100 1000 1000 1 5000 100 50000 1000 100000 HANDLE INCREMENTAL MAGNIFICATION Move the axis by ...

Страница 347: ...T PROGRAM RUN MDI HANDLE INCRE MENTAL RAPID TRAVERSE JOG REFERENCE POINT RETURN Set any desired override value by using the switch RAPID TRAVERSE OVERRIDE FEEDRATE OVERRIDE SPINDLE OVERRIDE Normally set the value to 100 25 100 50 1 160 170 180 190 200 210 220 230 240 250 260 270 280 290 300 150 140 130 120 110 100 90 80 70 60 50 40 30 20 10 0 100 50 60 70 80 90 110 120 SPINDLE OVERRIDE RAPID TRAVE...

Страница 348: ... Memory operation terminates when M02 or M30 in the program is executed The M02 or M30 lamp on the machine operator panel is turned ON To forcibly terminate automatic operation turn ON the RESET switch CAUTION Carry out dry operation before actually machining and confirm the machining program tool offset and workpiece coordinate system offset Downloaded from ManualsNet com search engine ...

Страница 349: ...unit MDI screen Operation procedure The MDI operation follows the memory operation Set data on the setting and display unit MDI screen Using the MODE SELECT switch select the MDI mode The following steps are the same as the memory operation steps See 4 7 MODE SELECT PROGRAM RUN MDI HANDLE INCRE MENTAL RAPID TRAVERSE JOG REFERENCE POINT RETURN Downloaded from ManualsNet com search engine ...

Страница 350: ...ate in automatic operation Note 1 The dry run rate is the movement rate set by using the MANUAL FEEDRATE switch by overriding the programmed feedrate in automatic operation Note 2 See Section 6 7 for feedrate override applied to manual feedrate 5 3 Manual feedrate Use the MANUAL FEEDRATE switch to set the feedrate in jog feed mode during manual operation The feedrate can be selected among 31 steps...

Страница 351: ...100 50000 1000 100000 5 5 Handle feed axis selection Use the HANDLE FEED AXIS SELECT switch to select the axis moved by handle operation when the handle mode is selected 5 6 Manual pulse generator In the manual handle mode fine feed of the machine can be made by turning the manual pulse generator The manual pulse generator has 100 graduations per revolution and outputs one pulse per graduation The...

Страница 352: ...E START switch is validated when the switch is turned ON then OFF Use the FEED HOLD switch to temporarily stop automatic operation for example deceleration stop of the control axis during automatic operation To restart operation use the CYCLE START switch 5 8 Feed axis selection Use the FEED AXIS SELECT switch to start the controlled axis during manual operation While the FEED AXIS SELECT switch i...

Страница 353: ...new switch setting is validated after the operation stops once 6 M S T and B commands are executed as programmed Note 1 Each coordinate value updated by the machine lock is preset to a value created based on the machine value by resetting including M02 and M30 6 2 Display lock 1 By turning ON the DISPLAY LOCK switch the machine will move for the movement by automatic and manual operation but the c...

Страница 354: ...RUN switch is turned ON the feedrate set by using the MANUAL FEEDRATE switch takes precedence over the programmed feedrate F 6 7 Manual override 1 When the MANUAL OVERRIDE switch is turned ON the override value set by using the FEEDRATE OVERRIDE switch takes precedence over the value set by using the MANUAL FEEDRATE switch 2 The override value also takes precedence over the dry run during automati...

Страница 355: ...bles the operator to specify whether or not a block beginning with a slash code is executed Example To work two parts as illustrated below if the following program is prepared and work is made by turning ON the OPTIONAL BLOCK SKIP switch part 1 is provided if work is made by turning OFF the switch part 2 is provided Program N1G54 N2G90G81X50 Z 20 R3 F100 N3X30 N4X10 N5G80 M02 Part 2 Switch OFF Par...

Страница 356: ...e distance W Y X Feed hold stop Path on program absolute command Manual interrupt Program coordinate system is updated by tool move distance Starts after manual interrupt Passes through the same path as program W Y X Fee hold stop Path on program absolute command Manual interrupt Program coordinate system is not updated by the tool movement distance value Path after manual interrupt Path is shifte...

Страница 357: ... image G command mirror image etc The external switch mirror image and parameter controlled mirror image are explained here Refer to the Programming Manual for information on G command mirror image External switch mirror image The mirror image function is controlled with the MIRROR IMAGE switch installed on the machine operation panel Parameter mirror image The mirror image function is controlled ...

Страница 358: ...nt to that of the external switch mirror image except that the 1 or 0 is set in the item MIRROR IMAGE of the NC screen Axis param screen instead of using a MIRROR IMAGE switch When 1 is set Mirror image ON When 0 is set Mirror image OFF This is used when there is no external switch for mirror image operation on the machine operation panel etc The external switch mirror image and parameter mirror i...

Страница 359: ...sing the MDI mode 3 MIRROR IMAGE switch ON 4 Program search 5 Cycle start 6 Machining finish MIRROR IMAGE switch OFF Note If an NC reset or Machining program restart is carried out during operation with 3 MIRROR IMAGE switch ON the mirror image center will move to the Restart position and the coordinate system will shift 3 Combination with other functions a Zero point return command G28 G30 during...

Страница 360: ...image center When mirror image and radius compensation are applied When only mirror image is applied d Machine coordinate system selection G53 The mirror image is not applied for positioning by a G53 command Issue the next movement command in the G90 mode e Fixed cycle G76 G87 The mirror image is not applied to shift operations in the XY direction for G76 and G87 commands The mirror image is appli...

Страница 361: ...he same machining program Program shape NC reset Return to the mirror center Mirror image center NC reset during operation Program example when repeating the program G90 G0 X0 Y0 Program start position X___ Y___ G0 X0 Y0 Return to program start position M02 NC reset If the NC is reset at a point other than the mirror image center and the same machining program is restarted the mirror image center ...

Страница 362: ... the mirror image center or issue an absolute value positioning or zero point return command G28 G30 once after canceling the mirror image The mirror state in the NC can be confirmed with the MR display Axes displayed with a MR are handled in the NC as having the mirror image applied This is so the MIRROR IMAGE switch ON OFF can be monitored The MR display disappears when the MIRROR IMAGE switch i...

Страница 363: ...am The parameter that is used by the error detect switch and the G09 command for determining the remaining distance after deceleration for moving to the next command can be set with the settings monitor device Error detect ON Error detect OFF Y axis command Y axis command X axis command 6 14 Follow up function The follow up function monitors machine motion in the emergency stop state and reflects ...

Страница 364: ... speed FM1 parameter setting value F5 F8 max speed FM2 parameter setting value Example For a 10mm min increase decrease amount per handle gradient If F max 3600mm min F 10 3600 K Thus K 360 3 The conditions for validation are as follows a The operation must be automatic program run MDI b The operation must be in automatic start c The operation must be in cutting feed and F1 digit feedrate command ...

Страница 365: ...automatic operation X axis Control with manual operation Manual automatic simultaneous signal ON Simultaneous control is possible Y axis Z axis A axis B axis MDI HANDLE INCREMENTAL REFERENCE POINT RETURN MANUAL TAPE JOG NONE NONE MEMORY 6 17 2 Detailed explanation 1 Conditions for validating this function This function is valid when the following conditions are established in any order a This func...

Страница 366: ...utomatic simultaneous valid axis will not stop with the single block stop or feed hold stop g If the manual automatic simultaneous valid axis reaches the stored stroke limit or stroke limit the axis moving in automatic operation will also stop immediately and the feed hold state will be entered In this case automatic operation can be restarted by canceling the stored stroke limit or stroke limit w...

Страница 367: ...progress Jog mode Y700 Manual automatic simultaneous valid Z axis Y522 Feed axis selection Z axis Y4E2 Axis moving signal Z axis X3A2 Movement with jog feed Movement with automatic operation OPW0105 Internal interlock axis exists b If the manual automatic simultaneous valid signal is turned ON for an axis moving with automatic operation the operation warning OPW0105 Internal interlock axis exists ...

Страница 368: ...n virtual axis interpolation f If the manual automatic simultaneous valid signal is turned ON for an axis moving with the automatic operation s G90 modal or G53 command and the manual automatic simultaneous valid axis is moved manually when the manual automatic simultaneous valid signal turns OFF the end point of automatic operation will be deviated by the amount the axis was moved manually During...

Страница 369: ...tomatic simultaneous valid signal is invalid for the slave axis during synchronous control When the manual automatic simultaneous valid signal is turned ON for the master axis the slave axis will become the manual automatic simultaneous valid axis f Manual random feed will not be executed if even one axis other than the manual automatic simultaneous valid axis is set as the manual random feed axis...

Страница 370: ...operation pause including a block stop is established automatic handle interruption is enabled 3 If the axis is moved during dwell G04 command processing by using automatic handle interruption the dwell count operation will stop A check is made for that the axis movement has been completed then the dwell count operation continues 4 Automatic handle interruption is enabled even if automatic machine...

Страница 371: ... of that axis The movement speed equals the Automatic movement speed Interruption speed by the manual handle The movement speed equals Automatic start movement speed Speed resulting from manual handle interruption 3 If during automatic start manual handle interruption is executed in the same direction for the axis that is moving at an external decelerating speed the axis movement speed may exceed ...

Страница 372: ...ning Return command is issued in the block next to the one for which the interruption has been completed For continuous running Return command is issued in the third block if the block for which the interruption has been completed is the first block Note Each of the POSITION and MACHINE display includes the distance of handle interruption For automatic handle interruption select whether absolute d...

Страница 373: ...ated Parameter 1_abs ON 1 Parameter 130038 intabs Every axis OFF 0 Absolute value is not updated Updated ON Absolute value is updated Not updated OFF 0 PLC interface manual absolute switching OFF Absolute value is not updated Updated Path after interruption Absolute value mode program absolute value update invalid Path after interruption Absolute value mode program absolute value update valid sing...

Страница 374: ...block for which tool radius compensation G41 G42 is being executed the proper tool path will return in the succeeding block This rule applies only when the program absolute update is active during single block running If program absolute update is active during continuous running the proper tool path will return with the following Executing the command in the fourth block after the one for which t...

Страница 375: ...rruption Incremental value mode continuous operation Path after interruption Absolute value mode program absolute value update valid single block operation Path after interruption Absolute value mode program absolute value update valid continuous operation Downloaded from ManualsNet com search engine ...

Страница 376: ...rogram absolute value update valid continuous operation 6 18 7 Interrupt amount reset Interrupt amount is reset when 1 Dog reference point return is executed 2 Emergency stop is released 3 Reset rewind is executed or 4 Reset 1 is executed when the interrupt amount reset parameter is ON Downloaded from ManualsNet com search engine ...

Страница 377: ...terrupt axis by setting the HANDLE AXIS SELECT switch on the machine operation panel Select the travel distance per handle graduation by setting the HANDLE INCREMENTAL MAGNIFICATION switch 10 10000 1 1 10 10 100 100 1000 1000 1 5000 100 50000 1000 100000 X Y Z 4 HANDLE FEED AXIS SELECT HANDLE INCREMENTAL MAGNIFICATION Turn the manual handle in the or direction and change the Z axis cut depth amoun...

Страница 378: ... unmodal command 3 When G61 exact stop check mode has been selected The G61 command is a modal command The modal is canceled by the following commands G61 1 High precision control G61 2 High precision control for die machining CAM data G61 3 High precision control for die machining height sensing data G61 5 High precision control for part machining G62 Automatic corner override G64 Cutting mode c ...

Страница 379: ...nging to the manual mode handle JOG JOG rapid traverse At this time the transit point for designating the return path can be designated Retracting is also possible by automatic operation handle interrupt c Designating the transit point Two transit points can be designated To designate move to the transit point with the manual mode and then turn ON the transit point switch to memorize it The transi...

Страница 380: ... start point Transit point 2 Transit point 1 Interruption point When transit point 2 is not designated When only interruption point is designated without transit point designation When transit point 2 is not designated the return start point will be regarded as the transit point 2 When only the interruption point is designated without a transit point designation the return start point will be rega...

Страница 381: ... ret1 move to the interruption point as shown with 5 in the drawing The non designated axes move as shown with 4 in the drawing The axes designated with ret2 move to the 2 transit point shown as 2 in the drawing while the non designated axes move as shown with 1 The parameter details are as shown below 7 6 5 4 3 2 1 0 7 6 5 4 3 2 1 0 ret1 ret2 Transit point 1 1st axis Transit point 1 2nd axis Tran...

Страница 382: ...e block is valid f If reference point return is carried out during the tool retract return the tool compensation amount will be invalidated when the reference point return is completed Thus if the tool is compensated before tool retract when the tool is returned after reference point return the path will shift by the tool compensation amount at the block following the block containing the interrup...

Страница 383: ...ration do not reset the program until manual synchronous tapping is completed The manual synchronous tapping mode will be canceled even if reset is applied in the handle mode c During manual synchronous tapping the acceleration deceleration time constant is the same as normal handle operation The return override is also invalid d When using the multiple spindle specifications changes to the comman...

Страница 384: ...on speed e External deceleration is valid even during automatic corner override G62 f The external deceleration signal is invalid for the machine lock axis g External deceleration is valid even during incremental feed movement h External deceleration is invalid during the synchronous tap modal i External deceleration is invalid during the tapping mode j External deceleration is valid even during s...

Страница 385: ...ile moving at a speed lower than the external deceleration speed the feedrate will not be affected Excluding during G00 non interpolation the composite speed of each axis will be the external deceleration speed during automatic operation The signal is valid after resetting and applying emergency stop Downloaded from ManualsNet com search engine ...

Страница 386: ...CHAPTER 3 MAINTENANCE Downloaded from ManualsNet com search engine ...

Страница 387: ...ection The axis must stop when the limit switch kicks the dog The stroke end alarm must be displayed in the ALARM DIAGNOSIS screen of the setting and display unit The axis must not move when a minus direction movement command is issued again The axis must move in the plus direction when a plus command is issued 2 Confirming the reference point return operation 1 Decrease the reference point return...

Страница 388: ...ers are set for the motor used 2 Adjusting the servo parameters The following three servo parameters are generally used to adjust the drive section system When changing this parameter data do so one or two increments at a time Do not change the parameter value greatly all at once 1 PGN1 Position loop gain Standard value 33 While this value is usually set to 33 it is lowered to approx 25 when overs...

Страница 389: ...d positions to the first grid point after leaving the near point dog This grid point is called the electrical zero point Normally this electrical zero point position is the reference point For the reference point return using the relative position detector the first return after turning the power ON is carried out with the dog type reference point return The second and following returns are carrie...

Страница 390: ...istance between the grid points is the grid space The grid space can be set in mm millimeter units in the ZERO POINT RETURN PARAM 150004 Grspc 5 Grid amount The grid amount expresses the distance from when the near point detection limit switch leaves the near point dog and reaches the grid point electrical zero point when the dog type reference point return is executed The grid amount can be confi...

Страница 391: ...tem zero point 150002 G28crp Approach speed Reference point Position returned to with the reference point return command Electrical zero point Grid point Grid space Near point dog Grid mask Grid mask amount Grid amount Reference point shift amount 150008 1_rfp 1 Reference point The grid amount is displayed on the ALM DIAG SERVO MONITOR screen The first grid at the end of the grid mask is the elect...

Страница 392: ...hift direction can be set only in the reference point return direction If the reference point shift amount is 0 the grid point electrical zero point will be the reference point 5 Grid space 150004 Grspc This parameter sets the distance between grids The normal grid space is the ball screw pitch SERVO PARAM 160018 PIT value or the movement amount per motor rotation set as a mm millimeter unit To ma...

Страница 393: ...y changing the near point dog or by setting the grid mask amount Setting the grid mask has the same effect as lengthening the near point dog If the grid amount is near the grid space or 0 the grid point will be at the position that the near point dog is kicked so set a grid mask The grid mask amount is set so that the grid mask is one half of the grid space The grid mask amount can be set only in ...

Страница 394: ...s parameter sets the direction to move after the limit switch kicks the dog causing a deceleration stop during dog type reference point return The direction is either positive 0 or negative 1 If the reference point position is in the positive direction from the near point dog set 0 If the reference point position is in the negative direction from the near point dog set 1 a When reference point ret...

Страница 395: ...lative position detection 9 Machine coordinate system offset 150008 1_rfp This parameter is set when the basic machine coordinate system zero point position is to be shifted from the reference point position When 0 is set the reference point position will be the position of the basic machine coordinate system zero point 1_rfp sets the reference point position from the basic machine coordinate syst...

Страница 396: ...t values can be read 4 Calculate the grid mask amount with the grid mask amount calculation method 5 Display the ZERO POINT RETURN PARAM screen Set the grid mask amount 6 Turn the power OFF and ON and then execute reference point return 7 Display the ALM DGN SERVO MONITOR screen on the setting and display unit The grid space and grid amount values can be read If the grid amount value is approx hal...

Страница 397: ...e established without using a dog This eliminates the need to install a dog or a limit switch on the machine and simplifies the machine structure The following four methods can be used for the dogless type zero point initialization Method Basic point type Adjustment procedures to be referred Random point type 4 4 1 Machine end stopper method Grid point type 4 4 2 Random point type 4 5 1 Marked poi...

Страница 398: ...nly Ref point offset 1st reference point Basic machine coordinate system zero point G53 zero point With the dog type there is no absolute position basic point The reference point is the basic point and the basic machine coordinate system is determined by the 150008 1_rfp value 3 Reference point return operation The dog type and high speed reference point return operations are as follows Manual ref...

Страница 399: ...ote 2 Automatic start is not possible 2 Selecting the zero point initialization method Select the zero point initialization method with the following parameters 130041 Abs on Axis spec param screen 0 Incremental position detection 1 Absolute position detection dog type 2 Absolute position detection dogless type 270005 No stopper Zero point set screen 0 Machine end stopper method 1 Marked point ali...

Страница 400: ...ill be memorized The zero point is initialized at this stage Notes 3 4 When the absolute position basic point memorizing process is completed will appear 4 After all axes have been returned to the zero point output the parameters Grid point Dog Encoder Z phase Grid point Zero point shift G28sft Reference point Note 1 If the execution of the dog type reference point return is interrupted by resetti...

Страница 401: ...r pushing against the machine end stopper Note 1 3 Press the Abs posn set key Note 2 4 Confirm the parameters for the axis for which zero point initialization is to be carried out 270005 No stopper 0 270008 Ref position type 0 Note 3 0 will appear at Status for the axis for which the zero point has not been initialized 5 Set 1 for 1 Ref position set of the axis for which zero point initialization ...

Страница 402: ... Status for that axis 6 Change to the manual mode and push against the machine end stopper until the current limit is reached Note 4 7 When the current limit is reached with step 6 the distance from the machine end stopper to the previous grid will appear at Machine End 8 Move in the direction opposite to the machine end with the manual mode The machine will not move in the machine end stopper dir...

Страница 403: ... power is turned ON the message AX0104 Some ax does not cross Z phase will appear when the current limit is reached In this case return one or more grid back and repeat the procedures from step 6 5 When the grid mask amount zero point return parameter 150005 Grmask is set and the grid mask amount is larger than the distance from the machine end stopper to the grid point the next grid point will be...

Страница 404: ...basic point Operation procedure Status display on Zero point set screen 1 Select the Zero point set screen 2 Press the Abs posn set key Note 1 3 Confirm the parameters for the axis for which zero point initialization is to be carried out 270005 No stopper 0 270008 Ref position type 1 Note 2 4 Change to the manual mode and move to the marked point Note 3 0 will appear at Status for the axis for whi...

Страница 405: ...or which zero point initialization is to be carried out Note 3 6 The distance from the machine basic position to the previous grid will appear at Machine End 7 Return in the direction opposite to the final entry direction with manual movement Note 4 When the axis movement stops and 1 is set for 1 Ref point set 2 will appear at the Status for that axis 8 When reached to the first grid point the mac...

Страница 406: ...n refers to the movement direction when the marked point machine basic position is reached with the procedure in step 4 8 6 8 6 Final entry direction Machine end Grid point Machine basic position Final entry direction 1 Final entry direction Machine end Grid point Machine basic position Final entry direction 1 Grid point 5 When the grid mask amount zero point return parameter 150005 Grmask is set ...

Страница 407: ...xes have been returned to the zero point output the parameters 0 will appear at Status for the axis for which the zero point has not been initialized When 270008 Ref point type 0 1_rfp 1_rfp New 270002 Ref position offset Old 270002 Ref position offset New basic machine coordinate system zero point G53 zero point New 1st reference point Old basic machine coordinate system zero point G53 zero point...

Страница 408: ...u key 3 Designate the axis for which the absolute position basic point is to be reset and set 2 for the 1 Ref position set of that axis Note 1 4 Following the previously explained zero point initialization procedures carry out initialization again 5 After the zero point has been initialized turn the power ON again 6 After the axes have been returned to the zero point output the parameters 0 will a...

Страница 409: ... absolute position basic point again Note When the absolute position has been lost due to any other causes the machine zero point may be deviated Thus do not recover the absolute position using this function 2 Detailed explanation Operation procedure Operation 1 Select the Zero point set screen 2 Press the menu Axis select and set the axis name The axis name at the top line of the display will cha...

Страница 410: ... is ON 4 Press the menu Abs posn set 5 Move the cursor to the Operation mode and select the operation mode A setting other than 0 to 3 will cause an error When 1 is selected operation can be started only when the absolute position is established 6 When the Operation mode is STEP or HANDLE move the cursor to Scale and set the feed amount per pulse A setting other than 0 to 3 will cause an error 7 M...

Страница 411: ...e position is being initialized with the stopper method zero point initialization This state is maintained until the machine end is pushed against Press Rel This appears after the machine end is pushed against and the current limit is reached continuously for a set time Origin type This appears until the machine basic point is moved to from the initialization of the absolute position and the basic...

Страница 412: ...as an HD and FLD Refer to section 3 3 Data Input Output screen in CHAPTER 1 SCREEN OPERATIONS The absolute position can be recovered using the absolute position data file backed up in an external device To recover the absolute position input the data file into the NC memory on the Input Output screen and then turn the power ON again Downloaded from ManualsNet com search engine ...

Страница 413: ... an error 6 Move the cursor to Parameter set and set the No of the operation parameter group A setting other than 0 to 3 will cause an error 7 Rotate the auxiliary axis Start by pressing Normal Rot or Reverse Rot JOG Rotation will start in the commanded direction When the same menu is pressed again the axis will immediately decelerate and stop If the Normal Rot menu is pressed during reverse run t...

Страница 414: ... the soft limit I can be validated with the stored stroke limit IC Stored stroke limit IB Stored stroke limit IIB Stored stroke limit IC Prohibited range Moveable range Stored stroke limit IC If a tool tries to move past the set range an alarm will occur and the axis will decelerate to a stop If the prohibited range is entered and an alarm occurs movement will be possible only in the direction opp...

Страница 415: ...dating conditions I Outside Set by the machine manufacturer When used with II the narrow range designated by the two types becomes the movement valid range 130014 Swot 130015 Swot Zero point return is completed 130014 and 130015 are not set to the same value II Outside 340011 soft limit inside 0 Used with I IIB Inside Set by the user The parameters can be changed and the function turned ON OFF wit...

Страница 416: ...set boundary is the prohibited range When used with the stored stroke limit II function the confined range designated by the two functions becomes the moveable valid range Point 2 Prohibited range Machine coordinate system Machine moveable range Point 1 Prohibited range Setting value Setting value The following values are set with the coordinate values in the machine coordinate system Point 1 1300...

Страница 417: ...s selected this function is called stored stroke limit IIB When using program commands entry of the tool into the prohibited range is prohibited with G22 and entry into the prohibited range is enabled with G23 The stored stroke limit II function can be invalidated for each axis with the parameter setting 340007 soft limit invalid 1 340011 soft limit inside can be set for each axis but when used in...

Страница 418: ...2 Point 4 Point 1 Point 3 Range prohibited with stored stroke limit IIB Machine coordinate system Machine movement valid range setting value setting value Prohibited range Prohibited range 3 Setting with program commands With the stored stroke limit II IIB function the prohibited range parameters can be changed and this function can be turned ON and OFF with the program commands Refer to the secti...

Страница 419: ...int 1 Point 3 Range prohibited with stored stroke limit IIB Machine coordinate system Machine movement valid range setting value setting value Prohibited range Prohibited range Point 6 Point 6 The following values are set with the coordinate values in the machine coordinate system Point 5 340025 OT_IB Point 6 340026 OT_IB The area determined by points 1 and 2 is the prohibited range set with store...

Страница 420: ... valid when the axis specification axis parameter 130027 IB_off is set to 0 or 1 and 130062 IC_off is set to 0 The boundary is set for each axis with the parameters axis specification parameters 130060 OT_IC and 130061 OT_IC The inside of the set boundary becomes the additional moveable range Point 2 Point 1 Point 3 Machine coordinate system Machine moveable range Prohibited range Prohibited range...

Страница 421: ...ted range the entire range will be prohibited If the inside is the prohibited range the entire range will be the moveable range 2 Stored stroke limit IC is validated by changing the axis specification parameter 130027 IB_off 3 Make sure that the lower limit value of the stored stroke limit IC setting value is smaller than the upper limit value 4 Movement in the prohibited range is limited to that ...

Страница 422: ...er clogging 4 A door of the control panel is not open 5 Ambient vibration 6 The unit is located in a dusty location 7 Something that causes high frequency is placed near the NC unit 7 1 2 Checking the inside of the NC unit Check that the following troubles have been eliminated 1 Cable connectors are loosened 2 Installing screws are loosened 3 Attachment amplifier screws are loosened 4 The cooling ...

Страница 423: ...ARM appears 1 Replacement procedure Turn the control section power OFF when replacing the battery Complete the battery replacement within 30 minutes of turning the power OFF If a battery is not connected within 30 minutes of turning the power OFF the data backed up by the battery may be destroyed 1 Confirm that the control unit power is OFF If the power is not OFF turn it OFF 2 Open the operation ...

Страница 424: ...cording to local laws CAUTION If the BATTERY LOW warning is output save the machining programs tool data and parameters to an input output device and then replace the battery If the BATTERY alarm occurs the machining programs tool data and parameters may be damaged After replacing the battery reload each data item Do not replace the battery while the power is ON Do not short circuit charge overhea...

Страница 425: ...d bottom left 4 Remove the fixing screws two locations top and bottom left of the control section installation fitting and open the control section installation fitting 5 Pull out the backlights built into the top and bottom left of the LCD panel The backlights have locking claws on the front Hold these claws down while pulling the backlight out 6 Insert the two new backlights into the top and bot...

Страница 426: ...ll in the slot on the control section cooling fan housing 4 Pull out the cooling fan from the control section cooling fan housing 5 Pull the connector connected to the cooling fan out from the control section PCB 6 Replace the cooling fan with the new one Insert the connector connected to the new cooling fan into the control section PCB 7 Put the cooling fan into the control section cooling fan ho...

Страница 427: ...stallation fitting Pull the HDD toward the top of the installation fitting and remove the damping cushions 8 Disconnect the F140 cable from the HDD and connect it to the new HDD Pay attention to the connector direction when installing 9 Install the HDD onto the HDD installation fitting with the HDD PCB section up Install the HDD in the grooves of the damping cushions attached to the HDD installati...

Страница 428: ...section Control section HDD installation fitting Damping cushions HDD fixing bracket F140 cable F140 cable PCB section PCMCIA interface PCB HR841 Fixing screw Pin 1 display mark Leave 4 pins open CAUTION Incorrect connections may damage the devices so connect the cables to the specified connectors Do not replace the HDD while the power is ON Dispose of the old HDD according to local laws Downloade...

Страница 429: ...nd fix with the installation screws 7 Connect the F140 cable to the HDD in the HDD unit Hold the HDD firmly in front and back and pay attention to the connector direction when connecting the F140 cable 8 Connect the heater power cable of the HDD unit to the operation section PCB 9 Close the operation box door Operation section PCB Heater power cable HDD unit Pay attention to the connector directio...

Страница 430: ...odically about once every two months clean the head of the floppy disk unit using the following procedure a Recommended cleaning disk Maker Memorex Japan Type Memorex Cleaning Floppy 3 5 inch double sided Method Dry method b Cleaning method 1 Insert the cleaning disk into the floppy disk unit to be cleaned 2 Start the cleaning program and operate following the instructions on the screen 3 When the...

Страница 431: ...k Use a soft tipped instrument such as a felt tip pen to write on labels already attached to the floppy disk 6 Gently insert the floppy disk into the floppy disk unit with the correct orientation The floppy disk may be damaged if it is roughly inserted or removed 7 Before using a floppy disk brought in from outdoors where there is a great difference in temperature or humidity leave the disk in the...

Страница 432: ... damage data damage etc as well as for storing important data c Observance of working conditions Floppy disk units and floppy disks are sensitive to temperature and humidity changes dust and dirt Therefore floppy disk units and floppy disks should be used observing the precautions mentioned above If the working conditions are not satisfied especially with regard to temperature for example when sta...

Страница 433: ...k defect Does an FLD error occur Heat the room until the temperature rises above freezing The floppy disk is off track due to the temperature Clean the floppy disk unit head Does an FLD error occur Replace the floppy disk with the backup disk Error caused by a dirty head Does an FLD error occur The floppy disk unit is defective Floppy disk defect NO NO YES YES YES NO NO YES NO YES NO YES Downloade...

Страница 434: ... easily scratched so be careful during handling 2 Glass is used in the LCD panel Be careful not to drop the LCD panel or allow it to hit hard objects as the glass may chip or break 3 The polarizing plate may be stained or discolored if drops of water etc adhere to it for long periods so be sure to wipe off any moisture immediately 4 Wipe off any dirt dust etc on the polarizing plate using absorben...

Страница 435: ...hod LCD panels changes with temperature fluctuation If this happens and the panel is difficult to see open the operation box door and adjust the contrast with the contrast adjustment volume on the LCD signal interface PCB 7 3 5 PCMCIA Card 1 Handling the PCMCIA card The general handling methods for the PCMCIA Card are described below Refer to the instruction manual of the PCMCIA Card used for deta...

Страница 436: ... the machine sequence alarm indicate Is the LCD screen normal 4 Frequency of fault When did the fault occur Frequency Did the fault occur during operation of another machine If the frequency is too small or the fault occurred during operation of another machine the cause may be noises of the supply voltage for example In this case check that i the supply voltage is normal does momentary drop occur...

Страница 437: ...plug them in Check for broken wires in the cable Replace the cable if there are any broken wires There is a problem with the power supply socket Always turn the switch on the socket ON if one is present Check whether the specified power voltage and power frequency are being output from the socket The external power supply is faulty Check whether the power is only being supplied by the external pow...

Страница 438: ...t Check whether the voltage fluctuates according to the time of day Check whether instantaneous power failures are occurring Faults occur when a peripheral device operation starts Check whether the voltage is instantaneously dropping when the peripheral device operation starts The PSEMG red LED of the HR081 Card is lit Cause Remedy The emergency stop switch connected to the EMG connector is ON A c...

Страница 439: ...faulty Contact the nearest service center The LCD screen is too dark or too light to see the characters Cause Remedy The contrast voltage is not adjusted correctly Turn the contrast voltage fine adjustment VR1 volume to the left or right to adjust the contrast of the HR273 Card mounted on the back of the display Then check that the screen is displayed correctly The LCD screen characters are light ...

Страница 440: ...erature protection when the HEAT UP LAMP on the operation section is lit Standby until the HDD warmup is completed When the problem does not correspond to any of the above Contact the nearest service center 5 Problems when the system starts The NC does not start correctly Cause Remedy The 7 segment NCLD1 display of the HR111 Card displays 8 Check that the NCSYS rotary switch is set to 0 The 7 segm...

Страница 441: ...If the correct voltage is being supplied contact the nearest service center 7 Others Check the following Is the mode selected correctly For tape operation is the tape correctly mounted Are the starting conditions satisfied Depending on the machine the start may be locked until the specified conditions are satisfied Check with the instruction manual issued by the machine manufacturer Are the overri...

Страница 442: ...CHAPTER 4 APPENDICES Downloaded from ManualsNet com search engine ...

Страница 443: ...ns in the same way as when creating usual user created machining programs In this case the parameter Basic specification parameter 110007 Fix_P must have been set 1 Turning ON the parameters for Fixed cycle operation 1 2 When this parameter is valid the IN OUT and EDIT screens are dedicated for operation of Fixed cycle programs The machining program handled here becomes a program for controlling t...

Страница 444: ...editing pages 2 Outputting Memory External device The operation method is the same as for user machining programs There are two ways of outputting the Fixed cycle programs which have been entered output of one program at a time or output of all programs together When the data transfer begins the message Transferring appears When the EOR code is read the data transfer stops and the message Transfer...

Страница 445: ... command Check for Fixed cycle invalidity Define the cutting amount Initialize the return amount total cutting amount Inhibit single block stop Define the return amount of the next block Calculate the feed amount Feed Does the total cutting amount return amount exceed the cut amount Cutting feed G 1 IF 30 GOTO1 G0 Z 2 G 6 H 7 2 5 3003 8 OR 1 G1 Z 3 IF 4 EQ 0 GOTO5 G4 P 4 N5 3003 8 G0 Z 3 2 N1 M99 ...

Страница 446: ... the spindle forward Return G85 O100000850 Boring 1 Fixed cycle block 1 movement command Check for Fixed cycle invalidity Inhibit single block stop Return G0 Z 28 29 11 14 END1 N1 G1 Z 3 26 3003 8 G0 Z 3 2 N2 M99 G 1 IF 30 GOTO1 G0 Z 2 G 6 H 7 2 5 3003 8 OR 1 3004 9 OR 3 G1 Z 3 IF 4 EQ 0 GOTO5 G4 P 4 N5 M4 3900 1 G1 Z 3 3004 9 IF 4 EQ 0 GOTO6 G4 P 4 N6 M3 3003 8 G0 Z 2 N1 M99 G 1 IF 30 GOTO1 G0 Z ...

Страница 447: ...ingle block stop Cancel single block stop inhibition Rotate the spindle forward Inhibit single block stop Orient the spindle Shift G87 is not affected by the G98 or G99 modal Cancel single block stop inhibition Shift Rotate the spindle forward G 1 IF 30 GOTO1 G0 Z 2 G 6 H 7 2 5 3003 8 OR 1 G1 Z 3 IF 4 EQ 0 GOTO5 G4 P 4 N5 M5 G0 Z 3 2 3003 8 M3 N1 M99 G 1 IF 30 GOTO1 3003 8 OR 1 26 30064 30074 28 1...

Страница 448: ...n Return G73 O100000730 Step cycle Fixed cycle block 1 movement command Check for Fixed cycle invalidity Initialize the total cutting amount Define the cutting amount Single block stop command Increment the total cutting amount counter Does the total cutting amount exceed the cut amount Z G 1 IF 30 GOTO1 G0 Z 2 G 6 H 7 2 5 3003 8 OR 1 G1 Z 3 IF 4 EQ 0 GOTO5 G4 P 4 N5 3003 8 M5 3003 8 OR 1 G0 Z 3 2...

Страница 449: ...y Inhibit single block stop Invalidate feed hold override Dwell Rotate the spindle forward Dwell Rotate the spindle reversely Return G1 Z 28 IF 4 EQ 0 GOTO5 G4 P 4 N5 G0 Z 14 28 11 14 END1 N1 G1 Z 3 29 28 IF 4 EQ 0 GOTO6 G4 P 4 N6 3003 8 G0 Z 3 2 N2 M99 G 1 IF 30 GOTO1 G0 Z 2 G 6 H 7 2 5 3003 8 OR 1 3004 9 OR 3 G1 Z 3 IF 4 EQ 0 GOTO5 G4 P 4 N5 M3 3900 1 Z 3 3004 9 IF 4 EQ 0 GOTO6 G4 P 4 N6 M4 3003...

Страница 450: ... for Fixed cycle invalidity Inhibit single block stop Orient the spindle Shift Return Shift Rotate the spindle forward G 1 IF 30 GOTO1 G0 Z 2 G 6 H 7 2 5 26 30064 30074 28 12 COS 26 13 SIN 26 29 13 COS 26 12 SIN 26 3003 8 OR 1 G1 Z 3 M19 X 28 Y 29 G0 Z 3 2 3003 8 X 28 Y 29 M3 N1 M99 Downloaded from ManualsNet com search engine ...

Страница 451: ...nd the designated file Verify error Could not find the designated program No sequence No or block at the compare stop Input some of ONB The search is not possible because one of O N or B is not designated Can t cancel verify stop The compare stop cannot be canceled because the operation is not in a compare stop 2 3 Restart search related operation messages Message Details Executing restart search ...

Страница 452: ...not inserted Insert an FLD and press the From list menu again Can t input data Data input was attempted when M S T B history was displayed Input the data after closing the M S T B history display Can t command manual value The manual value command process failed 2 4 Graphic display related operation messages Message Details Program check completed The trace in the program check completed with an M...

Страница 453: ... completed correctly Transferring The data is being transferred correctly Compare complete The data comparison completed correctly Compare execution The data comparison is being executed correctly Merge complete The data merge completed correctly Merge execution The data merge is being executed correctly Rename complete The rename has been completed Change complete The data conversion completed co...

Страница 454: ...d of a file that cannot be erased Can t rename designated file The name of a file that cannot be renamed was changed Can t make directory An error occurred while creating the directory Can t make directory on this device Creation of a directory was attempted for a device that cannot have a directory Can t condense designated file Condensing of a file that cannot be condensed was attempted Designat...

Страница 455: ... as a timeout Parity V error A parity V error was detected Memory alloc error Securing of the communication data range failed Variable conversion error An error occurred during the M2 macro conversion and the conversion failed Make directory complete Creation of the directory has been completed Directory pass is illegal The designated directory path name is illegal Input a correct directory path n...

Страница 456: ...rd for displaying the machine parameters 2 8 Tool related operation messages Message Details Designated group already exists An already existing group No was designated when changing the group No Tool life screen grp An already existing group No was designated when newly creating the group Tool life screen grp list Designate a group No that does not already exist Designated group does not exist Er...

Страница 457: ...chining parameters Can t calculate center angle for rot The three points required for measurement have not been taken in Retrieval of the center shift amount failed Retrieval of the sensor radius failed The center and angle measurement failed Measure three points before writing the coordinate system Sensor take in not possible Could not retrieve the position measured with the touch sensor Measure ...

Страница 458: ...es not exist MDI search complete The MDI search completed MDI search error Could not execute the MDI search Save left side file Y N Message to confirm the operation when saving files Y Save the file on the left side N Do not save the file on the left side Save right side file Y N Message to confirm the operation when saving files Y Save the file on the right side N Do not save the file on the righ...

Страница 459: ...hen the operation adjustment mode was not selected 2 13 Waveform related operation messages Message Details Scroll execution The waveform display is being scrolled Refresh execution The waveform is being redisplayed Executing sampling The waveform data is being sampled Input the axis name This appears when the data type is selected in the Ch1 or Ch2 data setting area Input the name of the axis to ...

Страница 460: ...ion ends The line is connected with automatic alarm notification Sending Do not turn the power OFF until the automatic alarm notification ends The diagnosis data is being sent with automatic alarm notification Communication has been started with emergency stop by the servo spindle or PLC alarm or by the establishment of the conditions set in the parameters None Press Call to call the NC service Do...

Страница 461: ...Do not turn the power OFF until the operator notification ends Redialing since the NC service is using the line for other communication Status of communication with NC service Connecting with NC service Wait for communication to end In connection standby state since line is being used by anshin net Status of communication with machine manufacturer Connecting with machine manufacturer Wait for comm...

Страница 462: ...C service Do not turn the power OFF during the one touch call The selected telephone number will be set as the telephone number to be notified to the NC service Hereafter the telephone number set with one touch call or operator notification will be notified to the NC service 6 Messages related to random number setting Message Display in message field Details None Input the new telephone number The...

Страница 463: ...mpleted The line has been disconnected once and the system is waiting for a connection from the machine manufacturer Connecting Do not turn the power OFF until transmission of the diagnosis data is completed A connection with the machine manufacturer is established or the system is connected to the machine manufacturer Transmitting Do not turn the power OFF until transmission of the diagnosis data...

Страница 464: ...ssion Reception of the message has completed and the line has been disconnected 5 Messages related to communication errors Message Display in message field Details Modem initial error Press the Send menu to transmit the diagnosis data to the machine manufacturer Do not turn the power OFF during transmission Communication is not possible because the modem is not connected etc Communication error Pr...

Страница 465: ...ut password is incorrect Input the password The Password menu key was pressed and the password input mode was entered Input a password Execute SRAM backup Y N Confirmation of operations Y or INPUT Backup the SRAM data on the HD N Do not backup the SRAM data on the HD Executing backup The SRAM data is being backed up on the HD Backup complete Backup of the SRAM data on the HD has been completed Bac...

Страница 466: ...ecification parameters No amp of the axis specification parameters etc SY0021 SV commu err Ax No type ilegal SY0022 SV commu err CRC er rcv incmp SY0023 SV commu err Recev frame No SY0024 SV commu er sum Ax No type ilgl SY0025 SV commu er sum CRC er rcv incmp SY0026 SV commu er sum Recev frame No There is an error in the communication between the NC and amplifier Check whether there is any abnorma...

Страница 467: ...n detection signal U V or W phases of the OHE type detector has become H or L PR SV0017 ADE AD converter error The AD convertor for current detection did not work correctly at initialization PR SV0018 WAT Initial communication error Correct communication of the absolute position or magnetic pole position data is not possible with the OHA type detector or serial pulse encoder PR SV001A WATS Communi...

Страница 468: ...during initialization Alarm output from inside the linear scale PR SV0029 SABS Absolute posn detect circuit err A hardware error occurred in the absolute position detection circuit in the absolute position linear scale Alarm output from inside the linear scale PR SV002A SINC Relative posn detect circuit err A hardware error occurred in the relative position detection circuit in the relative positi...

Страница 469: ...as omitted in the low speed serial type absolute position linear scale PR SV0043 FE2 Feedback error 2 A deviation was detected in the motor end detector and machine end detector feedback amounts in a closed loop system PR SV0046 OHM Motor overheat The motor or detector thermal protector activated NR SV004F IPS Instantaneous stop The control power was disconnected for 50ms or more NR SV0050 OL1 Ove...

Страница 470: ...tected during ready ON PR SV006A Pwr sply ext contactor fusion The external contactor was turned ON in spite of the READY OFF status PR SV006B Pwr sply rush relay fusion The rush resistance short circuit relay is still ON PR SV006C PCHE Pwr sply main circuit error The main circuit condenser is not correctly charged PR SV006E PME Pwr sply memory error An error occurred in the memory circuit section...

Страница 471: ...oftware processing failed to finish within the specified time AR SV1001 AMP unequipped The servo spindle amplifier is not connected Or the axis No setting for the servo spindle amplifier is incorrect PR SV1002 Illegal servo amp A spindle amplifier is connected to the servo axis Or a servo amplifier is connected to the spindle Check the axis No of the spindle specification parameters PR Downloaded ...

Страница 472: ...rror The size of move command data transmitted from the NC for position control is too large PR SP0036 TE Transferring error The periodic data transmission from the NC was interrupted PR SP0037 PE Initial parameter error A parameter value exceeding the tolerable range was set PR SP0038 TP1 Protocol error 1 frame A protocol error occurred during communication with the NC Frame error PR SP0039 TP2 P...

Страница 473: ...wer supply AR SP0071 PINL Pwr sply momentary fail detect The external contactor was turned OFF in spite of the ready ON status Or an instantaneous power failure of 55ms or more occurred NR SP0073 Pwr sply over regeneration The regenerative capacity limit of the power supply was exceeded PR Note SP0075 POV Pwr sply overvoltage The voltage between L and L exceeded 410V NR SP0076 Pwr sply EMG stop se...

Страница 474: ...ue In the correction mode move one of the axes in the direction that the error is reduced Set the allowable value to 0 check invalid or increase the allowable value in the correction mode Check the parameters etc that should be the same for synchronous axes AX0052 No synchronous CTRL spec Synchronous control was commanded though the synchronous control specifications are not provided Check the spe...

Страница 475: ...l reference point return the direction of the return differed from the axis movement direction selected with the axis selection key The direction selection with the axis compensation key is incorrect The error is canceled by carrying out the feed in the correct direction AX0106 Rotate work compen excessive The rotation axis workpiece position compensation amount exceeded 3mm Turn the rotation axis...

Страница 476: ...mergency stop Operation is not possible because an emergency stop has occurred Restart after canceling the emergency stop OP0107 Program running A program check etc was attempted during operation Carry out program checks after finishing the operation OP0108 Program checking A program operation restart search or machining time calculation was attempted during a program check Carry out the operation...

Страница 477: ...ignated block No does not exist Reconsider the program PR0010 No of simultaneous axes over The number of axis addresses commanded in the same block exceeds the specifications Divide the alarm block command into two Check the specifications PR0011 Illegal axis address The axis address commanded by the program and the axis address set by the parameter do not match Revise the axis names in the progra...

Страница 478: ...eaningless H code An H command other than H0 was commanded independently during tool length offset Reconsider the program PR0043 No end point operation in arc The end point coordinate command has not been issued for the R designated arc Reconsider the program PR0050 No inch mm spec A command has been issued with a G code for inch mm conversion even though there is no inch mm conversion G code spec...

Страница 479: ...d despite the fact that such a command does not exist in the specifications The G02 1 and G03 1 commands are issued for circular interpolation Check the spiral specifications PR0080 No hypothetic axis spec A hypothetical axis command G07 was issued despite the fact that such a command does not exist in the specifications Check the hypothetical axis specifications Change the G07 command PR0090 No t...

Страница 480: ... traverse command has issued when the circular interpolation command G02 G03 was issued during the F1 digit feed command Rapid traverse cannot be commanded and so any F1 digit command except F0 should be designated for the circular interpolation command Issue the G0 or G1 command unless the block which caused the alarm is the circular command block PR0122 No auto corner override spec An automatic ...

Страница 481: ...nal compensation command was issued even though there are no three dimensional compensation specifications Check the specifications PR0155 Fix cyc executed during compen A fixed cycle command has been issued in the radius compensation mode The radius compensation mode is established when a fixed cycle command is executed and so the radius compensation cancel command G40 should be issued PR0164 No ...

Страница 482: ...l fixed cycle spec There are no special fixed cycle specifications Check the specifications PR0221 No of special fixed holes 0 0 has been specified as the number of holes in special fixed cycle Reconsider the program PR0222 G36 angle interval error 0 has been specified as the angle internal with G36 Reconsider the program PR0223 G12 G13 radius error The radius value is less than the compensation a...

Страница 483: ...o A macro specification was commanded even though there are no such command specifications Check the specifications PR0271 No macro interrupt A macro interrupt command was issued even though there are no macro interrupt specifications Check the specifications PR0272 NC text macro text simultaneous An NC statement and a macro statement exist together in the same block Reconsider the program and pla...

Страница 484: ...nt error There is an error in the WHILE conditional DO END statement Reconsider the program PR0292 SETVN statement error There is an error in the SETVN statement when the variable name was set Reconsider the program The number of characters in the variable name of the SETVN statement must be 7 or less PR0293 DO END nesting over The number of s for DO END in the WHILE conditional DO END statement h...

Страница 485: ...hamfering less than the movement distance since this distance in the following block is shorter than the corner rounding or chamfering PR0385 Corner during G0 G33 Corner rounding or chamfering command was given during G00 or G33 modal Reconsider the program PR0386 Can t execute corner R C The corner R C movement cannot be created Reconsider the program PR0390 No geometric spec A geometric command ...

Страница 486: ...ere are no 2nd 3rd and 4th reference point return specifications Check the specifications PR0435 G27 and M commands in same block An M individual command was issued simultaneously in the G27 command block An M individual command cannot be issued in a G27 command block and so the G27 command and M individual command must be placed in separate blocks PR0436 G29 and M commands in same block An M indi...

Страница 487: ...ting check the cables and power supply of the connected devices and computer link parameters PR0463 Read forced quit The process was interrupted during input output by resetting Carry out input output again PR0470 No Computer Link A Computer link A was executed even though there are no computer link A specifications Check the specifications PR0471 No Computer Link B Computer link B was executed ev...

Страница 488: ... issued during the radius compensation processing Designate a radius compensation cancel command G40 or remove the skip command PR0611 No hi preci G61 1 spec A high accuracy mode G61 1 command was issued even though there are no such command specifications Check the specifications Remove the high accuracy mode command from the program PR0612 No hi preci die G61 2 3 spec A high accuracy die G61 2 G...

Страница 489: ...trol Reconsider the program PR0902 Normal axis set as linear axis Normal line control was set for a linear axis Set normal line control for a rotation axis PR0903 At block joint turn angle over The turning angle at the block seams exceeded the limit during normal line control Reconsider the program PR0920 No 3DIM coord conversion spec There is no three dimensional coordinate conversion function Ch...

Страница 490: ...ace servo amplifier 0025 Absolute position lost An error occurred in the detector s internal absolute position data Turn the power ON for 2 to 3 minutes while the alarm is occurring and then turn the power ON again Replace the battery and initialize the absolute position again 0034 CRC error An error occurred in the communication with the NC Take countermeasures against noise 0036 Timeout NC power...

Страница 491: ...EROM in the amplifier Replace servo amplifier 0017 PCB error A D conversion error An error occurred in the amplifier s internal A D converter Replace servo amplifier 0018 PCB error LSI error An error occurred in the amplifier s internal LSI Replace servo amplifier 0020 Detector error An error occurred in the communication between the servo amplifier and detector Connect correctly Replace or repair...

Страница 492: ...r the wiring Replace servo amplifier Take countermeasures against noise 0033 Overvoltage The voltage of the converter in the servo amplifier was 400V or more Wire correctly Replace servo amplifier For the internal regenerative resistor replace the amplifier For the external regenerative option replace the regenerative option 0046 Motor overheating An operation state causing the motor to overheat c...

Страница 493: ...lection exceeding the excessive error detection setting value occurred Increase the acceleration deceleration time constant Increase the torque limit value Review the power facility capacity Review the operation pattern Replace motor Connect correctly Repair or replace the cable Downloaded from ManualsNet com search engine ...

Страница 494: ...r has been lost Initialize the zero point 0003 Absolute position system related parameter error The absolute position system related parameters have been changed or lost Correctly set the parameters and then initialize the zero point AZ0071 Aux axis drop voltage Alarm infor mation Details Remedy 0001 Absolute position detector data lost The data in the detector has been lost due to battery voltage...

Страница 495: ...C er rcv incmp AY0026 Aux axis commu er sum Recev frame No There is an error in the communication between the NC and amplifier Check whether there is any abnormality in the following Cable Are there any broken wires Cable shield ground Connector connections Mounting state of the amplifier Contact the nearest service center 3 10 Auxiliary axis emergency stop AQ No Message Details Remedy An emergenc...

Страница 496: ...on SYW0005 PLC emergency stop The user PLC ladder sequence is not running This error also occurs when an error occurs in the data communication with the remote I O Turn ON the PLC ladder RUN switch on the CPU Card Second switch from the top of the QX DIP switches Check whether there is an abnormality in the connection between the NC main unit and remote IO unit SYW0006 PLC signal An emergency stop...

Страница 497: ... found in the modem and communication could not be established Connect the model and turn the power ON again SYW0072 Redial over Dialing failed and the number of redials was exceeded Check the number of redials setting SYW0073 No dial tone When dialing the phone line was not connected with an analog modem Connect the phone line SYW0074 Network error An error other than SYW0070 to SYW0073 occurred ...

Страница 498: ... serial type detector The absolute position was not compensated SVW009F WAB Low battery voltage The battery voltage supplied to the absolute position detector dropped SVW00E0 WOR Over regeneration warning Eighty percent of the regenerative alarm was detected SVW00E1 WOL Overload warning Eighty percent of the overload 1 alarm level has been detected An overload 1 alarm may occur if this operation c...

Страница 499: ...is not applied on the CN23 connector SPW00EB R Over regeneration warning Eighty percent of the over regeneration alarm was reached 4 4 Axis warnings AXW No Message Details Remedy AXW0101 External interlock axis exists The external interlock function has activated the input signal is OFF and one of the axes has entered the interlock state The interlock function has been validated so the interlock b...

Страница 500: ...0106 Operation mode change The automatic operation mode changed to another automatic operation mode during operation Return to the original automatic operation mode and restart OPW0107 No operation mode Starting was attempted without selecting the operation mode Or canceling of the operation mode was attempted during operation Restart after selecting the operation mode OPW0108 Operation mode dupli...

Страница 501: ...search was completed and the manual mode was selected Search the block to be restarted Turn OFF the restart switch OPW0116 Prog restart posn not searched Restarting was attempted before the program restart search was completed Restart after the program restart search is completed OPW0117 Prog restart posn not returned Automatic start is not possible because the axis has not returned to the program...

Страница 502: ...tarting was attempted during an absolute position detection alarm Start after canceling the absolute position detection alarm OPW0129 In abs posn initial setting Starting was attempted during zero point initialization of the absolute position detection system Start after the zero point initialization is completed OPW0130 Tool life over The tool life No of uses time etc has reached the setting valu...

Страница 503: ...ing axis ZRN incomplete The chopping signal turned ON before the chopping axis zero point return was completed Turn OFF the chopping signal and execute the chopping axis zero point return OPW0161 Chopping override zero The override amount became 0 during the chopping operation Check the chopping override amount Check the rapid traverse override when in rapid traverse OPW0162 Chopping axis conflict...

Страница 504: ...during tool evasion return so the tool offset after zero point return was invalidated To reset the error change the operation mode to a mode other than zero point return before the axis returns to the zero point The error will be reset when the tool return is completed The error will be reset when reset 1 is input or emergency stop is applied OPW0169 Rotate work compen excessive The rotary axis wo...

Страница 505: ...reviously designated G code was ignored Reconsider the program PRW0003 Ignored G code exists A G code exists that was ignored due to a G code priority order check Reconsider the program PRW0004 Unused address exists An address exists that was not used in the program block Reconsider the program PRW0005 Ref point ret in pattern rot Reference point return was attempted while rotating the figure Reco...

Страница 506: ...er to the items for ASW0033 0050 00E3 Absolute position counter warning There is an error in the absolute position detector internal data Take countermeasures against noise Replace the servomotor 00E9 Main circuit OFF warning The servo ON signal was input while the main circuit power was OFF The contactor operation is faulty Turn ON the main circuit power 4 8 Auxiliary axis system warnings AZW AZW...

Страница 507: ...olute position alarm Reference point return not possible Reference point return was executed during an absolute position alarm Initialize the absolute position and then fix the absolute position coordinates 0025 In initializing absolute position Reference point return not possible Reference point return was executing while initializing the absolute position Initialize the absolute position and the...

Страница 508: ...on initialization 0063 In absolute position alarm Starting not possible The start signal was input during an absolute position alarm Initialize the absolute position and then fix the absolute position coordinates 0064 In random positioning mode Manual operation not possible The manual operation mode was started during the random positioning mode Turn the random positioning mode OFF before switchin...

Страница 509: ...n tool registration screen was added Synchronous error screen Machining parameter names and details were changed partially Mistakes were corrected Oct 2000 BNP B2237E Revisions due to changes of screens specifications and operation details according to ver DO S W Followings are main points to be changed Touch panel functions were added Screens related to auxiliary axis were added Section about abs...

Страница 510: ...reen menu messages added MTB Net screen menu messages added Explanation of simultaneous manual automatic added Mistakes were corrected Jul 2003 BNP B2237J Explanation of the setting and display unit was rewritten Restart search Section of list was deleted partially Control parameter 2 The details of parameter were rewritten Tool registration screen Explanation of the erasing the tool registration ...

Страница 511: ...n is not possible Please contact your Mitsubishi Electric dealer with any questions or comments regarding the use of this product Duplication Prohibited This instruction manual may not be reproduced in any form in part or in whole without written permission from Mitsubishi Electric Corporation 1999 2003 MITSUBISHI ELECTRIC CORPORATION ALL RIGHTS RESERVED Downloaded from ManualsNet com search engin...

Страница 512: ...ons subject to change without notice Printed in Japan on recycled paper MITSUBISHI ELECTRIC CORPORATION HEAD OFFICE MITSUBISHI DENKI BLDG 2 2 3 MARUNOUCHI CHIYODA KU TOKYO 100 8310 JAPAN MODEL Manual No MODEL CODE Downloaded from ManualsNet com search engine ...

Отзывы: