2 Product Overview
46
P
roduc
t O
v
er
vie
w
2
Control Panel
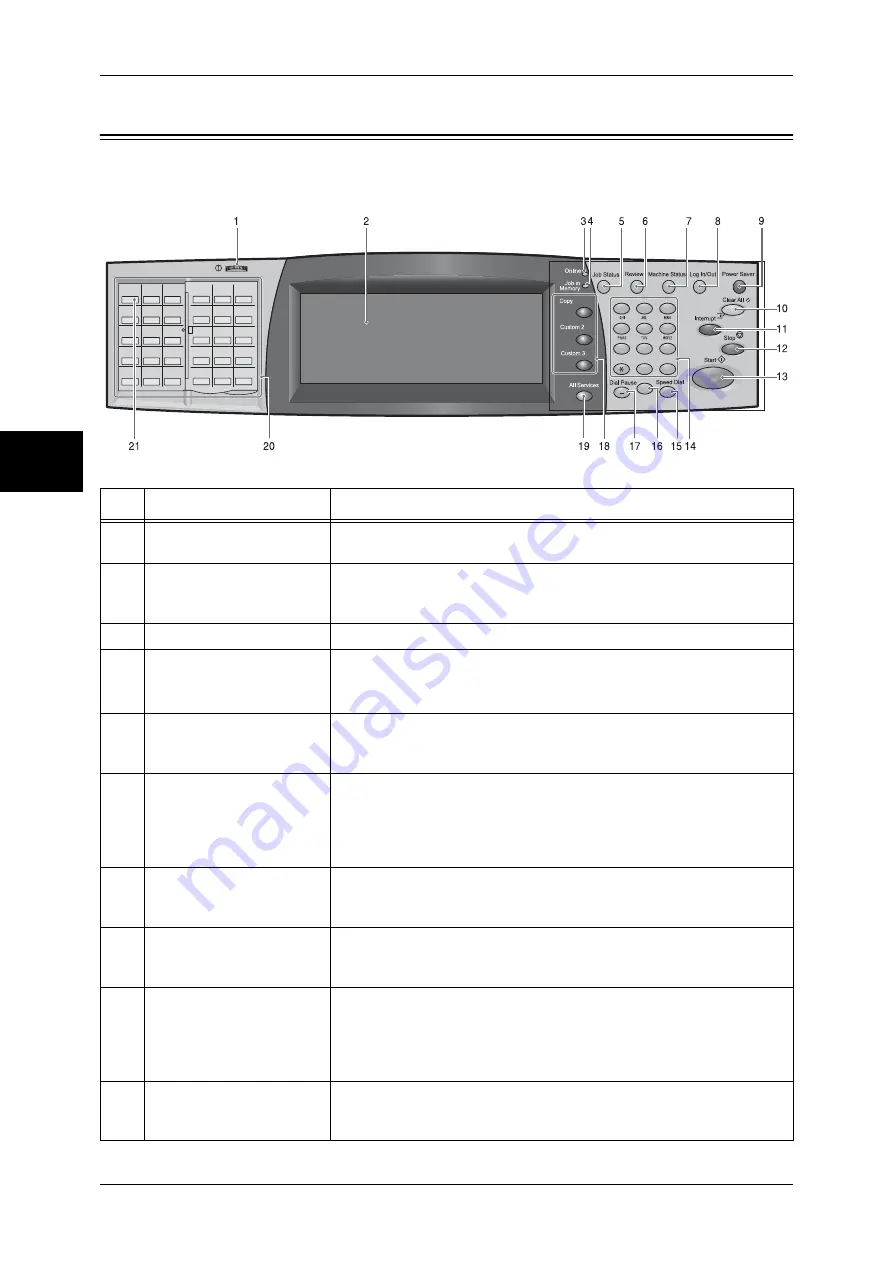
The following describes the names and functions of components on the control panel.
No.
Component
Function
1
Contrast dial
Adjusts the contrast of the touch screen. Use this dial to enhance or
decrease the contrast.
2
Touch screen
Displays messages required for operation and buttons for various
features. You can directly touch the screen to instruct operations and
set features.
3
<Online> indicator
Lights when the machine is sending or receiving data to or from a client.
4
<Job in Memory> indicator
Lights when data is stored in the machine's memory.
You can check stored documents in [Stored Documents List]. For information
on [Stored Documents List], refer to "Stored Documents List" (P.375).
5
<Job Status> button
Press this button to check or cancel the current job, to check or print
saved documents, or to check completed jobs.
In this manual, this button is indicated as the <Job Status> button.
6
<Review> button
Press this button to open the [Review] screen. In this screen, you can
check a list of the status of copy, fax and scan features whose settings
have changed from the defaults. You can also check the destination
information for sending faxes and e-mail.
In this manual, this button is indicated as the <Review> button.
7
<Machine Status> button
Press this button to check the machine status and meters, to check the
status of consumables, and to print reports.
In this manual, this button is indicated as the <Machine Status> button.
8
<Log In/Out> button
Press this button to display a login screen for the System Administrator
or for the users managed by the authentication feature.
In this manual, this button is indicated as the <Log In/Out> button.
9
<Power Saver> button
If the machine is not operated for a while, the machine's power
consumption is lowered to enter the power saver mode. In the power
saver mode, this button lights up. To cancel the power saver mode,
press this button again.
In this manual, this button is indicated as the <Power Saver> button.
10
<Clear All> button
Returns the settings you made to their default values, to return the
machine to the same status as when it is powered on.
In this manual, this button is indicated as the <Clear All> button.
001
002
003
004
005
006
007
008
009
010
011
012
013
014
015
016
017
018
019
020
021
022
023
024
025
026
027
028
029
030
001
002
003
004
005
006
007
008
009
010
011
012
013
014
015
016
017
018
019
020
021
022
023
024
025
026
027
028
029
030
1
2
3
4
5
6
7
8
9
0
#
C
Summary of Contents for ApeosPort-II 3000
Page 1: ...ApeosPort II 5010 4000 3000 DocuCentre II 5010 4000 User Guide...
Page 14: ......
Page 54: ......
Page 139: ...Layout Adjustment 137 Fax 4 Off No stamp is added On A stamp is added...
Page 254: ......
Page 350: ......
Page 406: ......
Page 538: ......
Page 599: ...17 Glossary This chapter contains a list of terms used in this guide z Glossary 598...
Page 618: ......


