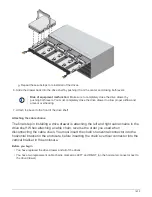


Hot-swap or replace an IOM12 module - shelves with IOM12 modules
Your system configuration determines whether you can perform a nondisruptive IOM12
module hot-swap or a disruptive IOM12 module replacement when an IOM12 module
fails.
Before you begin
All other components in the system—including the other IOM12 module—must be functioning properly.
About this task
• For multipathed (multipath HA or multipath) and quad-pathed (quad-path HA or quad-path) configurations,
you can hot-swap an IOM12 module (nondisruptively replace an IOM12 module in a system that is
powered on and serving data—I/O is in progress).
• For FAS2600 series and FAS2700 single-path HA configurations, you must perform a takeover and
giveback operation to replace an IOM12 module in a system that is powered on and serving data—I/O is in
progress.
• For FAS2600 series single-path configurations, you must halt your system to replace an IOM12 module.
If you attempt to hot-swap an IOM12 module on a disk shelf with a single-path connection,
you will lose all access to the disk drives on the disk shelf as well as any disk shelves
beneath. You could also bring down your entire system.
• The best practice is to have the current versions of disk shelf (IOM) firmware and disk drive firmware on
your system before adding new disk shelves, shelf FRU components, or SAS cables.
Current versions of firmware can be found on the NetApp Support Site.
NetApp Downloads: Disk Shelf Firmware
NetApp Downloads: Disk Drive Firmware
• Disk shelf (IOM) firmware is automatically updated (nondisruptively) on a new IOM12 module with a non
current firmware version.
IOM firmware checks occur every ten minutes. An IOM firmware update can take up to 30 minutes.
1653
Summary of Contents for AFF A700
Page 4: ...AFF and FAS System Documentation 1...
Page 208: ...3 Close the controller module cover and tighten the thumbscrew 205...
Page 248: ...2 Close the controller module cover and tighten the thumbscrew 245...
Page 308: ...Power supply Cam handle release latch Power and Fault LEDs Cam handle 305...
Page 381: ...Power supply Cam handle release latch Power and Fault LEDs Cam handle 378...
Page 437: ...1 Locate the DIMMs on your controller module 434...
Page 605: ...602...
Page 1117: ...3 Close the controller module cover and tighten the thumbscrew 1114...
Page 1157: ...2 Close the controller module cover and tighten the thumbscrew 1154...
Page 1228: ...Power supply Cam handle release latch Power and Fault LEDs Cam handle 1225...
Page 1300: ...Power supply Cam handle release latch Power and Fault LEDs Cam handle 1297...
Page 1462: ...Installing SuperRail to round hole four post rack 1459...
Page 1602: ...1599...
Page 1630: ...1627...
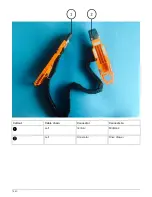
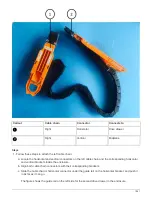
Page 1634: ...Orange ring on horizontal bracket Cable chain 1631...
Page 1645: ...Guide rail 1642...
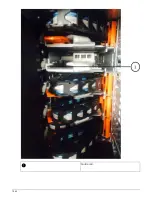
Page 1669: ...Attention LED light on 1666...


