Chapter 5
5-6
5.3 Detection Jams
5.3.1 Overview
0019-8974
imageCLASS MF9170c / imageCLASS MF9150c / imageCLASS MF8450c
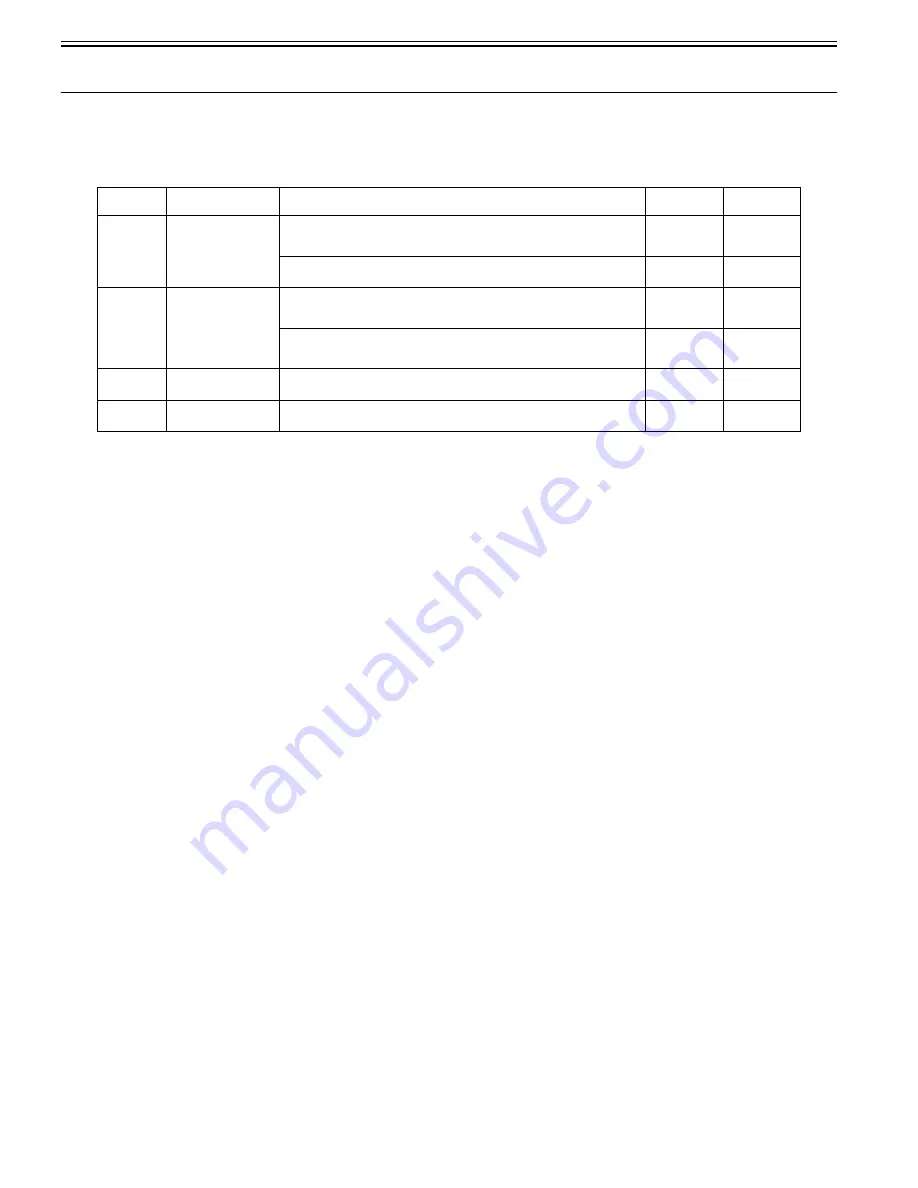
Jam detection
T-5-1
Jam removal
To remove a jam, open the ADF upper cover, remove a jammed sheet, and then set a document on the document tray.
However, a jam is not removed when the ADF paper trailing edge sensor detects the presence of paper (when residual paper exists).
Jam Code
Jam Type
Jam Condition
Single-sided
Reading
Double-sided
Reading
0001H
Delay jam
The leading edge of paper does not reach the ADF paper trailing edge sensor within 1.8
sec after the trailing edge of precedent page passes through the ADF paper trailing edge
sensor in 1-sided multiple jobs.
Yes
-
The leading edge of paper does not reach the ADF paper trailing edge sensor within 1.2
sec after reverse operation starts in 2-sided job.
-
Yes
0002H
Residual jam
The trailing edge of paper does not passes through the ADF paper trailing edge sensor
within 3.4 sec after the leading edge of paper reaches the ADF paper trailing edge
sensor in 1-sided job.
Yes
-
The trailing edge of paper does not passes through the ADF paper trailing edge sensor
within 3.5 sec after the leading edge of paper reaches the ADF paper trailing edge
sensor in 2-sided job.
-
Yes
0094H
In-body residual jam
(initial residual)
The ADF paper trailing edge sensor detects paper at power-ON.
Yes
Yes
0095H
Pickup NG
The paper is removed from the document tray during the pickup operation (within 0.1
sec after the start key is pressed).
Yes
Yes
Summary of Contents for imageCLASS MF8450c
Page 16: ...Chapter 1 Introduction ...
Page 55: ...Chapter 2 Basic Operation ...
Page 61: ...Chapter 3 Main Controller ...
Page 75: ...Chapter 4 Original Exposure System ...
Page 88: ...Chapter 5 Original Feeding System ...
Page 105: ...Chapter 6 Laser Exposure ...
Page 113: ...Chapter 7 Image Formation ...
Page 150: ...Chapter 8 Pickup and Feed System ...
Page 184: ...Chapter 9 Fixing System ...
Page 200: ...Chapter 10 External and Controls ...
Page 230: ...Chapter 11 Maintenance and Inspection ...
Page 233: ...Chapter 12 Measurement and Adjustments ...
Page 237: ...Chapter 13 Correcting Faulty Images ...
Page 260: ...Chapter 14 Error Code ...
Page 272: ...Chapter 15 Special Management Mode ...
Page 280: ...Chapter 16 Service Mode ...
Page 322: ...Chapter 17 Upgrading ...
Page 327: ...Chapter 17 17 4 3 Click Next F 17 4 4 Select a USB connected device and click Next F 17 5 ...
Page 328: ...Chapter 17 17 5 5 Click Start F 17 6 6 Click Yes F 17 7 Download will be started F 17 8 ...
Page 330: ...Chapter 18 Service Tools ...
Page 334: ...Appendix ...
Page 349: ......

