Chapter 5
5-1
5.1 Basic Construction
5.1.1 Overview
0019-8971
imageCLASS MF9170c / imageCLASS MF9150c / imageCLASS MF8450c
F-5-1
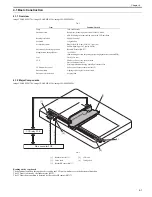
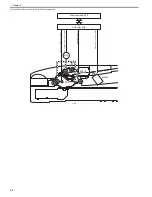
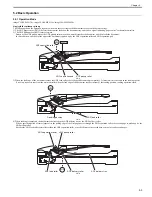
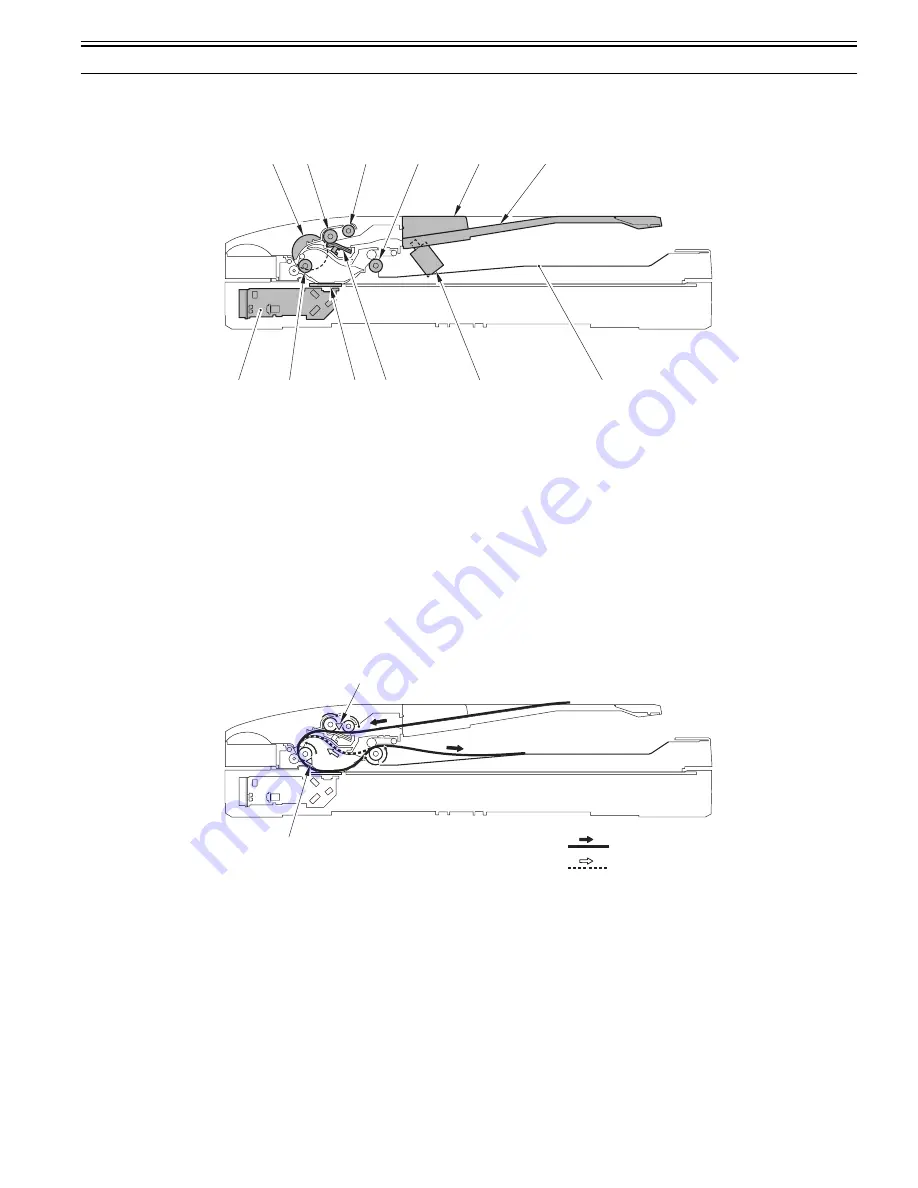
Reading at ADF
1) When the ADF paper sensor (SR718) detects the document on the document tray, the ADF pickup motor (M13) works and the ADF pickup roller descends to
the surface of the document.
2) A document set on the document ray is transported to the ADF separation roller by the ADF pickup roller while being pressed by the slide guide so that it does
not skew.
3) Only one sheet of document is separated by the ADF separation roller and the ADF separation pad.
4) The document is transported to the reading glass surface by the ADF feed roller.
The ADF paper trailing edge sensor (SR719) detects the leading edge of the document.
5) While being transported by the ADF feed roller, the document is read by the CCD unit.
6) The document is delivered on the ADF delivery tray by the ADF delivery roller.
A 2-sided original with its first side read is delivered to the reading position again with the reversal path.
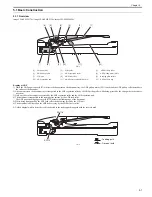
F-5-2
[1]
Document tray
[2]
Slide guide
[3]
ADF delivery roller
[4]
ADF pickup roller
[5]
ADF separation roller
[6]
ADF pickup motor (M13)
[7]
CCD unit
[8]
ADF feed roller
[9]
Reading glass surface
[10] ADF separation pad
[11] ADF delivery solenoid (SL5016)
[12] ADF delivery tray
[1]
[2]
[4]
[5]
[6]
[8]
[7]
[9]
[12]
[11]
[3]
[10]
: Feeding path
: Reversal path
SR719
SR718
Summary of Contents for imageCLASS MF8450c
Page 16: ...Chapter 1 Introduction ...
Page 55: ...Chapter 2 Basic Operation ...
Page 61: ...Chapter 3 Main Controller ...
Page 75: ...Chapter 4 Original Exposure System ...
Page 88: ...Chapter 5 Original Feeding System ...
Page 105: ...Chapter 6 Laser Exposure ...
Page 113: ...Chapter 7 Image Formation ...
Page 150: ...Chapter 8 Pickup and Feed System ...
Page 184: ...Chapter 9 Fixing System ...
Page 200: ...Chapter 10 External and Controls ...
Page 230: ...Chapter 11 Maintenance and Inspection ...
Page 233: ...Chapter 12 Measurement and Adjustments ...
Page 237: ...Chapter 13 Correcting Faulty Images ...
Page 260: ...Chapter 14 Error Code ...
Page 272: ...Chapter 15 Special Management Mode ...
Page 280: ...Chapter 16 Service Mode ...
Page 322: ...Chapter 17 Upgrading ...
Page 327: ...Chapter 17 17 4 3 Click Next F 17 4 4 Select a USB connected device and click Next F 17 5 ...
Page 328: ...Chapter 17 17 5 5 Click Start F 17 6 6 Click Yes F 17 7 Download will be started F 17 8 ...
Page 330: ...Chapter 18 Service Tools ...
Page 334: ...Appendix ...
Page 349: ......

