Chapter 16
16-8
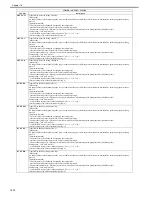
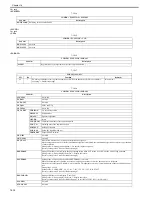
<PASCAL>
T-16-6
<MISC>
T-16-7
<VIFADJ>
T-16-8
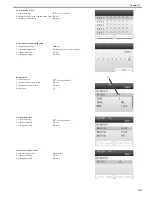
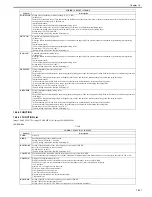
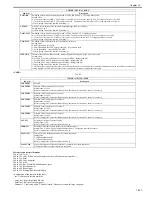
DFTAR-G
Entry of the shading target value when DF is used (GREEN color) (Normal document reading position)
Make the following adjustment using this item.
[When used]
An image failure occurred after execution of ADF white level adjustment (COPIER>FUNCTION>CCD>DF-WLVL1/DF-WLVL2) (caused by a dirt
on the chart, etc.).
Setting range: 0 to 99999
[Factory setting value: Differs depending on the machine]
[Value after RAM clearing: 0]
DFTAR-B
Entry of the shading target value when DF is used (BLUE color) (Normal document reading position)
Make the following adjustment using this item.
[When used]
An image failure occurred after execution of ADF white level adjustment (COPIER>FUNCTION>CCD>DF-WLVL1/DF-WLVL2) (caused by a dirt
on the chart, etc.).
Setting range: 0 to 99999
[Factory setting value: Differs depending on the machine]
[Value after RAM clearing: 0]
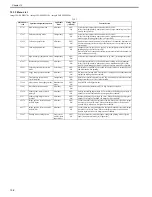
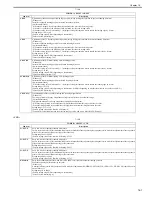
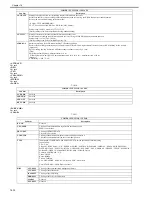
COPIER > ADJUST > PASCAL
Sub item
Description
OFST-P-Y
Adjustment of the test print reading density
Perform an offset adjustment for the test print reading signal when PASCAL control is performed at the time of automatic gradation correction (full
correction).
Setting range: -32 to 32
OFST-P-M
Adjustment of the test print reading density
Perform an offset adjustment for the test print reading signal when PASCAL control is performed at the time of automatic gradation correction (full
correction).
Setting range: -32 to 32
OFST-P-C
Adjustment of the test print reading density
Perform an offset adjustment for the test print reading signal when PASCAL control is performed at the time of automatic gradation correction (full
correction).
Setting range: -32 to 32
OFST-P-K
Adjustment of the test print reading density
Perform an offset adjustment for the test print reading signal when PASCAL control is performed at the time of automatic gradation correction (full
correction).
Setting range: -32 to 32
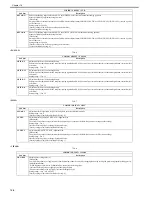
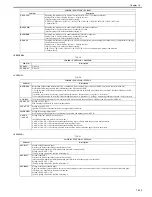
COPIER > ADJUST > MISC
Sub item
Description
SEG-ADJ
Adjustment of the separation level of text and photo in the text/photo/map mode
Setting range: -4 to 4
[Factory setting value/Value after RAM clearing: 0]
ACS-EN
Adjustment of copyboard ACS-EN ACS- judgment area
[When used]
The user does not need color adjustment of the upper edge or corners of the BOOK document. (At copyboard reading)
Setting range: -2 to 2
Increase the setting value to enlarge the judgment area.
[Factory setting value/Value after RAM clearing: 1]
ACS-EN2
Adjustment of DF ACS-EN ACS- judgment area
[When used]
The user does not need color adjustment of the upper edge or corners of the BOOK document. (At DF stream reading)
Setting range: -2 to 2
Increase the setting value to enlarge the judgment area.
[Factory setting value/Value after RAM clearing: 1]
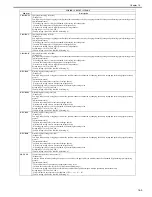
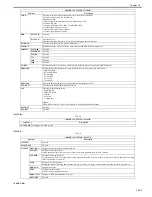
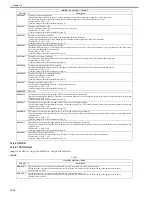
COPIER > ADJUST > VIFADJ
Sub item
Description
CRG-BS-Y
Charging bias setting value (Y)
[When used]
Low/high image density or fogging occurs but the problem cannot be solved by changing the density setting and performing special printing process.
[Adjustment method]
- When fogging occurs, it may be eliminated by increasing the setting value.
- Increase the setting value to slightly lower the image density.
- Decrease the setting value to slightly increase the image density.
Setting range: -10 to 10 (Unit: 20V)
[Factory setting value/Value after RAM clearing: 0]
COPIER > ADJUST > CCD
Sub item
Description
Summary of Contents for imageCLASS MF8450c
Page 16: ...Chapter 1 Introduction ...
Page 55: ...Chapter 2 Basic Operation ...
Page 61: ...Chapter 3 Main Controller ...
Page 75: ...Chapter 4 Original Exposure System ...
Page 88: ...Chapter 5 Original Feeding System ...
Page 105: ...Chapter 6 Laser Exposure ...
Page 113: ...Chapter 7 Image Formation ...
Page 150: ...Chapter 8 Pickup and Feed System ...
Page 184: ...Chapter 9 Fixing System ...
Page 200: ...Chapter 10 External and Controls ...
Page 230: ...Chapter 11 Maintenance and Inspection ...
Page 233: ...Chapter 12 Measurement and Adjustments ...
Page 237: ...Chapter 13 Correcting Faulty Images ...
Page 260: ...Chapter 14 Error Code ...
Page 272: ...Chapter 15 Special Management Mode ...
Page 280: ...Chapter 16 Service Mode ...
Page 322: ...Chapter 17 Upgrading ...
Page 327: ...Chapter 17 17 4 3 Click Next F 17 4 4 Select a USB connected device and click Next F 17 5 ...
Page 328: ...Chapter 17 17 5 5 Click Start F 17 6 6 Click Yes F 17 7 Download will be started F 17 8 ...
Page 330: ...Chapter 18 Service Tools ...
Page 334: ...Appendix ...
Page 349: ......

