EMBROIDERY APPLICATIONS
134
b
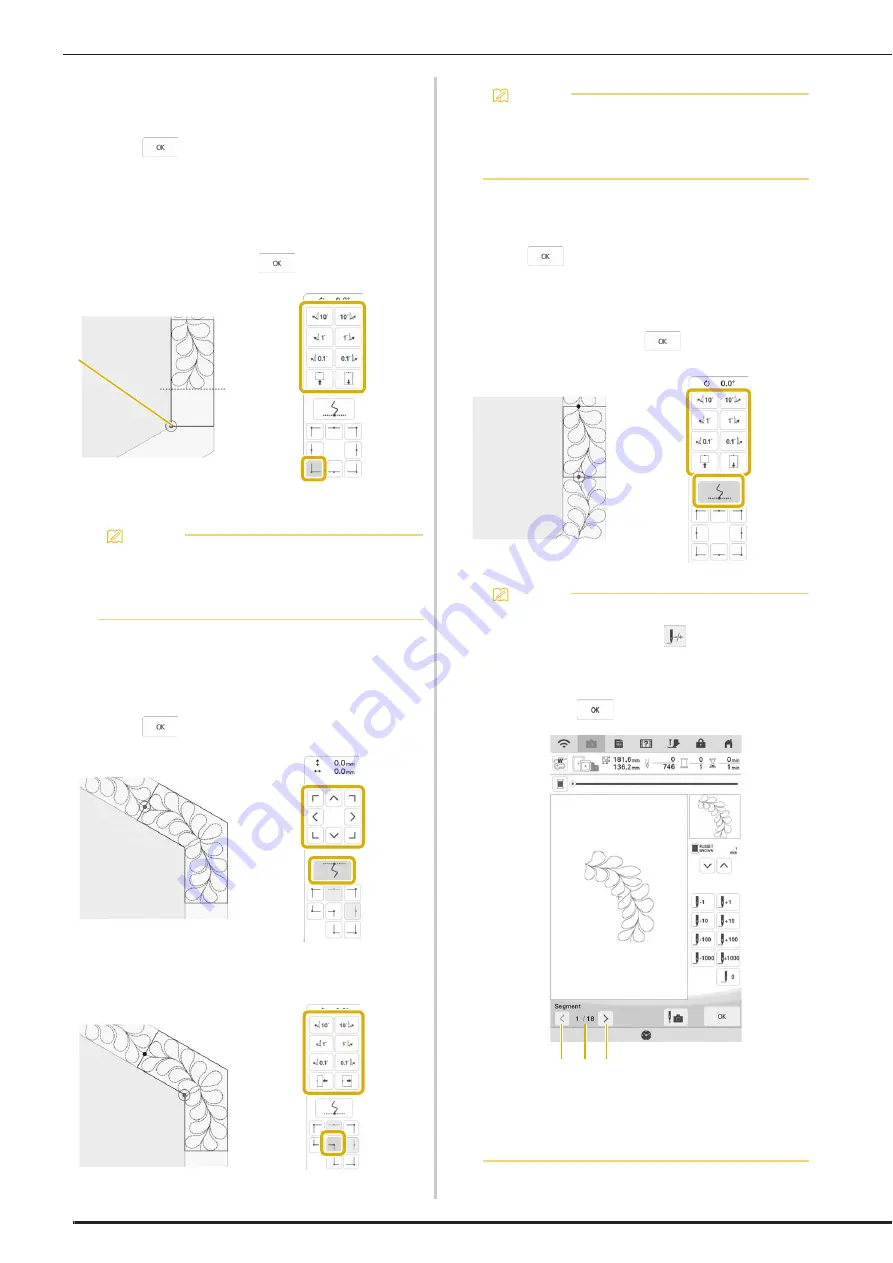
When embroidering the edge part immediately before a
corner
Use the move pattern keys to align the start point projected by
the projector with the end point of the previous pattern, and
then touch
.
Then, align the lower-left point (inner corner of the next pattern
to be embroidered) with the lower-left corner of the reference
lines. If the pattern is not angled correctly, rotate it. If the length
of the pattern does not match, enlarge or reduce the pattern so
that the lower-left point of the segment is at the lower-left
corner of the reference lines on the quilt.
After making adjustments, touch
.
a
Inner corner of next pattern to be embroidered
c
When embroidering the corner part
Rotate the quilt counterclockwise, rehoop it, and then attach the
embroidery frame to the machine.
Use the move pattern keys to align the start point projected by
the projector with the end point of the previous pattern, and
then touch
.
Then, align the inner corner of the pattern with the corner of the
reference lines.
d
When embroidering the last edge part
Use the move pattern keys to align the start point projected by
the projector with the end point of the previous pattern, and
then touch
.
Then, align the end point of the part with the start point of the
first part. If the pattern is not angled correctly, rotate it. If the
length of the pattern does not match, enlarge or reduce the
pattern.
After making adjustments, touch
.
Memo
• To maintain the overall shape of the hexagon,
it is important to carefully check and adjust
the length of the pattern that is stitched
immediately before the corner.
a
Memo
• The width of the corner segment can be
adjusted to best fit the inner corner. However,
make adjustments so that the shape is not
deformed.
Memo
• If you need to restitch a segment or skip a
segment, you can touch
in the embroidery
screen to continue to the next pattern or
return to the previous pattern. Select the
desired pattern in the embroidering order, and
then touch
.
a
Return to the previous pattern.
b
Embroidering order of current pattern/Total
number of segments
c
Continue to the next pattern.
a b c
Summary of Contents for Solaris VISION BLSA3
Page 1: ......
Page 2: ......
Page 6: ...CONTENTS 4 ...
Page 7: ...Chapter 1 Embroidery Step by Step ...
Page 59: ...Chapter 2 Basic Editing ...
Page 87: ...Chapter 3 Advanced Editing ...
Page 150: ...USING THE CAMERA TO CONNECT PATTERNS 148 ...
Page 151: ...Chapter 4 IQ Designer ...
Page 192: ...IQ INTUITION POSITIONING APP 190 ...
Page 193: ...Chapter 5 Appendix ...
Page 204: ...English 882 W34 Version 0 ...


