


EMBROIDERY APPLICATIONS
137
Ad
va
nc
ed
Ed
iti
n
g
3
i
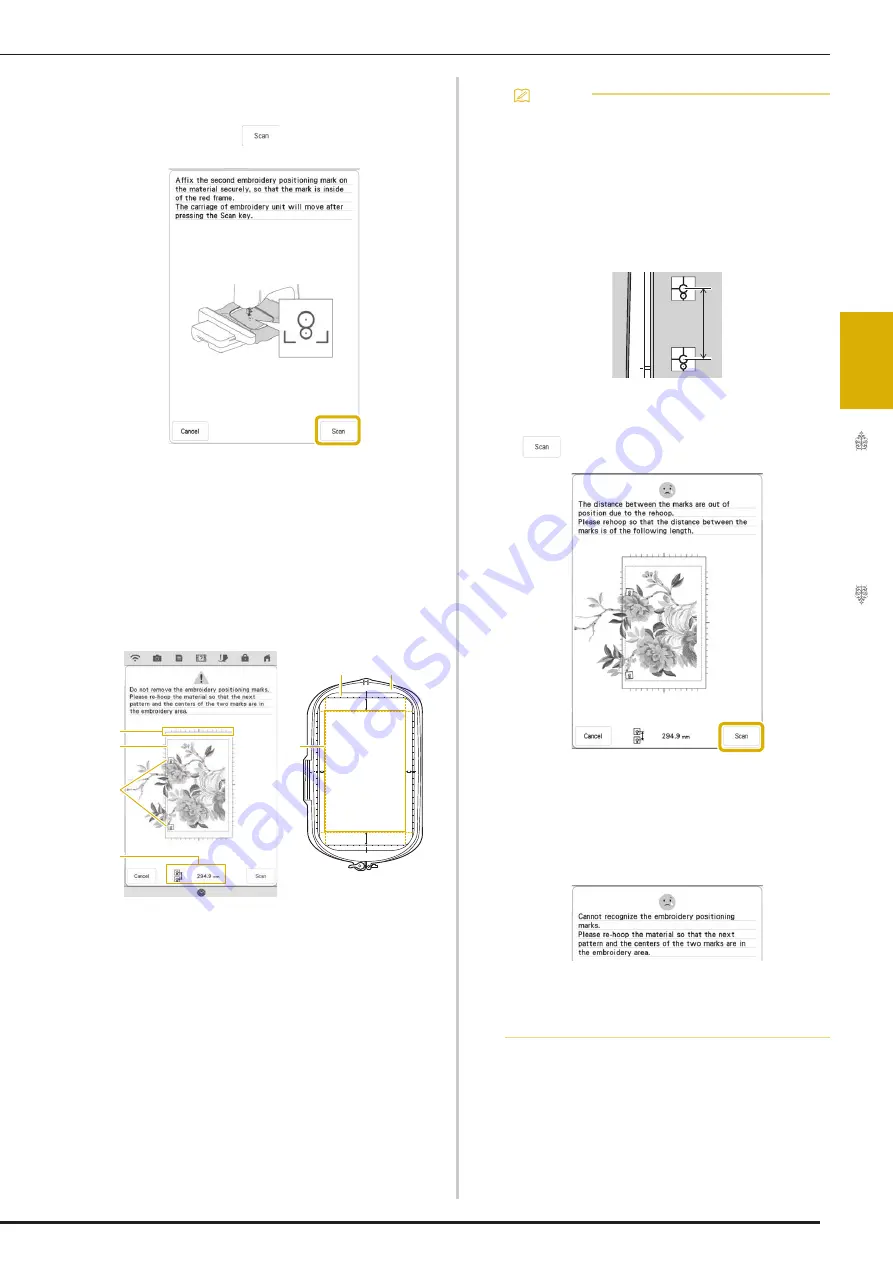
Affix the second embroidery positioning
sticker to the fabric as described in step
h
,
and then touch
.
The camera detects the second embroidery
positioning sticker.
j
While making sure that the two embroidery
positioning stickers do not peel off, remove
the embroidery frame from the machine,
and then rehoop the fabric.
*
Be sure to hoop the fabric so the next pattern and
both the embroidery positioning stickers are within
the embroidery area.
a
Embroidery area
b
If a built-in large-size split embroidery pattern is
selected and the embroidery frame (408 mm × 272
mm (approx. 16 inches × 10-5/8 inches)) is
installed, a scale for the embroidery frame appears
in the screen.
c
Embroidery positioning stickers
d
Embroidery frame (408 mm × 272 mm (approx. 16
inches × 10-5/8 inches))
e
Approx. 34 mm (Approx. 1-11/32 inches)
f
Approx. 10.8 mm (Approx. 27/64 inch)
g
Approx. 15.5 mm (Approx. 39/64 inch)
h
Approx. 28 mm (Approx. 1-7/64 inches)
i
Distance between the embroidery positioning
stickers
b
a
i
a
b
d
e
h
f
g
c
Memo
• In order to cleanly connect the first and
second patterns, make sure that the distance
between the embroidery positioning stickers
(distance between the centers of the large
circles) is the same before and after
rehooping the fabric. If the distance is not the
same, the fabric may not be taut. At this time,
do not correct the distance by moving a
sticker.
If the following message appears after step
k
, rehoop the fabric so that the distance is
the same as that displayed. And then touch
.
• If the following message appears, rehoop the
fabric so that the next pattern and both the
embroidery positioning stickers are within the
embroidery area as indicated in the screen. If
problem persists, refer to “The machine does
not detect the embroidery positioning
sticker.” on page 196.
• For best results, if fabric puckers, iron the
wrong side of the fabric to smooth out before
rehooping. At this time, do not iron over or
remove the embroidery positioning stickers.
Summary of Contents for Solaris VISION BLSA3
Page 1: ......
Page 2: ......
Page 6: ...CONTENTS 4 ...
Page 7: ...Chapter 1 Embroidery Step by Step ...
Page 59: ...Chapter 2 Basic Editing ...
Page 87: ...Chapter 3 Advanced Editing ...
Page 150: ...USING THE CAMERA TO CONNECT PATTERNS 148 ...
Page 151: ...Chapter 4 IQ Designer ...
Page 192: ...IQ INTUITION POSITIONING APP 190 ...
Page 193: ...Chapter 5 Appendix ...
Page 204: ...English 882 W34 Version 0 ...


