background image

Appendix 8 User Parameters

MITSUBISHI CNC

IV - 210

#9054

   MACRO PRINT FILE

Set the file name to save the output data to a memory card with the DRPNT command for the user 

macro.

If this parameter is not set, the data will be output under the following name.

 dprt$-MMDDhhmmssff

$ is the part system No. in which DPRNT is commanded, MMDDhhmmssff is the current date.

(MM: month, DD: day, hh: hour, mm: minute, ss: second, ff: millisecond)
(Note) This parameter is enabled when "#9007 Macro print directory" is set to "9".

---Setting range---

Program name or file name (32 characters)

#9101

   DEV0 DEVICE NAME

Set the device name corresponding to the device No.

Set a simple name for quick identification.

---Setting range---

Use alphabet characters, numerals and symbols to set a name within 3 characters.

#9102

   DEV0 BAUD RATE

Select the serial communication speed.

0: 19200 (bps)

1: 9600 

2: 4800

3: 2400

4: 1200

5: 600

6: 300

7: 110

#9103

   DEV0 STOP BIT

Select the stop bit length used in the start-stop system.

Refer to "#9104 DEV0 PARITY CHECK". At the output of data, the number of characters is always 

adjusted for the parity check. 

1: 1 (bit)

2: 1.5

3: 2

#9104

   DEV0 PARITY CHECK

Select whether to add the parity check bit to the data. 

Set this parameter in accordance with the I/O device specifications. 

0: Not add a parity bit in I/O mode

1: Add a parity bit in I/O mode

#9105

   DEV0 EVEN PARITY

Select odd or even when parity is added to the data. This parameter is ignored when no parity is 

added. 

0: Odd parity

1: Even parity

#9106

   DEV0 CHR. LENGTH

Set the length of the data bit.

Refer to "#9104 DEV0 PARITY CHECK". 

0: 5 (bit)

1: 6

2: 7 (NC connection not supported)

3: 8

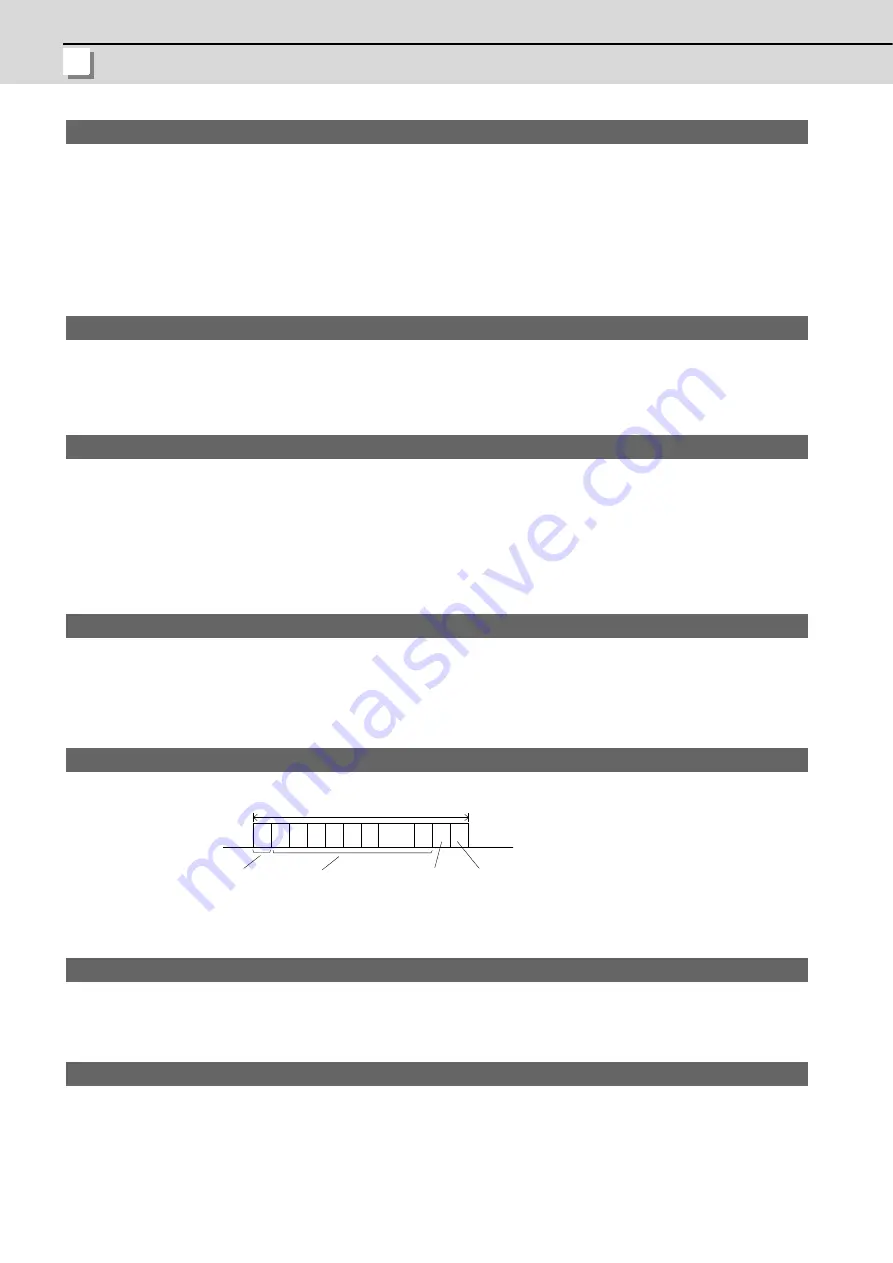
1character

Stop bit

Parity bit

Data bit

Start bit

ON

OFF

b1 b2 b3 b4 b5 b6

bn

Содержание E70 Series

Страница 1: ......

Страница 2: ...s manual Items not described in this manual must be interpreted as not possible This manual is written on the assumption that all option functions are added Confirm with the specifications issued by the machine tool builder before starting use Refer to the Instruction Manual issued by each machine tool builder for details on each machine tool Some screens and functions may differ depending on the ...

Страница 3: ......

Страница 4: ...ollowing sings indicate prohibition and compulsory The meaning of each pictorial sing is as follows DANGER When the user may be subject to imminent fatalities or major injuries if handling is mistaken WARNING When the user may be subject to fatalities or major injuries if handling is mistaken CAUTION When the user may be subject to bodily injury or when physical damage may occur if handling is mis...

Страница 5: ...d may exceed the allowable speed of the workpiece or chuck etc In this case the workpiece etc may jump out during machining which may result in breakage of tools or machine tool or may cause damage to the operators 1 Items related to product and manual For items described as Restrictions or Usable State in this manual the instruction manual issued by the machine tool builder takes precedence over ...

Страница 6: ...use of key chattering etc during editing NO NOS FOLLOWING G commands become a G00 operation during running EOB and EOR are symbols used for explanation The actual codes for ISO are CR LF LF and The programs created on the Edit screen are stored in the NC memory in a CR LF format however the programs created with external devices such as the FD or RS 232C may be stored in an LF format The actual co...

Страница 7: ... memory cassette while the power is ON Do not replace the cooling fan while the power is ON Do not replace the battery while the power is ON Be careful that metal cutting chips etc do not come into contact with the connector contacts of the memory cassette Do not replace the high speed program server unit while the power is ON Before touching the unit always touch a metal with a ground section to ...

Страница 8: ...ric parts etc and sold to scrap contractors Mitsubishi recommends sorting the product and selling the members to appropriate contractors 2 Requirements for Law for Treatment of Waste and Cleaning a Mitsubishi recommends recycling and selling the product when no longer needed according to item 1 above The user should make an effort to reduce waste in this manner b When disposing a product that cann...

Страница 9: ......

Страница 10: ... should be disposed of separately from your household waste If a chemical symbol is printed beneath the symbol shown above this chemical symbol means that the battery or accumulator contains a heavy metal at a certain concentration This will be indicated as follows Hg mercury 0 0005 Cd cadmium 0 002 Pb lead 0 004 In the European Union there are separate collection systems for used batteries and ac...

Страница 11: ......

Страница 12: ...tered trademarks of Microsoft Corporation in the United States and or other countries CompactFlash and CF are either trademarks or registered trademarks of SanDisk Corporation in the United States and or other countries UNIX is a registered trademark of The Open Group in the United States and or other countries Intel and Pentium are either trademarks or registered trademarks of Intel Corporation i...

Страница 13: ......

Страница 14: ...andling of our product English This is a class A product In a domestic environment this product may cause radio interference in which case the user may be required to take adequate measures 본 제품의 취급에 대해서 한국어 Korean 이 기기는 업무용 A 급 전자파적합기기로서 판매자 또는 사용자는 이 점을 주의하시기 바라며 가정외의 지역에 서 사용하는 것을 목적으로 합니다 ...

Страница 15: ......

Страница 16: ...larm Guidance 24 1 10 Screen Saver Backlight OFF Function 27 1 10 1 Backlight OFF 27 1 10 2 Backlight ON 28 1 11 Screen Capture 29 1 12 Menu Customization Function 30 2 Monitor Screens 33 2 1 Screen Configuration 35 2 1 1 Counter Display 39 2 1 2 Switching the Counter Types 40 2 1 3 Changing Between Auto MDI and Manual 41 2 2 Operation Search 42 2 2 1 Executing an Operation Search 44 2 2 2 Changin...

Страница 17: ...ad Meter Display 111 2 21 Spindle Standby Display 112 2 22 All Spindles Rotation Speed Display 113 3 Setup Screens 115 3 1 Screen Configuration 116 3 2 Tool Compensation Amount 118 3 2 1 Tool Compensation Amount M system 119 3 2 1 1 Setting the Tool Compensation Data 122 3 2 1 2 Switching the Input Method for the Tool Compensation Data 124 3 2 1 3 Erasing the Tool Compensation Data 125 3 2 1 4 Cop...

Страница 18: ...2 8 Displaying an Arbitrary Line 219 4 2 9 Rewriting Data 220 4 2 10 Inserting Data 220 4 2 11 Deleting Data 221 4 2 12 Searching for Character Strings 223 4 2 13 Replacing Character Strings 225 4 2 14 Copying Pasting Data 226 4 2 15 Adding Sequence No N No Automatically 227 4 2 16 G Code Guidance 230 4 2 17 Playback Editing M system 233 4 3 Program Check 2D 237 4 3 1 Checking Continuously 241 4 3...

Страница 19: ...istory 314 5 7 Self Diagnosis Screen 316 5 8 Data Sampling Screen 319 5 8 1 Sampling Parameter 321 5 8 1 1 Sampling Address 324 5 8 2 Executing NC Data Sampling 327 5 8 3 Outputting Sampling Data 328 6 Maintenance Screens 331 6 1 Parameter Screens 334 6 1 1 Changing the Parameter Display 339 6 1 2 Setting the Parameters 339 6 1 3 Copying Pasting Parameters 341 6 1 4 User Parameters 342 6 1 5 Echo ...

Страница 20: ...Lamps 7 2 1 Control Unit Ready 8 2 2 In Automatic Operation 8 2 3 Automatic Operation Start Busy 8 2 4 Automatic Operation Pause Busy 8 2 5 Return to Reference Position 8 2 6 Alarm 8 2 7 M00 8 2 8 M02 M30 8 3 Reset Switch and Emergency Stop Button 9 3 1 Reset Switch 10 3 2 Emergency Stop Button 10 4 Operation Mode 11 4 1 Mode Selection Switch 12 4 2 Jog Feed Mode 12 4 3 Rapid Traverse Feed Mode 13...

Страница 21: ... 36 6 17 3 Interruption Effective Axis 36 6 17 4 Axis Movement Speed Resulting From Interruption 37 6 17 5 Path Resulting After Handle Interruption 38 6 17 6 Handle Interruption in Tool Radius Compensation 40 6 17 7 Interrupt Amount Reset 42 6 17 8 Operation Procedure 42 6 18 All Axis Machine Lock 43 6 19 Each Axis Machine Lock 43 6 20 Deceleration Check 44 6 20 1 Functions 44 6 20 2 Deceleration ...

Страница 22: ...yboard Unit 16 2 5 Operation Panel I O Unit 17 2 6 CompactFlash CF Card 18 2 7 USB Memory 19 IV APPENDIXES Appendix 1 List of Function Codes 1 Appendix 2 Table of Command Value Ranges 3 Appendix 3 Circular Cutting Radius Error 11 Appendix 4 Registering Editing the Fixed Cycle Program 13 Appendix 4 1 Fixed Cycle Operation Parameters 14 Appendix 4 2 Transmitting Erasing the Fixed Cycle Program 14 Ap...

Страница 23: ...et Operation Messages 148 Appendix 7 6 Data Input Output related Operation Messages 149 Appendix 7 7 Parameter related Operation Messages 152 Appendix 7 8 Measurement related Operation Messages 153 Appendix 7 9 Tool Tool registration tool life related Operation Messages 155 Appendix 7 10 Editing related Operation Messages 156 Appendix 7 11 Diagnosis related Operation Messages 158 Appendix 7 12 Mai...

Страница 24: ...I SCREEN OPERATIONS ...

Страница 25: ......

Страница 26: ...I 1 1 Operating the Setting and Display Unit ...

Страница 27: ...part of display unit Operations such as screen transition and data setting are to be made with keyboard unit or menu keys The figure below is example of display unit and keyboard unit arranged sideways but there is a vertical arrangemet as well Example of unit arrangement Some models have keyboard units that are different from the above in keyboard size or arrangement etc Note Please do not hit th...

Страница 28: ...ays the contents of the next page The mark at the top of the screen indicates that there is a next page 3 Previous screen display key Part system changeover BACK Previous screen display key This redisplays the previously displayed screen Part system changeover key When using a multi part system NC this displays the data of the next part system The screen does not change if it is a part system comm...

Страница 29: ...move to the left C B CAN Cancel key This cancels the setting in the data setting area 8 SHIFT key SHIFT This validates the setting on the lower line of data key 9 Cursor keys This moves the cursor up or down one when setting data in the screen display items This moves the cursor one item to the left or right when selecting data in the screen display items at cursor left end Moves to the right end ...

Страница 30: ...g program text file that is stored in USB memory but it can not load machining program that is stored in USB memory Can operate Can not operate 1 2 3 Caution 1 Do not take out CF card USB memory when loading data 2 Take time about more than 10 seconds when inserting removing it after power stared 3 To prevent trouble do not remove or turn the power off when accessing to CF card USB memory 4 Do not...

Страница 31: ...nd interval 3 Operation status The operation mode is displayed 4 MDI status The MDI status is displayed when the MDI operation mode is selected This does not appear when other operation modes are selected 5 Screen name The tag for the currently selected screen is selected and displayed 6 Operation status The NC operation status is displayed 7 Alarm The currently occurring alarm or warning with the...

Страница 32: ...ved by hand at feed rate when the FEED AXIS SELECT switch is ON The travel distance per graduation of the handle depends on how the HANDLE INCREMENTAL MAGNIFICATION switch is set MANUAL Manual arbitrary feed This mode enables to move manually with arbitrary amount or arbitrary positioning position ZERO RTN Reference position return This mode enables a controlled axis to be returned manually to the...

Страница 33: ...cters 1 If text is longer than 40 characters divide it into two and display separately Classification No is displayed together 1 3 5 Operation Messages The operation message can be reset by pressing any key The following operation messages are released even if automatic start or reset is executed Search completed Restart search is completed Top search completed MDI Set ended Example S51 Parameter ...

Страница 34: ...ink param Hi prec axis Hi prec param Subpro stor Axis param Barrier data T list Operate param Servo unit Power unit Spindle unit Alarm message Mem dia Drv mon I F dia Option display H W S W Config Diagn Refer to 5 Diagnosis Screens Selfdia NC smp S W config Ladder config H W config Refer to 6 Maintenance Screens Subpro stor Link param Ethernet param I O param Barrier data Axis param Ctrl param 2 C...

Страница 35: ...TUP or by pressing a menu key displayed in the screen selection menu Operation method To display T ofs screen from the Setup screen 1 Press the function key SETUP The previously displayed setup screen will appear The menu display will differ according to the L system M system and parameter setting 2 Press the menu T ofs key Tool compensation amount screen appears ...

Страница 36: ... when INPUT is pressed Reset the correct data The key is input at the position where the cursor is displayed If a cursor is not displayed the key input is invalid When a key is input the data appears at the cursor position and the cursor moves one character space to the right keys Moves the cursor one character to the left or right INSERT key Enters the insert mode Note The overwrite mode is enter...

Страница 37: ...o the next position The following keys can be used to move the cursor with the cursor keys Moves the cursor to the previous line Moves the cursor to the next line Moves the cursor one item to the left Moves the cursor one item to the right 1 Move the cursor to the position where the data is to be deleted The cursor moves in the data setting area 2 Press the DELETE key The character in front of the...

Страница 38: ...t method Examples of operator settings and results Operation Setting example Operation results Addition 100 50 150 Subtraction 100 50 50 Multiplication 12 3 4 49 2 Division 100 3 33 3333333 Function 1 2 2 5 SQRT 4 5 4 Function symbols setting examples and results Function Function symbol Setting example Operation results Absolute value ABS ABS 50 60 10 Square root SQRT SQRT 3 1 7320508 Sine SIN SI...

Страница 39: ...ation input is given to priority So the window does not open and the cursor does not move 6 The exponential setting like 1 23E 4 cannot be used The operation result is not displayed with exponential 7 It is not possible to set characters exceeding the number of characters which can be input to the data setting area 8 It is not possible to omit 0 before the decimal point like 5 when operation input...

Страница 40: ...ording to the operation that takes place after the menu key is pressed A The menu is highlighted and the system waits for the user input After the input the operation follows the input details B The menu is highlighted and operation starts C Operation starts without highlighting the menu In section 2 Monitor screen and following the types are described in the following method Example Menus used fo...

Страница 41: ...indow The menu does not change in this case If the MenuList key is pressed again or if the Cancel key is pressed while the Menu list window is open the Menu list window closes and the state before the MenuList key was pressed is recovered Display items Display item Details 1 Screen name The screen name is displayed Example Monitr Setup 2 Menu name A list of the menu names functions included on eac...

Страница 42: ...al rot speed values of all the spindles Setup T ofs Set display tool offset data T meas Measure T length radius manually set them as tool offset amounts T reg Register T No according to the magazine pot spindle wait position T life Set and display tool usage status and other tool life management data Coord Set display workpiece coordinate system offset User Set display user parameters MDI Display ...

Страница 43: ...is pressed while editing the file on the Edit screen a prompt to confirm whether to save the program appears before Menu list window opens 2 Using the and page keys move the cursor to the menu for which the function outline is to be displayed The function outline for the selected menu appears The function outline does not appear if a menu with no name is selected The cursor does not move to the gr...

Страница 44: ...layed with the following type of configuration Insert memory card with guidance data before conducting display guidance If the key is pressed on any screen the guidance window will open If a pop up window other than the guidance window is open the guidance window will open over the currently opened pop up window In this case the menu state does not change If key or CANCEL key is pressed again when...

Страница 45: ...ion screen The edit window is displayed 2 Press the key The guidance window is opened and sub contents for edit operation method is displayed Note If the explanation of operation method is nothing the contents list is displayed 3 Move the cursor to the operation method to be displayed by key Select the Program editing Undoing program changes with the cursor 4 Press the INPUT key The operation meth...

Страница 46: ... gotten the cursor is non display the cursor is put on blank line the cursor is put on comment line the top of parameter guidance for each parameter appears Displaying the parameter guidance 1 Press the Param menu on maintenance screen The machining parameter screen is displayed 2 Press the key and move the cursor to 8005 ZONE r parameter 3 Press the key The guidance window is opened and the detai...

Страница 47: ...e by selecting the contents 1 Press the Search menu on operation screen The operation search window is displayed 2 Press the key The parameter operation guidance window is opened and sub contents for operation search is displayed 3 Press the key The contents for operation guidance are displayed ...

Страница 48: ...rted NC will load guidance data at the timing as follows a When operation parameter or alarm guidance is displayed b When switching display type to display G code guidance on edit screen c When G code guidance is displayed during display transition When NC is loading guidance data guidance data loading message will show up and loading will take few seconds to complete 5 Once guidance data is loade...

Страница 49: ...on parameter alarm guidance window The alarm tag is on the rightmost end of the guidance window A scroll bar appears when details and remedy etc do not fit in one page Screen configuration Display items Display item Details 1 Message This displays NC alarm and PLC alarm message The displayed content is same as the content displayed in the alarm message of the diagnosis screen 2 Number of page This...

Страница 50: ...inually even if the alarm is reset while the alarm guidance is displayed The alarm guidance is not executed for the alarm that has occurred while the alarm guidance is displayed Note 2 If the key is pressed when an alarm is not occurring the operation parameter guidance appears In this state if the alarm tag is selected with the right frame key nothing is displayed in the message details and remed...

Страница 51: ... commonly used for M700V M70V and E70 series This manual is written on the assumption that all option functions are added Confirm with the specifications manual issued by the machine tool builder before starting use Changing the alarm guidance 1 Press the key or key when the alarm guidance is displayed The alarm guidance with one priority lower than the current alarm guidance is displayed If the k...

Страница 52: ...screen display request signal input from the machine within the time set in the parameter 8078 Screen Saver Time the backlight will be turned OFF If 8078 Screen Saver Time is set to 0 the backlight will not be turned OFF The backlight can be turned OFF by pressing the SHIFT and C B CAN keys on the Monitor screen when a pop up screen is not displayed Even if 8078 Screen Saver Time is set to 0 the b...

Страница 53: ...e instruction manual issued by each machine tool builder for details Note that whether the backlight will be turned ON when any of the machine operation board keys other than the NC operation board keys is pressed will differ according to the machine specifications Refer to the instruction manual issued by each machine tool builder for details 2 If a key is pressed or the screen display request si...

Страница 54: ...e while the axis is moving by the manual operation mode etc 4 The screen cannot be operated while the bitmap file is being output to USB memory or memory card CF Do not turn OFF the power supply while being output The USB memory or memory card may be damaged 5 The bitmap file cannot be output when the USB memory or memory card is not inserted 6 When there is no empty capacity in the USB memory or ...

Страница 55: ...u 30 Main menu for edit screen 10601 Edit main menu 1 to 30 to 10630 Edit main menu 30 Refer to Appendix 10 User Parameters for details Main menu for monitor screen is changed as follows The figure below is the default layout Before After Setting example Menu on page 1 Menu on page 2 Menu on page 3 1 Set the parameters 10501 Monitr main menu 1 to 10530 Monitr main menu 30 as shown in the right Par...

Страница 56: ...ure scrn will also not be displayed even if it is set with the menu selection parameter 2 A menu selection parameter setting will be reflected to the menu list 3 Menus which are allocated to the short cut key it is enabled after the axis address is input such as Counter Set and MST become vaild by pressing a short cut key even if they are set as Not display 4 The menu set as hidden by the machine ...

Страница 57: ...1 Operating the Setting and Display Unit MITSUBISHI CNC I 32 ...

Страница 58: ...I 33 2 Monitor Screens ...

Страница 59: ...played on the Monitor screen The following operations regarding operation can be executed 1 Operation search 2 Restart search 3 Editing the searched machining program 4 Trace Display of machine movement path 5 Check Display of NC program s tool movement path 6 Correction of operating program s buffer 7 Counter set 8 Manual numeric command etc ...

Страница 60: ...uration I 35 2 1 Screen Configuration Auto MDI and Manual are displayed at the upper left of the screen These displays change according to the mode selection switch For Auto MDI 8 4 type For Manual 8 4 type 1 4 5 6 7 8 9 10 11 2 3 1 5 6 7 8 9 10 11 ...

Страница 61: ...olant status Note that the spindle rotation direction coolant status display differ according to the machine tool builder 6 M S T B commands This displays the values command for M miscellaneous function command value T tool command value B 2nd miscellaneous function command value S spindle command rotation speed and a number of workpiece machining times The displayed number of M miscellaneous func...

Страница 62: ...eration search 2 2 Operation Search This executes restart search 2 3 Restart Search This edits the machining program in search 2 4 Program Edit This executes trace 2 5 Trace This checks the program 2 6 Program Check 2D This enlarges the counter and displays the counters for all axes 2 7 Counter All axis Display This displays the tool compensation amount A value can also be set for the tool compens...

Страница 63: ... sets and cancels the origin 2 11 Origin Set Origin Cancel The spindle load and Z axis load etc are displayed in a bar graph These displayed contents differ according to the machine tool builder 2 20 Load Meter Display The current spindle tool No and the standby tool No are displayed These displayed contents differ according to the machine tool builder 2 21 Spindle Standby Display This displays co...

Страница 64: ...ition This can be changed with 8901 counter type 1 b Program position This can be changed with 8902 counter type 2 c Remaining command This can be changed with 8903 counter type 3 d Next command This can be changed with 8904 counter type 4 Layout Display Remarks e Relative position This can be changed with 8905 counter type 5 f Machine position This can be changed with 8906 counter type 6 a b c d ...

Страница 65: ... will also be changed Note 1 If the current counter type the counter type set by 8905 Counter type 5 before switching with the tab keys is other than Current position Restart position or Remain distance those counters will not be included in the counter types switchable with the tab keys Note 2 When a parameter 8951 No Tab counter sw is set to 1 a counter type will not be changed by the tab keys S...

Страница 66: ...han 0 Auto MDI and Manual is not switched Note 2 If the parameter 8909 Aut Manual switch is set to 3 the counter set by 8901Counter type 1 is enlarged 8909 Aut Manual switch Mode selection switch setting Screen display 0 No mode Auto MDI Memory Tape MDI Jog Manual Handle Step Manual arbitrary feed Reference position return Automatic dog less reference position return Rapid traverse Jog handle Rapi...

Страница 67: ... This displays a list of the contents contained in the device or directory displayed in 1 Use and to scroll the displayed list If the device is a memory card the file update date time is displayed in the Date Comment field For the NC memory the machining program comment is displayed Whether to show or hide the comment field can be selected by pressing the Comment nondisp menu When the comment fiel...

Страница 68: ...e top line C The last page of the directory list of files is displayed The cursor moves to the bottom line C This changes whether to show or hide the comment field in the list When the comment field is hidden the file name field will be enlarged B 2 2 2 Changing Whether to Show or Hide the Comment Field This updates the list contents The latest contents of the currently selected device and directo...

Страница 69: ...e searched Operation method 1 Press the main menu Search The sub menu appears The list appears as a pop up window 2 Select the device Example Memory card The selected device name and route directory memory card appear in the Device name Directory display field 3 Using the keys move the cursor to the directory containing the file to be set The following is displayed If the list contents differ from...

Страница 70: ...ers and symbols Note 1 The set status is held even if the NC power is turned OFF Note 2 The set status is common for list view of operation screen restart search screen etc Note 3 The cursor moves to the head when display non display in the comment field is switched Operation method 1 Press the menu Comment nondisp The file name is displayed up to 32 alphanumeric characters and symbols after the c...

Страница 71: ...g order is applied the appropriate order would be 1 A as 1 equals to 0x31 and A equals to 0x41 Note 2 When the device is Memory display for current directory and one directory above is not available Note 3 When comments are the same sorting is carried out by the file name character code ascending descending order Note 4 Date comment for the devices other than Memory are compared using character st...

Страница 72: ...NC has been reset or the power supply has been turned OFF while fixed cycle custom fixed cycle machine tool builder macro or macro interruption is executed the search with no input to the setting will be performed for each source program Note 2 When the user macro is executed the user macro execution position is searched Restart type 2 After machining program is stopped due to a holiday etc and th...

Страница 73: ...d to top search screen Restart type 1 The parameter 8914 Auto Top search is 1 automatic top operation Screen transition Main screen Top search screen Note File setting screen MSTB History screen Top search Search exec Top search INPUT File set Retn File input operation MSTB history MSTB history ...

Страница 74: ... set to ON However note that the tool path may change because of the radius compensation the corner R C and geometric read ahead blocks 8 When executing the restart for the type 1 with a tape the axes will not return to the proper machinig start position if the opearation starts from midway of the tape 9 WHILE GOTO statement cannot be used for a tape operation Thus if a restart search is executed ...

Страница 75: ...he program number the sequence number the block number and the number of repetition Actual restart position may not be same as the last executed program position when executing the restart search with restart type 1 because it is updated by the timing of machine stop operation after the automatic operation NC reset emergency stop single block stop and feed hold stop 4 Restart type This displays th...

Страница 76: ...uted with the highlighted restart type The type 1 or type 2 menu is always highlighted When restart search is executed the selected restart type is displayed at the display item 3 Restart type B This changes to the pop up window for setting the file and enables the file to be selected B 2 3 3 File Setting Screen This opens the MSTB history screen as a pop up window The M S T and B command used in ...

Страница 77: ... which device program to search for from this menu If a device having a directory is selected the root is selected first C Display starts from the first page of the directory list of files The cursor moves to the top line C The last page of the directory list of files is displayed The cursor moves to the bottom line C This updates the list details A list of the latest details of the currently sele...

Страница 78: ...of the directory list of files is displayed The cursor moves to the bottom line C This updates the list details A list of the latest details of the currently selected device and directory is displayed C This updates the list sorting method C 2 2 3 Changing the Sorting Method This returns the main menu C This changes whether to show or hide the comment field in the list When the comment field is hi...

Страница 79: ...S6 3 T commands and 3 B commands are displayed Regardless of parameter setting value 11038 T disp type the display of T disp shows only tool command value Menus Menu Details Type Reference When this is highlighted it indicates that the MSTB history pop up window is open If the menu is pressed when this menu is highlighted the system will close the MSTB history pop up window and the main pop up win...

Страница 80: ...m restart parameter 1302 AutoRP is ON the processing is restarted after all axes return to the restart position at the same time Refer to 2 3 10 Returning to the Restart Position Operation on program restart screen The following items are displayed when restart search is completed Remaining distance when the restart search is completed Restart position on local coordinates Each command value of th...

Страница 81: ... the program start position the program does not restart properly If the cycle starts when the Automatic return by program restart parameter 1302 AutoRP is ON the processing is restarted after all axes return to the restart position at the same time Refer to 2 3 10 Returning to the Restart Position Operation on program restart screen The following items are displayed when restart search is complet...

Страница 82: ...a pop up window 5 Set the position to restart search in the setting area Delimit the ONB number in the setting area using When O No was attached The main or sub program is targeted Ex 1000 6 0 When O No was not attached The program currently searched is targeted Ex 6 0 Note When the INPUT key is pressed without entering data in the input area restart search will be carried out for the last executi...

Страница 83: ... 9 Press the INPUT key The top search starts The search can be executed by pressing the menu Search exec instead of the INPUT key When the top search is completed the operation message Search Complete appears The top search pop up window closes and the main screen for restart search appears as a pop up window 10 Set the position to restart search in the setting area Delimit the ONBP number in the ...

Страница 84: ... restart search appears as a pop up window 10 Set the position to restart search in the setting area Delimit the ONBP number in the setting area using When O No was attached The restart search is executed at designated position by NBP No with the set O No at the head Ex 123 PRG 6 2 1 When O No was not attached The program currently searched is targeted Ex 6 2 1 11 Press the INPUT or Search exec Re...

Страница 85: ... is displayed If the list contents differ from the actual device or directory press the menu List Update 3 Press the INPUT key The directory changes and the contents of the designated directory appear in the list The moved directory appears in the directory display field 4 Repeat steps 2 and 3 5 After changing the directory press the Retn or CANCEL key The restart search main window opens as a pop...

Страница 86: ...on Note 5 If the restart switch is turned to ON after the axis is returned to the restart position with the restart switch OFF PR may not be displayed Return to the restart position after the restart switch is turned ON Note 6 After restart search had been completed if the movement command is issued by MDI before automatic restart position return has been started the program error P48 occurs Perfo...

Страница 87: ...n incomplete occurs Note 5 After automatic restart position return had been started if the automatic start is executed during MDI mode before not all axes have yet to complete automatic restart position return the error T01 Restart pos return incomplete occurs Note 6 After restart search had been completed if the movement command is issued by MDI before automatic restart position return has been s...

Страница 88: ...used for machining the MSTB commands used at first will not appear Operation method 1 Press the submenu MSTB history The pop up window changes to the MSTB history window The MSTB commands used for machining program are listed 2 Using the and keys move the cursor to the position of the data to set 3 Press the INPUT key The designated command is executed A value which has been commanded once is disp...

Страница 89: ...en searched or tape operation has been executed the edit window will not open When the program is edited the key input data is directly written into the program display area All data is overwritten from the cursor position Editing appears on the right side of the file name display when the input starts When the INPUT key is pressed the program is saved in the NC memory and the Editing message disa...

Страница 90: ...arch string replace cursor on input unit or editing it will not start cursor position search by pressing INPUT key Note 2 Operating search program will be the program that was searched when program edit window was open Note 3 When MDI program is displayed the block with the cursor will be set for MDI by pressing INPUT key Note 4 If the INPUT key is pressed when data protect key 3 is valid cursor p...

Страница 91: ...the following cases edit search is not available with the edit search window Edit lock B C is enabled Operation search is not carried out Edit file size exceeded A serial program is being searched Operation method Edit Search signal search 1 Carry out the operation search to find the program to carry out the cursor position search 2 Turn ON the edit search signal The edit search window is displaye...

Страница 92: ...xed cycle while stopped with single block stop in the midst of the fixed cycle the cursor position search target block will appear on the top of the program buffer display However automatic operation will start from the top of the remaining of the fixed program and after finishing the fixed cycle will move on to executing the cursor search target program Operation method search during single block...

Страница 93: ...achine operation to be monitored during machining The programs that can be traced are operation searched machining programs MDI program for MDI mode If no program has been operation searched the trace window will not open Using All display menu normal display and whole display modes can be switched Normal display All display is OFF Drawing area Drawing area 2 plane Input area displayed 6 1 2 3 5 4...

Страница 94: ... being drawn is displayed 3 Trace drawing area This area is used to draw the tool path as graphics Zero point mark for displaying can be selected with parameter 19002 Zero point mark display position 4 Scale The display range scale is displayed 5 Machining time display The time required for machining is calculated and displayed Nothing is displayed during tracing 6 Input area The input area appear...

Страница 95: ...e graphic drawing area This menu can be selected only when the full screen display mode is applied B This sets the viewpoint angle for the 3D display mode When the viewpoint angle is changed the graphic data displayed on the screen is erased Note that this menu can be used only in the 3D display mode C 2 5 5 Changing the Display Angle The display range scale and display position is automatically s...

Страница 96: ...yed at the counter The message Tracing appears After this the machine position path is drawn with graphics in the trace mode The path where the machine position or tool center position is drawn with graphics The path is drawn with a solid green line Operation method 1 Start tracing with the machine position 2 Press the main menu Trace ON The Trace ON menu is unhighlighted The tool mark in the draw...

Страница 97: ...nal scale when enlarging and a dotted line frame appears when reducing 3 Press the INPUT key The display scale is changed By changing the display scale the graphic data displayed on the screen is erased Operation method Changing the drawing display position 1 Press the Display range key A white frame indicating the display range appears on the screen The display range input mode is activated and t...

Страница 98: ... Up Down keys are pressed Which frame to be moved up down can be changed with the page key Note 1 In the 2 plane display mode such as XY XZ centering is applied for the upper and lower areas The operation method is the same as the 1 plane display mode Operation method Centering 1 Press the Display range key A white frame indicating the display range appears on the screen The display range input mo...

Страница 99: ...splayed as the horizontal axis and the Y axis is displayed as the vertical axis C This changes to the 1 plane display mode configured of Y Z The Y axis is displayed as the horizontal axis and the Z axis is displayed as the vertical axis C This changes to the 1 plane display mode configured of X Z The X axis is displayed as the horizontal axis and the Z axis is displayed as the vertical axis C This...

Страница 100: ...ng the Axis Movement Direction Graphic trace draws the path according to the axis movement direction designated by 1495 grf_ax_direction The movement direction can be set for each axis Refer to 4 3 9 Switching the axis movement direction for details Operation method Changing the display axis name 1 Press the menu Display mode The menus for the selectable display modes appear The input area appears...

Страница 101: ...lay mode is maintained even after rebooting the machine Note 2 The program display mode is applied to the trace function and program check 2D function commonly Note 3 The Program display menu key cannot be selected while the normal display mode is selected Program display mode is valid only when the full screen display mode is selected 2 5 8 Precautions for Tracing 1 When the command speed increas...

Страница 102: ...ata drawn at a high speed Using All display menu normal display and full screen display modes can be switched The programs that can be checked are operation searched machining programs MDI program for MDI mode If no machining program has been operation searched the program check window will not be opened Refer to 4 3 Program Check 2D for details Normal display All display is OFF Drawing area Full ...

Страница 103: ...2 Monitor Screens MITSUBISHI CNC I 78 2 7 Counter All axis Display A counter for all axes opens as a pop up display The type of displayed counter can be selected with the menu ...

Страница 104: ...tance is the incremental distance from the current position to the end point of that block B This displays the details of the command in the block executed after the block currently being executed B This displays the amount moved with the manual mode while the manual absolute switch was OFF B This displays the value obtained by subtracting the tool compensation amount compensated for that axis fro...

Страница 105: ... for details Tool compensation type I M system Parameter 1037 cmdtyp 1 The combined amount of the shape compensation and wear compensation are set as the compensation data with no distinction between shape compensation memory and wear compensation memory The tool compensation data is the shape compensation amount wear compensation amount The compensation data is used commonly for the tool length c...

Страница 106: ...ensation amount and wear compensation amount are set separately The shape compensation amount is furthermore divided into length and radius dimensions Of the compensation data the length dimension data is used for the tool length compensation and tool position offset and the radius dimension data is used for the tool radius compensation ...

Страница 107: ...tool nose wear amount for each tool used When the tool offset No is designated by the tool command T command compensation is carried out matching the tool length data and tool nose data b Tool length data Set the tool length in respect to the program basic position of each tool used When the tool offset No is designated by the tool command T command compensation is carried out matching the wear da...

Страница 108: ... the tool for each tool used When the tool offset No is designated by the tool command T command offset is carried out matching the tool length data and tool nose data CAUTION If the tool offset amount or workpiece coordinate system offset amount is changed during automatic operation including during single block stop the changes will be valid from the command in the next block or after several su...

Страница 109: ...ended workpiece coordinate offset can be used Refer to 3 6 Workpiece Coordinate System Offset for details Note 1 The G92 G52 coordinate system offset cannot be set CAUTION If the tool offset amount or workpiece coordinate system offset amount is changed during automatic operation including during single block stop the changes will be valid from the command in the next block or after several subseq...

Страница 110: ...unter Setting An arbitrary value can be set in the relative position counter which opens as a pop up window The counter cannot be set for an axis of auxiliary axis state Menus Menu Details Type Reference This closes the pop up window and quits this function C Close ...

Страница 111: ...ounter opens as a pop up window The cursor appears at the designated axis Z axis 2 Using the or the key move the cursor to the axis to be set The cursor moves 3 Input a numeric value Example 100 000 INPUT The set value 100 000 appears at the cursor position The cursor moves to the next axis If the INPUT key is pressed without inputting a value zero 0 will be set 4 Repeat step 3 for each axis The p...

Страница 112: ...igin cancel Origin set Origin cancel Function The coordinate system is shifted so the current position becomes the designated position of the workpiece coordinate system This is equivalent to G92 X0 When X is the target axis The coordinate system is shifted so the zero point of the workpiece coordinate system matches the zero point of the basic machine coordinate system This is equivalent to G92 G...

Страница 113: ...ill be set Origin zero 4 Repeat step 3 for each axis The pop up window closes when the origin has been set for the last axis For axes that are not to be operated press the key and move the cursor Operation method Canceling the origin 1 Press the main menu G92 set and then press the menu Origin cancel The relative position counter opens as a pop up window The menu Origin cancel is highlighted The c...

Страница 114: ...pindle function S miscellaneous function M tool function T and 2nd miscellaneous function B commands can be executed The manual numerical value command can be executed by inputting an address such as S M T or B as well Menus Menu Details Type Reference This closes the pop up window and quits this function C Close ...

Страница 115: ...alue is output to PLC program Note 3 Add a sign before the value to set a negative value The display will be a positive value Note 4 A value larger than 3001 slimt1 to 3004 slimt4 or 3005 smax1 to 3008 smax4 cannot be output for S Operation method Executing T31 with a manual numerical value command 1 Press the main menu MST The S M T B display opens as a pop up window Using the and keys move the c...

Страница 116: ...s Instruction Manual 2 13 Modal Display I 91 2 13 Modal Display The state of each modal during automatic operation is displayed The displayed details differ for the M system and L system M system 1 6 7 5 4 2 3 8 ...

Страница 117: ... range 5 G40 Tool radius compensation modal D0 Offset No xxxx Shape compensation amount in respect to tool radius xxxx Tool radius wear amount 6 G49 Tool length compensation modal Z Compensation axis name H0 Offset No xxxx Compensation amount xxxx Tool length wear amount 7 FA F modal value of currently executed program command FM Manual federate 8 Program command modal value of each currently exec...

Страница 118: ...second axis tool length and wear compensation amount for the tool being used 5 TC The total value of the additional axis tool length and wear compensation amount for the tool being used 6 TG Tool length offset No 7 TW Wear offset No 8 V Modal value for constant surface speed spindle rotation speed V1 to V6 9 FA F modal value of currently executed program command 10 FM Manual federate 11 FS Program...

Страница 119: ...ence No 0 to 99999999 3 B Block No 0 to 99999 4 L Remaining number of subprogram repetitions 0 to 99 5 Mode Operation mode 0 to 7 characters 6 Main Main program 7 1 to 8 Called subprogram user macro call and MDI interrupt 8 Assuming the whole machining program size as 100 the execution position during an automatic operation will be displayed in percentage When the automatic operation is not execut...

Страница 120: ...e NC is displayed with the 24 hour system HH MM SS 3 3 Power ON This displays the total integrated time of the time from NC power ON to OFF HHHH MM SS 4 4 Auto oper This displays the total integrated time of the work time from automatic start button pressing in the memory tape mode to M02 M30 or reset button pressing HHHH MM SS 5 5 Auto strt This displays the total integrated time during automatic...

Страница 121: ...ting The time setting mode is entered The cursor appears at the 1 Date position in the integrated time display 2 Input today s date 2012 12 03 appears at 1 Date and the cursor moves to 2 Time Example 2012 12 03 INPUT 3 Set the data for each item and press the INPUT key When 7 External integrated time 2 has been set the cursor disappears and the time setting menu highlight is turned OFF If the item...

Страница 122: ...ay The automatic operation time is displayed in upper line on cycle time display area The menu display returns to integrated time sub menu Example Auto oper 3 Press the menu Time select2 The time selection mode is activated and the following menu appears 4 Press the time type for the mode to display The automatic operation time is displayed in bottom line on cycle time display area The menu displa...

Страница 123: ...pear at the head when the power is turned ON 2 Variable value The setting range is 999 999 999 to 999 999 999 or blank An exponential is displayed when a 7 digits are set in the integer section and 5 digits or more as set in the decimal section Example 1234567 1 2346E 006 0 00001 1 0000E 005 The minimum setting unit that can be set is 1 0000E 099 99 digits below decimal point Note When the setting...

Страница 124: ...al value is not possible after variable clear and comment clear operations C A Note When an operation parameter 8939 Undo confirm msg is set to 1 the menu is highlighted while the operation message is displayed This copies the variable value and variable name at the cursor position A 2 16 2 Copying Pasting Common Variables This pastes the copied variable value and variable name C This clears the c...

Страница 125: ...t value to the original value appears Example If the original value is 135 000 136 234 appears 135 000 1 234 136 234 Operation method Setting COUNTER as the variable name for variable No 509 1 Select common variable 509 with the same procedure as steps 1 and 2 above The cursor appears at the cursor 509 variable position 2 Press the key The cursor moves to the 509 variable name 3 Input the variable...

Страница 126: ... variable No in the previous area will be displayed at the top by pressing or 4 Use a scroll bar The first page of the next area will be displayed by pressing while the last page of the area is displayed The biggest variable No in the previous area will be displayed at the head by pressing while the first page is displayed Variable numbers cannot be displayed continuously if another display area i...

Страница 127: ... 1 2 User macro call level 2 3 User macro call level 3 4 User macro call level 4 2 Display level This displays the nest level of the local variable displayed in the area 3 Variable No This displays the local variable No The alphabetic character before the local variable No is the argument code G L N O and P cannot be used as arguments and thus not displayed There are 33 local variables 1 to 33 for...

Страница 128: ...e level changes to display level 0 C This closes the pop up window and quits this function C Relation of user macro subprogram call execution level and display level Precautions Display level Display level Close Main level 0 O1 level 1 O10 level 2 O100 level 3 O1000 level 4 1 0 1 2 0 2 3 0 3 G65 P1A1 B2 C3 M02 G65 P10A10 B20 C30 M02 G65 P100A100 B200 M99 G65 P1000A1000 B2000 M99 M99 Local variable...

Страница 129: ...the display level changes in the order of 0 4 3 2 1 0 and so forth The displayed local variable No changes when the page changeover keys previous page next page are pressed Operation method Displaying the next level 1 Press the menu Display level The level 1 local variables appear from the head Operation method Displaying the previous level 1 Press the menu Display level The level 1 local variable...

Страница 130: ...ext command can be corrected in the following two cases When single block stop is applied and there is a command block to be corrected in the next command When there is an error program error in the next command and automatic operation is stopped 2 Not only the displayed buffer data but also the contents in the device are corrected with the buffer corrections The corrected data is reflected 3 Seve...

Страница 131: ... moved The cursor can be moved freely within the buffer correction area using the cursor keys 2 Correct the program with the same method as a normal program editing 3 Press the INPUT key The buffer correction mode ends and the corrected data is written into program If a program error has occurred the error display is erased 4 Confirm that the corrected data is correct and then restart The program ...

Страница 132: ...all 16 blocks can be displayed by scrolling the buffer correction area b Number of characters in one block is max 256 If exceeds 256 characters the block will be split into two c Up to 4096 characters can be edited with buffer corrections 4 Operations during buffer correction a If there is no EOB at the data in the last block corrected when the INPUT key is pressed it is added automatically b When...

Страница 133: ...ut the actual correction result will be reflected on the source program c The buffer cannot be corrected when the block where the buffer is corrected is in the forward side from the block called at another nest level The operation message Buffer correct not possible appears The buffer can be corrected when the block where the buffer is corrected is in the rear side from the block called at another...

Страница 134: ...indicating switch ON This is displayed for switches that are turned ON 2 Switch name The display contents differ depending on machine tool builder specification Menus Menu Details Type Reference Setting of the PLC switch is started A 2 20 1 Turning PLC Switches ON OFF This turns ON the switch currently indicated by the cursor C This turns OFF the switch currently indicated by the cursor C This clo...

Страница 135: ...etting mode Operation method To turn switch 6 Program restart ON 1 Press the menu Setting valid The menu Setting valid will be highlighted A message confirming the start of PLC switch setting will appear 2 Press Y or INPUT The PLC switch setting mode will be entered The cursor will appear at the PLC switch No position The menu keys ON and OFF will appear normally 3 Press the cursor keys and to mov...

Страница 136: ...ool builder pressing Load meter menu without setting ON load meter display causes an error Display items Display item Details 1 Load meter 1 Load meter 2 The spindle load and Z axis load etc are displayed in a bar graph These displayed contents differ according to the machine tool builder Menus Menu Details Type Reference This closes the pop up window and quits this function C 1 Close ...

Страница 137: ...indle standby display for each magazine complies with the setting value of the parameter 11054 Sp stby disp type 3 D For D data function and purpose refer to the instruction manual issued by the machine tool builder Menus Menu Details Type Reference Switch the spindle or standby display for each magazine This menu is switchable only when the parameter 11054 Sp stby disp type is set to 1 The select...

Страница 138: ...function only displays the value It is not possible to operate here Display items Display item Details 1 Spindles command rotation speed This displays the spindles command rotation speed S command value 2 Spindles actual rotation speed This displays the spindles actual rotation speed r min Menus Menu Details Type Reference This closes the pop up window and quits this function C 2 1 Close ...

Страница 139: ...2 Monitor Screens MITSUBISHI CNC I 114 ...

Страница 140: ...I 115 3 Setup Screens ...

Страница 141: ... tool length and diameter compensation using parameter 1287 ext23 bit4 Whether to display the axis counter is set by the parameter 1069 no_dsp 2 M S T B Command This displays all command values for M support function command value S spindle command rotation speed T tool command value and B 2nd miscellaneous function command value The spindle command rotation speed displays only 1st spindle The pre...

Страница 142: ... spindle and standby location to which the tool is attached 3 4 Tool Registration This performs the tool life management The life management data containing information such as the tool usage status is set and displayed Two management methods are used for tool life management 3 5 Tool Life Management This sets the workpiece coordinate system offset amount This sets and displays the coordinate syst...

Страница 143: ...ool compensation combinations are 200 sets on M system and 80 sets on L system Inputting an address key such as MST displays manual numerical value command window where manual numerical value command is executed Note When the tool compensation amount setting during automatic operation is enabled 11017 T ofs set at run 1 the tool compensation amount data can be set even during automatic operation o...

Страница 144: ...et in the integer part When 11050 T ofs digit type is set to 1 up to 4 digits can be set in the integer part Tool compensation type II Parameter 1037 cmdtyp 2 The shape compensation amount and wear compensation amount are set separately The shape compensation amount is furthermore divided into length and radius dimensions Of the compensation data the length dimension data is used for the tool leng...

Страница 145: ...page at a time Offset No This is the compensation data number Compensation data The display items differ depending on the tool compensation type Type I Compensation data Amount in which the shape and wear compensations are combined Type II Length dimension Tool length compensation amount Length wear Tool length wear compensation amount Radius dimension Tool radius compensation amount Radius wear T...

Страница 146: ...ing The data in the copied line can be pasted as many times as is required until new data is copied C This erases the compensation data in the selected line multiple lines can be erased Selection method Select the first and the last offset No to be erased A 3 2 1 3 Erasing the Tool Compensation Data Ex 1 E Set all compensation data to 0 If the INPUT key is pressed without selecting a line the comp...

Страница 147: ...It is possible to use the and keys as well to move the cursor to the offset No 102 3 Use the key to move the cursor to the length wear position 4 Input the length wear value The set value displays 37 000 INPUT Settings can be made by pressing the INPUT key instead of the INPUT key ً ۂ Old Tool radius compensation 5 0 Table Tool length compensation 40 0 New Tool radius compensation 5 0 Table Tool l...

Страница 148: ...or to the offset No 102 length wear position 2 Enter a value The input value is added to the original value and displays 3 000 INPUT Ex 37 000 displays if the original value is 40 000 40 000 3 000 37 000 Old Tool radius compensation 5 0 Table Tool length compensation 40 0 Tool offset data INPUT setting example New Tool radius compensation 5 0 Table Tool length compensation 3 0 INPUT Workpiece Work...

Страница 149: ...bsolute addition input can be switched either by the short cut key I key or by pressing the Abs Inc key in the menu The chosen method is kept after switching the screen and turning the power OFF 1 Absolute input mode In this mode the absolute input is applied when the tool compensation data is input by the INPUT key 2 Addition input mode In this mode the addition input is applied when the tool com...

Страница 150: ... to zero displays at the top of the compensation data To cancel the erasing press a key other than Y or INPUT Operation method Erasing the compensation data from offset No 122 to 125 1 Press the Line clear menu The menu is highlighted 2 Input the offset No of the data range to be erased A message box displays to confirm whether it is okay to erase the data 122 125 INPUT The background color of the...

Страница 151: ...he background color of the copied data changes to light blue 3 Move the cursor to the line offset No 109 where the data is to be pasted 4 Press the Line paste menu The copied compensation data is written in the line where the cursor is The background color returns to normal The copied compensation data is held until another line is copied Tool compensation type 8933 Disable lngth comp 1 8934 Disab...

Страница 152: ... offset No is designated by the tool command T command compensation is carried out matching the tool length data and tool nose data CAUTION If the tool compensation amount or workpiece coordinate system offset amount is changed during automatic operation including during single block stop the changes will be valid from the command in the next block or after several subsequent blocks 1 ...

Страница 153: ...nsation amount for 3rd or 4th axis at parameter 1520 Tchg34 Displays only for the number of valid axes if only 1st axis or 2nd axis are valid The setting display range is different depending on the combination of the settings of 1003 iunit and 1041 I_inch Note 1 The standard settings and display ranges are 9999 999 to 9999 999 The display range is when the minimum command unit is 1μm 1003 iunit B ...

Страница 154: ...after Line copy is selected from the menu the data prior to the changes is written when pasting The data in the copied line can be pasted as many times as is required until new data is copied C 3 Copying Pasting the Tool Compensation Data This erases the compensation data in the selected line multiple lines can be erased Selection method Select the first and the last offset No to be erased A 3 2 2...

Страница 155: ...ayed cursor can be moved and data set Data that cannot be displayed in the display area can be displayed using the keys below Scroll one line at a time Change the display contents one page at a time Offset No This is the compensation data number Compensation data This displays the tool length compensation amount of 1st axis 2nd axis and additional axis Set whether to set the additional axis tool n...

Страница 156: ...e tool is used as the programmed base position 1 The programmed base position is the center of the tool rest 2 The programmed base position is the tip of the base tool Same as 3 2 2 1 Wear Data 1003 iunit 1041 I_inch Setting display range B 0 9999 999 to 9999 999 1 999 9999 to 999 9999 C 0 9999 9999 to 9999 9999 1 999 99999 to 999 99999 Menus X axis tool length offset amount Basic position basic p...

Страница 157: ...ayed cursor can be moved and data set Data that cannot be displayed in the display area can be displayed using the keys below Scroll one line at a time Change the display contents one page at a time Offset No This is the compensation data number Compensation data This displays the following items Tool nose R Tool radius Nose R R wear Tool radius nose R wear amount Tool nose point P Tool nose point...

Страница 158: ...nges are as follows The display range is when the minimum command unit is 1μm 1003 iunit B 1041 I_inch 0 Same as 3 2 2 1 Wear Data 1003 iunit 1041 I_inch Setting display range B 0 9999 999 to 9999 999 1 999 9999 to 999 9999 C 0 9999 9999 to 9999 9999 1 999 99999 to 999 99999 Settings Details Setting displayrange Tool nose R This sets the tool radius nose R 9999 999 to 9999 999 R wear This sets the...

Страница 159: ...gnate the offset No The set number appears at the top of the area and the cursor moves 1 INPUT It is possible to use the and keys as well to move the cursor to the offset No 1 c Use the key to move the cursor to the length wear position d Input the X axis tool nose wear compensation amount The set value displays 18 000 INPUT Settings can be made by pressing the INPUT key instead of the INPUT key ً...

Страница 160: ... 000 18 000 Operation method Erasing one line of tool compensation data at the cursor position a Move the cursor to the line to be erased with the and keys The cursor appears at the data item of the selected offset No b Press the Line clear and INPUT menu The menu keys are highlighted and a message displays confirming whether it is okay to erase The background color of the data to be erased displa...

Страница 161: ... it is okay to erase the data 1 3 INPUT The background color of the data to be erased displays in light blue c Press the Y or INPUT key The compensation data for the selected offset No is erased and the menu highlight returns to normal Press a key other than Y or INPUT in order not to erase the data The data cleared to zero displays at the top of the compensation data Operation method Copying past...

Страница 162: ... comp 1 Wear Setting with the INPUT key is disabled The following menus cannot be selected Input Input Line copy Line paste Line clear Undo Tool length Setting with the INPUT key is disabled The following menus cannot be selected Input Input Line copy Line paste Line clear Undo Tool nose Setting of the tool nose R with the Input Input menus and INPUT key is disabled Setting of the R wear with the ...

Страница 163: ...l length measurement I Tool length measurement II Tool length measurement I When the tool is at the machine coordinate zero point the distance from the tool tip to the measurement point workpiece upper end is measured and can be set as tool compensation data Machine coordinate zero point Workpiece Table Movement amount Tool compensation data Using a reference position return etc position the tool ...

Страница 164: ... 2016 tlml is 0 the tool measurement type is tool length measurement I Screen image Machine coordinate zero point Gauge block Table Tool compensation data internal computing Movement amount Reference surface height tlml operation parameter Confirm the value of the operation parameter tlml When using the gauge block etc set the value of the reference surface height Using a reference position return...

Страница 165: ...ding to the parameter 1328 TLM type value 0 The position when the measurement switch was turned ON is displayed as 0 1 The display is based on the machine zero point L meas Z Axis name The axis selected in the parameters 8711 TLM L meas axis and 8712 TLM D meas axis is the target axis for the measurement R meas X Axis name 3 Reference surface height This displays a value for the reference surface ...

Страница 166: ...The cursor moves to the length dimension data of the top line of that data A 3 2 1 Setting the Tool Compensation Data This sets the reference surface height data The cursor moves to the reference surface height A When the data is set in the input area and the INPUT key is pressed the reference surface height is set This changes the mode to the tool length measurement mode This mode is enabled when...

Страница 167: ...nt values are displayed in Meas value during the measurement The menu T leng measure is highlighted as a default after the power is turned ON 3 Contact the measurement tool against the sensor using manual feed and manual handle feed Stop the feed when the tool contacts the sensor When the measurement tool contacts the sensor the skip position displayed in the measurement values counter 4 The curso...

Страница 168: ...is is the state in which retract by the retract amount has completed If the skip after deceleration stop confirmation signal is ON the status display will remain the same The On mea 0 state is shifted to when this state is reset On mea 4 This is the state during the second measurement If the skip signal is not input even after moving to the specified position a warning will appear and the status d...

Страница 169: ...ds in manual tool length measurement I the basic point method and the measurement value input method The method is selected by setting parameter 1102 tlm 1 Basic point method 1102 tlm 0 Obtain the tool length with the tool nose placed on the measurement point To carry out the basic point method a point to place the tool nose on measurement point is required Set the measurement point beforehand The...

Страница 170: ...of the diameter radius command a Tool length basic point b Measurement point c Z axis tool length d Z axis machine coordinate value e X axis tool length f X axis machine coordinate value Workpiece coordinate system offset selection method When the parameter 1282 ext18 bit2 is 1 the measurement point will be the point offset by the workpiece coordinate system offsets modal The tool length will be t...

Страница 171: ...oint specific to machines center of chuck face etc specified by the parameter 2015 tlml the center of the chuck face etc or the workpiece coordinate offset modal which is specified by parameter 1282 ext18 bit2 tool length measurement 1 measurement basic point selection 1282 ext18 bit2 Measurement point Parameter selection method 0 The point set in the parameter 2015 tlml Workpiece coordinate syste...

Страница 172: ...ion Measurement basic point 2015 tlml Workpiece measurement value Note 1 Always set the measurement basic point in radius value regardless of the diameter radius command Note 2 As for the workpiece measurement value set the diameter value for the diameter command and set the radius value for the radius command a Tool length basic point b Measurement basic point c X axis tool length d X axis machin...

Страница 173: ...ool length Measurement value workpiece coordinate position Workpiece measurement value Note 1 As for the workpiece measurement value set the diameter value for the diameter command and set the radius value for the radius command a Tool length basic point b Measurement point workpiece coordinate origin modal c X axis tool length d X axis measurement value e X axis workpiece coordinate position f Z ...

Страница 174: ...ction 2015 tlml Z axis Xp sensor machine coordinate position X axis position measured by moving in direction 2016 tlml X axis Zp sensor machine coordinate position Z axis position measured by moving in direction 2016 tlml Z axis When measured at the sub spindle side Xm sensor machine coordinate position X axis position measured by moving in direction 2097 tlml2 X axis Zm sensor machine coordinate ...

Страница 175: ... No Tool length measurement 2 PLC device and the wear data of the offset No set in Wear offset No Tool presetter PLC device is cleared When measuring the tool length of the basic axis and inclined axis during the inclined axis control the measurement basic position sensor position is set on the sensor position within the orthogonal coordinate not the position within the machine coordinate Example ...

Страница 176: ...E70 Series Instruction Manual 3 3 Tool Measurement I 151 Screen image Manual tool length measurement I Basic point method a Normal operation mode b Simple operation mode 4 1 5 4 1 5 ...

Страница 177: ...3 Setup Screens MITSUBISHI CNC I 152 Manual tool length measurement I Measurement value input method a Normal operation mode b Simple operation mode 2 1 4 5 2 1 4 5 ...

Страница 178: ...t for the axis selected using either the menu Measure X or the axis address key Displayed data Machine position Measurement basic point 2015 tlml Note 1 This is displayed only in Manual tool length measurement I Note 2 The data of maximum 3 axes displays when Manual tool length measurement I Simple operation mode is selected 2 Work meas Workpiece measurement result is set and displayed by the meas...

Страница 179: ...anual tool length measurement I Basic point method Manual tool length measurement I Measurement value input method Manual tool measurement II 5 Tool compensation data This displays the tool compensation data Note 1 Cursor movement and data input operations are same as Tool compensation type III L system Note 2 Automatically jumps to the offset No registered in Tool No Tool length measurement 2 PLC...

Страница 180: ...CONFIRM MSG is 1 this menu is highlighted and the operation message OK Y N appears The measurement result is written as tool compensation amount by pressing Y or INPUT key Even if other key is pressed the result is not written When this menu is pressed again while displaying the message the highlight is released and the operation message is erased This sets the offset No and press the INPUT key Th...

Страница 181: ... is carried out with the cursor placed at Work meas the cursor will remain displayed at Work meas A Setting the Tool Compensation Data Select the axis to measure The menu is highlighted when it is selected Multiple axes can be selected To cancel press the menu key again or press Cancel value Note 1 The axis name to be displayed follows the parameter 1013 axname B Carrying out tool length measureme...

Страница 182: ... is 1 the cursor does not move to the next offset No Note 5 When the parameter 11017 T ofs set at run is 1 the tool compensation amount data can be set even during automatic operation or operation pause Note 6 If the measurement result exceeds the setting range of the tool compensation amount the operation message Setting error will appear and the offset write cannot be executed Cancels displaying...

Страница 183: ...e tool compensation amount the operation message Setting error will appear and the offset write cannot be executed 1 Select the tool to be measured with a manual numerical value command Refer to 3 10 Manual Numerical Value Command for details The tool to be measured is selected 2 Manually align the tool nose with the measurement point 3 Press the address key of the axis to measure X axis or the Me...

Страница 184: ...r details The tool to be measured is selected 2 Point the cursor to the position offset No 4 where the measurement result are to be set with or key The cursor is displayed at offset No 4 3 Manually align the tool nose with the measurement point 4 Press the axis address key X axis to be measured or the Measure X menu The calculation result of X axis is displayed in Measure value The measure X menu ...

Страница 185: ...rement values will not be written At this time the highlight of the Offset write menu is cancelled and the operation message is cleared However the measurement values are not cleared and the highlight of the menus Measure X to Measure C stay the same Note 4 When the parameter 1124 ofsfix is 0 the cursor moves to the next offset No However when 1124 ofsfix is 1 the cursor does not move to the next ...

Страница 186: ...easurement result exceeds the setting range of the tool compensation amount the operation message Setting error will appear and the offset write cannot be executed Carrying out tool measurement Manual tool length measurement I Measurement value input method 1 Select the tool to be measured with manual numerical value command Refer to 3 10 Manual Numerical Value Command for details The tool to be m...

Страница 187: ...X menu without retracting the tool from the cutting end point The measure value is memorized The memorized value is displayed at Measure value and the cursor moves to Work meas The operation message Input workpiece measurement value displays 4 To measure the other axes at the same time repeat 2 to 3 The measurement values of the selected axes are recorded and displayed at Measure value The cursor ...

Страница 188: ... operation pause Note 5 If the measurement result exceeds the setting range of the tool compensation amount the operation message Setting error will appear and the offset write cannot be executed 7 To set the measurement results of the other axes repeat 6 Example 5 INPUT The value 5 is set to the 2nd line of Work meas Note 1 Compensation amount is written in diameter value for diameter command or ...

Страница 189: ...d in the longitudinal direction Forthe Z axis end face cutting is executed The workpiece is cut 4 Press the address key of the axis to measure or the Measure X menu without retracting the tool from the cutting end point The measure value is memorized The memorized value is displayed in Measure value and the cursor moves to the selected axis X axis of the Work meas The operation message Input workp...

Страница 190: ...ed and the operation message is cleared However the measurement values are not cleared and the highlight of the menus Measure X to Measure C stay the same 7 To set the measurement results of the other axes repeat 3 to 6 The measure value is memorized The memorized value is displayed in Measure value and the cursor moves to the selected axis Z axis of the Work meas The operation message Input workp...

Страница 191: ...e tool nose is moved 100μm or more after the sensor signal has turned OFF The above conditions are set with parameter 1227 aux11 bit2 Carrying out tool measurement Manual tool length measurement II 1 Select the tool to be measured with manual numerical value command Refer to 3 10 Manual Numerical Value Command for details The tool to be measured is selected 2 Set the offset No of the compensation ...

Страница 192: ...machine tool builder for details Inputting an address key such as MST displays manual numerical value command window where manual numerical value command is executed Display items Display item Details 1 Magazine This displays the currently selected magazine No 2 Tool No D A maximum of 8 digits of data can be input for a tool No Refer to the instruction manual issued by the machine tool builder for...

Страница 193: ...g Erasing the Tool No of Spindle Standby Tools Note 1 Unselected magazine tool data is not erased Note 2 The spindle and standby data cannot be erased This designates the magazine No to be displayed on the screen The displayed menu differs according to the machine specifications B 3 4 5 Switching the Magazines to be Displayed The cursor moves to the PLC command setting area and the mode changes to...

Страница 194: ...to the next tool number 50 INPUT When the INPUT key is pressed without setting a value the tool number does not change and the cursor moves to the tool number for the next pot number When the duplication check is valid the operation message Exists in magazine 1 Set Y N or Exists in spindle standby Set Y N etc appears if the input tool No already exists in valid magazine spindle standby Note 1 To s...

Страница 195: ...The function of the command depends on the machine tool builder s specifications 2 Press the menu PLC command or the key again to finish setting The PLC command setting mode is released and the menu highlight returns to normal Operation method Setting the tool No of spindle standby tools 1 Press the Spindle standby menu The cursor appears at the top tool No of spindle standby In addition the first...

Страница 196: ...ays confirming whether it is okay to erase 3 Press the Y or INPUT key All selected magazine tool data tool number and D is erased Spindle standby tool data is not erased Operation method 1 Press the menu T reg The tool registration data of the magazine 1 will be displayed Spindle standby of the magazine 1 is displayed 2 Press the menu Magazn 2 The tool registration data of the selected magazine No...

Страница 197: ...p number The usage time the No of uses or the wear amount of the tool which is designated by the program is accumulated and the tool usage state is monitored Item Setting Details 1103 T_Life T life manage valid 0 This ignores the tool life management data 1 This controls the tool life management 1104 T_Com2 Tool com 2 When tool life management is valid 0 This treats the program tool command as a g...

Страница 198: ...p count Multi part system spec max 80 groups No of tools in group Max 16 The tool life management related parameters basic shared parameters are shown below The tool life management screen is made up of the group list display screen and the life management data screen There is no group list display screen in L system tool life management 1 Only the life management data screen exists Refer to the f...

Страница 199: ... Regist group list The group Nos registered as the tool life management data are listed in ascending order Group Nos can be set from 1 to 99999999 and maximum 1000 groups Note can be set Maximum 60 groups can be displayed at a time Use the keys to change the display if the No of registered groups exceeds 60 An asterisk will be added to the No of the group in which all tools have reached their live...

Страница 200: ...No currently being used 1 to 999999 5 Comp No Displays the compensation No currently being used 1 to 80 6 Mthd Displays whether the group currently being used is controlled by the usage time or usage count 0 Time 1 Count 7 Used Displays the usage data for the tool currently being used Usage time 0 to 99999999 s Usage count 0 to 999999 set 8 Total Displays the total usage data for the tool currentl...

Страница 201: ...rasing all groups Changes the group No Specify a new group No and press the INPUT key to change the group No and then change the contents of the list An error occurs if an existing group No is specified A Changes the group No The tool life data for the group No indicated by the cursor will be displayed This changes to the mode enabling tool life management data to be set and displayed with group u...

Страница 202: ...up change key The menu is highlighted 3 Set the new group No The group No changes to 20 20 INPUT Operation method Changing to the group unit display M system L system Ex Displaying the group No 5 tool life data 1 Use the and keys to move the cursor to group No 5 2 Press the menu T life group or INPUT keys The screen changes to the group unit display and the group No 5 tool life management data dis...

Страница 203: ...playing the Life Management Data in Group Units M system The tool life management data of an arbitrary group is set and displayed If the registered tools cannot be displayed on one screen scroll the screen using the or key ً ۂ 1 2 3 4 5 6 7 8 9 10 ...

Страница 204: ... 3 Tool No This is the No corresponding to the each individual tool Maximum 1000 tools can be registered This is a fixed tool No actually output for the tool command and so on 1 to 99999999 4 ST Tool status 0 Unused tool Normally set to 0 when the tool is replaced with a new tool 1 Used tool This becomes 1 when the cutting actually starts 2 Normal life tool This becomes 2 when the usage data usage...

Страница 205: ...dled as the added compensation amount an addition is made to the compensation amount shown with the compensation No designated in the process program and compensation is performed 2 Direct compensation amount The tool life management data compensation data is handled as the direct compensation amount this No replaces the compensation amount shown for the compensation No designated in the process p...

Страница 206: ...his displays the usage data for individual tools based on the method specified for the tool life management method Usage time 0 to 4000 min No of mounting times Note This data is not counted during machine lock auxiliary function lock dry run or for a single block 0 to 65000 set No of uses 0 to 65000 set 1003 iunit 1041 I_inch 11050 T ofs digit type Setting display range B 0 0 999 999 to 999 999 1...

Страница 207: ...ta to be erased is specified with a separating the Nos If the INPUT key is pressed without specifying a line the data in the line where the cursor is located is erased A Erasing one line of tool life management data Designating and erasing a line This changes a group No If a new group No is set and the INPUT key pressed the group No changes An error occurs if a pre existing group No is set Note 1 ...

Страница 208: ...l No has not been set Operation method Changing a group No M system 1 Press the Grp No change menu The menu is highlighted 2 Designate the group No after changing The group No changes to 112 112 INPUT Operation method Setting the tool life data M system 1 Move the cursor to the data to be set using the and keys The menu is highlighted It is possible to move to the line after the registered line Se...

Страница 209: ...ignating and erasing the multiple lines M system 1 Press the menu Line clear The menu is highlighted 2 Set the range to be erased by marking the first and last Nos with a and press INPUT key A message appears to confirm the erasing The background color of the area to be erased changes to light blue 122 125 INPUT 3 Press the Y or INPUT key The tool life data corresponding to the designated No is er...

Страница 210: ...Status The tool life management status is indicated 0 to 2 A 0 Not used left side 1 Current tool tool being used 2 Service lifetime service life count is exceeded B Used by machine tool builder 0 to 99 right side Menus L system Menu Details Type Reference Copies one line of tool life management data where the cursor is located C Copying pasting the tool life data The copied tool life management da...

Страница 211: ...l life management data L system 1 Move the cursor to the line to be erased 2 Press the menu Line clear and INPUT keys The menu is highlighted A message displays confirming whether it is okay to erase the data The background color of the area to be erased changes to light blue 3 Press the Y or INPUT key One line of the selected life management data is erased and the menu highlight returns to normal...

Страница 212: ...ed tools cannot be displayed on one screen scroll the screen using the or key This screen is enabled only for tool life management II 1096 T_Ltyp 2 By setting parameter 1107 Tllfsc it is possible to select the life management data display mode for multiple groups Group 1 display mode 1107 Tllfsc 0 Group 2 display mode 1107 Tllfsc 1 1107 Tllfsc setting value 0 1 2 No of display groups 1 2 4 Max No ...

Страница 213: ...et Usage time s Usage count set Display item Details Setting range 4 This displays whether the tool for which the No is highlighted is a life tool ST 2 or a skip tool ST 3 5 Tool No This sets the tool No 1 to 999999 6 Comp No This sets the compensation No 1 to 80 7 Used This sets the usage data at such times as when the tool is not an unused tool Usage time This becomes 0 when the usage data is no...

Страница 214: ...le of tool life management data The first line No and the last line No of the data to be erased is specified with a separating the Nos If the INPUT key is pressed without specifying a line the data in the line where the cursor is located is erased A Erasing one line of tool life management data Designating and erasing a line This changes a group No If a new group No is specified and the INPUT key ...

Страница 215: ...on method Copying pasting the tool life data L system 1 Move the cursor to the line to be copied 2 Press the menu Line copy The background color of the copied data changes to light blue 3 Move the cursor to the line where the data is to be pasted 4 Press the Line paste menu The copied tool life management data is written to the data in the line where the cursor is located The background color retu...

Страница 216: ...is highlighted 2 Set the erasing range by marking the first and last Nos with a and press INPUT key 1 5 INPUT A message displays confirming whether it is okay to erase the data The background color of the area where the data is erased changes to light blue 3 Press the Y or INPUT key The tool life data corresponding to the designated No is erased and the menu highlight returns to normal The next li...

Страница 217: ...ion or page change key to specify which workpiece coordinate system offset to display or set The workpiece coordinate system offset amount data can be set in absolute or additional mode 2 EXT offset area This displays or sets the offset amount for the external workpiece system 3 G92 G52 offset area This displays the offset amount for G92 or the local coordinate system The offset amount of the corr...

Страница 218: ...or moves to the G54 offset This menu can be used when the G54 G59 offsets are not displayed C 3 6 1 Setting the Coordinate System Offset Enter the P number displayed at the screen to display the extension workpiece coordinate G54 1 Pn offset in the coordinate system offset area If the local coordinate system offset G52 displays in the G92 G52 area the display changes to G92 A This displays the G92...

Страница 219: ...o the Changing the offset amount using the page change keys previous page next page section in 3 6 4 Changing the coordinate system display for further details 3 Use the keys to move the cursor to the axis for which data is to be set 4 Set the offset amount 122 INPUT The set data displays and the cursor moves to the next data This setting can be made by pressing the menu INPUT key instead of the I...

Страница 220: ...re is the cursor in coordinate system offset G54 to G59 the local offset G52 data of the axis will be also erased 3 6 4 Changing the Coordinate System Display Press the Tab key to change the cursor position Use the page change keys to change the coordinate system offset display as shown below Use the tab keys to change the coordinate system offset cursor position Changing the coordinate system off...

Страница 221: ...st for details of each parameter Process parameter The E70 series is one part system control Axis parameter Axis based Display items Display item Details 1 Parameter display area Press the parameter selection menu Process param or Axis param keys etc to change the parameter display contents 2 Input section The set key displays Press the INPUT key to set the display data in the parameter where the ...

Страница 222: ...eters This pastes the range of parameters designated in area copy They are pasted in a parameter corresponding to the axis where the cursor is Once copied a parameter can be pasted any number of times until a new parameter is copied A This can be selected if the total number display axes is 4 or more This is used at the parameter screen with the array structure for each axis C This closes the pop ...

Страница 223: ...art system Operation method Normal setting Set 100 for X1 axis of 8204 OT parameter 1 Press the Axis param menu The axis parameter displays 2 Use the and keys to move the cursor to the setting position The cursor moves to the position where the data is to be set X1 axis 3 Enter a value The set value displays and the cursor moves one position downwards 100 INPUT Operation method Batch data setting ...

Страница 224: ... copied 2 Press the Area copy menu The menu is highlighted 3 Designate the copy range The range to be copied displays in the selected area color The menu highlight returns to normal Format First No Last No 8701 8705 INPUT An E can be used if the last number to be copied is the last number in the currently displayed parameter type Ex 8701 E Operation method Pasting the copied parameters 1 Move the ...

Страница 225: ...cifications 3 7 4 Echoback When the cursor moves to a parameter with 14 or more characters all of the set value is echoed back to the input area The value of such parameter is displayed with displays in the data field 3 7 5 Ethernet Parameter Password If the Ethernet parameter Host 1 password to Host 4 password is set displays regardless of the password characters set in that data field Parameter ...

Страница 226: ...DI Program Editing Press the main menu MDI key to display the contents of the MDI program in a pop up window When the parameter 1144 mdlkof is 0 MDI setting impossible switch to the MDI mode once to press the menu MDI Refer to 4 2 Program Editing for further details ...

Страница 227: ...relative position counter in a pop up window and set the counter Function Used to set an arbitrary value in the relative position counter Counter display change The set data displays only at the relative position counter Offset There is no change Refer to 2 10 Counter Setting for further details ...

Страница 228: ...ds This function is used to set and display all the Spindle function S Miscellaneous function M Tool function T and No 2 miscellaneous function B commands Input the address for S M T and B to set and display the manual numerical value commands Refer to 2 12 Manual Numerical Value Commands for further details ...

Страница 229: ...is commanded in the designated machining program including subprogram As for the T code of the tool that has not been registered it is indicated with text color and background color changed 2 Program No This shows designated program No When the number of characters exceeds 15 the excess is indicated as Menus T code list display window Menu Details Type Reference This displays T code list search wi...

Страница 230: ...ist of files is displayed The cursor moves to the bottom line C This changes whether to show or hide the comment field in the list When the comment field is hidden the file name field will be enlarged B 2 2 2 Changing Whether to Show or Hide the Comment Field This updates the list contents The latest contents of the currently selected device and directory are listed C This changes the method that ...

Страница 231: ...Switch to the automatic operation mode when T code list cannot be gotten Note6 When designating program which causes program errors researched T codes in the previous block will be displayed T codes in the block with program errors are not be listed Also error message is not be displayed Operation method Display the T code list 1 Press the menu T list The menu appears The T code list created last ...

Страница 232: ...I 207 4 Edit Screens ...

Страница 233: ... program display type is applied use change menu key to switch the active area Menus Menu Details Reference This edits the machining program 4 2 Program Editing This checks the program This is used to check the machining program without performing automatic operation 1 Program check 2D This displays a graphic drawing of the machining program movement path 4 3 Program Check 2D This performs the mac...

Страница 234: ...ass editing The conditions and the maximum edit size of mass editing are as follows Check display type Enables to edit a program confirming the program check screen Multi program display type Enables to edit two programs using left and right editing areas G code guidance display type Enables to edit a program referring to the G code guidance Playback display type Enables to edit program trying sam...

Страница 235: ... additional value of sequence No Edit type display Edit type display This displays EX in mass editing Current edit display Editing Current edit display Editing This displays when performing edit operations after displaying the program Insert mode display INS Insert mode display INS This displays when pressing the INSERT key and changing to the insert mode 4 Line number Line number This displays th...

Страница 236: ...e line before the cursor This menu cannot be selected during mass editing C This erases the designated line multiple lines can be erased This menu cannot be selected during mass editing A 4 2 11 Deleting Data In E70 series this menu cannot be selected This switches the display type C When the character string is designated and the INPUT key is pressed that character string is searched for A 4 2 12...

Страница 237: ...6 When a parameter 8936 Delete leading 0 is set to 1 if a file name consisting only of numerical figures is input 0 at the head of the file name is deleted and then a file is newly created Refer to When creating a new machining program in 4 4 15 Leading Zero for details Operation method 1 Press the menu Open New The following menu appears The list appears as a pop up window 2 Select a device Ex Me...

Страница 238: ... root directory is selected 3 Use the keys to align the cursor with target machining program The name of the machining program to be edited can be input in the input area 4 Press the INPUT key The program appears at the top if the file can be opened The cursor moves to the head character of the program The mode enters the overwrite mode The list display is closed 5 Edit a machining program Refer t...

Страница 239: ...en from this screen the operation message Read only as the file is being edited may appear Note 9 If an attempt was made to edit the currently edited file in the custom screen from this screen the operation message Read only file Can t edit appears and may not be able to edit Note 10 Display will change as follows depending on the value set in the user parameter 19006 EOR Disable 1 When the user p...

Страница 240: ...ote that the contents edited after the MDI program is saved last will not be saved in the NC memory Note 3 When 1288 ext24 bit0 MDI program clear is set to 1 the MDI programs are cleared at the following operations and only programs are saved When MDI operation ends When the power is turned ON again When reset is input When emergency stop is canceled Regardless of the operation mode the MDI progra...

Страница 241: ...ck B or Edit lock C appears and the program name cannot be registered When 8936 Delete leading 0 is set to 1 if a file name consisting only of numerical figures is input 0 at the head of the file name is deleted to be checked Ex When MDI registration is designated to 008000 while edit lock B is valid the operation message Edit lock B appears and the program name cannot be registered Note 4 When a ...

Страница 242: ...editing message The editing operations from when the file is actually opened are explained in the following sections These editing operations are common for the machining program and MDI program Operation method 1 Press the menu Erase file The following menu appears The list appears as a pop up window 2 Select a device Ex Menu Memory The selected device name and directory memory program appear in ...

Страница 243: ...ove in mass editing The cursor will move up one line in the program each time the cursor key is pressed If the key is pressed at the top line of the program display area the program will scroll up one line If the key is pressed at the end the program will scroll down one line When a block is displayed over 2 or more lines keys move the cursor by block unit during regular editing and by line unit d...

Страница 244: ...ayed as text data 4 2 8 Displaying an Arbitrary Line Note 1 When 0 is input the cursor moves to the first line Note 2 When E is input the cursor moves to the end Move the cursor using the tab keys back tab tab Split display by word unit Operation method 1 Press the menu Line jump The menu is highlighted The cursor appears at the lower input area 2 Input the line No The program appears with the set...

Страница 245: ...ing mass editing linefeed is inserted every time EOB is input Cursor moves to the head of next line Operation method 1 Move the cursor to the position of the data to be rewritten The cursor can be moved to one place to the right of EOB 2 Set the data The message Editing appears when setting is started The data is set from the position of the cursor Data at the area is overwritten The cursor moves ...

Страница 246: ...the cursor position moves to the left When this key is held down the characters can be deleted one at a time 3 Press the INPUT key The edited machining program is saved to the device and Editing disappears Operation method Deleting one line 1 Move the cursor to the line to be deleted 2 Press the C B key 1 line is deleted at the cursor position and Editing appears The lines following the cursor pos...

Страница 247: ...ing 1 line it is also possible to make a selection using the keys and designate by pressing the INPUT key 3 Press the Y or INPUT key The data in the range with the blue background is deleted and the menu highlight returns to normal The lines following the deleted data are shifted upward The cursor position and top line No do not change Press the N key not to delete Operation method Deleting severa...

Страница 248: ...gram Marking can be performed by adding an option to the character string being searched for Ex G20 MR G20 are marked in red Refer to the Marking function for further details 3 To continue searching press the INPUT key again The next corresponding character string is searched for When reaching the end of the program OK to return to the top and search Y N message will be displayed To search again f...

Страница 249: ...g irrespective of the characters before and after As a result if G2 is designated G20 G29 and G200 etc will also be the subject of a search Character string data setting example Marking function Argument character string format Details Marking color Search character string The cursor moves to the character string searched for None Search character string MR The cursor moves to the character string...

Страница 250: ... 1 Press the menu String replace The menu is highlighted The cursor appears at the lower input area 2 Designate the search character string and the replace character string Ex Search character string G02Replace character string In the case of G03G02 G03 INPUT Note 1 The character string is searched downward from the character after the current cursor position If a character string is discovered th...

Страница 251: ...an be copied and pasted between both left and right areas Note 2 Executing is displayed in flickering during line paste Operation method Copying 1 Press the Line copy menu The menu is highlighted The cursor appears at the lower input area 2 Designate the range to be copied Ex From line 8 to line 10 8 10 INPUT The background color for the range to be copied turns light blue The menu highlight retur...

Страница 252: ...nal value display column The cursor moves from the input area to the edit area When creating a new program 3 Press the menu Open New then press the menu Memory The list appears as a pop up window The machining programs in memory are displayed 4 Input a file name not used then press the INPUT key Ex 101 O101 is created in edit area 5 Input a program with N No Ex N100G28XYZ When editing an existing ...

Страница 253: ...g again Note 6 Even if the same N No exists by automatic addition an error will not occur Note 7 The system separately has N No in a right area and left area of the edit screen Note 8 When the previous block is leading zero like N010 N No automatic addition can be executed However 0 is not added and N10 is displayed 1 When the previous block has N No When the cursor is located at the last characte...

Страница 254: ...ters 4 When limits of total characters display per block is exceeded 5 When the N No is over 100000000 6 When the N No automatic additional value is not set 7 When the display character string in overwrite mode is interrupted Example when N No is not added G00X10 Input G00X10 G00N100X10 Input G00N100X10 N100 G00N100X10 Input N100 G00N100X10 N100G00N100X10 Input N100G00N100X10 N000001000 Input N000...

Страница 255: ...ents displayed on the G code guidance area depends on the cursor position on the Edit screen and is refreshed when moving the cursor The G code that meets following conditions are displayed in this area G code that exists between the head of block and cursor position including the cursor position G code that exists immediately before the cursor if multiple G codes meet the above condition Specific...

Страница 256: ...r of valid digits Remarks N intege r 1 to 8 When including 0 before integer command value unnecessary 0 is ignored m decimal places 0 1 l value commanded using L 0 to 2 This is valid when L exists immediately after the integer command value or decimal command value and is followed by a command value If the command with L address precedes G code the L command will not be described in the guidance G...

Страница 257: ...e displayed in mass editing 10 When the UNIT NAME of the H W configuration screen is FCU MU558 NC loads the guidance data from a memory card CF card at the timing of startup but if the memory card CF card is inserted after the NC has started NC will load guidance data at the timing as follows a When operation parameter or alarm guidance is displayed b When switching display type to display G code ...

Страница 258: ...layback counter This displays the playback movement amount axis movement value When absolute incremental command depending on G command the title and playback movement amount differs according to the parameter 1126 PB_G90 Note 1 When Absolute incremental command depending on address code both titles are displayed M system Max 3 axes When the rotary axis except for all coordinate linear type the di...

Страница 259: ... Open on the edit screen The selected program is displayed in right area Note 1 When the program is not displayed in the right area a playback editing will not be executed Note 2 When the incremental value is set playback movement amount will be cleared to 0 for all axes 4 Move the axis during manual mode The axis movement amount is displayed in playback movement amount In the incremental value mo...

Страница 260: ...cannot move left and right but can move only up and down 6 Press the axis address key such as X or Y The playback movement amount is input after the axis address in the playback editing area If the axis address key is pressed while the playback movement amount is being changed the playback movement amount at the time the key was pressed will be input Note When inputting a comment etc the character...

Страница 261: ... playback edited 7 The playback editing is disabled during mass editing 8 If the file to be played back edit is being edited in the custom screen the operation message Can t write into being edited file appears and may not be able to edit 9 Do not set the same address to the parameter 1013 axname and 1014 incax If the same address is set the absolute counter has priority 10 The playback editing ca...

Страница 262: ...machining program movement path without performing automatic operation The machining program can be checked with graphic data drawn at a high speed Using All display menu normal display and full screen display modes can be switched Normal display All display is OFF Drawing area Drawing area 2 plane Input area displayed 7 1 6 2 8 9 3 5 4 10 ...

Страница 263: ...larged and reduced Select the coordinate system to draw from the menu Drawing System The display for the path to be drawn will be switched by the setting of 1231 set03 bit1 and 1231 set03 bit2 Refer to 4 3 14 Switching the Draw Path Select the zero point to be displayed with following parameter 1231 set03 bit4 0 Basic machine coordinate system zero point 1 Workpiece coordinate system zero point 4 ...

Страница 264: ...is menu to display the menu for changing the display mode This changes the display range and erases the graphic data displayed on the screen C 4 3 6 Changing the Display Range This changes the drawing plane Press this menu to display the menu for changing the display mode There are 3 types of graphic drawing display mode 1 plane 2 plane and 3 dimension This changes the drawing plane and erases the...

Страница 265: ...tem to be drawn C 4 3 4 Setting the Coordinate System to Draw After the scale is automatically adjusted so that the entire machining program can be displayed in the 90 of the drawing area the graphic is drawn on the center of the drawing area It is automatically adjusted in the following cases When the program is selected When display size is switched normal display full display When the display r...

Страница 266: ...ath full path exceeds 48 changing directories cannot be performed 5 Press the INPUT key The check search is started The operation message Search complete appears when the search is completed After performing the search the device and program position appear in the current machining program display column The list is then closed The system distinguishes between the presence or lack of an extension ...

Страница 267: ... block stoppage occurs when performing a program check if the Check continu or Check step keys are pressed while performing a continuous check Furthermore the program check is restarted if the Check continu key is pressed during the block stoppage The program check is reset if the Check reset key is pressed while performing a continuous check A Program check completed message appears when the cont...

Страница 268: ...rogram check is executed for one block and a graphic drawing of the machining program movement path is made The check counter display is updated The check G modal display is updated The machining time is updated State during one block check State when one block check is completed 4 Press the menu Check step The program check is executed for the next block The menu returns to normal state The progr...

Страница 269: ... program check is reset and a Reset complete message appears Menus to select the coordinate system to draw Menu Details Type Reference This draws all workpiece coordinate systems The display for the check counter switches by the setting of 1231 set03 bit1 and 1231 st03 bit5 Refer to 4 3 14 Switching the Draw Path In the area to show the setting of the coordinate system to draw All Work is displaye...

Страница 270: ...nner by pressing a menu between G54 and G59 in the area to show the setting of the coordinate system to draw the selected workpiece coordinate system is displayed Select the type of workpiece coordinate system to draw When selecting the coordinate system G54 1P 1 Press the menu Coord G54 1P The operation message Input P number is displayed The menu is highlighted The input area is enabled 2 Input ...

Страница 271: ...G28 XYZ N10 G90 G54 G0 X100 Y100 Z100 N11 G91 G01 X 100 F500 N12 Y 100 N13 X100 N14 Y100 N15 Z 100 N16 Y 100 N17 Z100 N18 G0 Y100 Z 100 N19 G01 X 100 F500 N20 Z100 N30 G28 XYZ N40 G90 G55 G0 X200 Y200 Z200 N41 G91 G01 X 100 F500 N42 Y 100 N43 X100 N44 Y100 N45 Z 100 N46 Y 100 N47 Z100 N48 G0 Y100 Z 100 N49 G01 X 100 F500 N40 Z100 N50 G28 XYZ M30 Drawing coordinate system selection Drawing at 2D ch...

Страница 272: ...h White Tool center move path Green Green Operation method Enlarging the and reducing the drawing 1 Press the menu Display range A white frame indicating the display range appears on the screen The display range input mode is activated and the following menu appears 2 Press the menu Zoom In or Zoom out The size of the white frame can be changed by using key operations To enlarge the drawing size P...

Страница 273: ...ge key Note 2 The set displayed position will be held even after the power is turned OFF and ON again Operation method Changing the drawing display position 1 Press the menu Display range A white frame indicating the display range appears on the screen The display range input mode is activated and the following menu appears 2 Press the Up Down Left Right menu or cursor movement keys keys The curso...

Страница 274: ...hod Centering 1 Press the menu Display range A white frame indicating the display range appears on the screen The display range input mode is activated and the following menu appears 2 Press the Centering The display position is changed so that the current machine position appears in the center of the drawing area When auto graphic is valid the graphic data is automatically drawn again in the chan...

Страница 275: ... be set independently at the trace function and program check function These settings are not linked with one another Note 1 The set display angle is maintained even after rebooting the machine Changing the display axis name 1 Set the axis name and press the INPUT key XYC INPUT XYZ appears the graphic display mode name There are 3 drawing axes X Y and C 1 plane XY 2 plane XY XZ 3 dimension XYZ Ope...

Страница 276: ...he movement direction can be set for each axis When 1495 grf_ax_direction is set to 0 the axis movement directions are as follows When the axis movement direction is opposite direction the axis direction movement of 2D or 3D mode are as follow Example When the Yaxis movement direction is set in the opposite direction 2D mode 3D mode 2D mode 3D mode 㪂 㪄 㪂 㪄 㪯 㪰 㪂 㪄 㪂 㪄 㪯 㪱 㪂 㪄 㪂 㪄 㪯 㪱 㪂 㪄 㪰 㪂 㪂 㪄 㪄...

Страница 277: ...f about 90 of the drawing area When pressing the Program display menu key the contents of the machining program on checking is displayed on the drawing area When pressing the Program display again the displayed program is erased Note that this menu can be used only when the full screen display mode is selected Note 1 The selected display mode is maintained even after rebooting the machine Note 2 T...

Страница 278: ...lly adjusted so that the entire machining program can be drawn in the 90 of the drawing area A drawing path is switched according to the setting of parameter 1231 set03 bit1 bit2 Refer to 4 3 14 Switching the Draw Path on how to operate 1 Press the menu Auto Graphic The menu Auto Graphic is highlighted 2 Press the menu Check search The check search list is displayed 3 Use the PageUp PageDown keys ...

Страница 279: ...nt a message Executing auto scale will be highlighted When the auto adjustment of the scale is completed Checking message is displayed and the graphic drawing is performed automatically When the graphic drawing is completed Program check completed message is displayed and the graphic drawing mode will be canceled Each menu is displayed normally and the menu selection will be available ...

Страница 280: ...appens 6 When a large capacity program is selected it may take time to perform the auto graphic 7 If a displayed position for a figure is changed due to change in display range a graphic drawing will not be performed automatically Auto graphic drawing is performed only when the figure is enlarged or reduced 8 If a check search is performed on a file which went through an auto adjustment of the sca...

Страница 281: ...check drawing User macro I II Basic variable calculations decisions and branch functions are all enabled However the following functions are ignored or indefinite values are input Macro interface input output Single block stoppage Miscellaneous function complete signal waiting control Feed hold Feedrate override G09 enabled disabled control Reading of position information for other than the previo...

Страница 282: ...riable Commands Programmable Parameter Input and Programmable Compensation Data Input If a program check is performed for a machining program for which the variable command data etc is rewritten all data types are treated as shown in the following table after completion Data type Saving data before program check Explanation Parameter The programmable parameter input commands are set as actual data...

Страница 283: ...wk coord the counter of the workpiece coordinate position or the tool position workpiece coordinate system is displayed regardless of a parameter 1231 set03 bit5 Note2 The name of the counter display is changed according to the currently executed workpiece coordinate system 1231 set03 bit1 0 1 set03 bit2 0 Tool center move path machine position and programmed path tool position Note1 1 Tool center...

Страница 284: ...automatic operation are the contents of the program during automatic operation The contents of ONB display and buffer display in the operation screen during check execution are the contents of the program during check execution 7 When operation search or check operation Check continu or Check step is performed during program restarting the operation message in program restarting is displayed and t...

Страница 285: ...ernal memory and the external input output device The hard disk inside the NC unit is also treated as an external device Note When the program input output function is used set the parameter 8923 Hide Edit IO menu to 0 This function applies to the devices as follows Memory Serial Memory card CF card USB memory Ethernet ...

Страница 286: ...E70 Series Instruction Manual 4 4 Program Input Output I 261 During file transmission During file setting 1 2 4 3 5 6 7 ...

Страница 287: ...s displays data that is being transferred or compared If an error occurs while comparing data the block for which the error occurred displays 3 Guidance display area This displays the device name shortcut key 4 Process progress display section This displays the details and data input output direction for the process currently being performed 5 Capacity display section Note 1 This displays the file...

Страница 288: ...iles Compare This erases the selected file in file setting column A 4 4 5 Erasing a File This changes the name of the file in file setting column A to that of in file setting column B Note The same device must be selected for A and B A 4 4 6 Changing a File Name Rename This creates a new directory in the selected file setting column The directory can be created when memory card or USB memory is se...

Страница 289: ...nge the display area using the direction cursor keys or the tab keys Changing file setting column B to a valid area refer to upper right diagram 1 Press the or key File setting column B changes to a valid area Changing file setting column A to a valid area refer to upper left diagram 1 Press the or key File setting column A changes to a valid area File setting field A is valid File setting field B...

Страница 290: ...e set even if it does not actually exist This will not cause an error Note that the previously set directory is overwritten 2 When selecting a fixed cycle program it is necessary to set the basic common parameter 1166 fixpro Furthermore select Memory for the device and Program for the directory File operation procedure Outline of device directory and file name designating methods Device Designatio...

Страница 291: ... device When the menu Program or Program all is selected the setting of File name column is cleared When the device is only the memory the menu Program or Program all is valid When selecting the file name from the list 3 Move the cursor to the file name to be selected and fix INPUT The selected file name appears The list and input area are cleared and the screen returns to the original display The...

Страница 292: ...me The target program is that where the position of the 1 is 1 1 11 21 31 101 111 981 991 Designate 1 in the file name The target program is all of the programs containing 1 1 10 to 19 21 31 100 to 199 201 210 981 991 1000 Designate 1 1 in the file name The target program is 11 111 121 131 141 151 161 171 181 191 Ex 2 When programs 1 PRG to 1000 PRG and 1 to 1000 exist in the HD Designate in the f...

Страница 293: ...ctory above There is no change when is selected Repeat this operation until the cursor arrives at the target directory Next refer to operation 4 When inputting a directory from the input area 3 Input the directory path Example PRG PRECUT INPUT The input directory path appears in the directory column When selecting the file name from the list 4 Move the cursor to the file name to be selected and fi...

Страница 294: ...confirm the transfer Press the menu Transfr B A when transferring from device B to device A 6 Press the Y or INPUT key File transfer is commenced The process progress display area displays message indicating that transfer is in progress and also indicates the transfer direction Furthermore the data being transferred appears in the input comparison data display area of the input data display column...

Страница 295: ...m Note that the following characters cannot be used comma a to z small letters Space Up to 32 characters are allowed for the file name to create in or transfer to NC memory 5 If the file whose name includes lower case alphabet is transferred to NC memory the lower case letter will be converted into the capital letter 6 When using tape carry out parity V adjustment to improve the reliability of the...

Страница 296: ...tions above will cause an error 13 If a file to be transferred input is subject to edit lock Edit lock B 8000 to 9999 Edit lock C 9000 to 9999 the operation message Edit lock B or Edit lock C will appear and it cannot be transferred If 8936 Delete leading 0 is set to 1 and the program name consisting only of numerical figures is input 0 at the head will be deleted and checking will be performed Ex...

Страница 297: ...uired However in the case of serial batch file comparison is carried out with deleting 0 at the head of the program Operation method 1 Use the or key to select file setting column A 2 Designate the device directory and file name to be compared The designated file name appears in file setting column A 3 Use the or key to select file setting column B 4 Designate the other device directory and file n...

Страница 298: ...ears and may not be erased Use the or key to select file setting column B and designate the device directory and file name for file setting column B Following this the operation method is same as for Erasing a file in file setting column A Operation method Erasing a file in file setting column A 1 Use the or key to select file setting column A 2 Designate the device directory and file name to be e...

Страница 299: ...oes not exist is designated for the original file or if an existing file name is designated for the new file selection an error occurs and the name is not changed Note 5 The directory where the file in operation search check search is stored cannot be renamed The operation message Can t rename designated file appears 1 Changing a file name 1 Use the or key to select file setting column A 2 Designa...

Страница 300: ...100 characters it cannot be recognized as a path Operation method 1 Use the or key to select file setting column A 2 Designate the device The designated device name appears USB memory and memory card is the device to make directory 3 Select a directory to be newly created from the list or designate by inputting from the input area The designated details appear 4 Set the new directory in the input ...

Страница 301: ...ated file name appears in file setting column A 3 Use the or key to select file setting column B 4 Designate the merge source device directory and file name The designated file name appears in file setting column B 5 Press the menu Merg B A A message confirming the merge appears 6 Press the Y or INPUT key The file merge starts The data being merged appears in the input comparison data display area...

Страница 302: ...le Names There is a directory for each type of data in the NC memory The NC memory directory and file name handled on this screen is as follows Furthermore when storing the NC memory file in a device other than the NC memory be careful not to change the file extension XXX Operation method Formatting a memory card 1 Press the menu MemCrd format A message confirming the formatting appears 2 Press th...

Страница 303: ...signated for input output function programs except subject to edit lock will be processed Note 2 When a multiple programs are input to the memory without designating the file name like serial input or program batch input the message Edit lock B or Edit lock C will be displayed and the input will be interrupted if the program which is subject to edit lock is detected Machining program Edit Lock B E...

Страница 304: ...The search can be executed The search cannot be executed The operation message Program display lock C appears The window is not closed The contents of input area are not cleared Search from the restart search window Search from the top search window of restart search Influences of program display lock parameter on operation screen Screen operation 1122 pglk_c 1 Display Search 2 Display Search The ...

Страница 305: ...OFF When the KEY3 is OFF the following operations are stopped Note 1 If editing or settings etc are performed on the screens shown above when KEY3 is OFF a Data protect message appears Machining program protection KEY3 No Operation details Screen 1 MDI data memory registration Edit 2 Machining program editing Edit 3 New machining program creation Edit 4 Comment setting for programs being registere...

Страница 306: ...e user Example of the external device NC memory of machining program batch transfer When the external device is serial the top line is When the transfer direction file name is designated the top program name of transfer source can be omitted O1000 can be omitted in above example Batch input and verify to NC memory External device USB memory etc PROCESS01 Blank line O1000 TEST N1G28X0 Y0 Z0 N999M02...

Страница 307: ...esignate the file which consists of two or more machining programs The designated file name appears 4 Use the or key to select file setting column B 5 Designate the transfer direction device memory The designated device name memory appears 6 Press the menu Program all The Program all appears in the directory When the file name is designated only the top program of transfer source is stored in the ...

Страница 308: ...ce of machining program batch transfer When the external device is serial the top line is Case 1 Case 2 Device name Memory Memory Directory Program batch Program File name Null or file designation Null or file designation Batch output and verify from NC memory NC Memory 1000 TAP PRG 9999 TEST N1G28X0 Y0 Z0 N999M02 TAP01 G84W 100 R0 P2000 M30 G92X0 Y0 Z0 M30 External Device USB Memory etc PROCESS01...

Страница 309: ...will occur 4 Use the or key to select file setting column B 5 Designate the transfer direction device and directory The designated device name and directory appear 6 Designate the transfer direction file to input multiple machining programs The designated file name appears When the file name is not designated output to the file ALL PRG of the designated directory 7 Press the menu Transfr A B The o...

Страница 310: ...t 2 The file name of file which consists of two or more machining program can have up to 32 characters including the extension as well as the machining program 3 When the Program batch is designated to NC memory directory it is not possible to delete rename and merge files When the files are deleted in a batch use Program for directory and a wild card for file name 4 Refer to Note of 4 5 3 Transfe...

Страница 311: ...n 8936 Delete leading 0 is set to 1 if a file name consisting only of numerical figures is input the leading 0 is deleted when checking whether the file exists or not and when checking edit lock B edit lock C Example For a directory that has a file 1 if a file name 0001 is attempted to be input as a new file an error will occur Example of deleting of leading zero When creating a new machining prog...

Страница 312: ...separate file that contains one program 0 at the head of the program name is not deleted Designating the file name is required However in the case of serial batch file comparison is carried out with 0 at the head of the program name deleted Example 1 One file has one program 1 The file is transferred from the Memory card to memory When transferring to the memory the following occurs The leading ze...

Страница 313: ...s whose leading zeros are not deleted as the names contain nonnumerical characters 001000 PRG 001001 PRG 3 Comparison is carried out As the serial batch files are compared with the leading zeros deleted changing file names is not required Serial O0000 P0000 O001000 P001000 O001001 P001001 O001000 PRG P001000 PRG O001001 PRG P001001 PRG O0123456789 P0123456789 B Dev Memory Dir Program File Space A ...

Страница 314: ...I 289 5 Diagnosis Screens ...

Страница 315: ...n Screen The hardware configuration card name and sub number software configuration software number and sub number and PLC program configuration file name file label and execution type are displayed in this screen Software configuration Hardware configuration 1 3 2 ...

Страница 316: ...pe MODEL NAME FCA70 System type name SERIAL NO M7123456789 Serial No UNIT NAME FCU7 MU558 Unit type 3 Hardware list This displays each hardware name E70 Series CNC HN768 HN793 HN451 HN441 Main CPU Front memory interface card Memory card EXT HN746 CC Link card RIO1 n RIO2 n RIO3 n Remote IO unit 1 n 0 to 7 Remote IO unit 2 n 0 to 7 Remote IO unit 3 n 0 to 7 There are up to three channels The 7th an...

Страница 317: ...X Developer Max 8 characters c File label This displays this file label of PLC program file data of GX Developer Max 32 characters d Execution type This displays the execution type of PLC program HIGH High speed PLC program MIDDLE Middle speed PLC program INTIAL Initial state of PLC program WAIT Standby PLC program LOW Low speed PLC program blank Not the target of the execution Menus Menu Details ...

Страница 318: ...E70 Series Instruction Manual 5 2 Option Display Screen I 293 5 2 Option Display Screen There is no software option available for E70 series ...

Страница 319: ... the valid area with theand key when operations such as display changeover and data setting are carried out Each X Y M F L SM TI TO TS TA STI STO STS STA CI CO CS CA D R SB B V SW SD W P K and H data is the target data 2 Modal output This displays the data and device to carry out modal output The details to be defined are set here when carrying out the modal type forced output of PLC interface sig...

Страница 320: ... to read the device No and display data 7 6 5 4 3 2 1 0 1 0 1 0 0 0 0 1 0 1 1 0 1 0 1 0 Low order 8 bits High order 8 bits Device No bit type 7 6 5 4 3 2 1 0 X0008 1 0 1 0 0 0 0 1 XF XE XD XC XB XA X9 X8 X0010 0 1 1 0 1 0 1 0 X17 X16 X15 X14 X13 X12 X11 X10 X0018 0 0 0 0 1 0 0 0 X1F X1EX1DX1CX1B X1A X19 X18 Signal status display corresponding to each device No I O Device No word type R0010 ...

Страница 321: ...er contact TO TO0 to TO703 704 1 bit Timer output TS TS0 to TS703 704 16 bit Timer setting value TA TA0 to TA703 704 16 bit Timer current value STI STI0 to STI63 64 1 bit Integrated timer contact STO STO0 to STO63 64 1 bit Integrated timer output STS STS0 to STS63 64 16 bit Integrated timer setting value STA STA0 to STA63 64 16 bit Integrated timer current value CI CI0 to CI255 256 1 bit Counter c...

Страница 322: ...n the PLC signal change and the signal display there may be a delay in the display The machine may also not be able to correspond to extremely brief signal changes Note When setting the device No an error will occur if a number exceeding the specifications or an illegal address is set The valid area device Nos change in page units when is pressed Changing of the pages stops within the range of dev...

Страница 323: ...odally outputting data 1 to device X0048 1 Press the menu key Modal output The modal output mode is entered and the cursor appears at the modal output area 2 Using the and keys move the cursor to the setting position 3 Set the device and data and press the INPUT key X0048 1 INPUT Modal output is executed and the cursor disappears The data that was in the cursor position is overwritten by the input...

Страница 324: ...is set Ex X0048 X0048 the operation message Setting Data not found is displayed One shot outputting data 1 to device X0042 1 Press the menu key 1 shot outpu t The one shot output mode is entered and the cursor appears at the one shot output area 2 Set the device and data press the INPUT key X0042 1 INPUT The input data is overwritten in the one shot output area and is one shot output The cursor in...

Страница 325: ...enu Details Type Reference This displays the diagnosis information of the servo unit in the data display area B 5 4 1 Servo axis unit display items This displays the diagnosis information of the spindle unit in the data display area B 5 4 2 Spindle unit display items This displays the diagnosis information of the in the data display area B 5 4 3 Display items for the power supply unit This clears ...

Страница 326: ...ax current 2 This displays the motor current command in terms of continuous current during stalling An absolute value of the current command peak value sampled in most recent 2 seconds is displayed Max current 3 This displays the FB value of the motor current in terms of continuous current during stalling An absolute value of the current FB peak value sampled in most recent 2 seconds is displayed ...

Страница 327: ...s the feedback value of the speed detector Command unit Machine end FB This displays the feedback position of the machine end position detector Command unit FB error i This displays the error of the motor end FB and machine end FB DFB compen amnt i This displays the compensation pulse amount during dual feedback control Remain command The remaining movement distance of one block is displayed Comma...

Страница 328: ...ulti rotation counter value of the current detector Pn This displays the position within one rotation of the detector En This displays the absolute position error during NC power OFF ABS0 This displays the absolute position reference counter ABSn This displays the current absolute position MPOS This displays the offset amount of the MP scale when the power is turned ON Unit type This displays the ...

Страница 329: ...ds is displayed Overload This is the data used to monitor the motor overload Regen load This is the data used to monitor the resistance overload state when the resistance regenerative power supply is connected Est disturb torq This displays the estimated disturbance torque in terms of stall rated torque when the disturbance observer is valid Max disturb torq This displays the estimated disturbance...

Страница 330: ...tinues to display the maximum value Synchronous tapping error angle Max value This outputs the data of which absolute value is the largest among the synchronous tapping error angle 99999 999 to 99999 999 during the synchronous tapping modal This data will be initialized to 0 when entering the synchronous tapping modal or restoring the power Other than that the data continues to display the maximum...

Страница 331: ... the NC bit0 to bit7 Bit0 Current detection Bit1 Speed detection Bit6 In coil changeover Control output 5H This displays the control output signals to the NC bit8 to bitF Bit8 1 amplifire 2 motor switching Bit9 2nd speed detection BitE In spindle holding force up BitF 2nd in position Control output 6L This displays the control output signals to the NC bit0 to bit7 Control output 6H This displays t...

Страница 332: ...PN current This displays the bus current when PN bus voltage is at minimum driving regenerative 0 to 999 Bus current This displays the bus current driving regenerative 0 to 999 Max current1 This displays the maximum driving current after the NC power ON 0 to 999 Max current2 This displays the maximum driving current in most recent 2 seconds 0 to 999 Max rgn current1 This displays the maximum regen...

Страница 333: ...t 2 Using the menu Next axis tab keys and select the axis device from which to clear the alarm history 3 Press the menu Alarm his clr The menu is highlighted and a message appears to confirm the erasing The alarm history1 Time appears at the head 4 Press the Y key The alarm history data for the selected axis device is cleared to zero ...

Страница 334: ... This displays the registration No of the NC memory data When one of the 2 Data contents is set the number is highlighted indicating that the normal display of the data contents has stopped 2 Data contents Part system No Designate the part system No Designate 0 to designate the data common for the part systems The E70 Series is one part system control Section sub section axis Designate the section...

Страница 335: ...y indicated by address data at the cursor position The Data No highlight indicating data is being set is released and constant display is started After writing the cursor moves to Part system No of the next line A Based on the data of the address data where the cursor is this displays the continuous data to which the sub section No has been added to the address data from the line where the cursor ...

Страница 336: ...No is highlighted and the set value is displayed The cursor moves to the right item position 3 Separate the section No sub section No axis No with a and set 126 8007 0 INPUT The set value appears The cursor moves to the next Sys No line position 4 Move the cursor to the set line position of Sys No press the menu key Data write The cursor moves to memory data 5 Set the data and press the INPUT key ...

Страница 337: ... A list of currently occurring alarms or messages can be displayed on this screen The displayed messages include the NC alarms stop codes alarm messages operator messages etc A history of alarm information can be displayed also NC message PLC message 1 2 3 4 ...

Страница 338: ...ms this displays messages such as details of machine abnormalities Up to 4 messages are displayed 4 Operator message Using the PLC programs this displays operator information messages Macro alarm messages are also displayed in this field Up to 4 messages are displayed Message display colors Message type Character color Backgroun d color NC message Alarm White Red Warning Black Yellow Stop code Bla...

Страница 339: ...test alarm to 512 Alarm information recorded in the history is NC message and a stop code displayed on NC message screen and alarm messages displayed on PLC message screen The range etc of record are shown as follows Record condition When an alarm occurs When two or more alarms occur at the same time up to five alarms are recorded Number of history 512 alarms Whole Range of record NC alarm alarm w...

Страница 340: ...s pressed the data collection is started after the operation message The collection begin appears Press the N or other than INPUT key when the data collection will be not started restarted C The data collection of the alarm history is stopped The operation message The collection stop Y N appears When the Y or INPUT key is pressed the data collection is started after the operation message The colle...

Страница 341: ... is valid This does not display when the System lock specification is invalid Display item Details Battery vol state This displays the current state of the battery voltage as 0 to 3 below Condition Classification 0 normal state 1 battery drop Cautions gray 2 detector error 3 no battery Warning yellow used years This displays approximate time of the battery used from the last replacement Condition ...

Страница 342: ...urrence for Ether communication error Press the Ether clear menu to clear the cumulated count to 0 State Details In position This displays 1 in position state when the following conditions are satisfied for even one axis No acceleration deceleration delay for all axes Within the in position width set in the parameter for all axes Interlock When the automatic interlock n th axis signal or the manua...

Страница 343: ...ation error to 0 A This clears the cumulated count of the Ether communication error to 0 A This clears the time the battery has been used to 0 A Clearing the cumulated counter to zero 1 Press the menu Servo clear A operation message will be displayed 2 Press Y or INPUT The cumulated count of the servo communication error 1 and 2 will be cleared to 0 When other keys are pressed it will not clear to...

Страница 344: ...rive unit etc can be sampled Also the sampling data can be output externally on the I O screen under the Mainte tag Sampling specifications Note 1 The maximum number of sampled data items is the total number of data When the number of sampled channels is increased the number of data per channel will decrease Sampling cycle 1 7ms magnification Number of sampled axes 1 to 20 axes Servo axis 1 to 16 ...

Страница 345: ...position of the sampling buffer during the sampling process When the ring buffer is valid the head of the buffer can be seen with the value of the counter at the end of sampling 4 Sampling parameter This displays and sets the parameters necessary for sampling Menus Menu Details Type Reference This starts sampling This menu cannot be selected under the Sampling state When the trigger is set the Sta...

Страница 346: ...conditions are true Note1 4 Address condition false Sampling starts when Address Data and Data mask conditions are false Note1 0 to 4 Output form Select the data format when outputting the sampling data in text style 0 Outputs in decimal figure 1 Outputs in hexadecimal figure with 8 digits When Output form is set to 1 and 1004 ctlrunit is E 1nano the data larger than 1m will not be output correctl...

Страница 347: ...both Start condition and End condition are set to other than 1 variable No the value will be ignored even if set 0 to 999 PLC device This sets the PLC device that functions as the start end trigger When is added at the head the device will be a b contact If a device that does not exist is input or the device No is not within the setting range an error will occur 0 Data sampling trigger signal Y72C...

Страница 348: ...diately with settings from the screen or an external input Note 4 Even if End condition is satisfied the subsequent flow will differ according to the value set in Process type This also applies when ending manually Note 5 If the start condition is set to 1 the process form needs to be set to 2 ring buffer valid Example of End condition by setting address Setting End condition 3 Address 12345678 Da...

Страница 349: ...000 2nd spindle feedback 020000 Index Sampling data Servo axis Spindle Unit 00 Feedback position Refer to Adr n output unit in 5 8 1 Sampling Parameter 01 Commanded position 9B Spindle cutting torque output value R6528 1 9C Current feedback for cutting torque estimation 0 1 9D Speed command for cutting torque estimation 0 01r min 9E Flux command for cutting torque estimation 0 1 9F Estimated distu...

Страница 350: ...od Description PLC device name Only for bit device 1 bit data is output PLC device name size Only for word device Designate S D or Q for size S Single Word 2 byte 16 bit data is output D Double Word 4 byte 32 bit data is output Q Quad Word 8 byte 64 bit data is output PLC device name size bit Only for word device Designate bit number 0 to 63 decimal Designated bit is output to the position of bit ...

Страница 351: ...5 A setting error occurs if the size or bit is designated for a bit device Note 6 The setting of address n output unit is disabled when a PLC device is designated Note 7 When a PLC device is designated with a zero filled value such as X00001 it is handled in the same manner as X1 Device Device range Units Details Bit No Size designation X X0 to X1FFF 1bit Input signals to the PLC Y Y0 to Y1FFF 1bi...

Страница 352: ...t to the parameter Note 3 The contents of State is returned to Sampling stop The parameters related to NC data sampling is maintained Note 4 The data is displayed in 16 digits However the data can be set up to 8 digits Operation method Executing NC data sampling 1 Set sampling condition and data 2 Press the menu Samp start The sampling starts and the menu cannot be selected When the sampling end c...

Страница 353: ...the number of channel is 3 the address is 1 to 3 and the output unit is E it stops when 1ch is 100mm 2ch is 100mm and 3ch is 50mm Operation method Outputting the sampling data 1 Select the data I O screen under Mainte tag 2 Select the menu Area change and select the menu Memory Memory will display on A Dev 3 Select the menu Dir and select the menu Smp data Sampling data will display on the directo...

Страница 354: ... dumped in the length of the long type data 32bits Example When the number of channel is 3 the address is 1 to 3 and the output unit is C it stops when 1ch is 100mm 2ch is 100mm and 3ch is 50mm Output file format when output in hexadecimal figure Channel Output format 1st data 1ch 0001E840 2ch FFE17B80 3ch 000F4240 2nd data 1ch 0001E840 2ch FFE17B80 3ch 000F4240 3rd data 1ch 0001E840 2ch FFE17B80 ...

Страница 355: ...5 Diagnosis Screens MITSUBISHI CNC I 330 ...

Страница 356: ...I 331 6 Maintenance Screens ...

Страница 357: ...operations are performed Disable the setting of the machine parameters Display is enabled Some operations are prohibited on the maintenance screen Disable the parameter input on the input output screen Display items Display item Details 1 PLC stop state The PLC state stopped stop canceled is displayed Stopped STOP is highlighted Stop canceled STOP is not highlighted 2 Explanation of menu operation...

Страница 358: ...ta Confirming the diagnosis data collection status Starting Stopping to collect the diagnosis data Clearing the diagnosis data C 6 8 Diagnosis Data Collection Setting Screen This formats the NC memory A This formats the tool life management data A This changes the NC serial No A This changes the screen to the Data Input Output screen C 6 2 Input Output Screen This changes the screen to the Paramet...

Страница 359: ...s screen The configuration of the all parameter screens is applied to one of the following five patterns Pattern 1 This is the screen for setting the common parameters for the axis device etc Process param etc Pattern 2 This is the screen for setting the parameters having an array structure for each axis Axis param etc ...

Страница 360: ...ing parameters common for the axis and device etc The parameter names are not displayed Machine error data PLC constant etc Pattern 4 This is the screen for setting parameters having an array structure for each part system Base system parameters etc Note The E70 Series is one part system control ...

Страница 361: ...6 Maintenance Screens MITSUBISHI CNC I 336 Pattern 5 This is the screen for setting the subprogram storage destination parameters ...

Страница 362: ...ignated in area copy They are pasted in a parameter corresponding to the axis or part system where the cursor is Once copied a parameter can be pasted any number of times until a new parameter is copied B This can be selected when there are five or more display axes This is used in the screen for the parameters having an array structure for each axis C This changes the screen to the user parameter...

Страница 363: ...rmally the machine parameters can be referred to but cannot be set C BaseSys param PLC counter BaseAx spec PLC constnt BaseCom param Bit select Axis spec Er Comp param Zp rtn param Er Comp data Abs pos param Macro list Servo param Posn switch Spindle spec CC Link param1 Spindle param CC Link param2 PLC timer PLCIndx param PLC inc timer ...

Страница 364: ...ters 1 Press the menu change key until the menu Link param appears The menu Link param appears 2 Press the menu Link param The computer link parameters appears The menu Link param is highlighted 8201 Axis removal Setting Y1 axis to 1 1 Press the menu Axis param 2 Use the and keys to move the cursor to the position to be set The cursor moves to the position of the setting target data The cursor can...

Страница 365: ... Note 4 Parameters for up to four rows which are as currently displayed can be set at once Note 5 If the parameter value for several rows is input simultaneously the values will be set from the currently displayed left end no matter which row the cursor is currently at 8205 OT Setting X1 axis to 100 0 and Z1 axis to 200 0 1 Press the menu Axis param 2 Use the and keys to move the cursor to the pos...

Страница 366: ... Area copy and INPUT The menu is highlighted The setting value of the parameter at the cursor position highlighted Copying by designating the parameter No with key inputs 1 Move the cursor to the display area of the axes or part system to be copied 2 Press the menu Area copy The menu is highlighted 3 Designate the copy range Format First No Last No 8203 8205 INPUT The copy target range is highligh...

Страница 367: ...xis menu Area copy Area paste menu Process Parameter Control Parameter 1 Control Parameter 2 Axis Parameter Note 1 Note 2 Barrier data Note 3 Input Output Parameter Ethernet Parameter Computer Link Parameter Sub program storage destination parameter Operation Parameter Operation methods Subprogram storage destination parameters Example 1 1 Set the cursor to the 8882 Subpro stor DI dev D1 device 2 ...

Страница 368: ...ers can be set for the parameter or for bit related parameters the parameter setting value at the cursor position appears at the input area If more than 14 characters are set in the parameter will appear in the data field Parameters for which 14 or more characters can be set Bit related parameters ...

Страница 369: ... the setting column file setting column A or B where the cursor is currently located Program When Memory is selected for the device this displays the file name program No of the machining programs already registered The file names are displayed in order from the smallest number from 1 to 99999999 When a device other than memory is selected this displays the file name and directory to be included i...

Страница 370: ...eeds 100 the directory path is not retained but the directory path of 100 characters or less previously set remain retained When the device is Memory the initial directory display is Program When the device is Ethernet the initial directory display is root 7 Comparison data This displays the data being compared If an error occurs during comparison the block with the error is displayed Display item...

Страница 371: ...mn A transfer origin and file setting column B transfer destination C 6 2 4 Comparing Files Compare This erases the file in file setting column A Note The NC memory excluding programs serial and Ethernet host file cannot be erased B 6 2 5 Erasing a File This erases the file in file setting column B Note The NC memory excluding programs serial and Ethernet host file cannot be erased B This changes ...

Страница 372: ...alid The display area can be changed by pressing the menu key Area change or the cursor key and After changing the data setting operation is valid in that area Changing the valid file setting field When file setting field A top is valid 1 Press the menu Area change The file setting field B bottom is validated This can also be changed with the cursor key File setting field A is valid File setting f...

Страница 373: ... This selects the NC memory program parameter PLC program NC data C This selects the RS 232C device PC tape etc C This selects the front IC card C This selects the Ethernet connected host computer C This selects USB memory C Menu Details Type Reference The cursor appears in the list display The list contents can be selected with the INPUT key When a directory is selected the contents of the select...

Страница 374: ...a However at this time the file name has not yet been fixed Press the INPUT key again to fix the file name 4 When the key is pressed when setting a file name the file name in the input area is erased 5 When a fixed cycle program is designated the basic common parameters 1166 fixpro must be set Select Memory for the device and Program for the directory An initial directory is specified at turning t...

Страница 375: ... Press the menu File name When inputting the file name from the input area 4 Input the file name 10013 INPUT Selected file name appears When selecting the file name from the list 4 Press the menu From list The cursor appears in the list 5 Move the cursor to directory and file name to be selected and fix Selected file name is displayed in the input area INPUT 6 Press the INPUT key The selected file...

Страница 376: ...me for each directory is fixed Refer to 6 2 10 List of file names for the file names Note 2 When the menu Program or Program all is selected the setting of File name column is cleared Designating multiple files File First file name Last file name File All files will be selected Selecting a NC memory file other than a program 1 Press the menu Device select 2 Press the menu Memory Memory appears in ...

Страница 377: ... root directory is selected as the default 3 Select the menu Dir When inputting the directory from the input area 4 Input the directory path as a full path PRG PRECUT INPUT When selecting the directory from the list 4 Press the menu From list The cursor appears in the list 5 Move the cursor to directory to be selected and fix INPUT The selected directory appears in the data setting column The cont...

Страница 378: ... Press the menu File name When inputting the file name from the input area 4 Input the file name 10013 PRG INPUT When selecting the file name from the list 4 Press the menu From list The cursor appears in the list 5 Move the cursor to directory and file name to be selected and fix INPUT This operation is repeated until the cursor reaches the file When only the directory is selected and key is pres...

Страница 379: ... CNC I 354 Canceling the input mode 1 Press the Device Select Dir or File name The submenu appears To cancel the data input at this time press the key 2 Press the key The details in the input area are erased and the main menu appears ...

Страница 380: ...ppears 5 Press the menu Trnsfr A B A message appears to confirm the transfer 6 Press Y or INPUT The file transfer starts The data being transferred appears in the input data display column A message appears when the transfer is completed CAUTION EOB and EOR are symbols used for explanation The actual codes for ISO are CR LF LF and The programs created on the Edit screen are stored in the NC memory...

Страница 381: ...o the capital letter f When using tape carry out parity V adjustment to improve the reliability of the tape format Then use with the input output parameter Parity V validated g When the machine tool builder macro and fixed cycle program are input to NC memory change the program type with the parameter 1166 fixpro Also set in the Input Output screen as follows Device Memory Directory Program h Tran...

Страница 382: ... output parameters again 5 Notes when transferring common variable data files a If the variable value is 100000 or more or less than 0 0001 when transferring common variable data it is expressed with an exponential expression 6 Notes when transferring tool life data files a When tool life data is output from the NC memory the file information is inserted at the first and last of the file First fil...

Страница 383: ...user parameter 19006 EOR Disable between the external devices other than between NC memory and serial differs a comparison error may occur Operation method 1 Press the menu Area change and select file setting column A 2 Designate the device directory and file name to be compared The designated file name appears 3 Press the menu Area change and select file setting column B 4 Designate the other sid...

Страница 384: ... Can t rename designated file appears and may not be changed Note 4 If a file that does not exist is designated for the original file or if an existing file name is designated for the new file selection an error occurs and the name is not changed Erasing a file Erase A 1 Press the menu Area change and select file setting column A 2 Designate the device directory and file name to be erased The desi...

Страница 385: ...file setting column A 2 Designate the device The designated details appear The devices that can create a directory are Memory card and USB memory 3 Designate the directory where the new directory is to be created The designated details appear 4 Set the new directory in file setting column A The designated details appear 5 Press the menu Dir create The designated directory is created ...

Страница 386: ...rged are the memory memory card and USB memory Operation method 1 Press the menu Area change and select the file setting column A 2 Designate the merge destination device directory and file name The designated file name appears 3 Press the menu Area change and select the file setting column B 4 Designate the merge origin device directory and file name The designated file name appears 5 Press the m...

Страница 387: ...format Refer to Formatting a memory card for more details Note 1 USB memory is formatted with FAT16 Note 2 Only the DS formatted with FAT16 can be used Operation method Formatting a memory card 1 Press the menu MemCrd format A message confirming the formatting appears 2 Press Y or INPUT The memory card is formatted A message appears when the formatting is completed Operation method Formatting a US...

Страница 388: ...chine tool builder macro PRG MMACRO Program No User macro PRG UMACRO Program No Parameters Parameters User machine Text format PRM ALL PRM PLC program LAD USERPLC LAD NC data Tool compensation amount data Tool life management data Tool management data Common variable data SRAM data Workpiece offset data Option file DAT TOOL OFS TLIFE TLF TOOLMNG DAT COMMON VAR SRAM BIN WORK OFS OPTION ADD OPT Syst...

Страница 389: ...o is shown with the value following N A Axis No For axis data the axis No is shown with the value following A The first axis will be AI T Part system No For data per part system the part system No is shown with the value following T 1 T1 PLC axis T5 The E70 Series is one part system control C Spindle No For spindle data spindle No is displayed with a numerical value following C Thus 1st spindle is...

Страница 390: ...d on one screen is out put as follows Output example N1001T1P1 N1001T2P0 N1001T5P0 N1002T1P2 N1002T2P0 N1002T5P0 b If parameters are displayed per part system upon switch of the part system when key is pressed the parameter data is output per part system Output example N8001T1P99 N8002T1P0 N8003T1P10000 N8001T2P0 N8002T2P0 N8003T2P0 N1001T1P1 Parameter setting value Part system No 1 1 5 PLC axis P...

Страница 391: ...s output per spindle Output example 5 IP address Output example Example When 1926 Global IP address setting value is 192 168 200 1 N1926K1P192 N1926K2P168 N1926K3P200 N1926K4P1 N13001C1P100 Parameter setting value Spindle No 1 to 4 Parameter No N13001C1P100 N13002C1P100 N13003C1P15 N13001C2P100 N13002C2P100 N13003C2P15 2nd spindle data 1st spindle data N1926K1P192 Setting value for parameter data ...

Страница 392: ... tool length compensation input L11 for tool nose wear compensation input P Compensation No The compensation No is shown with the value following P X X axis compensation amount Absolute The X axis compensation amount data is shown with the value following X Absolute U X axis compensation amount Incremental The X axis compensation amount data is shown with the value following U Incremental Z Y axis...

Страница 393: ... Definition Details G Group No The group No for tool life management is shown with the value following G D Tool no The tool No is shown with the value following D S Status The tool status is shown with the value following S M Method The tool life management method is shown with the value following M L Length compensation The length compensation data is shown with the value following L R Radius com...

Страница 394: ...ry data is shown with the value following B Address Definition Details G Group No The group No for tool life management is shown with the value following G M Method The tool life management method is shown with the value following M 0 Life management is carried out using the time of cutting feed execution 1 Life management is carried out using the number of usages Counting the number of usages is ...

Страница 395: ...is 0 A and B are not used D Tool No The tool No is shown with the value following D H Compensation No The compensation No is shown with the value following H P Q Used The used data used time is shown with the value following P or Q The used data used count is shown with the value following P or Q Note 1 When the combination of the setting of tool life management method and address is illegal error...

Страница 396: ...formation Same as Power unit screen 6 S W configuration Same as S W config screen 7 Ladder configuration Same as Ladder config screen F_END COMMON FILE ASSEMBLY DATE 04 11 01 TIME 15 30 00 NC_TYPE MITSUBISHI CNC E70L FILE TYPE NC_UNIT NC_NAME FCA70P 2E UNIT_NAME FCU7 MU558 NC_SN M1234567890 END FILE TYPE HARDWARE DATA1 HW_NAME HN768 REVISION A DATA2 DATAn HW_NAME HN441 REVISION A END FILE END F_EN...

Страница 397: ...nated for input output function programs except subject to edit lock will be processed Note 2 When a multiple programs are input to the memory without designating the file name like serial input or program batch input the message Edit lock B or Edit lock C will be displayed and the input will be interrupted if the program which is subject to edit lock is detected Machining program Edit lock B Edit...

Страница 398: ...ttempted on the Position display1 screen and the INPUT key is pressed the origin set is not executed and the message Origin set not possible appears If the operations shown in No 6 to 10 are attempted and the INPUT key is pressed the message Data protect appears and the input and output are disabled Tool data protection KEY 1 No Operation Screen 1 Origin set Monitor 2 Tool compensation amount sett...

Страница 399: ...ration Screen 1 Control parameter ON OFF Setup User Control param 2 Axis parameter setting Setup User Axis param 3 Operation parameter setting Setup User Operation param 4 Machining parameter setting Setup User Process param Rotate meas 5 Common variable setting Monitr Position display Common variable 6 I O basic parameter setting Mainte Parameter 7 Parameter input output Mainte I O 8 Common varia...

Страница 400: ...tton is displayed in gray and cannot be selected Operation method 1 Use the menu Area change to select file setting column A 2 Designate the transfer source device directory and file name The designated file appears 3 Use the menu Area change to select file setting column B 4 Press the menu Anshin net to designate the transfer destination device and file name Anshin net server is displayed as devi...

Страница 401: ...e menu Area change to select file setting column B 4 Designate the transfer destination device directory and file name The designated file appears 5 Press the menu Transfr A B A message appears to confirm the reception of machining data When the file name is not designated in the file setting column A the message File name not designated for dev A appears to indicate the error 6 Press the Y or INP...

Страница 402: ... The Batch Input Output the Machining Program of NC Memory One file which consists of two or more machining program can be transferred to NC memory by dividing the file The machining programs united with one file can be transferred to the external device The targets are the machining programs of the user Example of the external device NC memory of machining program batch transfer When the external...

Страница 403: ...tion device memory The designated device name memory appears 6 Press the menu Dir Program all The Program all appears in the directory When the file name is designated only the top program of transfer source is stored in the designated file For example of Example of the external device NC memory of machining program batch transfer when TESTCUT is designated as the transfer direction file name the ...

Страница 404: ...sfer source file is ignored Note 7 When the transfer source is serial the program is similarly transferred even if direction of following case 1 and case 2 is set Example of NC memory the external device of machining program batch transfer When the external device is serial the top line is Case 1 Case 2 Device name Memory Memory Directory Program batch Program File name Null or file designation Nu...

Страница 405: ...ror will occur 4 Press the menu Area change key to select file setting column B 5 Designate the transfer direction device and directory The designated device name and directory appear 6 Designate the transfer direction file to input multiple machining programs The designated file name appears When the file name is not designated output to the file ALL PRG of the designated directory 7 Press the me...

Страница 406: ... 2 The file name of file which consists of two or more machining program can have up to 32 characters including the extension as well as the machining program 3 When the Program batch is designated to NC memory directory it is not possible to delete rename and merge files When the files are deleted in a batch use Program for directory and a wild card for file name 4 Refer to Note of 6 2 3 Transfer...

Страница 407: ...m data that is backed up in E70 can be restored to other models Display items Display item Details 1 Device name This displays the selected device name 2 Data name This displays the data name being backed up restored System data ladder APLC data and custom data are displayed 3 Execution status This displays the processing execution status Processing is executed in the system data ladder and APLC d...

Страница 408: ...Detail Type Reference This displays the sub menu for Device selection C This executes backup processing A 6 3 1 Performing a Backup Operation This executes restore processing A 6 3 2 Performing a Restore Operation This stops processing C Device select Backup Restore Stop ...

Страница 409: ...ss Y or INPUT key Backup operation begins An operation message Performing Backup appears When the backup is completed without error an operation message Backup complete appears Operation methods 1 Press the menu Restore The menu is highlighted An operation message Select directory to restore appears 2 Move the cursor to select the file Press the INPUT key An operation message OK Y N appears 3 Pres...

Страница 410: ...ommon setting area Language displayed Set the display language for system setup and after setup after the power is turned ON again This setting is registered at the 1043 lang Number of spindles Set the number of spindles connected to the NC This setting is registered at the 1039 spinno 2 Setting by system area Note The E70 is one part system control Set 0 for the 2nd part systems and later A setti...

Страница 411: ...ry switch No Motor type Set the motor types that are connected to each servo axis Input the values as indicated at the guidance display area The input values are then converted to and displayed as motor types Detector type Set the encoder types that are connected to each servomotor Input the values as indicated at the guidance display area The input values are then converted to and displayed as en...

Страница 412: ... data transfers Note 6 When the inserted memory card contains the spindle parameter setting file INITSP PRM the default parameters of Setting by spindle set on the screen are overwritten with those from the file Operation methods 1 Enter all the required settings on the system setup screen 2 Press the menu Param setting The menu is highlighted An operation message Set up parameter Y N appears 3 Pr...

Страница 413: ...ng item to be adjusted The cursor does not display during automatic adjustments 2 Adjustment item name This displays the names of the spindle analog adjustment items 3 Adjustment data This displays the setting data for each adjustment item 4 Current adjust data This displays data which is being adjusted manually Display only during a manual adjustment 5 Operation procedure This displays the operat...

Страница 414: ...d during manual adjustments to adjust downward in decrements of 10 C This is used during manual adjustments to adjust downward in decrements of 1 C This is used during manual adjustments to adjust upward in increments of 1 C This is used during manual adjustments to adjust upward in increments of 10 C Operation methods 1 Press the function key MAINTE The maintenance screen appears 2 Press the menu...

Страница 415: ...1 Use the keys to move the cursor to item 10101 then press the Manual adjust menu button The menu and the selected line are highlighted The current setting value is displayed at Current adjust data A 0V analog voltage is output to ch0 at this time 2 Monitor the analog voltage Adjust the 0V offset until the analog voltage is 0V 3 5mV The setting range 999 to 999 3 For plus voltage Press the menu Vo...

Страница 416: ...INPUT key Current adjust data is set as ch0 gain and the adjustment result is enabled The menu Manual adjust highlighting is cleared Adjusting the ch0 gain 1 Use the keys to move the cursor to item 10103 then press the menu Manual adjust The menu and the selected line are highlighted The current setting value is displayed at Current adjust data A ch0 10V analog voltage is output at this time 2 Mon...

Страница 417: ...h the parameter 2049 type type of absolute position detection system 3 Progress state State This displays the progress state of zero point initialisation Note Machine end This displays the distance from the mechanical basic position to the first grid point Machine posn This displays the current machine position Not passed will appear until the axis passes a grid point for the first time 8 2 3 4 5 ...

Страница 418: ...od automatic initialization Order Display Details of progress 1 Illegality While the absolute position is lost 2 Jog Start From when the menu Abs pos set is pressed to when a value is set in Zero P 3 Stopper1 From when JOG operation starts to when the axis pushes against the machine end stopper 4 Zero P Rel From when the axis pushes against the machine end stopper to when axis reaches the approach...

Страница 419: ... When the first data is displayed the last axis data will be displayed C This switches the data display to the next axis data When the last data is displayed the first axis data will be displayed C Procedures 1 Press the menu Axis select The menu is highlighted The cursor appears in the input area 2 Set the axis name which was set with 1022 axname2 and press INPUT key The axis name and data change...

Страница 420: ...pe is 1 Refer to 6 6 1 Selecting the Axis for procedures to select the axis 2 Select the HANDLE mode or JOG mode 3 Input 1 to Absolute posn set The input value appears at Absolute posn set 4 Input an arbitrary value to 2 Zero P The input value appears at 2 Zero P 5 Move the axis toward the machine end stopper a State Stopper Machine end Distance between stopper and grid point Machine posn Not pass...

Страница 421: ...wer ON the operation message Not passed on grid will appear Return to a point before the last grid and then repeat from step of pressing against the machine end stopper Note 3 If the first grid point is covered by the grid mask 2028 grmask as a result of return to the electric basic position the axis stops at the next grid point Note that zero point shift amount 2027 G28sft is invalid Basic machin...

Страница 422: ...et 4 Input an arbitrary value to 2 Zero P The input value appears at 2 Zero P 5 Start JOG operation State Stopper1 Machine posn Not passed current machine position The axis moves toward the machine end stopper at the push speed 2055 a State Stopper1 The axis pushes against the machine end stopper After the current reached its limit for given time the axis returns toward the approach point at the p...

Страница 423: ...celeration during movement at the specified push speed is performed in smoothing off step feed mode Note 5 If 0 is specified for 2056 aproch of the absolute position parameters the machine zero point is regarded as the approach point Note 6 Automatic initialization is interrupted if one of the following events occurs If it is interrupted State indicates Jog Start after selecting the Auto init set ...

Страница 424: ...tem zero point and reference position this disables automatic initialization Refer to the following left figure If 2 Zero P is set to 0 the machine end stopper direction is unpredictable this also disables automatic initialization Refer to the following right figure Machine end stopper Mechanical basic position Machine end stopper Mechanical basic position Looking from the basic machine coordinate...

Страница 425: ...sn set The input value appears at 0 Absolute posn set 4 Input an arbitrary value to 2 Zero P The input value appears at 2 Zero P 5 Move the axis toward the mechanical basic position and align it to the marked point a State Origin Set Machine posn Not passed current machine position 6 Input 1 to 1 Origin P The input value appears at 1 Origin P 7 Move the axis in the direction designated with the pa...

Страница 426: ...the marked point Note 3 If the first grid point is covered by the grid mask 2028 grmask as a result of return to the electric basic position the axis stops at the next grid point Note that zero point shift amount 2027 G28sft is invalid Note 4 Reconfirm the absdir setting if the machine does not move in the direction of 2050 absdir The machine will move only in the positive direction when set to 0 ...

Страница 427: ...27 G28sft is invalid Procedures Marked point alignment method II Parameter Setting value 2049 type absolute position detection type 4 marked point alignment method II is selected 1 Select the axis that 2049 type is 4 Refer to 6 6 1 Selecting the Axis for procedures to select the axis 2 Select the HANDLE mode HANDLE FEED AXIS SELECT mode or JOG mode 3 Input 1 to 0 Absolute posn set The input value ...

Страница 428: ...P can be set at any time as long as 0 Absolute posn set is set to 1 4 The grid point must be passed at least once after turning the power ON before initializing the zero point If the grid point has not been passed the operation message Not passed on grid will appear at the Machine posn 5 When the absolute position is established the required data will be stored in the memory Procedures Marked poin...

Страница 429: ...alue does not need to be considered To set the third gird point as the zero point when the Machine end display is 5 3 at the end basic position Example of 10 0mm grid interval Example 1 To set the reference position to the same position as the basic machine coordinate system zero point Example 2 To set the reference position at a position 200 0mm to the side from the basic machine coordinate zero ...

Страница 430: ...s can be confirmed in the servo diagnosis screen the number of servo alarm of servo unit spindle unit DA output information PLG diagnosis spindle and the maintenance diagnosis information of servo spindle unit such as alarm cause counter Servo unit Spindle unit 1 Display of the DA output data 1 2 3 1 2 3 ...

Страница 431: ...number of times can be cleared for each axis with All cnt clr accu Displays the number of times in which the alarm occurrence condition was met since the drive unit power was turned ON freq Displays the peak hold value when the alarm occurrence condition is met per constant cycle 3 DA output Currently not supported 4 Spindle PLG diagnosis information Spindle drive unit only Displays the data for e...

Страница 432: ...itches to the DA output Note 1 When the parameter 1039 spinno is set to 0 this menu will not be displayed Note 2 Even when the parameter 1039 spinno is set to other than 0 this menu will be grayed out and cannot be selected while displaying the servo unit diagnosis information B Currently not supported and cannot be used A Currently not supported and cannot be used A Clears the all values of AL ca...

Страница 433: ...ling data collection is stopped Sampling invalid Sampling data collection is disabled 2 Sampling spec Specify the part system spindle and servo axes where sampling data is to be collected System Specify the part systems where sampling data is not to be collected When 0 is set sampling is carried out for all part systems This setting is ignored if a non existent part system is specified The E70 Ser...

Страница 434: ... waveform driver statuses 1 3 4 data is collected Servo data 1 This selects whether or not servo current waveform speed FB current FB current command position FB position command droop data is collected Servo data 2 This selects whether or not servo current waveform detector position Rn Pn data is collected Modal This selects whether or not modal information information for each running block bloc...

Страница 435: ...d Sampling appears in the status column Operation methods 1 Press the menu Stop An operation message The collection stop appears 2 Press Y or INPUT key Data collection stops and History stop and Sampling stop appears in the status column To resume data collection press the menu Start Operation methods 1 Press the menu Data clear An operation message Execute the collection data clear appears 2 Pres...

Страница 436: ...II MACHINE OPERATIONS ...

Страница 437: ......

Страница 438: ...RM M00 M02 M30 DRY RUN RAPID TRAVERSE REFERENCE POSITION RETURN JOG TOOL LENGTH MEASURE MENT DETECT ERROR OVERRIDE CANCEL MANUAL OVERRIDE MANUAL ABSOLUTE HANDLE INTERRUPT OPTIONAL BLOCK SKIP OPTIONAL STOP HANDLE FEED AXIS SELECTION RAPID TRAVERSE OVERRIDE FEED RATE OVERRIDE MANUAL FEED RATE 10 10 100 100 1000 1000 1 5000 150 160 170 180 190 200 210 220 230 240 250 260 270 280 290 300 72 0 52 0 31 ...

Страница 439: ...MITSUBISHI CNC II 2 ...

Страница 440: ...II 3 1 Operation State ...

Страница 441: ...om the machine to controller is turned OFF or When power unit fuse in the controller blows Block stop Input Power OFF state a Power OFF b Power ON Operations not ready state Waiting for readiness of operations Failure in readiness of operations Emergency stop d Operations ready d Problem is resolved Operations ready state e Reset operations In automatic operations Automatic operation is paused Fee...

Страница 442: ...ition of operation state correlation diagram d This state is also called initial state When about four seconds has passed after the power is turned ON 2 From another ready state to reset Transition of operation state correlation diagram e When the RESET key on the setting and display unit is turned ON When external reset signal is input from the machine or When M02 or M30 is executed depending on ...

Страница 443: ...tion panel are OFF 1 From automatic operation in progress to automatic operation stop Transition of operation state correlation diagram h When the SINGLE BLOCK switch on the machine operation panel is turned ON and execution of the block is completed or When automatic mode input is changed to another automatic mode input CAUTION Stay out of the moveable range of the machine during automatic operat...

Страница 444: ...II 7 2 Indicator Lamps ...

Страница 445: ...e busy state entered when the FEED HOLD switch is pressed or block completion stop block stop 2 4 Automatic Operation Pause Busy The AUTO PAUSE lamp is ON from AUTO PAUSE switch turning on to AUTO START switch turning ON or when the mode selection switch is changed from the automatic to manual mode during the automatic operation 2 5 Return to Reference Position Output is executed when the controll...

Страница 446: ...II 9 3 Reset Switch and Emergency Stop Button ...

Страница 447: ...the modal state will return to its original state 3 2 Emergency Stop Button The EMERGENCY STOP button is a red mushroom shaped pushbutton The unready state is set by pressing the EMERGENCY STOP button During emergency stop the READY lamp goes OFF and automatic operation and manual operation do not work The controller is reset at that time If the EMERGENCY STOP button is pressed when a movement com...

Страница 448: ...II 11 4 Operation Mode ...

Страница 449: ...itch is turned off the controlled axis stops with deceleration Note 1 When the MANUAL OVERRIDE switch on the operation panel is turned ON the override value set by using the FEED RATE OVERRIDE switch takes precedence over the feedrate set by using the MANUAL FEED RATE switch Jog feed mode Select the mode to move the controlled axis consecutively at manual feedrate Rapid traverse feed mode Select t...

Страница 450: ...uilder for the rapid traverse feedrate Note 2 Refer to the section 5 for the RAPID TRAVERSE OVERRIDE switch 1 Using the MODE SELECT switch select the rapid traverse feed mode 2 Using the RAPID TRAVERSE OVERRIDE switch set arbitrary override value 3 To move the controlled axis turn ON the FEED AXIS SELECT switch The controlled axis is moved while the switch is turned ON When the switch is turned OF...

Страница 451: ...o alarm is ON or when the parameters are selected in the dog mode 1 The controlled axis is moved in the direction where the near point detection limit switch and dog approach each other in the reference position return mode 2 When the limit switch kicks the dog the controlled axis once stops with deceleration 3 Next the controlled axis moves to the reference position at the approach rate set in th...

Страница 452: ...ference position return turn ON the FEED AXIS SELECT switch or in the direction where the dog and limit switch approach each other For high speed reference position return turn ON the FEED AXIS SELECT switch or in the direction that the spindle head approaches the reference position Hold the FEED AXIS SELECT switch ON during reference position return until the machine passes by the dog dog mode or...

Страница 453: ...s not include the coordinate system shift amount Refer to the figure below The local coordinate system is canceled at the same time as clearing the coordinate system setting shift amount This function is valid for the manual reference position return and the coordinate system setting shift amount cannot be cleared when the reference position is reached by the automatic reference position return M ...

Страница 454: ...nce is moved at a given distance 4 6 Handle Feed Mode The controlled axis can be moved by turning the manual handle The travel distance per graduation of the handle depends on how the HANDLE INCREMENTAL MAGNIFICATION switch is set The axis that can be moved by using the manual handle is determined by setting the HANDLE FEED AXIS SELECT switch 1 Using the MODE SELECT switch select the handle feed m...

Страница 455: ...the FEED HOLD switch automatic operation will be restarted by turning ON the CYCLE START switch Memory operation terminates when M02 or M30 in the program is executed The M02 or M30 lamp on the machine operation panel is turned ON To repeat executing the same program input the rewind signal by reset rewind with PLC program To forcibly terminate automatic operation turn ON the RESET switch 4 8 MDI ...

Страница 456: ...II 19 5 Operation Panel Switches in Operation Mode ...

Страница 457: ...ssing Use the RAPID TRAVERSE OVERRIDE switch to override the rapid traverse feedrate in automatic or manual operation RAPID TRAVERSE OVERRIDE is applicable to the following Automatic operation G00 G27 G28 G29 G30 Manual operation Rapid traverse reference position return incremental feed Use the FEED RATE OVERRIDE switch to override the feedrate in automatic operation G01 G02 or G03 F command or th...

Страница 458: ...When B or C is set to the parameter 1003 iunit up to 1000 only can be validated 5 6 Handle Feed Axis Selection Manual feedrate mm min 0 7 2 72 720 7200 1 0 10 0 100 1000 10000 1 4 14 0 140 1400 14000 2 0 20 0 200 2000 2 7 27 0 270 2700 3 7 37 0 370 3700 5 2 52 0 520 5200 Movement amount 1003 iunit B or C Movement amount Other than 1003 iunit B or C 1 1 10 10 100 100 1000 1000 5000 5000 10000 10000...

Страница 459: ...al pulse generator has 100 graduations per revolution and outputs one pulse per graduation The travel distance per pulse is set by using the HANDLE INCREMENTAL MAGNIFICATION switch Use the CYCLE START switch to start automatic operation memory tape or MDI Automatic operation is executed by turning ON the switch Use also the switch for restart from stop by the FEED HOLD switch or the automatic oper...

Страница 460: ...II 23 6 Operation Panel Switch Functions ...

Страница 461: ...ition display of the setting display unit is incremented 2 The Z axis moves by manual operation even when the Z AXIS CANCEL switch is turned ON 3 If the Z AXIS CANCEL switch is changed over during automatic operation the new switch setting is validated when the automatic operation stops after the block being executed finishes 4 In reference position returns G28 G30 the axis is controlled to the mi...

Страница 462: ...optional block skip type setting 0 Enable only at the beginning of a block 1 Enable in the middle of a block as well as at the beginning of the block Example When machining two parts as illustrated below if the following program is prepared and the machining is done by turning ON the OPTIONAL BLOCK SKIP switch part a is provided if the machining is done by turning OFF the switch part b is provided...

Страница 463: ...absolute command c Manual interrupt The coordinate system W is not shifted d Path after manual interrupt e Tool passes along same path as that programmed f With manual absolute signal ON a Manual interrupt The coordinate system W is shifted b Manual interrupt amount c Feed hold stop d Programmed path absolute command e Manual interrupt The coordinate system W is shifted f Path after manual interru...

Страница 464: ...e left side of the shape shown in the following drawing a symmetrical shape to the left side shape can be machined on the right side by applying the mirror image function and running the same program Be sure the machining program starts and finishes at the mirror center Mirror image includes external input mirror image parameter setting mirror image programmable mirror image etc Only program mirro...

Страница 465: ...mining the remaining distance after deceleration for moving to the next command can be set with the setting and display unit 6 13 Follow up Function The follow up function monitors machine motion in the emergency stop state and reflects it in the current position and workpiece coordinates Thus the work program can be continued without re executing a reference position return after emergency stop 6...

Страница 466: ...ecrease amount per handle gradient is expressed with the following equation Example For a 10mm min increase decrease amount per handle gradient If F max 3600mm min 3 The acceleration deceleration method follows the rapid traverse setting when F0 is issued But G modal does not change 4 F1 digit feed command is valid in a G01 G02 G03 G02 1 or G03 1 modal 5 F1 digit feed command can be used for fixed...

Страница 467: ...th the handle operation Note 3 When K is 0 the speed is not changed 6 15 3 Preautions 1 When G00 mode is applied F1 to F5 are invalid in the G00 mode and the rapid traverse rate is established instead 2 If F0 is used in the G02 G03 G02 1 or G03 1 mode a program error P121 will occur The error will be eliminated if the F0 command is rewritten 3 When F1 to F5 with decimal point are assigned the 1mm ...

Страница 468: ...ion and the movement with manual operation will have the priority 6 16 2 Conditions for Validating Manual Automatic Synchronous Feed This function is valid when the following conditions are established One automatic operation mode and one manual operation mode are selected The manual operation mode can be selected during automatic operation The manual automatic simultaneous valid axis is selected ...

Страница 469: ...ill follow the automatic operation movement mode 6 Movement of the manual automatic simultaneous valid axis will not stop with the single block stop or feed hold stop 7 If the manual automatic simultaneous valid axis reaches the stored stroke limit or stroke limit the axis moving in automatic operation will also stop immediately and the feed hold state will be entered In this case automatic operat...

Страница 470: ... Automatic operation will stop in the interlock state until the Manual Automatic simultaneous valid n th axis signal turns OFF The manual automatic simultaneous valid axis can be controlled in the manual operation mode during this time G91 G00 X100 Y100 Program operation mode memory mode Automatic operation start Automatic operation block progress Jog mode Manual automatic simultaneous valid Z axi...

Страница 471: ...for which the manual automatic simultaneous valid signal is ON will stop 5 The interlock will not be applied even if the Manual Automatic simultaneous valid n th axis signal is turned ON for the virtual axis in virtual axis interpolation 6 If the Manual Automatic simultaneous valid n th axis signal is turned ON for an axis moving with the automatic operation s G90 modal or G53 command and the manu...

Страница 472: ...the manual arc feed will be invalidated even if the Manual Automatic simultaneous valid n th axis signal for the 1st and 2nd axes is ON In this case none of the axes can be moved with manual operation until the Circular feed in manual mode valid signal is turned OFF 4 The Manual Automatic simultaneous valid n th axis signal is invalid for the chopping axis during chopping 5 Manual random feed will...

Страница 473: ... dwell G04 command processing by using automatic handle interruption the dwell count operation will stop A check is made for the completion of the axis movement then the dwell count operation continues 4 Automatic handle interruption is enabled even if automatic machine lock has been set If manual machine lock has been set the machine does not move it only updates the POSITION display If manual ma...

Страница 474: ...nterruption is executed may exceed the cutting feed speed during cutting feed command G01 G02 G03 processing in automatic start To prevent this clamp the axis 3 If during automatic start manual handle interruption is executed in the same direction for the axis that is moving at an external decelerating speed the axis movement speed Automatic start movement speed Speed resulting from manual handle ...

Страница 475: ...play include the distance of handle interruption For automatic handle interruption select whether absolute mode is updated or not as follows a Using machine parameters set whether the manual absolute changeover switch or parameters are used b If the parameters are used set whether or not absolute position data is updated for each axis by using machine parameters other than those in item c If the m...

Страница 476: ...ion by manual handle Path after interruption Path after interruption Absolute mode program absolute position update valid single block operation A B Program path G90 X_ Y_ Program path G90 X_ Y_ Path after interruption Path after interruption B Distance of interruption in block execution Distance of interruption by manual handle Path after interruption Absolute mode program absolute position updat...

Страница 477: ...single block running If program absolute position update is valid during continuous running the proper tool path will return at the fourth block after the one where the interruption has been completed If there is no G block existed between the block where the interruption has been completed and the block that contains the tool radius competition cancel command G40 the proper tool path will return ...

Страница 478: ...of interruption by manual handle Path after interruption Absolute mode program absolute position update valid continuous operation Tool path Path after interruption Absolute mode program absolute position update valid continuous operation Program path G42 G40 Distance of interruption by manual handle Path after interruption Tool path ...

Страница 479: ...ted in the memory operation mode and the Z axis is used as a handle interrupt axis Perform automatic operation Turn ON the HANDLE INTERRUPT switch on the machine operation panel Select interrupt axis by setting the HANDLE AXIS SELECTION switch on the machine operation panel Select the travel distance per handle graduation by setting the HANDLE INCREMENTAL MAGNIFICATION switch Turn the manual handl...

Страница 480: ...ored from the middle point to the reference position 5 If the MACHINE LOCK switch is changed during manual operation the setting will be validated after the feed is stopped once 6 The M S T and B commands are executed according to the program 7 When the MACHINE LOCK is turned OFF after the axis is moved in the MACHINE LOCK ON state the current position display and the machine position will not mat...

Страница 481: ...cludes deceleration check specification type 1 and deceleration check specification type 2 The setting is selected with the parameter 1306 InpsTyp a Deceleration check specification type 1 1306 InpsTyp 0 The G0 and G1 deceleration check method can be selected with the base specification parameter deceleration check method 1 1193 inpos and deceleration check method 2 1223 aux07 bit1 Note XX express...

Страница 482: ... This check time is determined by the rapid traverse acceleration deceleration mode and rapid traverse acceleration deceleration time constant of simultaneously commanded axes The deceleration check time required during cutting feed is determined in the same manner It is the longest cutting feed deceleration check time of all axes This check time is determined by the cutting feed acceleration dece...

Страница 483: ...ition width SV024 Note that G0 and G1 can be designated independently with the axis specification parameter G0 in position check width G0inps and G1 in position check width G1inps If both the servo parameter and axis specification parameter are set the larger value will have the priority If the SV024 setting value is larger in position check will end when the SV024 setting value is established Spe...

Страница 484: ...direction in a G1 to G0 successive block the deceleration check for the movement in the opposite direction can be changed with the base specification parameter G1 G0 deceleration check 1502 G0Ipfg 2 Designating deceleration check for G1 G1 opposite direction movement reversal If the axis movement reverses to the opposite direction in a G1 to G1 successive block the deceleration check for the movem...

Страница 485: ...check method in G1 G9 0 Command deceleration check in G1 G9 1 In position check in G1 G9 The deceleration check is not performed for the commands except G1 G9 When 1306 InpsTyp deceleration check specification type is set to 1 Deceleration check specification type 2 this parameter will be invalid 0 1 1306 InpsTyp Deceleration check specification type Select the parameter specification type for the...

Страница 486: ...ed even in this case 3 Designating in position width The in position width programmable in position check width designated in the machining program has a priority over the in position width set in the parameters SV024 G0inps G1inps When error detect is ON in position check will be forcibly carried out 4 Deceleration check in G1 G0 G1 G1opposite direction movement reversal during high speed machini...

Страница 487: ...p gain 13002 PGN is changed during the axis movement Note 1 When G1 command is issued the in position check is performed regardless of the deceleration check parameter Note 2 XX expresses all commands Parameter Rapid traverse command Parameter Other than rapid traverse command G1 other than G0 command Inpos 1193 G0 XX G0 G9 XX AUX07 BIT 1 1223 BIT 1 G1 G0 G1 G9 XX G1 G1 0 Command deceleration chec...

Страница 488: ...ng travelling axes and the interpolation speed exceeds the external deceleration speed the external deceleration speed is applied a One or more axes travel in the same direction as of External deceleration signal b The interpolation speed of axes including a is exceeding the external deceleration speed When the parameter 1239 set11 bit6 is ON external deceleration speed setting is individual for e...

Страница 489: ...l deceleration speed of the multiple axes c The interpolation speed of axes including a is exceeding the external deceleration speed b 6 21 3 Relation With Other Funcitons 1 If External deceleration signal is enabled during synchronous or asynchronous tapping the feedrate is unchanged even though the deceleration conditions are satisfied 2 If External deceleration signal is enabled during thread c...

Страница 490: ... out 1 If there are two or more axes set the return order with parameter 2019 revnum 2 When the reference position is reached the corresponding Reference position reached signal will be output 3 This signal must be held until the Reference position reached signal is output If it is turned OFF midway the return operation will be interrupted and stop If the signal is input again the operation will r...

Страница 491: ...to 35999 Unit Note 1 Multi point orientation cannot be executed when using the magnetic sensor Note 2 Orientation is possible only when the gear ratio is 1 1 for the PLG orientation The orientation is completed at the PLG encoder s Z phase so when using reduction gears the orientation points will be generated at several points during one spindle rotation 3 Orientation in position advance output Th...

Страница 492: ...on loop reference position return C axis tapping the time constant is set by the parameter 3115 sp2_t1 to 3118 sp2_t4 Time constant in orientation position loop reference position return The orientation acceleration deceleration time is calculated with the following expression Example The acceleration deceleration time for gear 00 For position loop reference position return the parameter 3110 tap_...

Страница 493: ...tion speed sp2_t1 Orientation stop position slimt1 6000 3000 0 After decelerating up to the rotation speed 0 by the inclination of sp_t1 orientate to orientation stop position by accelerating decelerating with the inclination of sp2_t1 Orientation stop position sp2_t1 sp_t1 Time Rotation speed Orientation command speed slimt1 6000 3000 0 Rotation speed Time Orientation command speed sp2_t1 Orienta...

Страница 494: ... stopping usually the spindle rotates to orientation position using the position loop gain set in the parameter 13002 SP002 PGN Position loop gain interpolation mode By setting the parameter 3106 zrn_typ bitE Interpolation mode selection in orientation if the orientation is commanded when the spindle has been stopping the spindle rotates to orientation position using the parameter 13001 SP001 PGV ...

Страница 495: ...6 Operation Panel Switch Functions MITSUBISHI CNC II 58 ...

Страница 496: ...II 59 7 Other Functions ...

Страница 497: ...solute position detection is valid when using the absolute position detection system the stored stroke limit will be validated immediately after the power is turned ON Stored stroke limit coordinates The stored stroke limit check is carried out in the basic machine coordinate system established by the reference position return To validate the stored stroke limit even when the reference position re...

Страница 498: ...limits I II are handled as follows 7 1 1 Stored Stroke Limit I This is a stroke limit function used by the machine tool builder The boundary is set with the parameters 2013 OT Soft limit I and 2014 OT Soft limit I The outside of the set boundary is the prohibited range The outside of the set boundary is the prohibited range When used with the stored stroke limit II function the confined range desi...

Страница 499: ...ch axis with setting 8202 OT CHECK OFF to 1 Prohibited range X Outside Z Outside Moveable range Prohibited range 1 Stored stroke limit II When prohibited range is on outside When used with the stored stroke limit I function the narrow range designated by the two types becomes the movement valid range Moveable range Prohibited range A Set value for side B Set value for side C Prohibited range by st...

Страница 500: ...ed to the value set to R register for each axis When Stored stroke limit I change request signal is turned ON the range of stored stroke limit changes Changing the area for the stored stroke limit I is also possible during automatic operation Also the current settings for the stored stroke limit I can be checked by with the R register values Refer to PLC Programming Manual and PLC Interface Manual...

Страница 501: ...escription 1 An alarm will appear if the machine stops because it was about to exceed the set region Reset to cancel this alarm 2 This function is also valid during machine lock 3 This function is validated when all axes in which chuck barrier and tailstock barrier are set have finished their reference position returns 4 When there is a stored stroke check function and the stored stroke limit regi...

Страница 502: ...s X axis coordinates must be set as follows Note that the Z axis coordinates do not have to follow this setting 2 Using the PLC external signal input Set the coordinate values for each point between 8300 P0 to 8314 P10 P0 is the basic X coordinate of the chuck and tailstock barrier Set the workpiece center coordinate in the basic machine coordinate system as a radius value The coordinate value fro...

Страница 503: ...ction right P9 P10 Spindle section right Set the X axis coordinates so that P1 P2 P3 is established The P3 and P7 Z coordinates and the P6 and P9 Z coordinates shall be equal If there is no spindle inner diameter set the P8 X coordinate to the same value as P0 i For external claw ii For internal claw P7 and P9 are not used The tailstock end section angle is set with the parameters 8318 STOCK ANGLE...

Страница 504: ... To avoid this Example 3 is given In this example if the barrier points P1 P2 and P3 are set and the checkpoint is set in range c the tool can be stopped at the barrier boundary 2 When the tool enters the barrier region and an alarm occurs the tool may move in the opposite direction from which it came once the alarm is canceled by resetting 3 There is no barrier region for axes without a reference...

Страница 505: ...utomatic operation do not reset the program until manual synchronous tapping is completed The manual synchronous tapping mode will be canceled even if reset is applied in the handle mode 3 During manual synchronous tapping the acceleration deceleration time constant is the same as normal handle operation The return override is also invalid 4 When using the multiple spindle specifications changes t...

Страница 506: ...e warning Z64 Valid term soon to be expired appears at the bottom right of the screen This warning appears at every cycle start after power ON until the expiry date comes but can be cancelled by Reset Cycle start operation is enabled before the expiry date If the expiry date is passed the alarm message Z65 Valid term has been expired appears which disables cycle start operation Reset signal is una...

Страница 507: ... can check the number of days as illustrated in the following figure The number of remaining days reaches 0 on the expiry date If you open this screen while the alarm is occurring the screen as in the following figure appears If you attempt a cycle start operation the stop code T01 Cycle st prohibit Term exp d results which disables cycle start operation Remaining days until expiration ...

Страница 508: ...nit c Open the Mainte screen and select Input Output d In the A Dev field specify a memory card or USB memory in Dev a directory where the decryption code is stored in Dir and the created decryption code file name in File e Select Memory in B Dev and press Dir Then the menu key Decrypt code appears on the screen When Decrypt code is pressed Decryption Code automatically appears in Dir and PASSCODE...

Страница 509: ...7 Other Functions MITSUBISHI CNC II 72 ...

Страница 510: ...III MAINTENANCE ...

Страница 511: ......

Страница 512: ...III 1 1 Daily Maintenance and Periodic Inspection and Maintenance ...

Страница 513: ...r discolored if drops of water etc adhere to it for long periods so be sure to wipe off any moisture immediately Wipe off any dirt dust etc on the polarizing plate using absorbent cotton or other soft cloth A CMOS LSI is used in the LCD panel so be careful of static electricity when handling Never disassemble the LCD panel Doing so will damage the panel b Precautions for storage Do not store the L...

Страница 514: ...ll luminescent spots or small dark spots may appear on LCD panel but this is not a fault 3 Replacing the backlight Replacement should be commissioned to the Mitsubishi Service Center 1 1 3 Compact Flash USB memory 1 Handling the compact flash USB memory The general handling methods for the compact flash USB memory are described below Refer to the instruction manual of the compact flash USB memory ...

Страница 515: ...1 Daily Maintenance and Periodic Inspection and Maintenance MITSUBISHI CNC III 4 ...

Страница 516: ...III 5 2 Hardware Replacement Methods ...

Страница 517: ...e right side of the battery cover toward front 4 Disconnect the battery connector from the control unit BAT connector 5 Remove the battery from the battery holder 6 Fit the new battery into the battery holder 7 Insert the new battery connector into the control unit BAT connector Pay attention to the connector orientation do not insert backwards 8 Close the front cover of the control unit At this t...

Страница 518: ...ustrial waste in accordance with the local law WARNING If the battery low warning is issued save the machining programs tool data and parameters in an input output device and then replace the battery When the battery alarm is issued the machining programs tool data and parameters may have been destroyed Replace the battery and then reload the data CAUTION 1 Do not short circuit charge overheat inc...

Страница 519: ...e locking claws click 9 Connect the LED backlight cable to the new backlight 10 Connect the LCD cable to the LCD panel and mount the LCD panel using the 4 fixing screws 11 Mount the escutcheon with 4 fixing screws one each for 4 sections 12 Connect the backlight connector to the backlight driver 13 Confirm that all the cables are correctly connected and close the electric cabinet door 14 Connect t...

Страница 520: ...E70 Series Instruction Manual 2 1 Durable Parts III 9 8 4 type display unit Backlight connector MENU connector Backlight driver Backlight ...

Страница 521: ...rminal and the ground Hold the upper part of the protection fuse and pull it when replacing it 2 1 3 2 Operation Panel I O Unit Protection Fuse Disconnection of the protection fuse will be caused by misconnections of digital inputs outputs Hold the upper part of the protection fuse and pull it when replacing it Replacements Part type Protection fuse LM40 Replacements Part type Protection fuse LM40...

Страница 522: ... be replaced Remove the old key sheet as shown below then place the new one Note 1 Clean the surface before placing the new key sheet Note 2 The figure in the above is an example of FCU7 KB024 The keysheet for FCU7 KB025 can be removed in a similar way Key sheet for FCU7 KB024 N330B532G51 Key sheet for FCU7 KB025 N330B532G52 ...

Страница 523: ...ng screws first and then remove one upper fixing screw while supporting the control unit with a hand Then lift the control unit upward and take it off The two lower fixing screws do not need to be removed 5 Install a new control unit onto the control unit installation fitting with fixing screws 6 Connect all the cables back to the control unit Always connect the cables to the designated connectors...

Страница 524: ...hown below Refer to the Connection Manual when handling and wiring optical communication cable CKN 13SP Recommended clamp material KITAGAWA INDUSTRIES Optical communication cable section with reinforced sheath Bending radius Refer to the specification of your optical communication cable Control unit ...

Страница 525: ...2 Hardware Replacement Methods MITSUBISHI CNC III 14 2 2 1 Installation on FCU7 DU120 13 8 4 type HN281 cover LCD cable G497 with ferrite core Driver cable G488 LED backlight cable G487 ...

Страница 526: ... fixing the display unit at 4 places and take the display unit off 5 Install a new display unit with fixing screws 6 Connect all the cables back to the display unit Always connect the cables to the designated connectors 7 Confirm that all the cables are correctly connected and close the electric cabinet door CAUTION 1 Incorrect connections could cause devices to damage Connect the cables to design...

Страница 527: ...ws fixing the keyboard unit and take the keyboard unit off 5 Install a new keyboard unit with fixing screws 6 Connect all the cables connected to the keyboard unit Always connect the cables to the designated connectors 7 Confirm that all the cables are correctly connected and close the electric cabinet door CAUTION 1 Incorrect connections could cause devices to damage Connect the cables to designa...

Страница 528: ...unit with fixing screws Fix so that the NCKB connector slot is placed at the lower part 6 Connect all the cables back to the operation panel I O unit Always connect the cables to the designated connectors NCKB cable can be easily inserted by fitting the Δ1st pin position with the connector 7 Confirm that all the cables are correctly connected and close the electric cabinet door CAUTION 1 Incorrect...

Страница 529: ...ng procedures 1 Open the card interface door on the display unit right end 2 Press the eject lever twice to eject the CF card Note 1 Do not eject a CF card during the data reading writing Note 2 It is recommended to use CF cards of the original equipment manufactured parts MITSUBISHI is unable to guarantee the machine operation when a commercially available CF card is used In that case performance...

Страница 530: ...oor located on the display unit right end and insert remove the USB memory Note 1 Do not remove a USB memory during the data reading writing Note 2 Do not connect a device other than USB memory When using the commercially available USB memory careful performance check must be required by the machine tool builder USB memory slot ...

Страница 531: ...2 Hardware Replacement Methods MITSUBISHI CNC III 20 ...

Страница 532: ...IV APPENDIXES ...

Страница 533: ......

Страница 534: ...IV 1 Appendix 1 List of Function Codes ...

Страница 535: ...ored Stored Stored Stored Stored Stored Stored Stored Stored Stored Stored Stored Stored Stored Stored Stored Stored Not stored Not stored Stored Setting and display unit Key in Key in Key in Key in Key in Key in Key in Key in No key in automatically inserted Key in EOB Key in Key in No key in Key in Key in Key in Key in Key in No key in No key in Key in No key in No key in No key in No key in Scr...

Страница 536: ...IV 3 Appendix 2 Table of Command Value Ranges ...

Страница 537: ... 999 9999 mm rev 2nd to 4th reference position compensation value for machine coordinate system 99999 999 mm 99999 9999 mm Tool compensation amount shape 99999 999 mm 99999 9999 mm Tool compensation amount wear 99999 999 mm 99999 9999 mm Incremental feed amount 0 001 mm pulse 0 0001 mm pulse Handle feed amount 0 001 mm pulse 0 0001 mm pulse Soft limit range value with machine coordinate system 999...

Страница 538: ...on compensation value for machine coordinate system 9999 9999 inch 9999 99999 inch Tool compensation amount shape 9999 9999 inch 9999 99999 inch Tool compensation amount wear 9999 9999 inch 9999 99999 inch Incremental feed amount 0 0001 inch pulse 0 00001 inch pulse Handle feed amount 0 0001 inch pulse 0 00001 inch pulse Soft limit range value with machine coordinate system 9999 9999 inch 9999 999...

Страница 539: ...ynchronous feed feed per minute 0 001 to 1000000 000 min 0 0001 to 1000000 0000 min Synchronous feed feed per revolution 0 001 to 999 999 rev 0 0001 to 999 9999 rev 2nd to 4th reference position compensation value with machine coordinate system 99999 999 99999 9999 Incremental feed amount 0 001 pulse 0 0001 pulse Handle feed amount 0 001 pulse 0 0001 pulse Soft limit range value with machine coord...

Страница 540: ...rev 2nd to 4th reference position compensation value for machine coordinate system 99999 999 mm 99999 9999 mm Tool compensation amount shape 99999 999 mm 99999 9999 mm Tool compensation amount wear 99999 999 mm 99999 9999 mm Incremental feed amount 0 001 mm pulse 0 0001 mm pulse Handle feed amount 0 001 mm pulse 0 0001 mm pulse Soft limit range value with machine coordinate system 99999 999 mm 999...

Страница 541: ...ence position compensation value for machine coordinate system 9999 9999 inch 9999 99999 inch Tool compensation amount shape 9999 9999 inch 9999 99999 inch Tool compensation amount wear 9999 9999 inch 9999 99999 inch Incremental feed amount 0 0001 inch pulse 0 00001 inch pulse Handle feed amount 0 0001 inch pulse 0 00001 inch pulse Soft limit range value with machine coordinate system 9999 9999 in...

Страница 542: ... feed per minute 0 001 to 1000000 000 min 0 0001 to 1000000 0000 min Synchronous feed feed per revolution 0 0001 to 999 9999 rev 0 00001 to 999 99999 rev 2nd to 4th reference position compensation value with machine coordinate system 99999 999 99999 9999 Incremental feed amount 0 001 pulse 0 0001 pulse Handle feed amount 0 001 pulse 0 0001 pulse Soft limit range value with machine coordinate syste...

Страница 543: ...Appendix 2 Table of Command Value Ranges MITSUBISHI CNC IV 10 ...

Страница 544: ...IV 11 Appendix 3 Circular Cutting Radius Error ...

Страница 545: ... the ΔR radius error applying with circular cutting does not come within the allowable value proceed to reduce the cutting feed rate F set Ts to a lower value or review the program Note 2 In the steady state ΔR is constant However it is not constant with command start and stop transitions Under command start and stop conditions therefore the tracking coordinate should be as shown in the figure bel...

Страница 546: ...IV 13 Appendix 4 Registering Editing the Fixed Cycle Program ...

Страница 547: ...er is valid the IN OUT and Edit screens are usable only for operating a fixed cycle control subprogram During this period program file displays only fixed cycle programs Thus after fixed cycle program operation return parameter to 0 Note Parameter 1166 fixpro will be set to 0 when the power is turned OFF Appendix 4 2 Transmitting Erasing the Fixed Cycle Program Transmit erase the fixed cycle progr...

Страница 548: ... ROUND 10 11 12 EQ 4 GOTO 1 9 10 12 11 2 11 9 3003 1 N2 M99 N1 3901 126 G74 O100000740 End face cutoff cycle G 1 IF ABS 2 GT 0 GOTO 10 14 1 N10 13 3 IF 15 NE 0 GOTO 11 13 3 5 N11 16 0 DO1 10 0 11 4 DO2 10 10 4 IF ABS 10 GE ABS 1 GOTO 1 G01 X 11 G00 X 6 11 4 6 END2 N1 G01 X 1 10 11 IF 15 EQ 0 GOTO 20 IF 16 EQ 0 GOTO 21 N20 G00 Y 5 N21 16 1 G00 X 1 IF 14 GOTO 3 12 12 3 IF ABS 12 LT ABS 2 GOTO 2 14 1...

Страница 549: ... 1 GT 0 GOTO 10 14 1 N10 13 4 IF 15 NE 0 GOTO 11 13 4 5 N11 16 0 DO1 10 0 11 3 DO2 10 10 3 IF ABS 10 GE ABS 2 GOTO 1 G01 Y 11 G00 Y 6 11 3 6 END2 N1 G01 Y 2 10 11 IF 15 EQ 0 GOTO 20 IF 16 EQ 0 GOTO 21 N20 G00X 5 N21 16 1 G00 Y 2 IF 14 GOTO 3 12 12 4 IF ABS 12 LT ABS 1 GOTO 2 14 1 13 1 12 13 N2 G00X 13 13 4 5 END1 N3 G00X 1 5 M99 ...

Страница 550: ...G00 Y 2 3 4 15 11 G33 X 1 10Y 3 15 Q 22 M96 101 P1000D3 G00 Y 2 4 11 M97 101 IF 14 GT 0 GOTO 3 IF 16 GT 0 GOTO 7 12 12 1 13 ROUND 9 SQRT 12 IF ABS 13 11 GE ABS 8 GOTO 8 16 1 N7 13 11 8 N8 11 13 IF ABS 11 LT ABS 4 5 GOTO 9 11 4 5 14 1 N9 10 ROUND 17 11 7 IF 10 XOR 1 GE 0 GOTO 6 10 10 N6 10 10 55 G00 X 1 10 N12 END1 N3 IF ABS 6 LT 1 GOTO 5 14 0 13 0 DO2 IF 14 GT 0 GOTO 5 13 13 6 IF ABS 13 LT ABS 5 G...

Страница 551: ... EQ 0 OR 2 EQ 0 GOTO 1 Y 2 7 G1 X 1 Y 7 Y 2 G0 X 1 N1 M99 G78 O100000780 Thread cutting cycle G 1 IF 1 EQ 0 OR 2 EQ 0 GOTO 1 N90 40 90 41 5001 42 5002 Y 2 7 G33 X 1 Y 7 F 9 E 10 Q 20 M96 101 P1000 D3 G0 Y 2 M97 101 X 1 N1 M99 G79 O100000790 End face cutoff cycle G 1 IF 1 EQ 0 OR 2 EQ 0 GOTO 1 X 1 7 G1 X 7 Y 2 X 1 G0 Y 2 N1 M99 ...

Страница 552: ...8 28 11 26 28 29 Z 26 IF ABS 28 GE ABS 3 GOTO 1 G1 Z 29 G0 Z 28 29 11 14 END1 N1 G1 Z 3 26 G4 P 4 3003 8 G0 Z 3 2 IF 24 EQ 0 GOTO 2 M 24 1 G4 P 56 N2 M99 G83 G87 O100000831 Deep hole drilling cycle A G 1 IF 30 GOTO 2 M 24 29 0 28 11 Z 2 2 5 3003 8 OR 1 DO1 29 29 11 IF ABS 29 GE ABS 3 GOTO 1 G1 Z 28 G0 Z 14 28 11 14 END1 N1 G1 Z 3 29 28 G4 P 4 3003 8 G0 Z 3 2 IF 24 EQ 0 GOTO 2 M 24 1 G4 P 56 N2 M99...

Страница 553: ... 2 G 1 IF 30 GOTO 3 3003 8 OR 1 29 12 28 0 26 0 G0 Z 2 IF 12 NE 0 GOTO 1 IF 11 EQ 0 GOTO 2 N1 28 28 12 26 28 29 IF ABS 28 GE ABS 3 GOTO 2 G1 Z 12 G4 P 4 G0 Z 28 2 G4 P 13 29 11 15 DO1 28 28 11 26 28 29 G0 Z 26 2 IF ABS 28 GE ABS 3 GOTO 2 G1 Z 29 G4 P 4 G0 Z 28 2 G4 P 13 END1 N2 G1 Z 3 26 G4 P 4 3003 8 G0 Z 3 2 N3 M99 ...

Страница 554: ...ycle G 1 IF 30 GOTO 2 M 24 Z 2 2 5 3003 8 OR 1 3004 9 OR 3 G1 Z 3 G4 P 4 M 53 3900 1 G1 Z 3 3004 9 M 54 3003 8 IF 24 EQ 0 GOTO 1 M 24 1 G4 P 56 N1 G0 Z 2 N2 M99 G85 G89 O100000850 Boring cycle G 1 IF 30 GOTO 2 M 24 Z 2 2 5 3003 8 OR 1 G1 Z 3 G4 P 4 3003 8 Z 3 F 23 F 22 IF 24 EQ 0 GOTO 1 M 24 1 G4 P 56 N1 G0 Z 2 N2 M99 ...

Страница 555: ...F 4 EQ 0 GOTO 2 G4 P 4 N2 3003 8 G0 Z 3 2 I 23 N1 M99 G82 O100000820 Drill counter boring G 1 IF 30 GOTO 1 Z 2 G 6 H 7 2 5 3003 8 OR 1 G1 Z 3 G4 P 4 3003 8 G0 Z 3 2 I 23 N1 M99 G83 O100000830 Deep hole drill cycle G 1 IF 30 GOTO 2 29 11 28 0 Z 2 G 6 H 7 2 5 3003 8 OR 1 DO1 28 28 11 26 28 29 Z 26 IF ABS 28 GE ABS 3 GOTO 1 G1 Z 29 G0 Z 28 29 11 14 END1 N1 G1 Z 3 26 IF 4 EQ 0 GOTO 3 G4 P 4 N3 3003 8 ...

Страница 556: ... N5 29 0 28 11 DO1 29 29 11 IF ABS 29 GE ABS 3 GOTO 6 G1 Z 28 M 53 G1 Z 14 M 54 28 11 14 END1 N6 G1 Z 3 29 28 N7 G4 P 4 M 53 3900 1 G1 Z 3 3004 9 G4 P 56 M 54 3003 8 G0 Z 2 I 23 N9 M99 G85 O100000850 Boring 1 G 1 IF 30 GOTO 1 Z 2 G 6 H 7 2 5 3003 8 OR 1 G1 Z 3 IF 4 EQ 0 GOTO 2 G4 P 4 N2 3003 8 Z 3 G0 Z 2 I 23 N1 M99 G86 O100000860 Boring 2 G 1 IF 30 GOTO 1 Z 2 G 6 H 7 2 5 3003 8 OR 1 G1 Z 3 G4 P 4...

Страница 557: ...oring G 1 IF 30 GOTO 1 3003 8 OR 1 M19 X 12 Y 13 3003 8 Z 2 G 6 H 7 3003 8 OR 1 G1 X 12 Y 13 3003 8 M3 3003 8 OR 1 Z 3 M19 G0 X 12 Y 13 Z 2 3 3003 8 X 12 Y 13 M3 N1 M99 G88 O100000880 Boring 3 G 1 IF 30 GOTO 1 Z 2 G 6 H 7 2 5 3003 8 OR 1 G1 Z 3 G4 P 4 3003 8 M5 3003 8 OR 1 G0 Z 3 2 3003 8 M3 N1 M99 ...

Страница 558: ...0 Boring 4 G 1 IF 30 GOTO 1 Z 2 G 6 H 7 2 5 3003 8 OR 1 G1 Z 3 G4 P 4 3003 8 Z 3 G0 Z 2 I 23 N1 M99 G73 O100000831 Step cycle G 1 IF 30 GOTO 2 29 0 28 11 Z 2 G 6 H 7 2 5 3003 8 OR 1 DO1 29 29 11 IF ABS 29 GE ABS 3 GOTO 1 G1 Z 28 G4 P 4 G0 Z 14 28 11 14 END1 N1 G1 Z 3 29 28 G4 P 4 3003 8 G0 Z 3 2 I 23 N2 M99 ...

Страница 559: ...29 0 28 11 DO1 29 29 11 IF ABS 29 GE ABS 3 GOTO 6 G1 Z 28 M 53 G1 Z 14 M 54 28 11 14 END1 N6 G1 Z 3 29 28 N7 G4 P 4 M 53 3900 1 G1Z 3 3004 9 G4 P 56 M 54 3003 8 G0 Z 2 I 23 N9 M99 G75 O100000851 Circle cutting cycle G 1 IF 30 GOTO 1 28 18 IF 28 GE 0 GOTO 2 27 3 28 28 GOTO 3 N2 27 2 N3 26 4 IF 26 GE 28 GOTO 1 Z 2 G 6 H 7 2 5 3003 8 OR 1 G1 Z 3 28 28 26 29 28 2 G 27 X 28 I 29 I 28 P1 X 28 I 29 3003 ...

Страница 560: ... Instruction Manual Appendix 4 4 Standard Fixed Cycle Subprogram For M system IV 27 G76 O100000861 Fine boring G 1 IF 30 GOTO 1 Z 2 G 6 H 7 2 5 3003 8 OR 1 G1 Z 3 M19 X 12 Y 13 G0 Z 3 2 3003 8 X 12 Y 13 M3 N1 M99 ...

Страница 561: ...Appendix 4 Registering Editing the Fixed Cycle Program MITSUBISHI CNC IV 28 ...

Страница 562: ...IV 29 Appendix 5 RS 232C I O Device Parameter Setting Examples ...

Страница 563: ...on software BAUD RATE 2 2 2 2 2 STOP BIT 3 3 3 3 3 PARITY EFFECTIVE 0 0 0 0 0 EVEN PARITY 0 0 0 0 0 CHR LENGTH 3 3 3 3 3 HAND SHAKE 3 2 3 3 3 DC CODE PARITY 1 0 1 1 1 DC2 DC4 OUTPUT 0 0 1 0 1 CR OUTPUT 0 0 1 0 0 0 FEED CHR 0 0 0 0 0 PARITY V 0 0 0 0 1 0 1 TIME OUT SET 100 100 100 100 100 1 1 2 2 3 3 4 4 5 5 6 6 20 20 7 7 1 1 2 2 3 3 14 14 5 5 6 6 20 20 7 7 1 1 2 2 3 3 4 4 5 8 6 20 8 7 7 1 1 2 2 3 ...

Страница 564: ...IV 31 Appendix 6 Explanation of Alarms ...

Страница 565: ...the interlock state Remedy As the interlock function has activated release it before resuming operation Correct the sequence on the machine side Check for any broken wires in the interlock signal line M01 Internal interlock axis exists 0005 Details The internal interlock state has been entered The absolute position detector axis has been removed A command for the manual automatic simultaneous vali...

Страница 566: ...position return has been completed Remedy Execute 1st reference position return M01 Illegal op in mid pt sg block 0013 Details The operation mode was changed to MDI during single block stop at the middle point of G28 G29 G30 Remedy Change the operation mode Reset to clear the alarm M01 Sensor signal illegal ON 0019 Details The sensor signal was already ON when the tool length measurement 1 signal ...

Страница 567: ...edy Complete the zero point initialization and then perform reference position return M01 High accuracy skip disabled 0028 Details The drive unit s hardware or software does not conform to the high accuracy skip Remedy The software or hardware does not conform to the function Contact service center M01 Hi ac skip coord retrieval err 0029 Details Failed to retrieve the skip coordinate value from th...

Страница 568: ...lue was found with the synchronization deviation detection Remedy Select the correction mode and move one of the axes in the direction in which the errors are reduced Increase 2024 synerr allowable value or set 0 to disable error check When using simple C axis synchronous control set 0 for synchronous control operation method M01 No spindle select signal 0053 Details Synchronous tapping command wa...

Страница 569: ...eedrate maximum speed outside the soft limit range and etc or external deceleration speed when external deceleration is valid Remedy Change the settings of the handle feed clamp speed or the handle ratio M01 R pos offset value illegal 0065 Details At the start of reference position initial setting 2034 rfpofs Distance coded reference position detection offset is not set to 0 Remedy Set 2034 rfpofs...

Страница 570: ...other than 0 check for any short circuit in the signal line Correct the sequence program M01 F 1 digit feed rate zero 0104 Details The F1 digit feedrate has been set to 0 when the F1 digit feed command was executed Remedy Set the F1 digit feedrate from 1185 spd_F1 F1 digit feedrate F1 to 1189 spd_F5 F1 digit feedrate F5 M01 Spindle stop 0105 Details The spindle stopped during the synchronous feed ...

Страница 571: ...the restart search is completed Remedy Search the block to restart Turn the restart switch OFF M01 Program check mode 0112 Details The automatic start button was pressed during program check or in program check mode Remedy Press the reset button to cancel the program check mode M01 Auto start in buffer correct 0113 Details The automatic start button was pressed during buffer correction Remedy Pres...

Страница 572: ...medy Select the handle or manual arbitrary feed mode Turn OFF the correction mode switch M01 No synchronous control option 0121 Details The synchronous control operation method was set with R2589 while no synchronous control option was provided Remedy Set 0 for synchronous control operation method M01 Computer link B not possible 0123 Details Cycle start was attempted before resetting was complete...

Страница 573: ... the same as the rotary axis name Remedy Correct the rotary axis configuration parameters M01 Restart pos return incomplete 0128 Details Automatic return was performed with an axis whose return to the restart position was not complete Remedy Perform restart position return manually Enable 1302 AutoRP Automatic return by program restart before executing the automatic start M01 PLC interruption impo...

Страница 574: ...cted as the handle axis Remedy Select an axis other than the chopping axis as the handle axis or start chopping after changing the mode to the other mode M01 Dir cmnd mode invalid 0157 Details The drive unit s software or hardware does not conform to the direct command mode Inclined axis control is active Control axis synchronization across part system is active Control axis superimposition was ac...

Страница 575: ...ish the zero point first M01 Machine interference 1 0201 Details It was judged that an interference occurred in the No 1 step interference check and caused a deceleration stop When machine interference is detected the interfered part is highlighted yellow red and the part s name is displayed on the 3D monitor s model display Remedy Move the axis in a direction which does not cause interference Pre...

Страница 576: ...d surface machining command G68 2 tool axis direction control G53 1 and the inclined surface machining cancel command G69 can be issued Wait until the axes stop completely until the smoothing for all axes reaches zero Perform operation search for machining programs M01 Axs travel n a in manual index 0251 Details Moving a rotary axis was attempted during manual machining surface indexing when a man...

Страница 577: ...ash adjustment Remedy Continue the operation after canceling the measurement condition adjustment and backlash adjustment M01 APLC password mismatch 0280 Details The APLC authentication password is inconsistent Remedy Contact the machine tool builder M01 High cycle sampling disabled 0290 Details The drive unit s hardware or software does not conform to the high cycle sampling mode High cycle data ...

Страница 578: ...ference position return was attempted on the superimposed axis Skip command was issued to the master or superimposed axis Dog type reference position return was attempted on the master axis A travel command has been issued to an inclined axis whose base axis is in control axis superimposition Remedy Correct the program M01 Superimposition command illegal 1004 Details Superimposition start command ...

Страница 579: ...e or guide bushing spindle Remedy Check the parameters Change the reference spindle or guide bushing spindle to a spindle that is drive unit after MDS D series M01 GB SP sync Phase mem sgnl ilgl 1021 Details The guide bushing spindle synchronization phase memory signal was turned ON while the master spindle or guide bushing spindle was rotating The guide bushing spindle synchronization phase memor...

Страница 580: ...e same synchronization codes are commanded M01 Multiple C axes select invalid 1031 Details The C axis selection signal has been changed when the multiple C axes selection is not available The selected axis by the C axis selection signal cannot be controlled for the multiple C axes selection Remedy Correct the parameter settings and program M01 Tap retract Sp select illegal 1032 Details Tap retract...

Страница 581: ...n axis of a part system not in automatic operation Remedy Correct the program M01 Synchro ctrl setting disable 1036 Details Synchronous control operation method was set with R2589 when the mode was not the C axis mode Synchronous control operation method was set with R2589 in the zero point not set state Mirror image is disabled External mirror image or parameter mirror image was commanded during ...

Страница 582: ...ach other and then restart Interference check across part systems M01 Intrf check across sys Alarm 1052 Details A command has been given that causes the interfering objects to collide each other Remedy Correct the program M01 Interfe chk 0pt return incomp 1053 Details Interference check between part systems had started while zero point return of the part system set interfering object has not compl...

Страница 583: ...ization II hobbing Remedy Check the program M80 POSITION ERROR Details An axis position is illegal An alarm is displayed AL4 is output and a block stop is applied on the machining program When the block stop is not allowed in the thread cutting cycle and the like the stop is applied at the next position where allowed Remedy Carry out reset Then confirm that the system starts the operation If the a...

Страница 584: ...gnal to move the tool off the sensor Ensure at least 0 1mm for the movement to the sensor M91 INVALID MEASUR 9000 Details Speed at contact is below minimum The tool has contacted the sensor at the lower speed than set in 1508 TLM_Fmin Minimum speed toward tool setter Remedy Correct the feed rate to move the tool to the sensor M91 INVALID MEASUR 9001 Details Speed at contact is over maximum The too...

Страница 585: ...anual tool length measurement are temporally canceled When a tool has contacted a sensor and M01 Operation error 0019 has occurred tool escape is enabled by temporarily turning ON the interlock cancel request This alarm notifies that the interlock is disabled in the meantime Remedy After carrying out the tool escape from the sensor turn OFF the interlock temporary cancel signal for manual tool len...

Страница 586: ...e machine operation panel is ON valid Remedy Correct the feed hold switch setting The feed hold switch is B contact switch Fix any broken wires in the feed hold signal line Correct the sequence program T01 H W stroke end axis exists 0105 Details Automatic start is not possible as one of the axes is at the stroke end Remedy Manually move any axis whose end is at the stroke end Check for any broken ...

Страница 587: ...tic start after the restart search is completed T01 CNC overheat 0113 Details Automatic start is not possible because a thermal alarm Z53 CNC overheat has occurred Remedy Temperature of the control unit has exceeded the specified temperature Take appropriate measures to cool the unit T01 Cycle st prohibit Host comm 0115 Details Automatic start cannot is not possible because the NC is communicating...

Страница 588: ...m disable 0141 Details In multi part system a start signal was input for MDI mode while the MDI operation was being carried out in another part system Remedy End the other part system s operation before starting T01 Cycle start prohibit 0142 Details In manual coordinate system setting Automatic start is not allowed during the manual coordinate system setting Remedy The system restarts after either...

Страница 589: ...hine tool builder T01 Cycle start prohibit 0191 Details Automatic start was attempted while a file was being deleted written Remedy Wait for the file to be deleted written and then execute the automatic start T01 Cycle st prohibit Term exp d 0193 Details Automatic start is not possible because the valid term has been expired Remedy Obtain a decryption code from the machine tool builder and input i...

Страница 590: ...rm occurred 0215 Details An absolute position detection alarm occurred Remedy Clear the absolute position detection alarm T02 Aux axis changeover error 0220 Details A travel command was issued to an auxiliary axis Remedy Turn ON the NC axis control selection signal and press the CYCLE START switch to restart the automatic operation with T03 Single block stop signal ON 0301 Details The SINGLE BLOCK...

Страница 591: ...utting start is ON Remedy Correct the sequence program T03 Inclined Z offset change 0310 Details The inclined axis control No Z axis compensation signal has turned ON or OFF during the program operation Remedy Press the CYCLE START switch to resume the automatic operation T03 Aux axis changeover error 0330 Details The NC axis control selection signal was turned OFF while a NC axis was traveling Re...

Страница 592: ...iting for spindle orientation completion Note 1 This shows the wait state for the unclamp signal s ON OFF for the index table indexing Note 2 This shows the door open state caused by the door interlock function T11 Fin wait 0010 Factors for waiting completion Details The following Nos are shown during the operation of the corresponding completion wait factor The numbers will disappear when the ope...

Страница 593: ...rror 0012 Memory error 1 Details A hardware error was detected during the power ON self check Servo stop method Initial error Spindle stop method Initial error 0013 Software processing error 1 Details An error was detected for the software execution state Servo stop method Dynamic stop Spindle stop method Coast to a stop 0014 Software processing error 2 Details The current processing processor doe...

Страница 594: ...mmunication with the machine side detector Servo stop method Initial error Spindle stop method Initial error 001B Machine side dtc Error 1 Details An error was detected by the detector connected to the machine side The error details are different according to the detector type Servo stop method Dynamic stop Spindle stop method Coast to a stop Detector alarm Servo drive unit OSA105 OSA105ET2A OSA16...

Страница 595: ...rror AT343 AT543 AT545 ST748 Mitsutoyo Photoelectric type static capacity type data mismatch LC193M LC493M LC195M LC495M LC291M RCN223M RCN227M RCN727M RCN827M EIB Series HEIDENHAIN Relative absolute position data mismatch MPRZ Scale Mitsubishi Heavy Industries Detection position deviance SR75 SR85 SR77 SR87 RU77 Magnescale Encoder mismatch error SAM SVAM GAM LAM HAM Series FAGOR Absolute position...

Страница 596: ...op method Coast to a stop 0025 Absolute position data lost Details The absolute position data was lost in the detector Servo stop method Initial error 0026 Unused axis error Details In the multi axis drive unit there is an axis set to free and the other axis detected a power module error Servo stop method Dynamic stop Spindle stop method Coast to a stop 0027 Machine side dtc Error 5 Details An err...

Страница 597: ...95M LC495M LC291M RCN223M RCN227M RCN727M RCN827M EIB Series HEIDENHAIN Absolute position data error MPRZ Scale Mitsubishi Heavy Industries Gain fault SR75 SR85 SR77 SR87 RU77 Magnescale Absolute position data error Detector alarm Spindle drive unit MPCI scale Mitsubishi Heavy Industries Gain fault Note A driver processes all reset types of alarms as PR However AR will be applied according to the ...

Страница 598: ...ISHI Initialization error OSA18 MITSUBISHI CPU error MBE405W MITSUBISHI CPU error EIB Series HEIDENHAIN Initialization error MPCI scale Mitsubishi Heavy Industries Installation accuracy fault Note A driver processes all reset types of alarms as PR However AR will be applied according to the detector 002C Motor side dtc Error 2 Details An error was detected by the detector connected to the motor si...

Страница 599: ...e A driver processes all reset types of alarms as PR However AR will be applied according to the detector 002E Motor side dtc Error 4 Details An error was detected by the detector connected to the motor side The error details are different according to the detector type Servo stop method Dynamic stop Spindle stop method Coast to a stop Detector alarm Servo drive unit AT343 AT543 AT545 ST748 Mitsut...

Страница 600: ...ion stop enabled 0037 Initial parameter error Details An incorrect set value was detected among the parameters send from the NC at the power ON In the SLS Safely Limited Speed function an error was detected in the relation between the safety speed and safety rotation number in the speed observation mode Servo stop method Initial error Spindle stop method Initial error 0038 NC DRV commu Protocol er...

Страница 601: ... Servo stop method Dynamic stop Spindle stop method Coast to a stop 0042 Feedback error 1 Details Either a missed feedback pulse in the position detection or an error in the Z phase was detected Or the distance coded reference check error exceeded the allowable value when the distance coded reference scale was used Servo stop method Dynamic stop Spindle stop method Coast to a stop 0043 Feedback er...

Страница 602: ...hod Coast to a stop Detector alarm Servo drive unit AT343 AT543 AT545 ST748 Mitsutoyo Photoelectric type overspeed LC193M LC493M LC195M LC495M LC291M RCN223M RCN227M RCN727M RCN827M EIB Series HEIDENHAIN Overspeed SR75 SR85 SR77 SR87 RU77 Magnescale Over speed RL40N RA Series Renishaw Overspeed error Detector alarm Spindle drive unit TS5690 TS5691 MITSUBISHI Overspeed EIB Series HEIDENHAIN Overspe...

Страница 603: ...op Spindle stop method Coast to a stop 004D Dual signal error Details An error was detected in the signal related to the dual signal Servo stop method Dynamic stop Spindle stop method Coast to a stop 004E NC command mode error Details An error was detected in the control mode send from the NC Servo stop method Deceleration stop enabled Spindle stop method Deceleration stop enabled 004F Instantaneo...

Страница 604: ...s detected Servo stop method Maximum capacity deceleration stop 005B Safely limited Cmd spd err Details A commanded speed exceeding the safely limited speed was detected in the safely limited mode Servo stop method Deceleration stop enabled Spindle stop method Deceleration stop enabled 005D Safely limited Door stat err Details The door state signal input in the NC does not coincide with the door s...

Страница 605: ...p method Coast to a stop 0088 Watchdog Details The drive unit does not operate correctly Servo stop method Dynamic stop Spindle stop method Coast to a stop 008A Drivers commu data error 1 Details The communication data 1 between drivers exceeded the tolerable value in the communication between drive units Servo stop method Dynamic stop Spindle stop method Coast to a stop 008B Drivers commu data er...

Страница 606: ...ct with FG Frame Ground 006A Pw sply Ext contactor weld Details A contact of the external contactor is welding 006B Pw sply Rush circuit error Details An error was detected in the rush circuit 006C Pw sply Main circuit error Details An error was detected in charging operation of the main circuit capacitor 006D Pw sply Parameter error Details An error was detected in the parameter sent from the dri...

Страница 607: ...ower backup unit power supply option unit Check the LED display on the power backup unit to identify what alarm is occurring to the unit Refer to the instruction manual of your drive unit for details 0075 Pw sply Overvoltage Details L and L bus voltage in main circuit exceeded the allowable value As the voltage between L and L is high immediately after this alarm another alarm may occur if this al...

Страница 608: ...em Even when the parameter is set to a value within the setting range an error is occurring due to the hardware compatibility or specifications or in relation to several other parameters Refer to Parameter Numbers during Initial Parameter Error of each drive unit instruction manual for details Appendix 6 3 3 Safety Function Errors S05 S05 Safety function error 0001 Axis name Details The STO signal...

Страница 609: ...ation to several other parameters Refer to Parameter Numbers during Initial Parameter Error of each drive unit instruction manual for details S51 Parameter error 13001 13256 Axis name Details Spindle parameter setting data is illegal The alarm No is the No of the spindle parameter where the warning occurred Remedy Check the descriptions for the appropriate spindle parameters and correct them Even ...

Страница 610: ... the built in motor s incremental control system The magnetic pole is controlled by the initial detection value Reset method Automatically reset once the cause of the warning is removed 009E Abs pos dtc Rev count error Details An error was detected in the revolution counter data of the absolute position detector The accuracy of absolute position is not guaranteed Reset method Automatically reset o...

Страница 611: ...ning is removed 00E4 Set parameter warning Details An incorrect set value was detected among the parameters send from the NC in the normal operation Reset method Automatically reset once the cause of the warning is removed 00E6 Control axis detach warning Details A control axis is being detached State display Reset method Automatically reset once the cause of the warning is removed 00E7 In NC emer...

Страница 612: ...y Fan stop warning Details A cooling fan built in the power supply unit stopped Reset method Automatically reset once the cause of the warning is removed 00EF Pw sply Option unit warning Details A warning is detected in the power backup unit power supply option unit Check the LED display on the power backup unit to identify what alarm is occurring to the unit Refer to the using drive unit instruct...

Страница 613: ...ication error has occurred between controller and drive unit Remedy Take measures against noise Check for any failure of the communication cable connectors between controller and drive unit or between two drive units Check for any failure of the communication cables between controller and drive unit or between two drive units A drive unit may be faulty Take a note of the 7 segment LED contents of ...

Страница 614: ...rvice Center Update the drive unit software version Note When two or more Y02 System alarms occur at the same time only the alarm which has occurred first is displayed Y02 SV commu er Commu error 0051 x005 Details A communication error has occurred between controller and drive unit x Channel No from 0 Remedy Take measures against noise Check for any failure of the communication cable connectors be...

Страница 615: ...k for any failure of the communication cables between controller and drive unit or between two drive units A drive unit may be faulty Take a note of the 7 segment LED contents of each drive unit and contact the Service Center Update the drive unit software version Note When two or more Y02 System alarms occur at the same time only the alarm which has occurred first is displayed Y02 SV commu er Com...

Страница 616: ...nnected to the spindle drive unit or not 3025 enc on 2 Y05 Initial parameter error Details There is a problem in the value set for the number of axes or the number of part systems Remedy Correct the value set for the following corresponding parameters 1001 SYS_ON System validation setup 1002 axisno Number of axes 1039 spinno Number of spindles etc Y06 mcp_no setting error 0001 Details There is a s...

Страница 617: ...xes The exceeded number of axes per channel is displayed as alarm No x Exceeded number of axes at drive unit interface channel 2 0 to F y Exceeded number of axes at drive unit interface channel 1 0 to F This alarm also occurs when the drive unit is connected only with the 2nd channel without connecting with the 1st channel Remedy Remove connected axes from the channel whose alarm No is other than ...

Страница 618: ...ted axis No differs depending on whether or not an expansion unit is available or the setting of 11012 16 axes for 1ch Connecting 16 axes for 1ch The biggest connectable axis No is as shown below With the expansion unit axes No 0 to 7 can be connected Without the expansion unit axes No 0 to 7 are allowed when 11012 16 axes for 1ch Connecting 16 axes for 1ch is set to 0 axes No 0 to F when set to 1...

Страница 619: ...uence program Restart the NC Y20 Sfty obsrvation FB pos err 0003 Axis name Details The commanded position transmitted to the servo drive unit from NC is totally different from the feedback position received from the servo drive unit during the speed monitoring mode The name of the axis with an error is displayed Remedy The NC or the servo drive unit may be damaged Contact the service center Y20 Sf...

Страница 620: ... contactor Some contactors take a while to be shutdown after the servo ready is turned OFF and the servo ready was turned ON in the meantime Remedy Make sure that contactor s auxiliary B contact signal is output correctly to the device set on 1330 MC_dp1 Contactor weld detection device 1 and 1331 MC_dp2 Contactor weld detection device 2 If welding replace the contactor Restart the NC Y20 No spec S...

Страница 621: ...ntactor s welding Y20 STO function operation illegal 0013 Details The drive unit s STO function has failed to work properly Remedy If this alarm has occurred alone a drive unit failure can be suspected If other alarms have been generated at the same time it is also possible that there is communication problem Check the optical cable wiring Y20 STO function illegal at pwr ON 0014 Details The motor ...

Страница 622: ...4 G0tL G0 time constant linear Y51 Parameter G1tL illegal 0002 Details The time constant has not been set or exceeded the setting range Remedy Correct 2007 G1tL G1 time constant linear Y51 Parameter G0t1 illegal 0003 Details The time constant has not been set or exceeded the setting range Remedy Correct 2005 G0t1 G0 time constant primary delay Second step time constant for soft acceleration decele...

Страница 623: ...terpolation Y51 OMR II parameter error 0018 Details An illegal setting was found in the OMR II related parameters OMR II has been disabled Remedy Correct the related parameter settings Y51 PLC indexing stroke length err 0019 Details 12804 aux_tleng Linear axis stroke length has not been set or exceeded the setting range while the linear axis equal indexing is enabled for the PLC indexing axis Reme...

Страница 624: ...llegal 0034 Details The time constant is out of the specified range Remedy Correct 2599 G0t1_2 G0 time constant 2 primary delay Second step time constant for soft acceleration deceleration Y51 Values of PC1 PC2 too large 0101 Details The PC1 and PC2 settings for the rotary axis are too large Remedy Correct 2201 SV001 PC1 Motor side gear ratio and 2202 SV002 PC2 Machine side gear ratio Y90 No spind...

Страница 625: ...n wait queue error listen 0003 Details Connection wait queue error listen Remedy Set the parameter then turn the power OFF and ON again Z31 Connection request error accept 0004 Details Connection request error accept Z31 Data recv error socket error 0005 Details Data receive error socket error Z31 Data recv error data error 0006 Details Data receive error data error Z31 Data send error socket erro...

Страница 626: ...ocket connection error 0001 Details Connection has failed Five or more clients attempted a connection Remedy Check the connection of the network cables and check for broken wires and a failure of the network connection devices such as hub When using the Direct Socket communication I F connect up to four clients Z35 Direct Socket receive error 0002 Details Receiving data from a client has failed Re...

Страница 627: ...ion of the battery cable After fixing the battery s fault check the machining program Z53 CNC overheat Details The controller or operation board temperature has risen above the designated value Note Temperature warning When an overheat alarm is detected the alarm is displayed and the overheat signal is output simultaneously Automatic operation will be continued while restarting after resetting or ...

Страница 628: ...ote I O 1st part system communication interrupted station remote I O 3rd part system communication interrupted station and board connection remote I O communication interrupted station Remedy Check and replace the cables Replace the remote I O unit Check the power supply existence of supply and voltage Z57 System warning Details Program memory capacity has been set over the value that can be forma...

Страница 629: ... received Check the configuration setting 3D Slave data send range overlap 3E Slave data receive range overlap 3F Not set data hand shake Damage in HN571 Replace HN571 40 RAM range exceeded 41 Slave parameter data set illegal CA No segment D4 Data base read illegal Download the configuration data again D5 Operating system illegal Damage in HN571 Replace HN571 DC Watch dog error DD Hand shake mode ...

Страница 630: ...ve value was set for transfer size in the FROM TO instruction Remedy Correct the transfer size Z69 External link error 5 Details The number of FROM TO instructions within one scan has exceeded 50 Remedy Correct the user PLC ladder sequence so that the number of FROM TO instructions per scan is 50 or less Z69 External link error 6 Details The access to the buffer memory by the FROM TO instruction h...

Страница 631: ...SET to cancel the alarm Movement can be resumed after the cancellation However the 3D machine interference check will become invalid Inform the machine tool builder if an alarm occurs Z82 3D machine interference Machine model illegal 0002 Details Machine model is illegal Remedy Press RESET to cancel the alarm Movement can be resumed after the cancellation However the 3D machine interference check ...

Страница 632: ...Appendix 6 5 System Alarms Z IV 99 Z83 NC started during SP rotation 0001 Details The NC was started while the spindle was rotating Remedy Turn the power OFF and confirm that the spindle is not rotating then turn the power ON again ...

Страница 633: ...t 1016 iout 1017 rot 1018 ccw 1040 M_inch 2049 type Remedy Correct the parameter settings Then turn the power ON again and perform zero point initialization Zero point initialization Required Z70 Abs posn initial set illegal 0004 Axis name Details The zero point initialization point is not at the grid position Remedy Perform the zero point initialization again Zero point initialization Required Z7...

Страница 634: ... 0001 Axis name Details Backup voltage in the absolute position detector dropped Remedy Replace the battery check the cable connections and check the detector Turn the power ON again and perform zero point initialization Zero point initialization Required Alarm reset when power is turned OFF Z70 0101 is displayed after the power is turned ON again Servo alarm No 25 Z71 AbsEncoder Commu error 0003 ...

Страница 635: ...Z71 AbsEncoder Initial commu er 0007 Axis name Details Initial communication with the absolute position detector is not possible Remedy Check and replace the cables card or detector Turn the power ON again and perform zero point initialization Zero point initialization Required only when the detector has been replaced Alarm reset when power is turned OFF Reset Servo alarm No 18 Z72 Message Positio...

Страница 636: ...ion Z80 No spec Distance coded scale 0003 Details The distance coded reference scale has been set available although this function is out of the specifications Remedy Check the specifications If you do not use this function correct the detector type with the servo parameter Z81 R pos adjustment data lost 0001 Details Reference position adjustment value data saved in the NC has been damaged Remedy ...

Страница 637: ...tion Turn it OFF if ON EMG Emergency stop SPIN Details Spindle drive unit is not mounted Remedy Cancel the causes of the other emergency stop Check the emergency stop signal input in the spindle drive unit EMG Emergency stop PC_H Details Failure in the high speed PC processing abnormal Remedy Correct the sequence program To stop monitoring the high speed PC processing temporarily set 1 in 1219 aux...

Страница 638: ... incorrect or the 1909 Tout ini set time is too short in basic specification parameters Remedy Check the CC Link card wiring and the external sequencer transmission Check the link communication errors shown on the diagnostic screen Correct the settings of the serial link parameters in basic specification parameters EMG Emergency stop WAIT Details The preparation sequence is not sent from the maste...

Страница 639: ...contact signal is correctly output to the device that is set in 1330 MC_dp1 and 1331 MC_dp2 Contactor weld detection device 1 and 2 and then turn the power ON again EMG Emergency stop IPWD Details The data backup for power failure might not have been executed successfully at the previous power failure Remedy If this message appears frequently the power supply may be deteriorated Contact the servic...

Страница 640: ... signal in HOST or DR signal in CNC is not turned ON Remedy Check for any disconnected cable Check for any broke wire Make sure that the HOST power is turned ON L01 Parity H error 15 Details Communication ended with parity H Remedy Check the software in HOST and make sure that the data to be transmitted to CNC is ISO code L01 Parity V error 16 Details Communication ended with parity V Remedy Corre...

Страница 641: ...is compatible with the designated mode Note 1 The number of PLC program steps displayed on the screen may not match the actual number of error occurrence steps because of the PLC program timing Use this as a guideline of the occurrence place Note 2 Emergency stop EMG will be applied Remedy Turn the power ON again or download the PLC program with the same format as at the power ON U10 Illegal PLC 0...

Страница 642: ...place Remedy Refer to the methods for using the BCD and BIN function commands Details Software exception An abnormal stop occurred in PLC program process due to a bus error etc bit6 CALL CALLS RET command error bit7 IRET command execution error Note 1 The number of PLC program steps displayed on the screen may not match the actual number of error occurrence steps because of the PLC program timing ...

Страница 643: ...ails The PLC program is not written into ROM Note The number of PLC program steps displayed on the screen may not match the actual number of error occurrence steps because of the PLC program timing Use this as a guideline of the occurrence place Remedy Write the PLC program into ROM ...

Страница 644: ...he service center N005 Invalid net communication Details The modem connection port is being used for another function such as input output The modem connection port settings are incorrect Remedy Stop using the modem connection port with the other function and then turn the power ON again Correct the settings of the modem connection port N006 Received result of diagnosis Details A diagnosis data fi...

Страница 645: ... customer number Remedy Input the customer number again N011 Storage capacity over Details The file reception failed in machining data sharing because the size of the file to be received is bigger than free space in the NC Remedy Ensure sufficient free space in the NC N012 File deletion error Details A file on Anshin net server cannot be deleted in machining data sharing Remedy Confirm that the fi...

Страница 646: ... 1 G42 1 has been issued during the modal in which the normal line control is not acceptable The command has been issued during the modal in which the two part system simultaneous thread cutting is not acceptable Remedy Correct the program P30 Parity H error Details The number of holes per character on the paper tape is even for EIA code and odd for ISO code Remedy Check the paper tape Check the t...

Страница 647: ...emory mode Remedy Enter the M02 and M30 command at the end of the program Enter the M99 command at the end of the subprogram P37 O N number zero Details 0 has been specified for program or sequence No Remedy Designate program Nos within a range from 1 to 99999999 Designate sequence Nos within a range from 1 to 99999 P38 No spec Add Op block skip Details n has been issued while the optional block s...

Страница 648: ...restart search position P50 No spec Inch Metric change Details Inch Metric changeover G20 G21 command was issued while the function is out of specifications Remedy Check the specifications P60 Compensation length over Details The commanded movement distance is excessive over 231 Remedy Correct the command range for the axis address P61 No spec Unidirectional posit Details Unidirectional positionin...

Страница 649: ... the base circle for involute interpolation Correct the start and end points if they are at an even distance from the center of the base circle for involute interpolation P72 No spec Herical cutting Details A helical command has been issued though it is out of specifications Remedy Check whether the specifications are provided for the helical cutting An Axis 3 command has been issued by the circul...

Страница 650: ...ed though it is out of specifications Remedy Check the specifications P93 Illegal pitch vaule Details An illegal thread lead thread pitch was specified at the thread cutting command Remedy Correct the thread lead for the thread cutting command P100 No spec Cylindric interpolat Details A cylindrical interpolation command was issued though it is out of specifications Remedy Check the specifications ...

Страница 651: ... circular command P120 No spec Feed per rotation Details Feed per rotation G95 was commanded though it is out of specifications Remedy Check the specifications P121 F0 command during arc modal Details F0 F 1 digit feed was commanded during the arc modal G02 G03 Remedy Correct the machining program P122 No spec Auto corner override Details An auto corner override command G62 was issued though it is...

Страница 652: ...code illegal Details The 2nd miscellaneous function address commanded in the program differs from the address set in the parameters Remedy Correct the 2nd miscellaneous function address in the program P131 No spec Cnst surface ctrl G96 Details A constant surface speed control command G96 was issued though it is out of specifications Remedy Check the specifications Issue a rotation speed command G9...

Страница 653: ...nsation command G40 G41 G42 G43 G44 or G46 has been issued in the arc modal G02 or G03 Remedy Issue the linear command G01 or rapid traverse command G00 in the compensation command block or cancel block Set the modal to linear interpolation P152 No intersection Details In interference block processing during execution of a tool radius compensation G41 or G42 or nose R compensation G41 G42 or G46 c...

Страница 654: ...nt tip point No Enable 8106 G46 NO REV ERR P158 Illegal tip point Details An illegal tip point No other than 1 to 8 was found during G46 nose R compensation Remedy Correct the tip point No P159 C CMP REMAINS Details One of the followings was commanded while the compensation has not been canceled the compensation amount remained 1 Automatic tool nose R compensation G143 2 Radius compensation G145 3...

Страница 655: ...he tool group management program was executed with the tool life management disabled Remedy Add the offset No command to the compensation command block Check the number of sets for the tool compensation Nos and correct the offset No command to be within the number of sets When setting the L system tool life management II 1096 T_Ltyp 2 enable the tool life management 1103 T_Life 1 to execute a tool...

Страница 656: ... block Remedy Register the tool life data once for one group commanding with a duplicate group No is not allowed Correct to the group No P180 No spec Drilling cycle Details A fixed cycle command G72 G89 was issued though it is out of specifications Remedy Check the specifications Correct the program P181 No spindle command Tap cycle Details Spindle rotation speed S has not been commanded in synchr...

Страница 657: ...sued during synchronous tapping modal Remedy Cancel the synchronous tapping before issuing the S command P190 No spec Turning cycle Details A lathe cutting cycle command was issued though it is out of specifications Remedy Check the specification Delete the lathe cutting cycle command P191 Taper length error Details In the lathe cutting cycle the specified length of taper section is illegal Remedy...

Страница 658: ...er of blocks in the shape program called by the compound type fixed cycle for turning machining I commands G70 to G73 The maximum number differs according to the model P203 D cmnd figure error MRC Details A proper shape will not obtained by executing the shape program for the compound type fixed cycle for turning machining I G70 to G73 Remedy Correct the shape program for the compound type fixed c...

Страница 659: ...e return from the subprogram or by GOTO in the subprogram call was not set Remedy Specify the sequence Nos in the call block of the subprogram P232 No program No Details The machining program has not been found when the machining program is called The file name of the program registered in IC card is not corresponding to O No Remedy Enter the machining program Check the subprogram storage destinat...

Страница 660: ...tation M98 I_J_P_H_L_ was commanded though it is out of specifications Remedy Check the specifications P251 Figure rotation overlapped Details Figure rotation command was issued during figure rotation Remedy Correct the program P252 Coord rotate in fig rotation Details A coordinate rotation related command G68 G69 was issued during figure rotation Remedy Correct the program P260 No spec Coordinate...

Страница 661: ...imit imposed by the specifications P275 Macro argument over Details The number of argument sets in the macro call argument type II has exceeded the limit Remedy Correct the program P276 Illegal G67 command Details A G67 command was issued though it was not during the G66 command modal Remedy Correct the program Issue G66 command before G67 command which is a call cancel command P277 Macro alarm me...

Страница 662: ...ith ENDIFs Put IF condition before THEN ELSE command P290 IF sentence error Details There is an error in the IF conditional GOTO statement Remedy Correct the program P291 WHILE sentence error Details There is an error in the WHILE conditional DO END statement Remedy Correct the program P292 SETVN sentence error Details There is an error in the SETVN statement when the variable name setting was mad...

Страница 663: ...ing tape or MDI mode Remedy Correct the program P300 Variable name illegal Details The variable names have not been commanded properly Remedy Correct the variable names in the program P301 Variable name duplicated Details A duplicate variable name was found Remedy Correct the program so that no duplicate name exists P310 Not use GMSTB macro code Details G M S T or B macro code was called during fi...

Страница 664: ...ugh it is out of specifications Remedy Check the specifications P382 No corner movement Details The block next to corner chamfering corner rounding is not a travel command Remedy Replace the block succeeding the corner chamfering corner rounding command by G01 command P383 Corner movement short Details The travel distance in the corner chamfering corner rounding command was shorter than the value ...

Страница 665: ...nd geometric block P394 No linear move command GEOMT Details The second geometric block contains no linear command Remedy Issue the G01 command P395 Illegal address GEOMT Details The geometric format is invalid Remedy Correct the program P396 Plane selected in GEOMT ctrl Details A plane switching command was issued during geometric command processing Remedy Complete the plane switching command bef...

Страница 666: ...s P420 No spec Para input by program Details Parameter input by program G10 was commanded though it is out of specifications Remedy Check the specifications P421 Parameter input error Details The specified parameter No or set data is illegal An illegal G command address was input in parameter input mode A parameter input command was issued during fixed cycle modal or nose R compensation G10L70 G11...

Страница 667: ...k Details An M command was issued simultaneously in the G29 command block Remedy Place the M code command which cannot be issued in a G29 command block in separate block from G29 command block P438 G52 invalid during G54 1 Details A local coordinate system command was issued during execution of the G54 1 command Remedy Correct the program P450 No spec Chuck barrier Details The chuck barrier on com...

Страница 668: ...ils Milling was commanded though it is out of specifications Polar coordinate interpolation was commanded though it is out of specifications Remedy Check the specifications P481 Illegal G code mill Details An illegal G code was used during the milling mode An illegal G code was used during cylindrical interpolation or polar coordinate interpolation The G07 1 command was issued during the tool radi...

Страница 669: ... interpolation was commanded during tool radius compensation The G16 plane in which the radius value of a cylinder is 0 was specified A cylindrical interpolation or polar coordinate interpolation command was issued during coordinate rotation by program Remedy Correct the program Issue G40 or G97 before issuing G12 1 Issue a T command before issuing G12 1 Issue G40 before issuing G13 1 Specify the ...

Страница 670: ...impossible to superimpose was designated as a master axis or superimposed axis Remedy Correct the program P521 Illegal synchronization axis Details The axis specified as a reference or synchronized axis of synchronization across part systems cannot be synchronized Remedy Correct the program P530 DEC POINT ERR Details A decimal point was added to the address where the decimal point command is not a...

Страница 671: ...erpolation option Remedy Check the specifications P551 G06 2 knot error Details The knot k command value is smaller than the value for the previous block Remedy Correct the program Specify the knot by monotone increment P552 Start point of 1st G06 2 err Details The block end point immediately before the G06 2 command and the G06 2 first block command value do not match Remedy Match the G06 2 first...

Страница 672: ...ly one axis P605 T TLM command in a block Details The T code is in the same block as the automatic tool length measurement block Remedy Specify the T code before the automatic tool length measurement block P606 T cmnd not found before TLM Details The T code was not yet specified in automatic tool length measurement Remedy Specify the T code before the automatic tool length measurement block P607 T...

Страница 673: ...Remedy Check the specifications P612 Exponential function error Details A travel command for exponential interpolation was issued during mirror image for facing tool posts Remedy Correct the program P700 Illegal command value Details Spindle synchronization was commanded to a spindle that is not connected serially Remedy Correct the program Correct the parameter settings P900 No spec Normal line c...

Страница 674: ... was issued during a modal for which 3 dimensional coordinate conversion cannot be performed Remedy Refer to MITSUBISHI CNC 700 70 Series Programming Manual Machining Center System for usable G commands P923 Illegal addr in 3D coord blk Details A G code and G68 was commanded in a block though the G code cannot be commanded with G68 Remedy Refer to MITSUBISHI CNC 700 70 Series Programming Manual Ma...

Страница 675: ...sture vector command is incorrect Remedy Correct the program P950 No spec Tilt face machining Details Inclined surface machining option is not supported Remedy Check the specifications P951 Ill cmd in tilt face machining Details A forbidden command G command etc was issued during inclined surface machining Remedy Check the program If you want to execute a command G command etc that is unavailable ...

Страница 676: ... the program Set the tool length compensation amount or command a tool length offset No whose compensation amount is not 0 P960 No spec Direct command mode Details G05 P4 was commanded while direct command mode option is OFF Remedy Check the specifications P961 Invalid during dir cmnd mode Details A G code other than G05 P0 was commanded in direct command mode A sequence No command F code command ...

Страница 677: ...ing commands that required pre reading nose R offset corner chamfering corner rounding geometric I geometric IB and compound type fixed cycle for turning machining resulted in eight or more pre read blocks Remedy Delete some or all of the combinations of commands that require pre reading ...

Страница 678: ...IV 145 Appendix 7 Operation Messages ...

Страница 679: ...restart search was completed Executing restart search The restart search is being executed Execute operation search The program is not searched Execute the operation search Can t cancel verify stop The compare stop cannot be canceled because the operation is not in a compare stop Executing top search The top search is being executed correctly Top search completed The top search was completed corre...

Страница 680: ...n making the display mode settings Set using an existing axis name Incorrect tool No was specified at the execution of tool clear Execute operation search The program is not searched Execute the operation search Checking The program check is being executed Check stopped The program check is being stopped Work form is illegal A workpiece is not drawn correctly because the two or more workpiece widt...

Страница 681: ...he data N Do not erase the data Clear all axes Y N Message to confirm the all axes clear Y or INPUT Clear the data for all axes N Do not clear the data Cannot return to origin Operations other than line paste paste and data input cannot be undone It is the initial state Cannot undo It cannot be undone if the previous setting is set in another part system The last operation was performed in other s...

Страница 682: ...rted Erase complete The file has been erased Erase ended Some file not erased The file erasing completed but there are some files that could not be erased Verify error An error occurred when performing a file verification Compare error Compare next file Y N Message to confirm the comparison Y or INPUT Compare the next file N Do not compare the next file Compare complete The data comparison complet...

Страница 683: ...g devices were designated Timeout error A timeout error occurred when communicating with the external device Checking Cannot be executed during a check Dir create Complete Creation of the directory has been completed Can t make directory An error occurred while creating the directory Directory pass is illegal The designated directory path name is illegal Input a correct directory path name Data pr...

Страница 684: ...ot ready An attempt was made to perform an FD operation search with no FD An attempt was made to display the FD list with no FD MemoryCard not ready An attempt was made to perform operations with no memory card DS not ready An attempt was made to perform operations with no data server USB memory not ready Operation was attempted when an USB memory is not inserted Can t write in READ ONLY file Cont...

Страница 685: ...ve been made up to the n 1 th column Password is illegal The password designated for displaying the MachineParameter screen is illegal Input the password The menu key for first displaying the Machine Parameter screen was pressed after the power was turned ON Paste error An attempt was made to paste in a different parameter from the copy parameter Paste Y N Message to confirm the operation when pas...

Страница 686: ...ned on The sensor signal was already ON when the tool measurement mode TLM signal was validated The sensor signal turned ON when there was no axis movement after the tool measurement mode TLM signal was validated The sensor signal turned ON at a position within 100μm from the final entry start position Move the axis in a safe direction after turning the sensor signal OFF or turning the tool measur...

Страница 687: ...center and the angle was failed Input 0 to coord center angle for rot The center and the angle are not 0 Set 0 in the parameter 8623 Coord rot centr H 8624 Coord rot centr V and 8627 Coord rot angle Can t calculate Hole center cannot be determined Meas axis not returned to ref position The workpiece measurement was executed when dog type reference point return has not been executed Carry out refer...

Страница 688: ...stered to group also Pot number not exist The set pot number does not exist Check the pot number Create new file Y N Message to confirm the operation when newly creating data files etc Y or INPUT Newly create N Cancel the operation Input the tool number Waiting tool number input Clear not possible The clear range is incorrect Spindle stndby tool display not possible The spindle standby cannot be d...

Страница 689: ...he data erasing completed Can t erase designated file The selected file cannot currently be erased Designated file does not exist A file that does not exist was designated when file editing Designated file already exists When creating a new file a file name was designated that alreadyexists Replace Y N Message to confirm the character string replacement Y or INPUT Replace the character string N Do...

Страница 690: ...ble range during mass editing Save then operate again Save not possible A special file history file etc that cannot be saved was edited and an attempt was made to save it Perform an operation to quit editing Failed saving due to file size over etc during mass editing Setting of 1166 fixpro was illegal Use the settings for a regular program MDI cannot be entered due to MDI editing mode Press INPUT ...

Страница 691: ...file Can t edit The target program cannot be edited in this screen because it is being edited in the custom screen Read only as the file is being edited The target program is opened as read only because it is being edited in the custom screen Can t write into being edited file The target program cannot be overwritten transferred merged or entered MDI because it is being edited in the custom screen...

Страница 692: ...t the nearest service center Quit HMI Y N Message to confirm the HMI quitting Y or INPUT Quit the HMI N Do not quit the HMI Format NC memory Y N Message to confirm the NC memory formatting Y or INPUT Start formatting the NC memory N Do not format the NC memory Execute SRAM backup Y N Message to confirm the SRAM back up Y or INPUT The SRAM data is backed up to the HD N The SRAM data is not backed u...

Страница 693: ...estore Check to ensure that the serial number in the NC has been set and that the system data to be restored matches Operating aux axis It is not possible to set parameter and input output data during auxiliary axis operation It is not possible to change the display axis during auxiliary axis operation Delete the allocation Y N Message to confirm deletion of the parameter allocation The allocation...

Страница 694: ...her to stop data collection Press Y or INPUT to stop data collection The collection is being executed An attempt was made to start data collection while data collection was being performed The collection is stopping An attempt was made to stop data collection while data collection was stopped The collection invalid The data collection is set invalid in the parameter Check the parameter Scroll exec...

Страница 695: ...mple PLC program is lost Contact the service center Message Details Auto backup disabled Device illegal Set a correct value in the device No of the automatic backup device Auto backup disabled No DS When turning ON the power next time insert DS Auto backup disabled No memory card When turning ON the power next time insert the memory card Auto backup disabled No USB memory When turning ON the power...

Страница 696: ...ss Y or INPUT to stop alarm history The collection is being executed An attempt was made to start alarm history while alarm history was being performed The collection is stopping An attempt was made to stop alarm history while alarm history was being stopped Execute the collection data clear Y N Determines whether to clear alarm history Press Y or INPUT to clear alarm history Data clear complete T...

Страница 697: ...ion by the clearing Flash ROM operation is in progress F ROM clear complete Indicates that the Flash ROM clearing by the Flash ROM clear operation is completed F ROM clear error An error occurred while clearing the DeviceNet unit s Flash ROM by the Flash ROM clear operation Execute the Flash ROM clear operation again If this message persists it might be due to a breakdown of the DeviceNet unit Rep...

Страница 698: ...ected file Attempted to edit or correct the buffer for the read only program file Edit lock B It is not possible to change machining program B 8000 to 8999 user standard subprogram or machining program C 9000 to 9999 machine tool builder custom program as edit lock B is enabled Edit lock C It is not possible to change machining program C 9000 to 9999 machine tool builder custom program as edit loc...

Страница 699: ...Appendix 7 Operation Messages MITSUBISHI CNC IV 166 ...

Страница 700: ...IV 167 Appendix 8 User Parameters ...

Страница 701: ...name to set an axis address other than above Setting range Axis names such as X Y or Z 1027 base_J Base axis J Set the names of the base axes that compose the plane Set the axis name set in 1013 axname If all three items base_I base_J and base_K do not need to be set such as for 2 axis specifications input 0 and the parameter will be blank Normally when X Y and Z are specified respectively for bas...

Страница 702: ...ed the file system will be changed after the power is turned ON So always execute format The new format will be enabled after turning the power ON again Setting order 1 cmdtyp changeover 2 Turn power ON again 3 Format 4 Turn power ON again 1041 PR l_inch Initial state inch Select the unit system for the program travel amount when the power is turned ON or reset and for position display 0 Metric sy...

Страница 703: ...g axis 0 Use an axis vertical to the selected plane as hole drilling axis 1 Use the Z axis as the hole drilling axis regardless of the selected plane 1084 RadErr Arc error Set the tolerable error range when the end point deviates from the center coordinate in the circular command Setting range 0 to 1 000 mm 1085 G00Drn G00 dry run Select whether to apply dry run feed at manual setting speed instea...

Страница 704: ...how to handle the common variables when resetting 0 Common variables won t change after resetting 1 The following common variables will be cleared by resetting 100 to 149 when 100 sets of variables are provided 100 to 199 when 200 sets or more of variables are provided 1129 PwrVCl Clear variables by power ON Select how to handle the common variables when the power is turned ON 0 The common variabl...

Страница 705: ... command 1079 F1digit is set to 1 Feedrate when F4 is issued mm min When 1246 set08 bit6 is set to 1 and F 1 digit feed is commanded the feedrate can be increased decreased by operating the manual handle Setting range 0 to 1000000 mm min 1189 spd_F5 F1 digit feedrate F5 Set the feedrate for the F command in the F 1 digit command 1079 F1digit is set to 1 Feedrate when F5 is issued mm min When 1246 ...

Страница 706: ...y to the restart position and then restart the program 1 The system automatically moves to the restart position at the first activation after the program restarts 1506 F1_FM Upper limit of F1 digit feedrate Set the maximum value up to which the F 1 digit feedrate can be changed Setting range 0 to 1000000 mm min 1507 F1_K F 1 digit feedrate change constant Set the constant that determines the speed...

Страница 707: ...Fix the shape recognition range for SSS control 1926 PR Global IP address IP address Set the main CPU s IP address Set the NC IP address seen from an external source 1927 PR Global Subnet mask Subnet mask Set the subnet mask for the IP address 1928 PR Global Gateway Gateway Set the IP address for the gateway 1934 PR Local IP address Set the HMI side CPU s IP address Note This parameter is valid on...

Страница 708: ...acy control mode Set the rapid traverse rate for each axis in the high accuracy control mode 2001 rapid will be used when 0 is set Setting range 0 to 1000000 mm min 2110 Clamp H precision Cutting feed clamp speed for high accuracy control mode Set the cutting feed maximum speed for each axis in the high accuracy control mode 2002 clamp will be used when 0 is set Setting range 0 to 1000000 mm min 7...

Страница 709: ...N after the range is passed Setting range 0 to 99999 999 mm 8007 OVERRIDE Set the override value for automatic corner override Setting range 0 to 100 8008 MAX ANGLE Set the maximum corner opening angle where deceleration should start automatically When the angle is larger than this value deceleration will not start Setting range 0 to 180 8009 DSC ZONE Set the position where deceleration starts at ...

Страница 710: ... only Set the screw cut up amount for G76 and G78 thread cutting cycle Setting range 0 to 127 0 1 lead 8015 CDZ ANGLE for L system only Set the screw cut up angle for G76 and G78 thread cutting cycle Setting range 0 to 89 8016 G71 MINIMUM for L system only Set the minimum value of the last cutting amount by the rough cutting cycle G71 G72 The cutting amount of the last cutting will be the remainde...

Страница 711: ... Coefficient 100 set value Note This function will be enabled when 8021 COMP_CHANGE is set to 0 Setting range 0 to 99 Theoretical radius decrease error amount Displays the theoretical radius decrease error amount ΔR mm from the automatic calculation by NC Theoretical radius decrease amount in arc R5mm arc deceleration speed Displays a deceleration speed mm min along an arc of 5 mm radius R1mm arc ...

Страница 712: ...he angle is 90 degree Corner deceleration speed at 90 degree Display corner deceleration speed when the angle is 90 degree 8021 COMP_CHANGE Select whether to share or separate the compensation coefficient at the corner curve during the high accuracy control mode 0 Share 8019 R COMP is applied 1 Separate Corner 8022 CORNER COMP Curve 8023 CURVE COMP Note Set 1 when using SSS control 8022 CORNER COM...

Страница 713: ... only Set the maximum chord error tolerance in a block that includes an inflection point Set the tolerance applicable when the applicable block is developed to fine segments by CAM normally about 10 μm When 0 000 is set the applicable block will be linear Setting range 0 000 to 100 000 mm 8028 Toler 2 for M system only Set the maximum chord error tolerance in a block that includes no inflection po...

Страница 714: ...M system only Set the length of the block to be excluded when deciding a corner Enabled when 8036 CordecJudge is set to 1 Setting range 0 to 99999 999 mm 8041 C rot R Set the length from the center of the normal line control axis to the tool tip This is used to calculate the turning speed at the block joint This is enabled during the normal line control type II Setting range 0 000 to 99999 999 mm ...

Страница 715: ...56 G74 RETRACT Set the amount of retract amount of cut up of the cutting off cycle G74 G75 Setting range 0 to 999 999 mm 8057 G76 LAST D Set the amount of final cut in by the compound type thread cutting G76 Setting range 0 to 999 999 mm 8058 G76 TIMES Set how many times the amount of final cut in cycle G76 finish margin will be divided in the compound type thread cutting G76 Setting range 0 to 99...

Страница 716: ... mm 8078 Screen Saver Timer Set the period of time before turn OFF of the display unit backlight When 0 is set the backlight is not turned OFF Setting range 0 to 60 min 0 The backlight is not turned OFF 8081 Gcode Rotat for L system only Set the rotation angle for the program coordinate rotation command This parameter is enabled when 1 is set in 1270 ext06 bit5 Coordinate rotation angle without co...

Страница 717: ...steps or errors etc set a large value To enable sufficient deceleration set a small value If 0 000 is set the standard value 1 000mm will be applied Setting range 0 to 100 000 mm 8092 ClampCoeff for M system only Set the clamp speed at the curved section configured of fine segments Coefficient setting value Setting range 1 to 100 8093 StepLeng for M system only Set the width of the step at which t...

Страница 718: ...rrent compensation direction will be maintained 8107 R COMPENSATION Select whether to move to the inside because of a delay in servo response to a command during arc cutting mode 0 Move to the inside making the arc smaller than the command value 1 Compensate the movement to the inside 8108 R COMP Select Select the arc radius error compensation target 0 Perform compensation over all axes 1 Perform ...

Страница 719: ...nable 1 Disable 8117 OFS Diam DESIGN Select tool radius or tool diameter compensation amount to be specified 0 Tool radius compensation amount 1 Tool diameter compensation amount 8119 Comp unit switch Select the setting unit of compensation amount that has no decimal point 0 1mm or 1inch unit 1 The minimum command unit follows 1003 iunit 8120 FONT SELECTION Select the font when Simplified Chinese ...

Страница 720: ... coordinate system 1 Machine coordinate system 8129 Subpro No select Select the subprogram No to be called preferentially in subprogram control 0 Commanded program No 1 Four digit program No beginning with O No 2 Eight digit program No beginning with O No Note The program to be called in user macro figure rotation macro interruption and compound type fixed cycle also follows this setting 8135 G5P4...

Страница 721: ...e the start up or cancel command block handle the offset vector in the direction vertical to that of the command instead 1 The processing is executed for the intersection point between the command block and the next block 8158 Init const sur spd Select the initial state after power ON The same value as 1229 set01 bit3 will be reflected When either setting changes the other will change accordingly ...

Страница 722: ...and 8205 are set in reverse Setting range 99999 999 to 99999 999 mm 8205 OT CHECK P Set the coordinates of the direction in the movable range of the stored stroke limit II or the upper limit coordinates of the prohibited range of stored stroke limit IIB Setting range 99999 999 to 99999 999 mm 8206 TOOL CHG P Set the coordinates of the tool change position for G30 n tool change position return Set ...

Страница 723: ...he current position from the end point INC command 0 1 2 3 Moves in the direction of the commanded sign by the commanded incremental amount starting at the current position Reference position return 0 1 2 The movement to the middle point applies to the ABS command or the INC command Returns with movement within 360 degrees from the middle point to reference position 3 The movement to the middle po...

Страница 724: ...00000 mm min 8300 P0 for L system only Set the reference X coordinates of the chuck and the tail stock barrier Set the center coordinate radius value of workpiece by the basic machine coordinate system Setting range 99999 999 to 99999 999 mm 8301 P1 for L system only Set the area of the chuck and tail stock barrier Set the coordinate from the center of workpiece P0 for X axis radius value Set the ...

Страница 725: ...huck and tailstock barrier 0 Disable Setting from special display unit will be enabled 1 Enable 8311 P7 for L system only Set the area of the left spindle section Set the coordinate from the center of workpiece P0 for X axis radius value Set the coordinate value by basic machine coordinate system for Z axis Setting range 99999 999 to 99999 999 mm 8312 P8 for L system only Set the area of the left ...

Страница 726: ... L system only Set the angle for the left tailstock end section The angle will be interpreted as 90 if there is no setting when 0 is set Setting range 0 to 180 0 90 default 8319 Stock Angle R for L system only Set the angle for the right tailstock end section The angle will be interpreted as 90 if there is no setting when 0 is set Setting range 0 to 180 0 90 default 8621 Coord rot plane H Set the ...

Страница 727: ...ulated Setting range 999999 999 to 999999 999 mm 8627 Coord rot angle Set the rotation angle for coordinate rotation control When this parameter is set the coordinate rotation vector 8625 8626 will be 0 Setting range 360 000 to 360 000 8701 Tool length Set the length to the touch tool tip Setting range 99999 999 to 99999 999 mm 8702 Tool Dia Set the diameter of the sphere at the touch tool tip Set...

Страница 728: ...22 axname2 axis name Setting range Axis name Note If the axis name is illegal or not set the 3rd axis name will be set as default 8712 TLM D meas axis Set the tool diameter measurement axis Set the 1022 axname2 axis name Setting range Axis name Note If the axis name is illegal or not set the 1st axis name will be set as default 8713 Skip coord Switch For M system only Select the coordinate system ...

Страница 729: ...e subprogram When D0 is designated at a subprogram call the subprogram to be called will be searched from the directory selected with this parameter Refer to 8880 Subpro stor D0 dev Setting range Directory 48 characters 8882 Subpro stor D1 dev Select the storage destination device for the subprogram M Memory G HD Note F FD Note R Memory card D Data server Note Note This is available only with M700...

Страница 730: ... from the directory selected with this parameter Refer to 8884 Subpro stor D2 dev Setting range Directory 48 characters 8886 Subbro stor D3 dev Select the storage destination device for the subprogram M Memory G HD Note F FD Note R Memory card D Data server Note Note This is available only with M700 M700VW Series When D3 is designated at a subprogram call the subprogram to be called will be search...

Страница 731: ...e searched from the directory selected with this parameter Refer to 8888 Subpro stor D4 dev Setting range Directory 48 characters 8890 8894 Subpro srch odr D0 to D4 Specify the search order of D0 to D4 devices and directories storing subprograms when D0 to D4 are omitted from subprogram call Search is performed in the order from 1 to 5 When 0 is set the device is excluded from search If the same v...

Страница 732: ...piece coordinate position 3 Machine position 4 Program position 8 Remain command 9 Manual interrupt amount 10 Next command 11 Restart position 12 Remain distance 16 Tip workpiece coordinate position 18 Tool axis movement 19 Tip machine position 20 Relative position 21 Table coordinate position 22 Workpiece installation position 23 Inclined surface coordinate Setting range 1 to 23 8904 Counter type...

Страница 733: ...achine position 4 Program position 8 Remain command 9 Manual interrupt amount 10 Next command 11 Restart position 12 Remain distance 16 Tip workpiece coordinate position 18 Tool axis movement 19 Tip machine position 20 Relative position 21 Table coordinate position 22 Workpiece installation position 23 Inclined surface coordinate Setting range 1 to 23 8909 PR Aut Manual switch Select the counter d...

Страница 734: ...omatic backup is executed at the first power ON in the period between the designated date and the end of that month When 1 is set to Auto backup day 1 the automatic backup is executed every turning NC power ON When 0 is set to all on Auto backup day 1 to 4 the automatic backup is not executed It is possible to specify the designated date up to 4 days for a month Setting range 0 to 31 8917 Auto bac...

Страница 735: ...ow for both tool radius and tool length compensation for tool length measurement type II 8921 Mass Edit select Select the editing mode for the machining programs saved in HD FD and memory card When the program size is 1 0MB When 8910 Edit Undo is invalid 2 0MB or more mass editing will be applied 0 Regular editing mode 1 Mass editing mode 8922 T reg dup check Set whether to enable the duplication ...

Страница 736: ...s display spindles will be displayed in a default order the 1st spindle on the upper side the 2nd spindle on the lower side When 00 is set in 1 part system display of the 15 type display all spindles will be displayed Note 2 If you designate a bigger number than the setting of 1039 spinno or either the high order or low order setting is 0 the 1st spindle will be displayed Note 3 If the low order i...

Страница 737: ...able INPUT comp Select whether to enable INPUT menu in T ofs tool compensation amount setting or Coord workpiece coordinate system offset setting menu on Setup screen 0 Enable 1 Disable 8930 Disable INPUT var Select whether to enable INPUT menu in Com var common variables menu on Monitr screen 0 Enable 1 Disable 8931 Display Set limit Select the restriction of the connected NC s screen display set...

Страница 738: ... file name 8937 File sort volume Set the maximum number of files to sort in the memory card and DS lists If the setting is large update of the list may take longer With M70V M70 E70 Series the maximum number will be 64 regardless of the setting of this parameter Setting range 64 to 1000 M700 M700VW Series 64 to 250 M700VS Series Standard 64 8938 Edit Not show Prg Select whether to enable the autom...

Страница 739: ...bled when 8942 1 color is set to the values 1 to 4 1 Purple default 2 Pink 3 Light blue 4 Orange 8944 PR 3 color Set the color to be shown on the top left of screen for the 3rd part system This enables switching the color patterns for each part system When set to the values 1 to 4 the part system name is shown in the form of button image Note Enabled when 8942 1 color is set to the values 1 to 4 1...

Страница 740: ... the conventional specification A line feed between is not dealt as It is dealt as an upper case lower case letter depending on the CapsLock status A symbolic character may be converted into a specific character Type 2 A line break inside square brackets is dealt as Regardless of the CapsLock status the defined character is input A symbolic character is also input as defined 0 Type 1 Conventional ...

Страница 741: ...APE MODE DEV Select the device No to be run with the tape mode The device Nos correspond to the input output device parameters Setting range 0 to 4 9007 MACRO PRINT PORT Select the output port used for the user macro DPRINT command 1 ch1 2 ch2 9 Memory card 9008 MACRO PRINT DEV Select the device No used for the DPRINT command The device Nos correspond to the input output device parameters Setting ...

Страница 742: ... device parameters Setting range 0 to 4 9051 Data I O port Select whether to use display side serial port or NC side serial port for data input output function 0 Display side serial port 1 Display side serial port 2 NC side serial port Note The setting range differs according to the model 9052 Tape mode port Select whether to use display side serial port or NC side serial port for tape mode 0 NC s...

Страница 743: ...ame within 3 characters 9102 DEV0 BAUD RATE Select the serial communication speed 0 19200 bps 1 9600 2 4800 3 2400 4 1200 5 600 6 300 7 110 9103 DEV0 STOP BIT Select the stop bit length used in the start stop system Refer to 9104 DEV0 PARITY CHECK At the output of data the number of characters is always adjusted for the parity check 1 1 bit 2 1 5 3 2 9104 DEV0 PARITY CHECK Select whether to add th...

Страница 744: ...ne Yes 3 Yes Yes 9112 DEV0 CR OUTPUT Select whether to add the CR code just before the EOB L F code during output 0 Not add 1 Add 9113 DEV0 EIA OUTPUT Select ISO or EIA code for data output In data input mode the ISO and EIA codes are identified automatically 0 ISO code output 1 EIA code output 9114 DEV0 FEED CHR Set the length of the tape feed to be output at the start and end of the data during ...

Страница 745: ...21 DEV0 EIA CODE Set the code in hexadecimal which does not duplicate the existing EIA codes for the special code When output with EIA code data can be output using the alternate code in which the special ISO code not included in EIA is specified Setting range 0 to FF hexadecimal 9122 DEV0 EIA CODE Set the code in hexadecimal which does not duplicate the existing EIA codes for the special code Whe...

Страница 746: ...be output using the alternate code in which the special ISO code not included in EIA is specified Setting range 0 to FF hexadecimal 9128 DEV0 EIA CODE Set the code in hexadecimal which does not duplicate the existing EIA codes for the special code When output with EIA code data can be output using the alternate code in which the special ISO code not included in EIA is specified Setting range 0 to ...

Страница 747: ...to terminate data reading 0 3 EOR 1 2 EOB or EOR When M700 700VW display side serial port is selected 0 No terminator 1 EOR 2 EOB 3 EOB or EOR 9208 DEV1 HAND SHAKE Select the transmission control method No handshaking will be used when a value except 1 to 3 is set 1 RTS CTS method 2 No handshaking 3 DC code method 9209 DEV1 DC CODE PRTY Select the DC code type when the DC code method is selected 0...

Страница 748: ... 1 Disable 9218 DEV1 DATA ASCII Select the code of the output data 0 ISO EIA code Depends on whether 9113 9213 9313 9413 or 9513 EIA output parameter is set up 1 ASCII code 9219 DEV1 INPUT TYPE Select the mode for input verification 0 Standard input Data from the very first EOB is handled as significant information 1 EOBs following the first EOB of the input data are skipped until data other than ...

Страница 749: ...DE Set the code in hexadecimal which does not duplicate the existing EIA codes for the special code When output with EIA code data can be output using the alternate code in which the special ISO code not included in EIA is specified Setting range 0 to FF hexadecimal 9226 DEV1 EIA CODE Set the code in hexadecimal which does not duplicate the existing EIA codes for the special code When output with ...

Страница 750: ...3 2 9304 DEV2 PARITY CHECK Select whether to add a parity check bit to the data Set this parameter in accordance with the I O device specifications 0 Not add a parity bit in I O mode 1 Add a parity bit in I O mode 9305 DEV2 EVEN PARITY Select whether even or odd parity will be used when parity is used This parameter is ignored when no parity is added 0 Odd parity 1 Even parity 9306 DEV2 CHR LENGTH...

Страница 751: ...O and EIA codes are identified automatically 0 ISO code output 1 EIA code output 9314 DEV2 FEED CHR Set the length of the tape feed to be output at the start and end of the data during tape output Setting range 0 to 999 characters 9315 DEV2 PARITY V Select whether to perform the parity check for the number of characters in a block at the input of data At the output of data the number of characters...

Страница 752: ...l 9322 DEV2 EIA CODE Set the code in hexadecimal which does not duplicate the existing EIA codes for the special code When output with EIA code data can be output using the alternate code in which the special ISO code not included in EIA is specified Setting range 0 to FF hexadecimal 9323 DEV2 EIA CODE Set the code in hexadecimal which does not duplicate the existing EIA codes for the special code...

Страница 753: ...can be output using the alternate code in which the special ISO code not included in EIA is specified Setting range 0 to FF hexadecimal 9401 DEV3 DEVICE NAME Set the device name corresponding to the device No Set a simple name for quick identification Setting range Use alphabet characters numerals and symbols to set a name within 3 characters 9402 DEV3 BAUD RATE Select the serial communication spe...

Страница 754: ... when a value except 1 to 3 is set 1 RTS CTS method 2 No handshaking 3 DC code method 9409 DEV3 DC CODE PRTY Select the DC code type when the DC code method is selected 0 Not add parity to DC code DC3 13H 1 Add parity to DC code DC3 93H 9411 DEV3 DC2 4 OUTPUT Select the DC code handling when outputting data to the output device DC2 DC4 0 None None 1 Yes None 2 None Yes 3 Yes Yes 9412 DEV3 CR OUTPU...

Страница 755: ...nificant information 1 EOBs following the first EOB of the input data are skipped until data other than EOB is input 9420 DEV3 OUT BUFFER Select the buffer size of the output data which is output to output device using NC side serial port If the output device has a data receiving error overrun error decrease the buffer size with this parameter If the buffer size is decreased output time will prolo...

Страница 756: ...FF hexadecimal 9426 DEV3 EIA CODE Set the code in hexadecimal which does not duplicate the existing EIA codes for the special code When output with EIA code data can be output using the alternate code in which the special ISO code not included in EIA is specified Setting range 0 to FF hexadecimal 9427 DEV3 EIA CODE Set the code in hexadecimal which does not duplicate the existing EIA codes for the...

Страница 757: ...Add a parity bit in I O mode 9505 DEV4 EVEN PARITY Select whether even or odd parity will be used when parity is used This parameter is ignored when no parity is added 0 Odd parity 1 Even parity 9506 DEV4 CHR LENGTH Select the length of the data bit Refer to 9504 DEV4 PARITY CHECK 0 5 bit 1 6 2 7 NC connection not supported 3 8 9507 DEV4 TERMINATR TYP Select the code to terminate data reading 0 3 ...

Страница 758: ... to 999 characters 9515 DEV4 PARITY V Select whether to perform the parity check for the number of characters in a block at the input of data At the output of data the number of characters is always adjusted to for the parity check 0 Not perform parity V check 1 Perform parity V check 9516 DEV4 TIME OUT sec Set the time out time to detect an interruption in communication Time out check will not be...

Страница 759: ...ng range 0 to FF hexadecimal 9523 DEV4 EIA CODE Set the code in hexadecimal which does not duplicate the existing EIA codes for the special code When output with EIA code data can be output using the alternate code in which the special ISO code not included in EIA is specified Setting range 0 to FF hexadecimal 9524 DEV4 EIA CODE Set the code in hexadecimal which does not duplicate the existing EIA...

Страница 760: ... 4 1200 5 600 6 300 7 110 8 38400 9602 STOP BIT Select the stop bit length used in the start stop system Refer to 9603 PARITY EFFECTIVE At the output of data the number of characters is always adjusted to for the parity check 1 1 bit 2 1 5 3 2 9603 PARITY EFFECTIVE Select whether to add the parity bit to the data The parameter is set when using a parity bit separately from the data bit Set this pa...

Страница 761: ...ode is output 0 Not output the DC1 code 1 Output the DC1 code bit7 Enable disable resetting Select whether to enable the resetting in the computer link 0 Enable 1 Disable 9610 LINK PARAM 2 Bit 2 Specify the control code parity even parity for the control code Select whether to add an even parity to the control code in accordance with the I O device specifications 0 Not add a parity bit to the cont...

Страница 762: ...r link B 0 Not output the DC3 code 1 Output the DC3 code 9616 CTRL INTERVAL Not used Set to 0 9617 WAIT TIME Not used Set to 0 9618 PACKET LENGTH Not used Set to 0 9619 BUFFER SIZE Not used Set to 0 9620 START SIZE Not used Set to 0 9621 DC1 OUT SIZE Not used Set to 0 9622 POLLING TIMER Not used Set to 0 9623 TRANS WAIT TMR Not used Set to 0 9624 RETRY COUNTER Not used Set to 0 9701 PR IP addr aut...

Страница 763: ...logging into the host computer Setting range 15 characters alphanumeric or less 9714 Host1 directory Set the directory name of the host computer The directory released to the client NC unit with the host computer s server is handled as root directory by the NC unit Setting range 31 characters alphanumeric or less 9715 Host1 host type Select the type of the host computer 0 UNIX PC automatic judgmen...

Страница 764: ... Wrd num cmnt Set the number of words to be displayed as a comment Note One word designates a character string divided by one or more spaces Setting range 0 to 100 0 Default value 9721 Host 1 no total siz Set whether to display the total number of characters registered in the machining programs of host1 when displaying the file list If there are many files in the directory to be referred to the li...

Страница 765: ...737 Wrd pos size 9738 Wrd pos Dir 9739 Wrd pos cmnt 9740 Wrd num cmnt 9736 Host 2 Wrd pos name Set the file name display position nth word from left of the list displayed when the ftp command dir is executed Note One word designates a character string divided by one or more spaces Setting range 0 to 100 0 Default value 9737 Host 2 Wrd pos size Set the size display position nth word from left of th...

Страница 766: ...by setting 1 0 Display 1 Not display 9751 Host3 host name Set the host computer name This parameter allows the NC to easily recognize the host computer on the network Set the host computer s name name registered in C windows hosts or the IP address Setting example For host name mspc160 For IP address 150 40 0 111 Note Set the host computer s TCP IP address if communication is not carried out corre...

Страница 767: ...displayed when the ftp command dir is executed Note One word designates a character string divided by one or more spaces Setting range 0 to 100 0 Default value 9758 Host 3 Wrd pos Dir Set the DIR display position nth word from left of the list displayed when the ftp command dir is executed Note One word designates a character string divided by one or more spaces Setting range 0 to 100 0 Default va...

Страница 768: ... name when logging into the host computer Setting range 15 characters alphanumeric or less 9773 Host4 password Set the password when logging into the host computer Setting range 15 characters alphanumeric or less 9774 Host4 directory Set the directory name of the host computer The directory released to the client NC unit with the host computer s server is handled as the root directory by the NC un...

Страница 769: ...e 9779 Host 4 Wrd pos cmnt Set the comment date time etc display position nth word from left of the list displayed when the ftp command dir is executed Note One word designates a character string divided by one or more spaces Setting range 0 to 100 0 Default value 9780 Host 4 Wrd num cmnt Set the number of words to be displayed as a comment Note One word designates a character string divided by on...

Страница 770: ...n the page 2 when 0 is set Loc var 10516 Sixth from left in the page 2 when 0 is set P corr 10517 Seventh from left in the page 2 when 0 is set PLC SW 10518 Eighth from left in the page 2 when 0 is set G92 set 10519 Ninth from left in the page 2 when 0 is set Col stp 10520 Tenth from left in the page 2 when 0 is set LD MTR 10521 First from left in the page 3 when 0 is set Sp stby 10522 Second from...

Страница 771: ...n 0 is set Not display 10565 Fifth from left in the page 2 when 0 is set Not display 10566 Sixth from left in the page 2 when 0 is set Not display 10567 Seventh from left in the page 2 when 0 is set Not display 10568 Eighth from left in the page 2 when 0 is set Not display 10569 Ninth from left in the page 2 when 0 is set Not display 10570 Tenth from left in the page 2 when 0 is set Not display 10...

Страница 772: ...ge 2 when 0 is set Not display 10618 Eighth from left in the page 2 when 0 is set Not display 10619 Ninth from left in the page 2 when 0 is set Not display 10620 Tenth from left in the page 2 when 0 is set Not display 10621 First from left in the page 3 when 0 is set Not display 10622 Second from left in the page 3 when 0 is set Not display 10623 Third from left in the page 3 when 0 is set Not dis...

Страница 773: ...omestic call Begin with a communication company No for international call Hyphens can be used as a delimiting character Setting range Within 28 characters 10806 Comment 3 Set a comment such as a party s name for the notification party telephone No 3 Setting range Within 20 alphanumerical characters excluding spaces 10807 Password Set the password for sharing of machining data Setting range 4 chara...

Страница 774: ...M700VW M700 Series PC Subnet Set the subnet mask for the display unit or PC in which machining programs are stored PC Gateway Set the gateway for the display unit or PC in which machining programs are stored 19001 Syn tap S cancel 0 Retain the spindle speed S in synchronous tap return 1 Cancel the spindle speed S in synchronous tap return with G80 The same value as 1223 aux07 bit6 will be reflecte...

Страница 775: ...rrent position on the local coordinate system before rotating without rotating the start point in accordance with the coordinates rotation 19401 G33 n chamfer spd Not used 19405 Rotary ax drawing Specify this parameter to draw a path of C axis rotary axis according to its rotation in the graphic trace and 2D graphic trace When 1013 axname is set to C the axis is handled as a rotary axis By setting...

Страница 776: ... of 19428 ManualB Std F2 19426 setting will be used as surface speed control standard speed 2 19427 setting will be used as surface speed control standard speed 1 Setting range 1 to 1000000 min 19427 ManualB Std R2 Set a radius used as standard for the rotary axis speed When the same value is set as 19425 ManualB Std R1 the surface speed control standard speed 1 ManualB Std F1 will be selected as ...

Страница 777: ...Appendix 8 User Parameters MITSUBISHI CNC IV 244 ...

Страница 778: ...utput 6 2 Input Output Screen III MAINTENANCE 2 1 Durable Parts 4 1 Durable Parts I SCREEN OPERATIONS 5 8 Data Sampling Screen Reviewed and revised the construction of sections Mistakes are corrected Sep 2015 IB NA 1501186 C Added Changed the following chapters in order to support the system software L0 version The following chapters are added I SCREEN OPERATIONS 3 4 5 Switching the Magazines to b...

Страница 779: ...rvice Center UL KRAKOWSKA 50 32 083 BALICE POLAND 1845 SATTELITE BOULEVARD STE 450 DULUTH GEORGIA 30097 U S A TEL 48 12 630 4700 FAX 48 12 630 4701 TEL 1 678 258 4529 FAX 1 678 258 4519 Mitsubishi Electric Turkey A Ş Ümraniye Şubesi Texas Service Satellites Turkey Service Center GRAPEVINE TEXAS 76051 U S A ŞERIFALI MAH NUTUK SOK NO 5 34775 TEL 1 678 258 4529 FAX 1 678 258 4519 ÜMRANIYE ISTANBUL TU...

Страница 780: ...TIAN RD S FUTIAN DISTRICT SHENZHEN 518034 CHINA TEL 86 755 2399 8272 FAX 86 755 8218 4776 INDONESIA China Xiamen Service Dealer China Dongguan Service Dealer PT MITSUBISHI ELECTRIC INDONESIA Indonesia Service Center Cikarang Office JL Kenari Raya Blok G2 07A Delta Silicon 5 Lippo Cikarang Bekasi 17550 INDONESIA KOREA TEL 62 21 2961 7797 FAX 62 21 2961 7794 MITSUBISHI ELECTRIC AUTOMATION KOREA CO L...

Страница 781: ...le cases simultaneous revision is not possible Please contact your Mitsubishi Electric dealer with any questions or comments regarding the use of this product Duplication Prohibited This manual may not be reproduced in any form in part or in whole without written permission from Mitsubishi Electric Corporation 2013 2015 MITSUBISHI ELECTRIC CORPORATION ALL RIGHTS RESERVED ...

Страница 782: ......

Отзывы: