Generic Service UDP Relay
Page 26-20
Forward to VLANs
Use this parameter to list, add, or delete
VLANs
to which the
NBNS UDP
relay will forward.
This default is
UNSET
. This value redisplays as
SET
when at least one
VLAN
is configured. Up
to 32
VLANs
may be configured. You can list forwarding
VLANs
, or add or delete
VLANs
from
the forwarding list by entering
434=l
,
434=a
, or
434=d
on the command line.
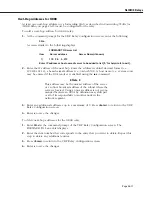
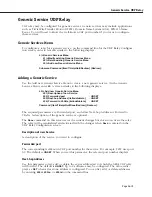
To configure a generic service:
1.
On the Add new Generic Service menu, enter a description of the generic service. For
example:
431=TFTP
2.
Enter the relevant
UDP
port number. For example:
432=69
3.
At least one next-hop address must be configured. To add an address, enter:
433=a
The screen displays similar to the following:
FORWARD TO Server List
Item
Server address
Server Name (if known)
Enter IP address or host name of server to be added to list [‘h’ for help/<ret> to exit]:
4.
Enter the next-hop address in dotted decimal format (i.e., 198.206.181.12), a hexadecimal
address (i.e., 0xc6ceb501). A host name (i.e., system.com) may be entered if the
DNS
resolver is enabled using the
res
command.
5.
When you are finished entering next-hop addresses, press
<Enter>
to return to the prompt
for the Add new Generic Services menu.
6.
Select any
VLANs
for the relay to forward to. At the prompt, enter
434=a
A screen similar to the following displays:
Available/Selected VLANS
Item
Group ID:VLAN ID
MASK
IP ADDR
1)
1:1
255.255. 0.
0
172. 23. 9.105
*
* = selected for forwarding
Enter item number of VLAN to be selected [‘h’f or help/<ret> to exit] :
7.
Enter the item number of the group/
VLAN
that you want to select. Repeat this step for all
the groups/
VLANs
you want to select. An asterisk displays next to all selected
VLANs
.
8.
Press
<Enter>
to return to the Add new Generic Services menu. Add any other generic
services in this way.
9.
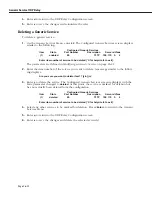
Enter
d
to keep the current changes and return to the Generic Services menu. Enter
d
to
return to the UDP Relay Configuration screen.
10.
Enter
s
to save the changes and reinitialize the relay.
Содержание Omni Switch/Router
Страница 1: ...Part No 060166 10 Rev C March 2005 Omni Switch Router User Manual Release 4 5 www alcatel com ...
Страница 4: ...page iv ...
Страница 110: ...WAN Modules Page 3 40 ...
Страница 156: ...UI Table Filtering Using Search and Filter Commands Page 4 46 ...
Страница 164: ...Using ZMODEM Page 5 8 ...
Страница 186: ...Displaying and Setting the Swap State Page 6 22 ...
Страница 202: ...Creating a New File System Page 7 16 ...
Страница 270: ...Displaying Secure Access Entries in the MPM Log Page 10 14 ...
Страница 430: ...OmniChannel Page 15 16 ...
Страница 496: ...Configuring Source Route to Transparent Bridging Page 17 48 ...
Страница 542: ...Dissimilar LAN Switching Capabilities Page 18 46 ...
Страница 646: ...Application Example DHCP Policies Page 20 30 ...
Страница 660: ...GMAP Page 21 14 ...
Страница 710: ...Viewing the Virtual Interface of Multicast VLANs Page 23 16 ...
Страница 722: ...Application Example 5 Page 24 12 ...
Страница 788: ...Viewing UDP Relay Statistics Page 26 24 ...
Страница 872: ...The WAN Port Software Menu Page 28 46 ...
Страница 960: ...Deleting a PPP Entity Page 30 22 ...
Страница 978: ...Displaying Link Status Page 31 18 ...
Страница 988: ...Displaying ISDN Configuration Entry Status Page 32 10 ...
Страница 1024: ...Backup Services Commands Page 34 14 ...
Страница 1062: ...Diagnostic Test Cable Schematics Page 36 24 ...
Страница 1072: ...Configuring a Switch with an MPX Page A 10 ...
Страница 1086: ...Page B 14 ...
Страница 1100: ...Page I 14 Index ...

