Creating a New Group
Page 19-21
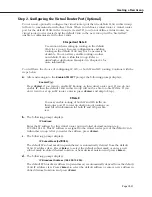
Step 2. Configuring the Virtual Router Port (Optional)
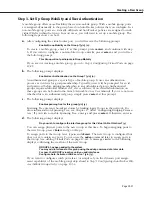
You can now optionally configure the virtual router port that the default
VLAN
in this Group
will use to communicate with other
VLAN
s. When you define a virtual router, a virtual router
port for the default VLAN in the Group is created. If you do not define a virtual router, no
virtual router port is created and the default
VLAN
in the new Group will be “firewalled,”
unable to communicate with other
VLAN
s.
♦
Important Note
♦
Use caution when setting up routing on the default
VLAN
for a Group. In some configurations enabling
routing on the default
VLAN
may not be necessary or
desirable. You can always enable routing on other,
non-default
VLAN
s, within this Group. Refer to
AutoTracker Application Example 4
in Chapter 24 for
more information.
You will have the choice of configuring
IP
,
IPX
, or both
IP
and
IPX
routing. Continue with the
steps below:
a.
After answering
n
to the
Enable ATM CIP?
prompt, the following prompt displays:
Enable IP (y):
Press
<Enter>
if you want to enable IP Routing on this virtual router port. If you do not
enable IP, then the default
VLAN
in this Group will not be able to route IP data. If you
don’t want to set up an IP router, enter
n
, press
<Enter>
and skip to Step j.
♦
Note
♦
You may enable routing of both
IP
and
IPX
traffic on
this router port. If you set up dual-protocol routing, you
must fill out information for both
IP
and
IPX
parame-
ters.
b.
The following prompt displays:
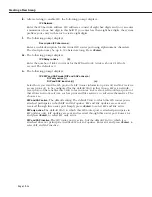
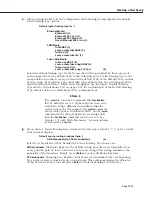
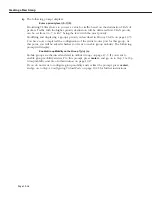
IP Address:
Enter the IP address for this virtual router port in dotted decimal notation (e.g.,
198.206.181.10). This IP address is assigned to the virtual router port of the default
VLAN
within this Group. After you enter the address, press
<Enter>
.
c.
The following prompt displays:
IP Subnet Mask (0xffffff00):
The default IP subnet mask (in parentheses) is automatically derived from the default
VLAN IP
address class. Press
<Enter>
to select the default subnet mask or enter a new
subnet mask in dotted decimal notation or hexadecimal notation and press
<Enter>
.
d.
The following prompt displays:
IP Broadcast Address (198.200.10.255):
The default IP broadcast address (in parentheses) is automatically derived from the default
VLAN IP
address class. Press
<Enter>
to select the default address or enter a new address in
dotted decimal notation and press
<Enter>
.
Содержание Omni Switch/Router
Страница 1: ...Part No 060166 10 Rev C March 2005 Omni Switch Router User Manual Release 4 5 www alcatel com ...
Страница 4: ...page iv ...
Страница 110: ...WAN Modules Page 3 40 ...
Страница 156: ...UI Table Filtering Using Search and Filter Commands Page 4 46 ...
Страница 164: ...Using ZMODEM Page 5 8 ...
Страница 186: ...Displaying and Setting the Swap State Page 6 22 ...
Страница 202: ...Creating a New File System Page 7 16 ...
Страница 270: ...Displaying Secure Access Entries in the MPM Log Page 10 14 ...
Страница 430: ...OmniChannel Page 15 16 ...
Страница 496: ...Configuring Source Route to Transparent Bridging Page 17 48 ...
Страница 542: ...Dissimilar LAN Switching Capabilities Page 18 46 ...
Страница 646: ...Application Example DHCP Policies Page 20 30 ...
Страница 660: ...GMAP Page 21 14 ...
Страница 710: ...Viewing the Virtual Interface of Multicast VLANs Page 23 16 ...
Страница 722: ...Application Example 5 Page 24 12 ...
Страница 788: ...Viewing UDP Relay Statistics Page 26 24 ...
Страница 872: ...The WAN Port Software Menu Page 28 46 ...
Страница 960: ...Deleting a PPP Entity Page 30 22 ...
Страница 978: ...Displaying Link Status Page 31 18 ...
Страница 988: ...Displaying ISDN Configuration Entry Status Page 32 10 ...
Страница 1024: ...Backup Services Commands Page 34 14 ...
Страница 1062: ...Diagnostic Test Cable Schematics Page 36 24 ...
Страница 1072: ...Configuring a Switch with an MPX Page A 10 ...
Страница 1086: ...Page B 14 ...
Страница 1100: ...Page I 14 Index ...

