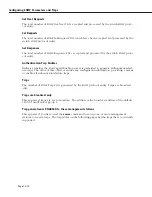
Configuring SNMP Parameters and Traps
Page 13-6
e.
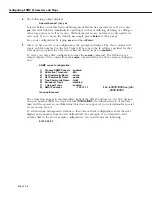
The following prompt displays:
Special Access? (no): yes
Select whether or not this Network Management Station has special access. If you enter
yes
, this
NMS
will have administrative privileges such as modifying, deleting, or adding to
other trap entries as well as its own. Without special access, an
NMS
can only update its
own entry. If you choose the default,
no
, simply press
<Enter>
at the prompt.
Save your configuration by typing
save
and then
<Enter>
.
f.
After you have saved your configuration, the prompt re-displays. The above entries will
create an
NMS
number 8 in the list. Traps will be sent to the
IP
address specified for that
NMS
station (provided the
NMS
state is
on
and unicast traps are
enabled
).
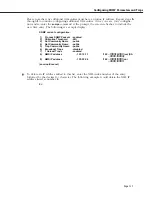
To view your new
SNMP
configuration, enter the
snmpc
command. The following is a
sample display of the output from the
snmpc
command after the above sample configura-
tion:
SNMP current configuration:
1)
Process SNMP Packets - enabled
2)
Utilization Threshold
- 60%
3)
Set Community Name
- admin
4)
Get Community Name
- public
5)
Trap Community Name - trap1
6)
Broadcast Traps
- disabled
7)
1 Unicast Traps
- enabled
8) NMS IP address
- 123.12.1.1
/162 --bffffffff:ffffffff (on) (SA)
-- ffffffff:fffffffff
(save/quit/cancel)
:
The values that appear to the immediate right of the
NMS IP
address are: the
UDP
destina-
tion port number (
162
), the trap bit masks (
ffffffff:bfffffff
), the functional state of the
NMS
(
on
), and the special access (
SA
) status (this does not appear if you selected
no
for special
access in step above).
To add network management stations to this current
SNMP
configuration, enter the next
highest entry number from the last defined
NMS
. For example, if you wanted to add
another
NMS
to the above sample configuration, you would enter the following:
9=123.22.2.2
Содержание Omni Switch/Router
Страница 1: ...Part No 060166 10 Rev C March 2005 Omni Switch Router User Manual Release 4 5 www alcatel com ...
Страница 4: ...page iv ...
Страница 110: ...WAN Modules Page 3 40 ...
Страница 156: ...UI Table Filtering Using Search and Filter Commands Page 4 46 ...
Страница 164: ...Using ZMODEM Page 5 8 ...
Страница 186: ...Displaying and Setting the Swap State Page 6 22 ...
Страница 202: ...Creating a New File System Page 7 16 ...
Страница 270: ...Displaying Secure Access Entries in the MPM Log Page 10 14 ...
Страница 430: ...OmniChannel Page 15 16 ...
Страница 496: ...Configuring Source Route to Transparent Bridging Page 17 48 ...
Страница 542: ...Dissimilar LAN Switching Capabilities Page 18 46 ...
Страница 646: ...Application Example DHCP Policies Page 20 30 ...
Страница 660: ...GMAP Page 21 14 ...
Страница 710: ...Viewing the Virtual Interface of Multicast VLANs Page 23 16 ...
Страница 722: ...Application Example 5 Page 24 12 ...
Страница 788: ...Viewing UDP Relay Statistics Page 26 24 ...
Страница 872: ...The WAN Port Software Menu Page 28 46 ...
Страница 960: ...Deleting a PPP Entity Page 30 22 ...
Страница 978: ...Displaying Link Status Page 31 18 ...
Страница 988: ...Displaying ISDN Configuration Entry Status Page 32 10 ...
Страница 1024: ...Backup Services Commands Page 34 14 ...
Страница 1062: ...Diagnostic Test Cable Schematics Page 36 24 ...
Страница 1072: ...Configuring a Switch with an MPX Page A 10 ...
Страница 1086: ...Page B 14 ...
Страница 1100: ...Page I 14 Index ...

