Installing a Switching Module
Page 3-4
Installing a Switching Module
All switching modules can be inserted and removed from the switch chassis while power is
on or off without disrupting the other modules.
A standard screwdriver is required for install-
ing and removing switching modules.
You can also hot swap modules of the same type while
the switch is active.
Switching modules may be installed in any slot other than Slot 1. (Slot 1 is reserved for an
MPX
.) In a setup with redundant
MPX
modules, Slots 1 and 2 are reserved for the
MPXs
. Addi-
tional modules can be installed in any available slot. (OmniS/R-3 slots are numbered 1 to 3
starting from the topmost slot. OmniS/R-5 slots are numbered 1 to 5 starting from the topmost
slot. OmniS/R-9 slots are numbered 1 to 9 starting from the left.)
♦
Anti-Static Warning
♦
Before handling a switching module, free your hands
of static by wearing a grounding strip, or by grounding
yourself properly. Static discharge can damage the
components on the switching module.
To insert a switching module follow these instructions:
1.
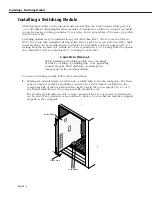
Holding the module firmly in both hands, carefully slide it into the card guide. The front
panel connectors and
LED
s should face outward. In a 9-slot Omni Switch/Router, the
component side of the board should face right (toward the power supply). In a 3- or 5-
slot Omni Switch/Router, the component side should face up.
The module should slide in easily. A large amount of force is not necessary and should
not be used. If any resistance is encountered, check to be sure that the module is aligned
properly in the card guide.
Switch Module
Card Guides
Slide Card In
Содержание Omni Switch/Router
Страница 1: ...Part No 060166 10 Rev C March 2005 Omni Switch Router User Manual Release 4 5 www alcatel com ...
Страница 4: ...page iv ...
Страница 110: ...WAN Modules Page 3 40 ...
Страница 156: ...UI Table Filtering Using Search and Filter Commands Page 4 46 ...
Страница 164: ...Using ZMODEM Page 5 8 ...
Страница 186: ...Displaying and Setting the Swap State Page 6 22 ...
Страница 202: ...Creating a New File System Page 7 16 ...
Страница 270: ...Displaying Secure Access Entries in the MPM Log Page 10 14 ...
Страница 430: ...OmniChannel Page 15 16 ...
Страница 496: ...Configuring Source Route to Transparent Bridging Page 17 48 ...
Страница 542: ...Dissimilar LAN Switching Capabilities Page 18 46 ...
Страница 646: ...Application Example DHCP Policies Page 20 30 ...
Страница 660: ...GMAP Page 21 14 ...
Страница 710: ...Viewing the Virtual Interface of Multicast VLANs Page 23 16 ...
Страница 722: ...Application Example 5 Page 24 12 ...
Страница 788: ...Viewing UDP Relay Statistics Page 26 24 ...
Страница 872: ...The WAN Port Software Menu Page 28 46 ...
Страница 960: ...Deleting a PPP Entity Page 30 22 ...
Страница 978: ...Displaying Link Status Page 31 18 ...
Страница 988: ...Displaying ISDN Configuration Entry Status Page 32 10 ...
Страница 1024: ...Backup Services Commands Page 34 14 ...
Страница 1062: ...Diagnostic Test Cable Schematics Page 36 24 ...
Страница 1072: ...Configuring a Switch with an MPX Page A 10 ...
Страница 1086: ...Page B 14 ...
Страница 1100: ...Page I 14 Index ...


