Installing and Using Utilities 5-85
You can also completely abort the upgrade from the Active Upgrade Console, if necessary.
6.
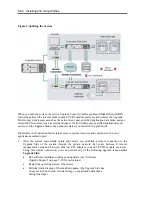
When you are finished installing software on the Upgrade Side, you disconnect the remote
connection to the Upgrade Side and initiate the
merge
process.
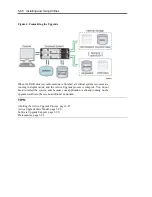
When you merge the system, the Active Upgrade Console stops your applications on the
Production Side and unmounts any application data disks to ensure that pending disk updates
are flushed to disk. It then merges system resources so that the network, external storage, and
application data disks become available to the whole system again. With the exception of the
internal disks, all critical system resources return to duplex mode (Figure 3).
Figure 3. Merged System
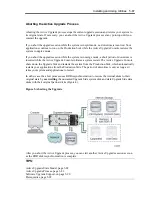
Finally, the system restarts your applications, including the Active Upgrade Console, from the
Upgrade Side system disk. Depending on the complexity of your applications and the upgrade
you performed, your applications may be backed up and running in under a minute.
7.
After the system is successfully merged, you can test your applications and verify the success
of your upgrade(s) with full access to the system’s resources. If you discover a problem, you
can still abort the upgrade process and restore the system to its previous state, because the
original copy of your system disk (on the Production Side) has not been overwritten yet.
8.
When you are certain that the upgrade(s) were successful, you can
commit
the changes to make
them permanent.
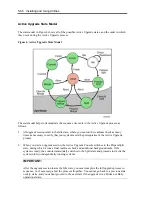
When you commit the changes, the Active Upgrade Console resynchronizes the RDR disks in
your system by
overwriting
the original Production Side system disk and stale Upgrade Side
data disks with their partner disks, which are up-to-date (Figure 4).
NOTE:
Because the original version of your system disk is erased during the commit process, you
cannot
abort an upgrade session after initiating the commit process.
Summary of Contents for Express5800/320Fd-MR
Page 13: ...v Appendix B I O Port Addresses This appendix lists factory assigned I O port addresses...
Page 19: ...xi THIS PAGE IS INTENTIONALLY LEFT BLANK...
Page 43: ...2 10 General Description Rear View...
Page 47: ...2 14 General Description CPU IO Module CPU IO module...
Page 67: ...2 34 General Description This page is intentionally left blank...
Page 79: ...3 12 Windows Setup and Operation 3 Confirm that RDR of the disk is cancelled...
Page 106: ...Windows Setup and Operation 3 39 This page is intentionally left blank...
Page 198: ...4 92 System Configuration This page is intentionally left blank...
Page 370: ......
Page 371: ...This page is intentionally left blank...
Page 389: ...6 18 Maintenance 3 Stop of PCI module 1 4 Start of PCI module 1...
Page 391: ...6 20 Maintenance This page is intentionally left blank...
Page 465: ...System Upgrade 8 31 board must not be mixed with N8804 005 or N8803 035...
Page 480: ......
Page 483: ......

