background image

Getting

 Started


1-55

1

Paper

To set the paper type

  5 

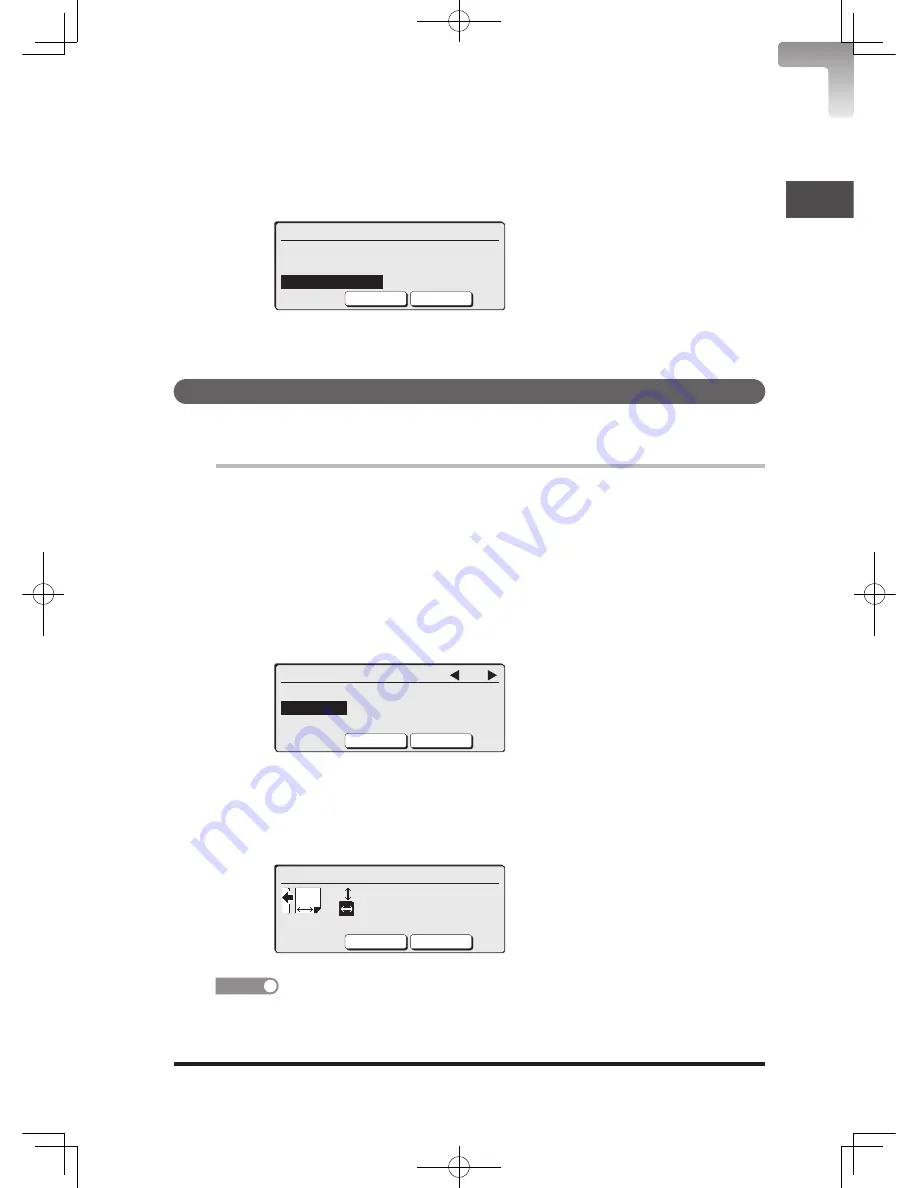
Select “Paper Type” using the cursor keys and press [Edit].

  6 

Select the paper type using the cursor keys and press [Enter].

Paper Type

Plain          Postcard

PasteBrd.      Envelope

OHP

Cancel

Enter

  7 

Press <Reset> to return to the standby screen.

Registering custom sizes

To use the custom paper, set the width and length of paper in advance. You can 

register five types of the custom paper.

  1 

Press <Menu>, <3>, [Enter].

  2 

Select “Bypass [Others] Paper” using the cursor keys and press 
[Enter].

  3 

Select “Paper Size” using the cursor keys and press [Edit].

  4 

Select “Other” using the cursor keys and press [Enter].

  5 

Select the custom size you want to enter using the cursor keys and 
press [Enter].

Bypass [Others]:Other    3/3

Custom1   Custom4

Custom2  

 Custom5

Custom3

Cancel

Enter

  6 

Enter the vertical and horizontal size of paper using the numeric 
keys.

Press the upper or lower of the cursor keys to switch the entry for 

vertical and horizontal.

Custom2

            120 mm  ( 90-297)

            2_56 mm  (140-432)

Close

Enter

NOTE

Vertical or horizontal is the direction of the paper seen from the front of the machine 
(page 1-42).

DB2-90290-60.indb   55

2007/02/02   12:31:49

Summary of Contents for mfx-2200

Page 1: ...ENG User s Guide User s Guide Part Number DB2 90290 60 2007...

Page 2: ...machine The manuals for this machine are the following Installation Manual This is the first documentation you should refer to for installing and setting up the machine Safety Information Please read...

Page 3: ...tions Chapter 4 Advanced Fax Functions Chapter 5 Operation Management 6 7 8 9 Chapter 6 Security Function Chapter 7 Scanner and Printer Driver Chapter 8 Entering Editing Functions Chapter 9 Maintenanc...

Page 4: ...7 MFP part names and functions 1 7 Internal parts 1 11 Control panel part names and functions 1 12 LCD 1 14 Changing the screen 1 14 Copy screen 1 15 Fax screen 1 16 Scanner screen 1 17 Displayed ico...

Page 5: ...standard TTI 1 40 Registering TTI numbers 1 40 Paper Paper 1 41 Acceptable paper 1 41 Unacceptable paper 1 43 Printing area 1 43 Automatic paper supply function 1 44 Loading Paper 1 45 Precautions whe...

Page 6: ...copy 2 17 Series copy 2 19 Repeat copy 2 20 Mix copy 2 22 Margin 2 24 Erase center 2 25 Duplex copy 2 26 Booklet copy 2 42 Interrupt copy 2 47 Card copy 2 48 Function Combination 2 50 Copy function co...

Page 7: ...Fax Mode 3 29 Primarily using the phone Tel Mode 3 31 Operations During Reception 3 32 Display During Reception 3 32 Out of paper reception 3 32 Recording Received Documents 3 33 Reduction margin 3 33...

Page 8: ...letin box 4 21 Registering an F code relay box 4 24 Deleting an F code box 4 28 Printing a list of F code boxes 4 29 Transmission using a sub address F code transmission 4 29 Reception using a sub add...

Page 9: ...check transmission 6 8 Check Broadcast Destination 6 10 Setting the broadcast destination check 6 10 Transmission after the broadcast destination check 6 11 Dial Double Push 6 12 Setting the dial doub...

Page 10: ...list 8 15 Other Settings 8 17 Setting procedure 8 17 Other settings list 8 17 Printing a Fax Settings List 8 20 Copy Function Settings Copy Default Settings 8 21 Setting the default 8 21 Copy default...

Page 11: ...9 3 Replacing the drum cartridge 9 5 Replacing the Stamp Option 9 8 Daily Maintenance 9 10 Cleaning the outside of the machine 9 10 Cleaning the scanner area 9 11 Cleaning the recording head charging...

Page 12: ...Chapter 10 Appendix 10 1 Function Number List 10 2 Printing a function list 10 11 Main Specifications 10 12 Consumables 10 14 Optional Items 10 15 Index 10 16 DB2 90290 60 indb 10 2007 02 02 12 30 51...

Page 13: ...es if you handle the machine incorrectly For safe operation please follow instructions carefully IMPORTANT Describes important conditions or restrictions you should carefully observe to avoid problems...

Page 14: ...onsumption of office equipments of which power are often turned ON for a long time from the energy saving view that efficiently use the energy when needed It adopts the voluntary system a manufacturer...

Page 15: ...the ventilating slot of the machine at least 10 cm away from walls or other devices To ensure proper ventilation and easy operation secure an adequate installation space around the machine 1121 mm 10...

Page 16: ...around it inside the machine are extremely hot To avoid getting burned DO NOT TOUCH Do not burn toner cartridges Exposure to an open flame can cause the toner cartridge to burn or explode causing seri...

Page 17: ...ther consumables out of the reach of small children If a child should ingest toner consult a physician immediately IMPORTANT Do not store the toner cartridge or toner bottle drum cartridge or drum uni...

Page 18: ...s or mouth immediately flush with cold water and consult a physician Be careful not to stain your hands or clothes with the toner If your hands or clothes get stained wash them immediately with cold w...

Page 19: ...Metal Hydride batteries are installed inside machine as back up memory batteries Please dispose of used batteries in an environmentally friendly manner accord ing to the manufacturer s instructions F...

Page 20: ...xviii DB2 90290 60 indb 18 2007 02 02 12 31 22...

Page 21: ...18 Key displays and functions on the LCD 1 19 Power Switch and Energy Save Mode 1 20 Power switch 1 20 Energy save mode 1 21 Voice Guidance 1 22 Voice Guidance 1 22 Voice guidance items 1 22 Operatio...

Page 22: ...Paper Paper 1 41 Acceptable paper 1 41 Unacceptable paper 1 43 Printing area 1 43 Automatic paper supply function 1 44 Loading Paper 1 45 Precautions when loading paper 1 45 Loading paper in the paper...

Page 23: ...n By entering a protected passcode Security reception allows you to set it so that fax documents received after a specified time are not printed If a fax number is entered twice using the numeric keys...

Page 24: ...automatically rotated 90 degrees and printed according to the direction of the paper In addition a saved document will be rotated 90 degrees and transmitted You can transmit regardless of the paper si...

Page 25: ...and reduced respectively then combined onto a single sheet for printing page 2 17 Scanning duplex documents Duplex double sided documents can be scanned Interrupt copy You can interrupt the current jo...

Page 26: ...o store a scanned document in a file format including PDF OfficeBridge is the all in one package that allows you to better expand various network functions such as the network printer function or Inte...

Page 27: ...Getting Started 1 7 1 Part Names and Functions MFP part names and functions 1 2 3 4 5 6 16 15 14 12 9 8 10 11 7 13 DB2 90290 60 indb 7 2007 02 02 12 31 23...

Page 28: ...occurs or replace the drum cartridge 10 Right cover release lever C1 Pull up this lever when you open the side cover 11 Bypass tray Used when you copy or print onto different paper from one loaded in...

Page 29: ...ument glass 19 Document glass Load the document surface to be scanned downward 20 Paper loading guide Adjust this guide according to the width of paper loaded in the bypass tray 21 Extension tray Pull...

Page 30: ...et 28 External telephone line jack Used to connect an answer phone etc 29 Telephone line jack Used to connect a phone line cord 30 USB port Connect a USB Universal Serial Bus cable to this port for PC...

Page 31: ...the charging needle when you replaced the toner cartridge or the print quality becomes bad 4 LED print head cleaning rod B6 Insert and remove this rod to clean the print head when the print quality be...

Page 32: ...e the print data 8 Menu Press this to set advanced functions or each entry 9 Cursor keys Often used when you select the function displayed in LCD or move the cursor etc When you press the upper cursor...

Page 33: ...whether or not to attach the TTI to the header of a transmitting document List Press this to output a list 16 Macro keys page 8 43 Program Press this to program operational steps in the macro keys M1...

Page 34: ...7 13 30 Memory 100 Resol Normal Contrast Normal ScanSize Auto 1 2 Copy standby screen Copy Ready Set 1 Memory 100 Paper Auto Zoom 100 Doc Type Text 1 2 Fax standby screen Fax Ready Fax Mode 2 Apr 2007...

Page 35: ...tions They also display the status of the selected function You can register often used functions page 8 52 Status Set number Displays the number of copies Memory Displays the amount of memory left Co...

Page 36: ...d function You can register often used functions page 8 52 Status Memory Displays the amount of memory left Current time Reception mode Icon Displays a pictogram when an advanced function is set Fax m...

Page 37: ...tatus Scan Box selection Press this to select a scan box Touch panel keys Used to set a variety of functions They also display the status of the selected function This can be changed to the often used...

Page 38: ...nding the one touch keys Speed dials 057 to 200 not corresponding the one touch keys Advanced fax functions NOTE The icon of fax advanced functions is displayed on the fax standby screen in the follow...

Page 39: ...cannot select the key Doc Type Photo Setting option Sec Rx Off Cursor keys Used to switch screens or set the contrast Screen change Contrast 1 2 Lightest Normal Darkest Cancel Close Enter Cancel cance...

Page 40: ...r plug or touch the power switch with wet hands Doing so could result in electric shock IMPORTANT When you turn off the power once and wish to turn it on again wait for 3 seconds or more before doing...

Page 41: ...out of the low power mode press any key on the control panel Sleep mode When the low power mode continues for approximately 60 minutes the machine automatically switches to sleep mode You can set the...

Page 42: ...guidance example is displayed When blinking press the voice guidance key to receive instruction Play Repeat Close Voice guidance items Operation guidance This explains functions the registration setti...

Page 43: ...the voice guidance continues during a series of operations Example Speed Dial Enter Edit 1 Press Menu 1 Enter 2 Voice Guidance blinks Select the speed dial you want to enter using the cursor keys and...

Page 44: ...option OP Guidance Mode Set the operation guidance mode Auto Manual OP Guidance Volume Set the operation guidance volume Low Middle High Full Error Guidance Volume Set the error reset guidance volume...

Page 45: ...ted function in the advanced copy functions Error reset guidance When a paper jam occurs Press Menu 7 0 9 Enter Error Guidance Volume page 1 24 Stop is pressed to cancel the fax Toner becomes low Pape...

Page 46: ...7 Enter Complete beep Fax Print Complete Sound volume adjustment Menu 7 0 7 Enter Job Complete beep List print completes Output setting Menu 7 0 7 Enter Complete beep List Print Complete Sound volume...

Page 47: ...ize Auto 1 2 2 Enter the target function using the numeric keys For function numbers refer to Function Number List page 10 2 Function List 1015_ Cancel Clear Enter 3 Press Enter Searching for a functi...

Page 48: ...8 3 Select the target function using the cursor keys Fax Menu 1 4 Group Cover Page Security Rx Closed Tx ID check Tx Delayed Tx Close Settings Enter 4 Press Enter DB2 90290 60 indb 28 2007 02 02 12 31...

Page 49: ...2 Name 6 24 Lower case Remote Clear Cancel Enter Numeric keys Cursor keys Touch panel keys Cursor keys Used to move the cursor Numeric keys Used to enter characters and numbers Touch panel keys Used...

Page 50: ...be entered are shown below Entry mode Character type Operation Sample Upper case Alphabet Upper case An upper case alphabet is entered ABC Lower case Alphabet Lower case A lower case alphabet is enter...

Page 51: ...100 ize uto 1 2 MNO mno 6 Fax Mode 13 30 Memory 100 trast ormal ScanSize Auto 1 2 PQRS pqrs 7 Fax Mode Memory 100 ScanSize Auto 1 2 TUV tuv 8 ax Mode ry 100 ize uto 1 2 WXYZ wxyz 9 Fax Mode Memory 100...

Page 52: ...1 31 2 Enter the number using the numeric keys Entering symbols When you press the key while entering characters the entry mode switches to the symbol entry screen 1 Press the key In the language set...

Page 53: ...Move the cursor to the position you want to insert the space Name 13 24 Lower case MuratecEurope CharMode Blank 2 Press Blank to insert the space Name 14 24 Lower case Muratec Europe CharMode Blank D...

Page 54: ...te Name 15 24 Lower case Muratec Europpe Clear Cancel Enter 2 Press Clear Name 14 24 Lower case Muratec Europe Clear Cancel Enter To insert 1 Move the cursor using the cursor keys to the position you...

Page 55: ...Answering Fax mode or Tel mode options For more details on how to select the reception mode refer to page 1 38 Dial tone detection Set the dial tone detection Sender name TTI This makes it easy to sh...

Page 56: ...start setting each item select the item using the cursor keys and press Enter 4 After setting all the items press Close to return to the standby screen Print the fax settings list and check the regist...

Page 57: ...current time using the numeric keys and press Enter Curr Time Enter current time 2 _007 04 02 13 30 Cancel Enter Setting the daylight saving Set the daylight saving When you set it to On the machine a...

Page 58: ...Reception Mode 1 2 Fax Mode Tel Fax Mode Fax Tel Mode Cancel Enter NOTE For more details about the fax reception mode refer to Receiving Faxes page 3 25 Setting the dial tone detection Set it to On to...

Page 59: ...lect the TTI you want to enter or change using the cursor keys and press Enter TTI Enter Edit 01 Not registered 02 Not registered 03 Not registered Close Enter 4 Enter the TTI and press Enter TTI Ente...

Page 60: ...vice Dept Cancel Enter Registering TTI numbers 1 Press Menu 9 Enter 2 Select TTI Number using the cursor keys and press Enter 3 Enter the TTI number using the numeric keys and press Enter Up to 20 dig...

Page 61: ...A5 B4 B5 B5 Postcard 8K 270mm 390mm 16K 195mm 270mm 16K 270mm 195mm Letter Letter Legal 11 17 H Ltr H Ltr Executive Executive F4 210mm 330mm COM10 Monarch DL Envelope1 90mm 205mm Envelope2 240mm 332m...

Page 62: ...able paper could change in quality if improperly stored which may cause a paper jam poor printing quality and malfunction Store paper in a place that meets the following conditions Store in a place wi...

Page 63: ...rfaces are processed such as carbon paper thermal paper or pressure sensitive paper Paper subject to processing such as gilding or embossing Paper of different sizes mixed together Irregularly shaped...

Page 64: ...with the following priority 1st paper cassette 2nd paper cassette option 3rd paper cassette option 4th paper cassette option Bypass tray IMPORTANT To use the bypass tray in the automatic paper supply...

Page 65: ...the specified number of sheets If you load paper higher than the paper upper limit mark it may cause a paper jam PET Align the paper guide securely against the edge of loaded paper If the paper guide...

Page 66: ...ll out the paper cassette from MFP 2 Slide the paper guide D2 to match the paper size 3 Place the side to be printed on upward and load paper in the paper cassette IMPORTANT Do not load paper mixed in...

Page 67: ...Letter Letter Legal 11 17 Half letter Half letter Executive or Executive align the dial to Others 6 Securely return the paper cassette in MFP 7 When you set the paper size dial to Others set the pape...

Page 68: ...1 2 8K LTR 11 17 16K LTR HLTR 16K LGL HLTR 5 Press Reset to return to the standby screen Loading paper in the bypass tray To print on envelopes postcards custom paper OHP films use the bypass tray Th...

Page 69: ...8K 270mm 390mm 16K 195mm 270mm 16K 270mm 195mm Letter Letter Legal 11 7 Half letter Half letter Executive Executive F4 COM10 Monarch DL Envelop1 90mm 205mm Envelop2 240mm 332mm or custom paper align...

Page 70: ...r sizes 1 Select Paper Size using the cursor keys and press Edit 2 Select Other using the cursor keys and press Enter Bypass Others Normal 2 2 Other Cancel Enter 3 Select the paper size using the curs...

Page 71: ...the bypass tray 2 Set the paper size dial to Postcard Align the dial groove to the one on the bypass tray 3 Slide the paper guide to the postcard size and load the postcard with the side to be printed...

Page 72: ...load the envelope straight with the side to be printed on downward IMPORTANT Fold the flap of the envelope Do not use envelopes that come with glue as a sealant When the envelope is a type where the...

Page 73: ...ng refer to Registering custom sizes page 1 55 NOTE If the envelope is printed out wrinkled take the following steps 1 Register the envelop size so that the length is longer than the width in Register...

Page 74: ...Size using the cursor keys and press Edit 4 Select the paper size using the cursor keys and press Enter Bypass Others Normal 1 2 A3 A5 B5 A4 A5 B5 A4 B4 Postcd Cancel Enter NOTE The following options...

Page 75: ...r using the cursor keys and press Enter 3 Select Paper Size using the cursor keys and press Edit 4 Select Other using the cursor keys and press Enter 5 Select the custom size you want to enter using t...

Page 76: ...er Type using the cursor keys and press Edit Then select the target paper type and press Enter To register other custom paper size repeat from step 3 Bypass Others Paper Paper Size 120 256 Paper Type...

Page 77: ...s scanning Maximum Transmission Width 300 mm Length 900 mm Copy Width 300 mm Length 500 mm Width 297 mm Length 420 mm A3 Minimum Width 120mm Length 100mm Width 148 mm Length 105 mm A6 Number of sheets...

Page 78: ...staples paper clips or adhesive tape attached Documents pasted or glued together Glossy documents or documents with a special coating If you load the following types of documents on the document glas...

Page 79: ...on fluid ink or stamps on the document are completely dry before loading Be sure to check there is no document on the ADF If a document is left on the ADF any document on the glass cannot be scanned F...

Page 80: ...he document edge stops on the ADF Check again that the document guide match the document width When you load multi page documents the sheets are scanned from top top page to bottom sheet by sheet NOTE...

Page 81: ...t documents with the document guide extended The document may be reduced and printed Doing so may result in skewed feeding Do not load the documents with different sizes The documents may be reduced a...

Page 82: ...1 62 DB2 90290 60 indb 62 2007 02 02 12 31 51...

Page 83: ...ing 2 9 Setting the document type contrast 2 10 Zoom copy 2 11 Sort copy 2 15 Copy reservation 2 16 Advanced Advanced Functions 2 17 Combined copy 2 17 Series copy 2 19 Repeat copy 2 20 Mix copy 2 22...

Page 84: ...iate paper to match the document the following message is displayed Paper 1 A4 Ratio 100 Paper size is unsuitable Using the autoselected paper Press start or stop key Paper Zoom Press Start to copy on...

Page 85: ...rflow Paper Auto Zoom 100 Doc Type Text 1 2 Press Stop to return to the standby screen If the memory is exceeded too often wait until the memory is available or press Doc Type to change the copy image...

Page 86: ...cument the machine will automatically rotate the image for coping The rotating direction is counterclockwise Rotation is not performed in the combine or repeat copy Rotation may not occur depending on...

Page 87: ...documents refer to Loading Documents page 1 59 3 Set each copy setting as necessary In basic functions you can set the paper selection zoom scanning quality scanning contrast and sort For details on...

Page 88: ...details on loading documents refer to Loading Documents page 1 59 2 Set to the sort copy combine copy duplex copy or booklet copy NOTE For duplex copy function the duplex print unit is required For bo...

Page 89: ...nd 1 2 Please Set next doc Ratio Auto Memory 97 Paper 1 A4 6 When you finish scanning all the documents press Scanning End Copying starts NOTE The default settings of Next Doc are No for the ADF Yes f...

Page 90: ...of copies is displayed on the upper right of the copy standby screen Copy Ready Set 15 Memory 100 Paper Auto Zoom 100 Doc Type Text 1 2 NOTE To change the number of copies entered overwrite it with t...

Page 91: ...ed paper is loaded Bypass tray Load the desired copy in the bypass tray and select it Load the paper which cannot be loaded in the paper cassette postcards or custom paper etc page 1 48 1 Load your do...

Page 92: ...ntaining photos or images Background Does not scan a document background with a base pattern or color 3 Changed to the selected document type Contrast 1 Press Contrast 2 Select the desired contrast us...

Page 93: ...c magnification Automatically selects the magnification according to the specified paper size and performs the zoom copy function When the document size cannot be automatically detected the document w...

Page 94: ...A4 A3 122 A4 B4 A5 B5 115 B5 A4 B4 A3 100 even 86 A3 B4 A4 B5 81 B4 A4 B5 A5 70 A3 A4 B4 B5 A4 A5 Depending on the selected magnification the image could run off the paper or there could be extra bla...

Page 95: ...mber of copies one copy is made 6 Press Start The paper is automatically selected and used for copying in the set magnification When you set the paper in step 2 the selected paper is used for copying...

Page 96: ...g numeric or cursor key Enter Fixed Cancel 65 Press Fixed to return to the screen for selecting the fixed magnification 6 Enter the number of copies using the numeric keys Copy Ready Set 12 Memory 100...

Page 97: ...Off The sort copy icon is displayed when Sort On is set Copy Ready Set 1 Memory 100 Contrast Normal Sort On 2 2 4 Set other copy functions as necessary 5 Enter the number of copies using the numeric k...

Page 98: ...Copy Reserve Ready is displayed while printing copies Copy Reserve Ready Set 1 Memory 99 Print P 1 2 Set 1 1 Paper 1 A3 Zoom Auto Doc Type Text 1 3 2 Load the document you want to reserve 3 Set the do...

Page 99: ...after setting the combined copy function Even if the paper is set to auto it will be re set to use paper from the 1st cassette To set other paper options do so after setting the combined copy function...

Page 100: ...is displayed Press Reset to cancel the combine copy setting 4 Press Paper as necessary and select the paper to copy on using the cursor keys page 2 9 Select an option other than auto The document loa...

Page 101: ...riesCopy using the cursor keys and press Enter 2 Select the binding direction for the loading documents using the cursor keys Document with left binding Document with right binding SeriesCopy Bind Pos...

Page 102: ...re set to copy from the 1st paper cassette To set other paper options do so after setting the repeat copy function The copied image could run off depending on the paper size and document The rotate co...

Page 103: ...Reset to cancel the repeat copy setting 4 Press Paper as necessary and select the paper to copy on using the cursor keys page 2 9 Select an option other than auto The document loading method changes d...

Page 104: ...document sizes for mixing are A3 and A4 A4 and A5 or B4 and B5 Mix copy procedure 1 Load the documents with the edges aligned on the ADF To load the documents Align the edges and load the documents as...

Page 105: ...Copy Functions 2 23 2 Advanced 6 Select On and press Enter Mix Copy Off On Cancel Enter The mix copy icon is displayed on the standby screen 7 Press Start DB2 90290 60 indb 23 2007 02 02 12 32 07...

Page 106: ...ack sides symmetrically horizontally or vertically 1 Load your document and press Copy 2 Press Menu 3 Select Margin using the cursor keys and press Enter 4 Press Edit 5 Press Binding to select the mar...

Page 107: ...press Copy 2 Press Menu 3 Select Erase Center using the cursor keys and press Enter 4 Enter the erase center width using the numerical keys or cursor keys You can enter the erase center width in the...

Page 108: ...s from a book onto both sides of the paper Book F B Copy the documents onto both sides of the paper so that the copied pages are faced like the facing pages of a book NOTE For the duplex copy function...

Page 109: ...es of the document select LeftRight When the images are vertically reversed on the front and back sides of the document select Top Duplex Copy 2 1sided DocBind LeftRight Top Cancel Enter NOTE The outp...

Page 110: ...ard Loading direction of the back side Left or right binding Top binding Loading direction of the back side Rotated 180 Left or right binding Top binding Loading direction of the front side Load the t...

Page 111: ...ion of the back side Left or right binding Top binding Loading direction of the back side Rotated 180 Left or right binding Top binding Loading direction of the front side Load the top side to the lef...

Page 112: ...de Left or right binding Top binding Loading direction of the back side Rotated 180 Left or right binding Top binding Loading direction of the front side Load the top side to the left Loading directio...

Page 113: ...f the back side Left or right binding Top binding Loading direction of the back side Rotated 180 Left or right binding Top binding Loading direction of the front side Load the top side to the left Loa...

Page 114: ...e 2 2sided Book F B 2 1sided Cancel Enter 5 Select LeftRight or Top for the binding position of copied images Duplex Copy 1 2sided Finish LeftRight Top Cancel Enter NOTE The output copied images depen...

Page 115: ...glass Left or right binding Left or right binding Top binding Top binding Load the top side to the left Left or right binding Top binding Top binding Left or right binding Loading upward Left or righ...

Page 116: ...n When the images are vertically the same on the front and back sides of the document select LeftRight When the images are vertically reversed on the front and back sides of the document select Top Du...

Page 117: ...the front side of the document is complete the following screen is displayed Load the document with the back side upward on the ADF Set duplex document Next Loading Direction Stop Start 1 2 10 Press...

Page 118: ...ight binding Top binding Left or right binding Loading direction of the back side Rotated 180 Left or right binding Top binding Top binding Top binding Loading direction of the front side Load the top...

Page 119: ...binding Left or right binding Loading direction of the back side Rotated 180 Left or right binding Top binding Top binding Top binding Loading direction of the front side Load the top side to the lef...

Page 120: ...Loading direction of the back side Rotated 180 Left or right binding Left or right binding Top binding Left or right binding Loading direction of the front side Loading upward Loading direction of the...

Page 121: ...Top binding Loading direction of the back side Rotated 180 Left or right binding Left or right binding Top binding Left or right binding Loading direction of the front side Loading upward Loading dir...

Page 122: ...cel Enter The zoom magnification is automatically set 5 Select Left or Right according to the document binding position Duplex Copy Book Face Finish Left Right Cancel Ratio Enter NOTE Left binding Per...

Page 123: ...ok F B 2 1sided Cancel Enter The zoom magnification is automatically set 5 Select Left or Right according to the document binding position Duplex Copy Book F B Finish Left Right Cancel Ratio Enter NOT...

Page 124: ...r option For left or right binding select those other than the paper option Left binding Binding position Document inserting direction Copy Select Left to bind the booklet pages on the left side Load...

Page 125: ...ctions 2 43 2 Advanced Top binding Select top binding to bind the booklet pages from the top Select the paper option Binding position Document inserting direction Copy DB2 90290 60 indb 43 2007 02 02...

Page 126: ...nd press Enter Copy Menu 2 2 Booklet Copy List Mix Copy Card Copy Close Settings Enter 6 Select Left or Right using the cursor keys and press Enter Booklet Copy Bind Left Right Top Cancel Enter The ic...

Page 127: ...to BP A4 1 A4 2 A5 Cancel Enter 4 Press Menu 5 Select Booklet Copy using the cursor keys and press Enter Copy Menu 2 2 Booklet Copy List Mix Copy Card Copy Close Settings Enter 6 Select Top using the...

Page 128: ...Load your documents 8 Press Start NOTE The copy magnification is set to Auto To change the magnification press Zoom before pressing Start and set the magnification DB2 90290 60 indb 46 2007 02 02 12...

Page 129: ...scanning the documents using the ADF press Stop to output the documents 2 Load the documents you want to interrupt and copy Then set other copy functions as necessary NOTE To cancel the interrupt mod...

Page 130: ...not available Card Copy is available only from the document glass Automatic zoom ratio is not available with this feature Document size which can be copied is as follows ID Card 86 56 mm Personal Che...

Page 131: ...t 1 2 7 Refer to the table on the previous page set the card or check on the document glass 8 If you want to change the paper press Paper A copy result will vary according to the paper direction Refer...

Page 132: ...epeats Series copy Duplex copy Duplex copying of one sided documents 1 Duplex copying of duplex documents 1 One sided copying of duplex documents Duplex copying of facing documents 1 Duplex copying of...

Page 133: ...ack document duplex Booklet copy Automatic paper selection Manual Custom paper selection Auto Fixed Zoom Bypass Paper cassette Plain paper Other than plain paper Standard paper selection Other paper s...

Page 134: ...ed functions separately To cancel one of the combined advanced functions go to each advanced copy setting screen and return the setting to the default Example To cancel only the combine copy function...

Page 135: ...ling symbols 3 15 Setting a sender name TTI 3 18 Attaching the sender name 3 19 Setting the stamp option 3 20 Job Confirmation Fax Cancel Canceling Checking Fax 3 21 Canceling Checking fax 3 21 Cancel...

Page 136: ...journal report automatically 3 39 Reading a journal report 3 40 Printing a journal daily report 3 41 Setting the transmission confirmation report temporarily 3 42 Setting the transmission confirmatio...

Page 137: ...nsmitted as A4 page 8 18 Automatic document size detection is not available when the mirror carriage under the document glass is operating When the document size cannot be automatically detected When...

Page 138: ...ime transmission page 3 14 to retransmit the documents from the printed page number If the quick memory transmission page 3 15 is OFF and the memory transmission is ON the memory may be exceeded when...

Page 139: ...ter the destination fax numbers in the speed dials in advance you can specify the destination using the speed dial one touch dial or address book Using the numeric keys Enter the destination number us...

Page 140: ...Book 2 5 DEF Development departmen GHI General affairs dept GHI German sales company Close Clear Select For details on using the address book refer to Using the address book page 3 8 5 Press Start The...

Page 141: ...ress Fax 2 Specify the destination refer to step 4 on page 3 5 3 Press Start 4 Press Next Doc while scanning the documents and set Next Doc to Yes When loading the document on the document glass proce...

Page 142: ...r cursor key 3 Search for the destination using the cursor keys Addressbook 2 5 DEF Development departmen GHI General affairs dept GHI German sales company Close Clear Select 4 Press Select to select...

Page 143: ...meric keys To search for the destination name of symbols press of the numeric keys Alphabet groups containing no registered destination name are displayed in shade 5 Select the target destination usin...

Page 144: ...one touch keys address book or numeric keys on the telephone NOTE When picking up the handset to make a call if the receiving party is using manual reception have that party prepare to receive the fa...

Page 145: ...he right side of the control panel and press Monitor You can operate similarly by pressing Menu selecting On hook using the cursor keys and pressing Enter 3 Press Volume 4 Adjust the volume using the...

Page 146: ...usy or if there is no answer the machine waits one minute or three minutes in some countries then tries to dial the same number again The machine will attempt the redial up to two times Fax Ready Redi...

Page 147: ...nning the document background with a base pattern or color Contrast 1 Press Contrast 2 Select the desired contrast using the cursor keys and press Enter You can also press to select the contrast Selec...

Page 148: ...er party before transmitting the document To use real time transmission set the memory transmission setting to OFF NOTE The real time transmission is not available using the document glass When you us...

Page 149: ...is set to ON at the time of shipment To change the default to OFF refer to Other Settings page 8 17 Dialing symbols To insert the pause or switch the tone signal when dialing enter the dialing symbols...

Page 150: ...keys Enter Fax Number 0_ Prefix Cancel Clear Enter 3 Press DialOpt Enter Fax Number 0_ Prefix Register DialOpt Group 4 Select Pause using the cursor keys and press Enter Dialing Opt Pause Prefix Canc...

Page 151: ...gs Enter 3 Select Prefix using the cursor keys and press Enter Dialing Opt Pause Prefix Cancel Enter 4 Enter the fax number using the numeric keys Enter Fax Number N123456789_ Prefix Cancel Clear Ente...

Page 152: ...using the cursor keys and press Enter Fax Menu 4 4 Dialing Opt List Tx Report TTI Select Close Settings Enter 4 Select the TTI using the cursor keys and press Enter TTI Select 1 ABC Inc 2 Sales Dept...

Page 153: ...of TTI illuminates the setting is ON attaching the TTI When it is OFF the setting is OFF not attaching the TTI x Mode y 100 ze to 1 2 NOTE The TTI transmission is set to ON at the time of shipment To...

Page 154: ...cursor keys and press Enter 4 Select the On using the cursor keys and press Enter 5 Press Close The icon of the advanced functions is displayed NOTE To change the default of the stamp setting to ON r...

Page 155: ...currently being transmitted or not 1 Press Job Confirm Fax Cancel When there is a document currently being transmitted proceed to step 5 When there is no document currently being transmitted 2 Select...

Page 156: ...ntly being transmitted is displayed as Comm Reserved 002 20 09 00 S003 S003 General affairs dept OK to delete Yes No If you delete a communication document for Broadcast transmission or Group transmis...

Page 157: ...Confirm Fax Cancel 1 Press Job Confirm Fax Cancel 2 Select Delayed Commands using the cursor keys and press Enter 3 The communication reserved documents are displayed To change the screen press the cu...

Page 158: ...ct the destination s you want to delete using the cursor keys and press Select You can select multiple destinations The selected destination is displayed with a check mark Press Select again to releas...

Page 159: ...en the other party transmits a fax or makes a call 1 Receives 2 Start the reception NOTE Even if the telephone is not connected to this machine you can set the machine to ring Fax Ringer page 8 36 You...

Page 160: ...refore the calling party will be charged even if you are absent and cannot receive the call To receive a phone call you need to connect the telephone to this machine When the other party transmits a f...

Page 161: ...call 3 Talk to the other party When the other party is manually transmitting there may be no sound when you pick up the handset so confirm on the phone that no one is on the line before pressing Start...

Page 162: ...NOTE The machine might ring at fax reception depending on the other fax machine When the other party makes a call 1 The machine rings in a few moments after the reception Continuous ringing means the...

Page 163: ...swering machine 2 The answering message is given We are not in at the moment 3 Start the reception NOTE To make the machine ring you need to set the fax ringer page 8 36 The automatic switch between a...

Page 164: ...starts Message recording NOTE When the other party is manually transmitting the answering machine will activate and play the answering message before the machine switches to fax so please include inst...

Page 165: ...party If it is a fax reception you hear the beep or no sound 3 Press Start Check the request of the other party press Start and put down the handset When the other party is manually transmitting there...

Page 166: ...a paper jam or if paper runs out the Out of paper reception function comes on and the received document is stored in the memory If a countermeasure against paper shortage is taken the stored document...

Page 167: ...ger than the reduction margin it is printed on a separate page NOTE Set the reduction margin from 0 mm to 85 mm according to the blank length of often received documents For details on setting the red...

Page 168: ...per printing area so the reduction rate may vary even on the same page When you receive documents which are larger than A4 A5 or B5 and the length exceeding A4 A5 or B5 is longer than the reduction ma...

Page 169: ...ize document Auto Fixed 100 As in original size As in original size As in original size As in original size Reduced to fit onto 1 sheet Received in each original size the area that does not fit on 1 s...

Page 170: ...not available the paper is selected according to the following priority If all the paper runs out the out of paper reception function will be carried out A4 A4 B5R B5R A4 B4 B5R B4 Paper size priorit...

Page 171: ...ct this report if you always want to print the status of the latest communications individually When the communication status is printed using the daily journal report it will not be described on the...

Page 172: ...press Enter 4 Select the journal report you want to print using the cursor keys and press Enter Journal Report Fax Tx Fax Rx Fax Tx Rx Close Enter 5 Press Yes Print the selected journal report Fax Tx...

Page 173: ...using the cursor keys and press Enter The auto printing is set and the display returns to the standby screen Auto Print Journal Off ON no time setup ON with time setup Cancel Enter To set the time fo...

Page 174: ...ccurs the other party may have printed the page on which an error occurred 7 Dept When the department management is set the department number is recorded here 8 Result Communications results OK Comple...

Page 175: ...r the journal report page 3 39 1 Communication status Journal report 2 Journal daily report Status added Status printed once in the journal daily report 1 Press Menu select List using the cursor keys...

Page 176: ...or keys and press Enter 4 Press Close to return to the standby screen NOTE When this function is set to ON issue the Tx report the icon of the advanced functions is displayed When you assign Tx Report...

Page 177: ...only 2 Mode Resolution in the communication 3 Start Time Time to start the communication 4 Time Time required from the start to the end of the communication 5 Page The number of pages communicated 6 R...

Page 178: ...Press No Comm 001 02 13 30 S001 S001 Kyoto Head Office OK to delete Yes No 3 Press Close Delayed Commands 1 2 Comm 006 02 13 30 S001 Reserved 001 03 16 00 012 3 Reserved 002 03 17 00 Bcast Close Dele...

Page 179: ...keys and press Enter 3 Select Command List and press Enter If no command is stored the No command stored is displayed 4 Press Yes The command list is printed NOTE To shortcut the process press Menu 1...

Page 180: ...eys and press Enter 3 Select Command Document using the cursor keys and press Enter 4 Select the command document you want to print using the cursor keys and press Print 5 Press Yes The selected comma...

Page 181: ...ing the one touch keys Press the one touch key in which the destination is registered The one touch keys 01 to 56 correspond to the speed dials 001 to 056 For example when you register the destination...

Page 182: ...ou called using the MFP numeric keys 3 Talk to the other party when the line is connected When you press Monitor pick up the handset and talk NOTE If you delete Monitor or Speed Dial on the soft keys...

Page 183: ...Code Communications 4 17 What are F code communications 4 17 Sub addresses and passwords 4 17 Functions available with F code communications 4 17 Registering an F code box 4 18 Registering an F code...

Page 184: ...istering forwarding conditions 4 44 Checking Deleting forwarding destination numbers 4 47 Deleting forwarding conditions 4 48 Printing a list of forwarding conditions Fax forward list 4 49 Setting the...

Page 185: ...touch keys 01 to 56 correspond to the speed dials 001 to 056 For example when you register the destination in the speed dial 002 you can specify the same destination by pressing the one touch key 02...

Page 186: ...r 2007 13 30 Memory 100 Press Location to check entries Location 1 4 2 The destination confirmation screen appears Location 1 2 FAX 1234567890 FAX S001 Kyoto Head Office FAX S008 Service Division Clos...

Page 187: ...as necessary For the setting procedure refer to Setting the resolution contrast page 3 13 3 Press Menu 4 Select Group and press Enter Close Enter Settings Fax Menu 1 4 Group Cover Page Security Rx Cl...

Page 188: ...o load documents refer to Loading Documents page 1 59 2 Set the resolution and contrast as necessary For the setting procedure refer to Setting the resolution contrast page 3 13 3 Enter the destinatio...

Page 189: ...the reserved communication and re set To clear the reserved communication press Job Confirm Fax Cancel For details refer to page 3 21 For real time transmission the document remains loaded on the ADF...

Page 190: ...ber to register as a prefix using the numeric keys and press Enter If you enter the incorrect number press Clear and delete it Dial Prefix Enter Dial Prefix 1234_ Cancel Enter Clear NOTE 0000 is regis...

Page 191: ...document and press Fax For details on how to load documents refer to Loading Documents page 1 59 2 Press Menu select Dialing Opt using the cursor keys and press Enter Close Enter Settings Fax Menu 4...

Page 192: ...tered 3 Press DialOpt DialOpt 002 Enter Fax Number _ 4 Select Prefix using the cursor keys and press Enter The dialing symbol N is entered 5 Enter the destination fax number using the numeric keys and...

Page 193: ...r the message Cancel Enter Clear CoverPage Setup 1 0 120 Lower case _ Up to 120 characters can be entered For details about entering characters refer to page 1 29 You can check the entered message by...

Page 194: ...cursor keys and press Enter 3 Select Cover Page using the cursor keys and press Enter 4 Select the document you want to print and press Enter Close Enter Cover Page Doc 1 Doc 2 Doc 3 5 Press Yes Yes N...

Page 195: ...ng the cursor keys and press Enter Cancel Enter Cover Page Off Doc 3 Doc 1 Doc 2 Select Off not to transmit a cover page 5 The cover page is set Press Close to return to the standby screen The cover p...

Page 196: ...cuments page 1 59 2 Set the resolution and contrast as necessary For the setting procedure refer to Setting the resolution contrast page 3 13 3 Press Menu 8 Enter 4 Select Store using the cursor keys...

Page 197: ...ox Doc 4 To delete the polling documents press Yes Yes No Polling Doc Delete OK to delete Printing polling documents 1 Press Menu 8 Enter 2 Select Print using the cursor keys and press Enter 3 Select...

Page 198: ...Fax Menu 2 4 Fax Forward Fax Copy Enlarge Tx Polling F Code Polling F Code Tx 3 Select On using the cursor keys and press Enter Cancel Enter Polling Off On 4 Press Close to return to the standby scre...

Page 199: ...unications When the other communication party sets an F code security box F code security communications can be accessed by specifying the sub address and password if necessary for that box Unless the...

Page 200: ...s Enter a sub address and password in each F code box Be sure to enter a sub address Enter a password as necessary Setting an I D code prevents anyone other than the specified person s from operating...

Page 201: ...te it and then enter the correct one You cannot register the same sub address as one for other boxes 3 Enter an I D code 4 digits using the numeric keys and press Enter Cancel Enter Clear F Code Box R...

Page 202: ...boxes as well To set a hold time A hold time is the period 0 to 31 days for which security documents are retained Documents will be retained indefinitely when 0 days are set 9 Select Hold Time using...

Page 203: ...ox Name and press Edit 4 Enter a box name and press Enter Cancel Enter Clear Enter Box Name 12 16 Lower case Paris Office _ Up to 16 characters can be entered For details about entering characters ref...

Page 204: ...et To set the auto print When the auto print is set to On documents received in bulletin boxes are printed 9 Select Auto Print using the cursor keys and press Edit 10 Select On or Off using the cursor...

Page 205: ...D code to print out stored documents etc Make a record not to forget it 15 Select I D Code using the cursor keys and press Edit 16 Enter an I D code 4 digits using the numeric keys and press Enter Ca...

Page 206: ...r Speed Dial 001 200 Please Enter the number S0 _01 Kyoto Head Office You can specify destinations as follows Cannot specify using the numeric keys Using the one touch keys Press the one touch key for...

Page 207: ...hine is not added to transmitting documents Both The TTI of your machine is added to transmitting documents as well as the TTI of the relay box Overwrite The TTI of your machine is added to transmitti...

Page 208: ...de 4 digits using the numeric keys and press Enter Cancel Enter Clear F Code Box Reg Enter I D Code _ If you enter an incorrect code press Clear to delete it and then enter the correct one 14 To conti...

Page 209: ...I D code and press Enter 5 Select Location using the cursor keys and press Edit 6 Press Location Brdcast Group Location Speed Dial 001 200 Please Enter the number S_ Confirm with Location 7 The entere...

Page 210: ...gistered enter the I D code 4 digits using the numeric keys and press Enter Cancel Enter F Code Box Del Enter I D Code _ Clear If the I D code is not registered proceed to step 5 5 To delete press Yes...

Page 211: ...E To shortcut the process press Menu 1 0 2 7 Enter and press Yes Transmission using a sub address F code transmission Entering sub addresses and passwords enables F code security box transmissions F c...

Page 212: ...sswords can be entered with up to 20 numerals or If a password is not required press Enter without entering anything and proceed to step 7 7 Press Close to return to the standby screen When the F code...

Page 213: ...g Enter Sub Address 1234567890_ 5 Enter a password using the numeric keys and press Enter Clear Cancel Enter F Code Polling Please enter a password 112233 _ Passwords can be entered with up to 20 nume...

Page 214: ...e refer to Setting the resolution contrast page 3 13 3 Press Menu 8 Enter 4 Select Store and press Enter 5 Select F Code Bulletin using the cursor keys and press Enter 6 Select the F code box in which...

Page 215: ...d press Enter Close Enter F Code Bulletin Overwrite Add Overwrite Overwrites documents in the box Add Adds the document in the box Up to 30 documents can be stored 9 Press Yes Scanning the documents s...

Page 216: ...For security reception documents For documents received in the bulletin boxes 1 Press Menu 8 Enter 2 Select Print using the cursor keys and press Enter 3 Select F Code Doc using the cursor keys and pr...

Page 217: ...e Doc 1 11 All stored documents 01 Already stored 02 Not registered Select All stored documents to print all documents stored in this F code box For the security reception step 6 is omitted 7 Press Ye...

Page 218: ...ivision 02 Paris Office 03 Tokyo Office 5 If the I D code is registered enter the I D code 4 digits using the numeric keys and press Enter Clear Cancel Enter Delete bulletin board doc Enter I D Code _...

Page 219: ...using the cursor keys and press Enter 3 Select F Code Doc using the cursor keys and press Enter Close Enter Other Lists 2 2 F Code Doc Block Junk Fax 4 Press Yes Print the list of F code documents Ye...

Page 220: ...type contrast and sort for the copy functions you cannot set other functions Fax Copy 1 Load your document and press Fax For details on how to load documents refer to Loading Documents page 1 59 2 Se...

Page 221: ...ching to the copy screen you cannot switch to the fax screen press Fax 9 Set the resolution and contrast as necessary 10 Press Start Transmitting and copying start simultaneously NOTE Press Stop to ca...

Page 222: ...ument glass 1 Load your documents and press Fax For details on how to load documents refer to Loading Documents page 1 59 2 Set the resolution and contrast as necessary For the setting procedure refer...

Page 223: ...oom Enter Press Fixed on the zoom magnification screen the display returns to the fixed magnification screen You cannot reduce a document Set the magnification between from 100 to 400 6 Press Close 7...

Page 224: ...only the document length that has been scanned 1 Load your document and press Fax For details on how to load documents refer to Loading Documents page 1 59 2 Set the resolution and contrast as necessa...

Page 225: ...ax Functions 6 Press Start Only the set area is scanned and transmission starts NOTE To cancel the fax transmission press Job Confirm Fax Cancel For details refer to page 3 21 DB2 90290 60 indb 43 200...

Page 226: ...ding conditions as follows Individual settings Set to On to enable fax forwarding for each individual forwarding destination When the overall fax forwarding setting is set to ON forwarding starts at t...

Page 227: ...axes will not be forwarded until you set the overall fax forwarding to On 5 Select Individual using the cursor keys and press Enter 6 To forward faxes with this forwarding condition select On and pres...

Page 228: ...ess Enter 10 For forwarding to print the received document simultaneously on this machine select On and press Enter Auto Print Off On Cancel Enter 11 After entering all settings press Enter 12 To cont...

Page 229: ...press Enter 4 Select Forward Dial No and press Enter 5 Press Location Enter Trans Num _ Confirm with Location Spd Dial Group Location 6 The entered forwarding numbers are displayed To delete select t...

Page 230: ...ect the forwarding condition you want to delete and press Enter Delete Fax Forward 1 1234567890 2 987654321 Close Enter 4 Press Yes to delete Delete Fax Forward 987654321 OK to delete Yes No 5 To cont...

Page 231: ...List Tx Report TTI Select Settings Close Enter 2 Select Other Lists using the cursor keys and press Enter 3 Select Fax Forward List and press Enter 4 Press Yes Fax Forward List Wouid like to print Yes...

Page 232: ...ing the cursor keys and press Enter Fax Menu 2 4 Fax Forward Fax Copy Enlarge Tx Polling F Code Polling F Cord Tx Close Settings Enter 3 To forward faxes select On and press Enter The fax forward is s...

Page 233: ...5 3 Deleting department codes and names 5 4 Setting the department management function 5 5 Faxing and copying when the department management function is ON 5 5 Printing a list of department management...

Page 234: ...the department management function ON page 5 5 4 Use the department code to make copies and send faxes page 5 5 5 Check the department list for operating conditions page 5 6 Registering copy charge C...

Page 235: ...ress Enter 3 Select the number for which you register the department code and name and press Enter Enter Dept Management 001 Not registered Close Enter Select 001 for the first entry To change a regis...

Page 236: ...and name press Close and repeat from step 3 9 Press Reset to return to the standby screen Deleting department codes and names 1 Press Menu 7 1 9 Enter 2 Select Delete using the cursor keys and press E...

Page 237: ...is set Dept Management On Off Off On Cancel Enter 4 Press Reset to return to the standby screen Faxing and copying when the department management function is ON To send faxes 1 Press Fax to switch to...

Page 238: ...at you need not enter the first digits 0 Ex 000044500 44500 The entered department code remains valid for about 3 minutes after the operation We recommend you press Reset after making copies to preven...

Page 239: ...ng accumulated data Delete all accumulated data by department 1 Press Menu 7 1 9 Enter 2 Select Reset counter using the cursor keys and press Enter Dept Management 2 2 Cost Management 00 00 Reset coun...

Page 240: ...opies appears Print Counter Current count 0000002643 Close 5 Press Reset to return to the standby screen NOTE To shortcut the process press Menu 7 0 0 Enter Two pages are counted for one duplex printe...

Page 241: ...ition Dept Management Jobs Waiting to Print Close Enter 5 Select either Out of paper Rx or Reserved Copy using the cursor keys and press Enter The waiting print jobs appear Jobs Waiting to Print Out o...

Page 242: ...5 10 DB2 90290 60 indb 10 2007 02 02 12 33 32...

Page 243: ...on 6 8 Check Broadcast Destination 6 10 Setting the broadcast destination check 6 10 Transmission after the broadcast destination check 6 11 Dial Double Push 6 12 Setting the dial double push 6 12 Per...

Page 244: ...on On it remains invalid NOTE Before setting the closed transmission you need to register a protect passcode page 8 33 For the passcode setting refer to Registering a passcode page 6 5 For details abo...

Page 245: ...u can set the closed transmission Off only for one transmission by the procedure below When the closed transmission is set to OFF 1 Load your document and press Fax For details on how to load document...

Page 246: ...nge specified by a passcode refer to Passcode and communication range page 6 6 1 Press Menu 5 0 9 Enter 2 Enter the protect passcode using the numeric keys and press Enter 3 Select Closed Rx using the...

Page 247: ...ut the closed communication and the communication range specified by a passcode refer to Passcode and communication range page 6 6 1 Press Menu 5 0 9 Enter 2 Enter the protect passcode using the numer...

Page 248: ...78 Communication error If a communication error has occurred a check message is printed The error is denoted as error code T 2 2 Communication range of closed reception When the closed transmission fu...

Page 249: ...u need to register a protect passcode page 8 33 Even if you set the ID check transmission function to ON you can set it to OFF only for one transmission in the case of advanced communications 1 Press...

Page 250: ...You can set the ID check transmission to OFF only for one transmission by following the procedure below When the ID check transmission is set to OFF 1 Load your document and press Fax For details on...

Page 251: ...eck transmission setting will be returned to Off NOTE When the ID check transmission function is set to ON an error T2 2 will occur if The lower 4 digits of the fax number you entered differ from thos...

Page 252: ...setting the broadcast destination check you need to register a protect passcode page 8 33 1 Press Menu 5 0 9 Enter 2 Enter the protect passcode using the numeric keys and press Enter 3 Select Check br...

Page 253: ...the resolution contrast page 3 13 3 Press Start after entering all the destinations Fax Ready Fax Mode S003 German sales company 2340 2 Apr 2007 13 30 Memory 100 Press Location to check entries Locati...

Page 254: ...dial for entry NOTE Before setting the dial double push you need to register a protect passcode page 8 33 1 Press Menu 5 0 9 Enter 2 Enter the protect passcode using the numeric keys and press Enter...

Page 255: ...cument and press Fax For details on how to load documents refer to Loading Documents page 1 59 2 Set the resolution and contrast as necessary For the setting procedure refer to Setting the resolution...

Page 256: ...Setting the security reception Default Off NOTE Before setting the security reception you need to register a protect passcode page 8 33 Canceling the protect passcode cancels the security reception I...

Page 257: ...you specified it the security reception activates at the start time every day Start Time 2 _0 00 Cancel Enter NOTE By registering Security Rx to a touch panel key page 8 52 or soft key page 8 50 you...

Page 258: ...ke to print Yes No 6 The received documents are printed After the received documents are printed the Secure Rx is canceled message appears and the security reception is canceled Then the machine retur...

Page 259: ...ode 2 This mode blocks receptions from destinations you have registered Register the lower 4 digits of the destination fax number Up to 50 destinations can be entered Mode 3 This mode combines Mode 1...

Page 260: ...you want to block faxes 4 Select Enter Edit and press Enter 5 Select a registration box and press Enter Block Junk Fax Mode2 01 Not registered Close Enter To change a registered number select it and...

Page 261: ...rsor keys and press Enter Block Junk Fax Mode2 01 1122 02 1234 03 2233 Close Enter 4 Press Yes to delete Press No to return to step 3 without deleting the number BlockJunkFax Delete 01 1122 OK to dele...

Page 262: ...ct Close Settings Enter 2 Select Other Lists using the cursor keys and press Enter 3 Select Block Junk Fax using the cursor keys and press Enter 4 Press Yes The block junk fax list is printed Block Ju...

Page 263: ...3 Select either Fax Settings Settings or List using the cursor keys and press Enter Protect Function Fax Functions Settings List Close Enter 4 Select the function you want to protect and press Enter F...

Page 264: ...ing the numeric keys Manual transmission Redial Closed transmission ID check transmission Settings Entering the speed dials F Code boxes Fax forward Department management Protect settings List Speed d...

Page 265: ...Scanning 7 2 Using the scanner function 7 2 How to scan 7 2 Importing a scanned document into the PC 7 3 Printing Printing from the PC 7 4 Using the printer function 7 4 Printing 7 4 Canceling printin...

Page 266: ...cument glass or the ADF Scan Ready 0 Ratio 100 Size Auto Mem 100 Scan Box Doc Type Text Contrast Normal 1 2 For details on how to load documents refer to Loading Documents page 1 59 3 Set the scan set...

Page 267: ...2 Select the command for importing images Normally click Import or Acquire Image from the File menu 3 Select a scanner driver Select Muratec MFX 2200 2700 Scanner 4 Specify a scan box If the ID code...

Page 268: ...ommand For details refer to the manual of your application software 1 Open a document with your application 2 Load paper in the paper cassette or bypass tray For details on how to load paper refer to...

Page 269: ...s version 1 Click Printers and Faxes from the Start menu 2 Double click the icon for the active printer The print queue appears 3 Right click the document to cancel printing and select Cancel To cance...

Page 270: ...7 6 DB2 90290 60 indb 6 2007 02 02 12 33 42...

Page 271: ...g Group Dials 8 12 Entering Editing 8 12 Entering Editing group names 8 13 Printing a group list 8 14 Transmission Default Settings 8 15 Setting the default 8 15 Fax transmission default settings list...

Page 272: ...ting a system setting list 8 39 Printing a list of stored documents 8 40 Clearing the user data 8 42 Macros 8 43 Programming a macro 8 43 Changing a macro name 8 45 Deleting a macro 8 47 Printing a ma...

Page 273: ...you to send faxes and or search by group Super G3 You can transmit faxes via Super G3 ultra high speed communication mode NOTE You can protect the entry of the speed dials page 6 21 Entering Editing T...

Page 274: ...age 1 29 To set a group number or Super G3 as necessary 6 To use the group transmission function page 4 5 enter a group number Select Group No using the cursor keys and press Edit 7 Select a group num...

Page 275: ...ter other speed dials press Close and repeat from step 2 11 Press Close to return to the standby screen NOTE It is useful to write the destination names registered in the speed dials 001 to 056 on the...

Page 276: ...o 056 In the fax mode if you press an unregistered one touch key the entry operation automatically starts 1 Press Fax to switch to the fax mode 2 Press an unregistered one touch key 3 Press Yes to ent...

Page 277: ...st number is displayed 5 The following operation is same as step 4 through 11 in Entering Editing page 8 3 Deleting a speed dial 1 Press Menu 1 Enter 2 Select the speed dial you want to delete using t...

Page 278: ...2 Select the speed dial you want to move using the cursor keys and press Move Speed Dial S003 1 67 001 Kyoto Head Office 002 U S sales company 003 German sales company Move Delete Swap You can also se...

Page 279: ...1 67 001 Kyoto Head Office 002 U S sales company 003 German sales company Move Delete Swap You can also select by entering a speed dial number using the numeric keys 3 Move the cursor to another speed...

Page 280: ...x forwarding functions Limitations on replacing You cannot replace the limited speed dials The speed dials you cannot replace appear shaded Swap S004 S004 2 67 004 U K sales company 005 Paris Office 0...

Page 281: ...nu 4 4 Dialing Opt List Tx Report TTI Select Close Settings Enter 2 Select Speed Dial and press Enter 3 Press Yes The speed dial list is printed Speed Dial Would you like to print Yes No NOTE You can...

Page 282: ...from 01 to 32 1 Press Menu 2 Enter 2 Select a group number you want to enter using the cursor keys and press Allocate Group 2 11 04 Not registered 05 Not registered 06 Not registered Close Allocate E...

Page 283: ...t registered 05 Not registered 06 Not registered Close Allocate Edit 3 Enter a group name using the numeric keys Up to 16 characters can be entered For details about entering characters refer to Enter...

Page 284: ...ant to print a list using the cursor keys and press Enter Group 1 11 01 Sales group 02 Service group 03 Engineering grp Close Enter You cannot select a group with no destination entered 4 Press Yes Gr...

Page 285: ...ect the item you want to set using the cursor keys and press Enter 6 Change the default For details about setting items refer to the following Fax transmission default settings list 7 After setting pr...

Page 286: ...the memory transmission is performed If you set this to Off the memory transmission is not performed Real time transmission Off On 5017 Cover Page Transmits faxes with the selected cover page attached...

Page 287: ...ut setting items refer to the following Other settings list 7 After setting press Close to return to the standby screen NOTE If you enter the function number in the other settings list after pressing...

Page 288: ...ication 100 Print without the reduction Some received documents may be printed separately on two pages Auto 100 5125 Reduc Margin This sets the default reduction margin Normally you do not need to cha...

Page 289: ...me Stamp If you set this to On the received date year month day and time can be printed with the word Received at the header of the received document THE SLEREXE COMPANY LIMITED SAPORS LANE BOOLE DORS...

Page 290: ...nd press Enter Fax Menu 4 4 Dialing Opt List Tx Report TTI Select Close Settings Enter 2 Select Settings using the cursor keys and press Enter 3 Select Fax Settings using the cursor keys and press Ent...

Page 291: ...tings Scanner Settings Close Enter 4 Select Default Settings using the cursor keys and press Enter NOTE To shortcut the process press Menu 4 0 1 Enter 5 Select the item you want to set using the curso...

Page 292: ...ghtest contrast Lighter Setting to scan documents at a lighter contrast Normal Setting to scan documents at normal contrast Darker Setting to scan documents at a darker contrast Darkest Setting to sca...

Page 293: ...gs using the cursor keys and press Enter Settings 2 3 Copy Settings Fax Settings Scanner Settings Close Enter 3 Select Copy Reservation using the cursor keys and press Enter Copy Settings Default Sett...

Page 294: ...sor keys and press Enter Copy Menu 2 2 Booklet Copy List Mix Copy Card Copy Close Settings Enter 2 Select Settings using the cursor keys and press Enter 3 Select Copy Settings and press Enter 4 Press...

Page 295: ...Fax Settings Scanner Settings Close Enter 4 Select Default Settings using the cursor keys and press Enter NOTE To shortcut the process press Menu 6 0 1 Enter 5 Select the item you want to set using th...

Page 296: ...is sets the default scan image contrast Lightest Setting to scan documents at the lightest contrast Lighter Setting to scan documents at a lighter contrast Normal Setting to scan documents at normal c...

Page 297: ...I D code Setting a scan box name and I D code 1 Press Menu 2 Press Settings 3 Select Scanner Settings using the cursor keys and press Enter NOTE To shortcut the process press Menu 6 0 3 Enter 4 Selec...

Page 298: ...For details about entering characters refer to Entering Characters page 1 29 8 To set the I D code select I D Code and press Enter You do not always need to enter an I D code If you set the I D code y...

Page 299: ...cursor keys and press Enter 2 Select Settings using the cursor keys and press Enter 3 Select Scanner Settings using the cursor keys and press Enter Settings 1 3 Copy Settings Fax Settings Scanner Sett...

Page 300: ...ttings 1 3 Speed Dial Group Paper Settings Close Enter NOTE To shortcut the process press Menu 3 Enter 4 Select the item you want to set using the cursor keys and press Enter 5 Change the default For...

Page 301: ...g the other paper size page 1 48 List Paper You can select the paper size or cassette for printing lists If the list does not fit on the paper you selected the machine will automatically reduce and ro...

Page 302: ...for the first or cover and subsequent pages of received documents Different types sizes and paper color can be loaded into the separate cassettes For example if the rotation size and or color of the p...

Page 303: ...t Pcode 0000 9999 Enter new passcode _ Cancel Clear Enter NOTE You cannot register 0000 0000 is used to delete the current passcode Make a record of your passcode and keep it in a safe place You also...

Page 304: ...E To shortcut the process press Menu 7 Enter 4 Select the item you want to set using the cursor keys and press Enter 5 Change the default For details about setting items refer to the Management settin...

Page 305: ...med Reset After Scan If you set this to On the machine will reset the settings immediately after the document scanning is complete If you set this to Off the settings will be reset after the time peri...

Page 306: ...s when the fax transmission is complete Rx Complete Beeps when the fax reception is complete Fax Print Complete Beeps when printing received documents is complete Energy Save Rx Cmplt Beeps when the r...

Page 307: ...ill start immediately If you press or hold Energy Save for three seconds or more the machine will go into the sleep mode Low Power Mode This sets the time to go into the low power mode Sleep Mode If y...

Page 308: ...21 No protect passcode is registered at shipment Prohibit Usable 715 Mode Prohibition If you set this to Prohibit the prohibited function cannot be used You cannot set Copy Mode Fax Mode and Scan Mode...

Page 309: ...ys and press Enter Fax Menu 4 4 Dialing Opt List Tx Report TTI Select Close Settings Enter 2 Select Settings using the cursor keys and press Enter 3 Select System Settings using the cursor keys and pr...

Page 310: ...Opt List Tx Report TTI Select Close Settings Enter 2 Select Settings using the cursor keys and press Enter 3 Select Store Doc List using the cursor keys and press Enter You cannot select it if there...

Page 311: ...ment memory size 1024 KB is equal to 1 MB 3 Page Shows the number of stored documents 4 Note Information for each document such as the reservation number received date and time or stored box number is...

Page 312: ...nnot recover the data once cleared 1 Press Menu 7 2 5 Enter 2 To clear press Yes User Data Clear Delete all data registered in Settings OK to delete Yes No 3 The confirmation screen appears again To c...

Page 313: ...While you are programming a macro key the beep sounds and the mode keys Copy Fax Scanner blink which indicate that the macro program is underway As the number of steps that can be registered approach...

Page 314: ...d to step 7 Press No to return to the standby screen without programming the step 6 To finish programming press Macro Program 7 Enter a title Edit Title 20 60 Number Sort Copy Reduce 81 _ Cancel Clear...

Page 315: ...rformed After that you can set the delayed transmission and so on If you press Yes and include Start in the macro the fax will be automatically transmitted Therefore you cannot set anything such as a...

Page 316: ...lear to delete the old title and enter a new title Edit Title 0 60 Lower case _ Cancel Clear Enter Up to 60 characters can be entered For details about entering characters refer to Entering Characters...

Page 317: ...Enter 3 Select the macro key you want to delete using the cursor keys and press Enter Delete 1 Sort Copy Reduce 81 2 Department List 3 Not Registered Close Enter 4 To delete press Yes 2 Department Lis...

Page 318: ...sing the cursor keys and press Enter 3 Select Macro List using the cursor keys and press Enter Settings 3 3 Department List Macro List Close Enter 4 Press Yes Macro List Would you like to print Yes No...

Page 319: ...Default Normal You can adjust the running speed for macros It is useful when you want to monitor the operation on the screen 1 Press Macro Program 2 Select Key speed using the cursor keys and press E...

Page 320: ...ant to set using the cursor keys and press Enter Soft Key Setting 1 2 1 Speed Dial Fax Set 2 On hook Fax Set 3 TTI Fax Set Close Enter 3 Select the function you want to set using the cursor keys and p...

Page 321: ...2 1 Zoom Copy Set 2 On hook Fax Set 3 TTI Fax Set Close Enter 6 To continue to register other soft keys repeat from step 2 7 Press Close to return to the standby screen 8 Attach the function label to...

Page 322: ...using the cursor keys and press Enter Touchpanel Key Setting Copy mode Fax mode Scan mode Close Enter 3 Select Enter Edit using the cursor keys and press Enter Copy mode Enter Edit Delete Initialize C...

Page 323: ...be deleted from the menu displayed when you press Menu The number of touch panel keys you can register depends on the standby screens or the installed options Fax standby screen Max 24 Copy standby s...

Page 324: ...h panel key 1 Press Menu 7 0 3 Enter 2 Select the standby screen using the cursor keys and press Enter 3 Select Delete using the cursor keys and press Enter 4 Select the touch panel key you want to de...

Page 325: ...you can return them to the factory defaults page 8 55 Initializing the touch panel keys You can return the touch panel key functions on each standby screen to the factory presets 1 Press Menu 7 0 3 En...

Page 326: ...8 56 DB2 90290 60 indb 56 2007 02 02 12 34 11...

Page 327: ...Troubleshooting Paper Jams 9 13 If a paper jam occurs inside the machine 9 13 If a paper jam occurs in the bypass tray 9 15 Document Jams 9 16 Error Messages 9 18 Alarm lamps 9 18 Printed error messa...

Page 328: ...r area to the A4 sized paper is 6 Handling precautions Never burn or dispose of the toner cartridge in a fire This could cause any remaining toner to ignite resulting in a larger fire and or burns Whe...

Page 329: ...llowing places This could cause defects in printing quality Places exposed to direct sunlight Places subject to high temperature and or high humidity Places subject to rapid temperature changes Dusty...

Page 330: ...tridge several times to distribute the toner evenly inside the cartridge 4 Slide the new toner cartridge into the main unit gently and firmly until it locks into place 5 Clean the recording head and c...

Page 331: ...ce the drum cartridge approaches the Drum Near End message appears on the display Replace with a new drum cartridge 1 Open the front and side covers 2 Remove the used drum cartridge from the main unit...

Page 332: ...he double stick tape completely from the drum cartridge if the tape remains on the cartridge Spacer Film NOTE Attach the removed spacer to the used drum cartridge to prevent toner leakage Please dispo...

Page 333: ...e replacement confirmation screen pops up when the new drum cartridge installation is complete Press Yes A new drum detected A new drum detected Would you like to use it Yes No NOTE If you press Yes r...

Page 334: ...to your hands wash with water immediately Please use the stamp authorized by Muratec If the ADF is not installed you cannot use the stamp 1 Open the platen cover 2 Open the left side of the document...

Page 335: ...r of a new stamp 5 Put the removed cover on the used stamp and remove the used stamp 6 Insert the new stamp into the stamp unit 7 Put the stamp unit back in place 8 Attach the document pad as it was a...

Page 336: ...nd paint Do not use tissue paper or paper towel for cleaning They could attach inside the machine or generate electrostatic charges Use a soft cloth to avoid damaging the surface of the machine Cleani...

Page 337: ...dirt is heavily built up wipe with a cloth dipped in a small amount of mild cleaning solution and then wipe again with a clean dry cloth Platen cover Document pad Document glass ADF glass To clean the...

Page 338: ...ing head open the front cover Insert and remove the recording head cleaning rod B6 To prevent uneven cleaning do not stop until cleaning is complete After cleaning be sure to return the cleaning rod t...

Page 339: ...or mouth immediately flush with cold water and consult a physician If a paper jam occurs during printing the toner will not be fixed on the paper Be careful not to stain your hands or clothes with th...

Page 340: ...he both of the feeder roller Do not touch the feeder roller This could cause defects in printing quality 3 Holding both sides of the jammed paper remove it carefully 4 Put the paper release lever back...

Page 341: ...paper slowly pull it out to the arrow direction If you cannot pull it out referring to If a paper jam occurs inside the machine remove the jammed paper NOTE If the Paper jam Please check the blinking...

Page 342: ...cover IMPORTANT If you cannot easily pull out the document do not force it Turn the dial to discharge the document If you try to force or pull too hard on the document it could tear 1 Pull up the ADF...

Page 343: ...scan the documents Load the documents according to the instructions on the screen If you press No during a fax transmission the machine will stop transmitting If you press No during a copy operation i...

Page 344: ...corrected the alarm lamp will turn off You can turn off the alarm lamp when Communication error occurs Memory overflows during the reception Memory overflows while documents are stored You cannot turn...

Page 345: ...e T 1 1 T 2 1 T 2 2 T 2 3 T 5 1 T 5 2 T 8 1 R 8 1 Check the received documents Call the other party and ask them to check the operating status of their machine T 4 2 Repeat transmission 1 The document...

Page 346: ...Wrong number receiving party answered and hung up Check the correct fax number and resend the document The receiving party answered manually and hung up the phone Check the receiving method on the oth...

Page 347: ...error communication failed Resend the document If this error occurs repeatedly contact your authorized Muratec dealer T 4 1 Due to a line error the receiving party disconnected the line during documen...

Page 348: ...e sending party is ask him her to resend the document If this error occurs repeatedly contact your authorized Muratec dealer R 2 3 Due to a line error the line is disconnected R 3 1 A document was pul...

Page 349: ...ailure occurs inside the machine Please contact your authorized Muratec dealer 9 35 Cannot combine with __ You are trying to combine the functions which cannot be set simultaneously 2 50 Carriage Erro...

Page 350: ...has not been entered in the F code relay box registration 4 24 Enter Sub Address No sub address has been entered in the F code box 4 17 Invalid Passcode A wrong number is entered Enter the correct pas...

Page 351: ...ed to directly enter more than one destination using the numeric keys for the fax forwarding You can enter only one destination using the numeric keys 4 44 Paper jam Please check the blinking cover A...

Page 352: ...d document direction Rotate document 90 or re set the magnification Rx doc Stored You tried to set the protect passcode for the security reception to 0000 cancel when you received documents After prin...

Page 353: ...Wait until the transmission ends The paper does not come out Check if paper or a foreign object is not jammed Check the error message and remove the jammed paper or foreign object 9 23 Paper often ja...

Page 354: ...over to close it Cannot transmit Status Check item Countermeasure Reference page Cannot transmit Check the transmission procedure Check the procedure and try again 3 5 Check if the destination number...

Page 355: ...he memory is not full Check the memory Cannot receive Status Check item Countermeasure Reference page Cannot receive Check if the auto reception mode is set Check the reception mode 1 38 Check if pape...

Page 356: ...rtridge 9 2 White or black spots is printed Appropriate paper is not used Use appropriate paper 1 43 The drum or toner cartridge is worn out or broken Replace with a new drum or toner cartridge 9 2 Th...

Page 357: ...2 The machine may malfunction Please contact your authorized Muratec dealer 9 35 Blank spots are printed Paper is moist Replace with a new paper 1 45 Appropriate paper is not used Use appropriate pape...

Page 358: ...o is set to 100 Select paper that is the same size as the document 2 9 Check if the directions of a document and paper are same Select the paper in the same direction Or match the document direction t...

Page 359: ...While printing a list Printing will stop During document scanning Scanning will stop Even when power is restored scanning will not restart After the power is back on press Stop to discharge the docum...

Page 360: ...n name registered in the speed dial etc transmis sion only 2 Telephone number registered in the speed dial etc or speci fied using the numeric keys transmission only 3 Self node name of the other part...

Page 361: ...shown in this chapter please contact your authorized Muratec dealer If you detect odd sounds smoke or odor emitting from your machine unplug it imme diately and contact your authorized Muratec dealer...

Page 362: ...9 36 DB2 90290 60 indb 36 2007 02 02 12 34 29...

Page 363: ...Appendix Chapter 10 Function Number List 10 2 Printing a function list 10 11 Main Specifications 10 12 Consumables 10 14 Optional Items 10 15 Index 10 16 DB2 90290 60 indb 1 2007 02 02 12 34 29...

Page 364: ...size or cassette for printing lists Cassette Others Paper Select the paper size when you set the paper size dial to Others in the paper cassette Print Cassette You can select the cassette to use when...

Page 365: ...3 Contrast If you set this to ON you can display or print a TTI in the default setting 5015 TTI If you set this to ON the memory transmission is given priority in the default setting If you set it to...

Page 366: ...de or tel fax mode you can set the number of rings before fax reception starts 5119 Of Rings You can set the default dialing pause when you enter the pause symbol 5121 Dialing Pause You can set the de...

Page 367: ...ther to combine the transmission history in one transmission or divide it per page 5149 Divide Tx Setting 1 If you set this to ON the received date and time can be printed with the word Received at th...

Page 368: ...e You can set the fax reception ringer even if the telephone is not connected to this machine Fax Ringer You can adjust the job complete beep volume Job Complete Volume You can set the beep upon compl...

Page 369: ...t a specified time every day ON with time setup You can set the sleep mode If you set it to OFF the machine will not go into sleep mode Sleep Mode You can set the time for the machine to go into low p...

Page 370: ...fax charges per department register the cost per page of copy Cost Management Delete all accumulated data Reset counter page 5 2 page 5 8 If you set this to Prohibit you can prohibit transmitting faxe...

Page 371: ...4 36 Delete the stored polling document or F code bulletin board document Print page 3 46 page 4 15 page 4 34 page 6 16 Print the stored polling document F code bulletin board document or security rec...

Page 372: ...nt management list page 5 6 1021 Macro List Print the macro settings list page 8 48 Shutdown 10 Speed Dial Print the speed dial list 0 Shutdown 1 If you turn off the power with OfficeBridge installed...

Page 373: ...ngs Enter 2 Select Settings using the cursor keys and press Enter 3 Select Function List using the cursor keys and press Enter Settings 2 3 System Settings Functions List Store Doc List Close Enter 4...

Page 374: ...16K 195 mm 270 mm 16K 270 mm 195 mm Letter Letter Legal 11 17 H Ltr H Ltr Executive Executive COM10 Monarch DL Envelope1 90 mm Width 205 mm Length Envelope2 240 mm Width 332 mm Length Custom Width 90...

Page 375: ...be between 6 and 7 seconds for the communication with G3 machines when you transmit the same document in 14400bps Copy specification Item Consumables specifications Scanning line density Scanner 600 d...

Page 376: ...00 sheets Stamp ink 1 Replacement ink cartridge of the stamp Blue 30 000 sheets Pink 10 000 sheets Above two types are available Paper Use paper recommended by Muratec For details refer to Paper page...

Page 377: ...fficeBridge All in one package that can expand such functions as network printer network scanner Internet Fax and direct PC Fax Mechanical counter Used to check the total number of printed pages easil...

Page 378: ...he closed transmission 6 2 Combined copy 2 17 Command documents Printing command documents 3 46 Command list Printing a command list 3 45 Consumables xvi 10 14 Contrast Copy 2 10 Fax 3 13 Copy default...

Page 379: ...swords 4 17 Fax Copy 4 38 Fax Forward 4 44 Checking Deleting forwarding destination numbers 4 47 Deleting forwarding conditions 4 48 Printing a list of forwarding conditions Fax forward list 4 49 Regi...

Page 380: ...perations during reception 3 32 Optional items 10 15 Other settings 8 17 Other settings list 8 17 Out of paper reception 3 32 P Paper 1 41 Acceptable paper 1 41 How to store paper 1 42 Printing area 1...

Page 381: ...tting the stamp 3 20 T Touch panel keys 1 19 Deleting a touch panel key 8 54 Entering Editing 8 52 Entering from a blank touch panel key 8 53 Initializing the touch panel keys 8 55 Trademarks xiii Tra...

Page 382: ...10 20 DB2 90290 60 indb 20 2007 02 02 12 34 39...

Reviews: