22 Problem Solving
514
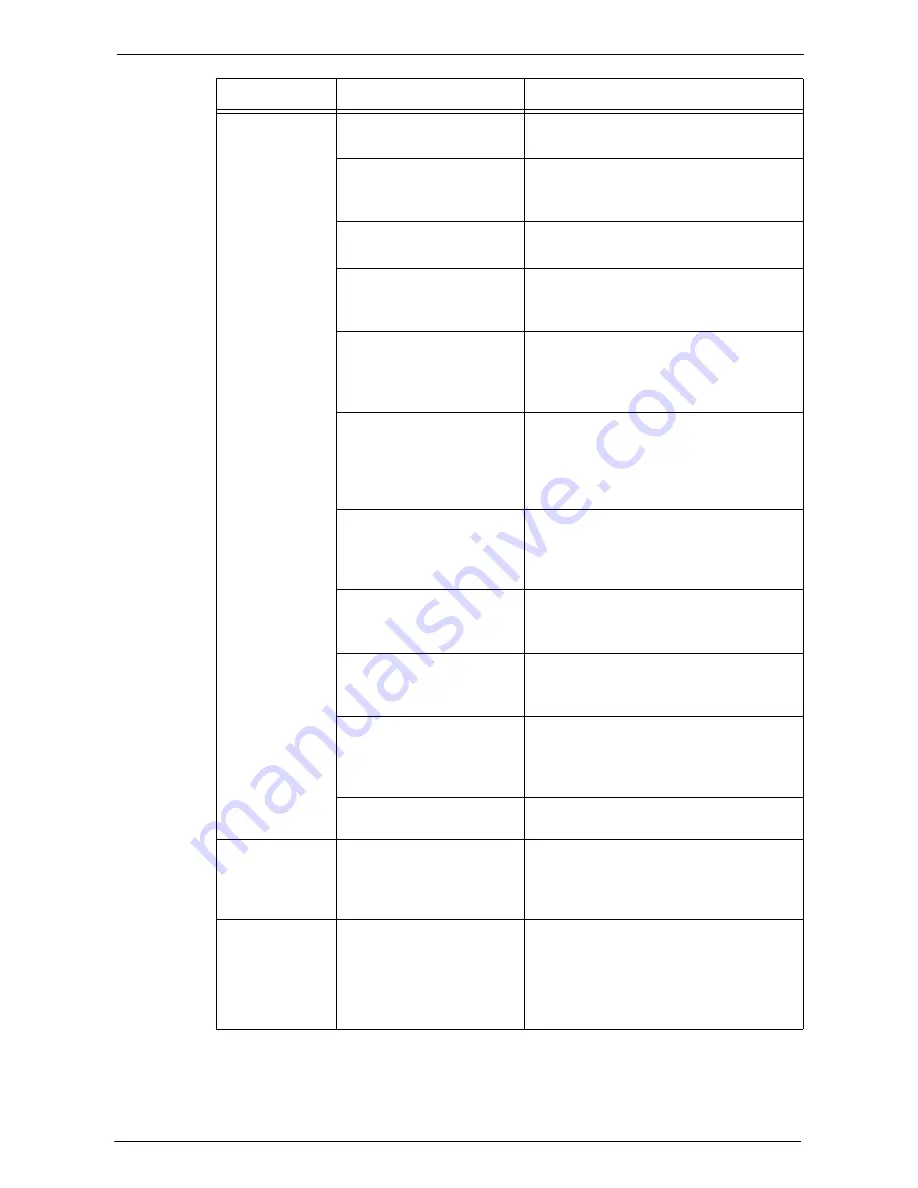
Paper is often
jammed or
wrinkled.
Is the paper loaded correctly
in the tray?
Load the paper correctly.
Refer to "Loading Paper" (P.207).
Is the paper tray inserted
correctly?
Firmly push in the paper tray until it stops to
insert it correctly.
Refer to "Loading Paper" (P.207).
Is the paper damp?
Replace the paper with new one.
Refer to "Loading Paper" (P.207).
Is the paper curled?
Turn over the paper in the tray, or replace the
paper with new one.
Refer to "Loading Paper" (P.207).
Are the paper and paper tray
settings correct?
Correctly set the paper and paper trays to
correspond to the paper.
Refer to "Changing the Paper Settings"
(P.214).
Are any torn pieces of paper
remaining or is there a foreign
object in the machine?
Open the cover of the machine or slide out
the paper tray to remove the torn pieces or
the foreign object.
Refer to "Paper Jams" (P.617) or "Loading
Paper" (P.207).
Is non-standard paper loaded
in the tray?
Replace with paper that meets machine
specifications.
Refer to "Print Media Guidelines" (P.200) or
"Loading Paper" (P.207).
Is paper exceeding the
maximum fill line in the tray?
Load paper in the paper tray so that it does
not exceed the maximum fill line.
Refer to "Loading Paper" (P.207).
Are the paper guides set
correctly?
Load the paper correctly, and align the paper
guides to the paper.
Refer to "Loading Paper" (P.207).
Is the image nearly the same
size as the paper?
Increase the edge erase widths.
For more information, refer to "Copy" (P.49)
when you copying, or to the help of the print
driver when printing.
Is the paper finely cut out?
Some types of paper may not be cut out
finely. Load the paper after fanning it well.
A document is not
fed into the
document feeder.
Is the document small?
The minimum size of the document that can
be loaded on the document feeder is 125 x 85
mm (Standard size: A5).
Refer to "Copying Procedure" (P.50).
An error message
appears after
paper is loaded in
Tray 5 and the
<Start> button is
pressed.
Check the positions of the
paper guides of Tray 5.
Adjust the paper guides to the correct
positions.
Refer to "Loading Paper in Tray 5 (Bypass
Tray)" (P.211).
Symptom
Cause
Remedy
Summary of Contents for C5765DN
Page 1: ...Dell C5765dn Color Laser Multifunction Printer User s Guide Regulatory Model C5765dn ...
Page 48: ...2 Product Overview 48 ...
Page 132: ...4 Fax 132 4 Select Save 5 Press the Start button ...
Page 144: ...5 Scan 144 ...
Page 176: ...9 Media Print Text and Photos 176 ...
Page 278: ...14 Machine Status 278 ...
Page 424: ...16 Dell Printer Configuration Web Tool Settings 424 ...
Page 650: ...23 Install Operation for Eco copy My Forms 650 ...


