background image

3 Copy

114

On

Build Job is applied. The feature buttons appear. Specify any option if necessary.

Note

The features selected here cannot be canceled or changed while the machine executes a copy job.

For information on features available in Build Job, refer to "Features that can be set in Build Job" 

(P.114).

Features that can be set in Build Job

Copy Output

For more information, refer to "Copy Output (Specifying Finishing Options)" (P.109).

Booklet Creation

For more information, refer to "Booklet Creation (Creating a Booklet)" (P.99).

Covers

Note

The machine does not copy on a cover when using the Build Job feature.

For more information, refer to "Covers (Attaching Covers to Copies)" (P.102).

Segment Separators

For more information, refer to "[Segment Separators] Screen" (P.116).

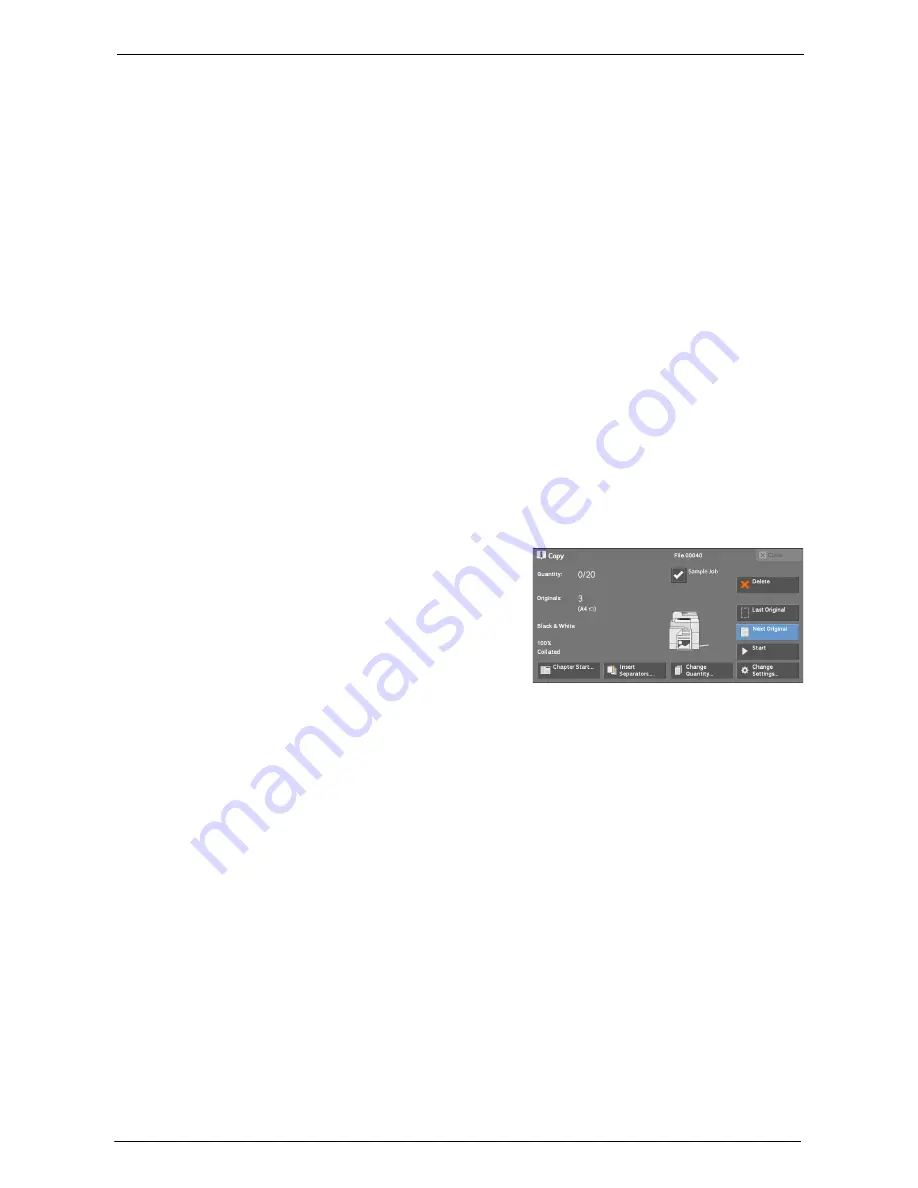
[Copy] Screen When Build Job is in Progress

The following describes the screen that appears while the Build Job is being executed.

Chapter Start

Displays the [Build Job - Chapter Start] screen.

Refer to "[Build Job - Chapter Start] Screen" (P.116). 

Insert Separators

Displays the [Segment Separators] screen.

Refer to "[Segment Separators] Screen" (P.116).

Change Quantity

Displays the [Change Quantity] screen on which you can change the number of copy sets 

using the numeric keypad.

Change Settings

Displays the [Copy] screen on which you can change the settings for the next document. 

After changing the settings, press the <Start> button on the control panel to start scanning 

of the document. To return to the previous screen, press the < # > button.
When using a stored program for Build Job
While the machine makes copies using the Build Job feature, you can use a stored program.
1) Select [Change Settings].
2) Select the [Job Assembly] tab.

Summary of Contents for C5765DN

Page 1: ...Dell C5765dn Color Laser Multifunction Printer User s Guide Regulatory Model C5765dn ...

Page 2: ...which Microsoft is licensing such intellectual property may be found at http go microsoft com fwlink LinkId 52369 DES This product includes software developed by Eric Young eay mincom oz au AES Copyright c 2003 Dr Brian Gladman Worcester UK All rights reserved This product uses published AES software provided by Dr Brian Gladman under BSD licensing terms TIFF libtiff Copyright c 1988 1997 Sam Leff...

Page 3: ...AP 24 DES 26 AES 26 TIFF libtiff 26 ICC Profile Little cms 26 XML Paper Specification XPS 26 Cyrus SASL 26 Legal Notice 28 2 Product Overview 29 Machine Components 30 Power Source 34 Switching the Main Power On 34 Switching the Power On 34 Switching the Power Off 35 Switching the Main Power Off 36 Ground Fault Interrupter 37 Power Saver Mode 38 Entering the Power Saver Mode 38 Exiting the Power Sa...

Page 4: ... Darken Adjusting the Copy Density 75 Image Quality 76 Original Type Selecting the Document Type 76 Image Options Adjusting Copy Density Sharpness Saturation of Images 78 Image Enhancement Erasing the Background Color of Documents Adjusting Contrast 78 Color Effects Selecting an Image Quality 79 Color Balance Adjusting Color Balance 80 Color Shift Adjusting the Color Tone 82 Layout Adjustment 83 2...

Page 5: ... Specifying Destinations 127 Step 4 Starting the Fax Job 128 Step 5 Confirming the Fax Job in Job Status 129 Operations during Faxing 130 Stopping the Fax Job 130 Changing the Scan Settings 131 5 Scan 133 Scanning Procedure 134 Step 1 Loading Documents 134 Step 2 Selecting the Features 136 Step 3 Starting the Scan Job 138 Step 4 Confirming the Scan Job in Job Status 140 Step 5 Saving the Scanned D...

Page 6: ...ons on Media Print 167 Media Print Text 169 Selecting Files 169 Select From List Screen 170 Media Print Photos 171 Selecting Files 171 Select From List Screen 172 Selecting the Printing Options 173 Media Print Photos 173 Media Print Text 174 Index Print 175 10 Job Status 177 Job Status Overview 178 Checking Current Pending Jobs 179 Checking Completed Jobs 181 Printing and Deleting Stored Jobs 182 ...

Page 7: ...Roller 234 Replacing Separator Rollers 236 Cleaning the Machine 240 Cleaning the Exterior 240 Cleaning the Interior Laser Scanners 240 Cleaning the Conductivity Temperature Depth CTD Sensor 241 Cleaning the Touch Screen 245 Cleaning Document Cover and Document Glass 246 Cleaning the White Chute and Constant Velocity Transport Glass 246 Cleaning Document Feeder Rollers 247 Executing Calibration 248...

Page 8: ...295 Audio Tones 298 Screen Button Settings 299 Paper Tray Settings 301 Image Quality Adjustment 304 Reports 305 Maintenance 307 Notify Job Completion by E mail 308 Plug in Settings 308 Other Settings 308 Copy Service Settings 316 Copy Tab Features Allocation 316 Preset Buttons 317 Copy Defaults 317 Copy Control 321 Original Size Defaults 322 Reduce Enlarge Presets 323 Custom Colors 323 Connectivit...

Page 9: ...1 Job Flow Service Settings 372 Media Print Service Settings 373 Stored File Settings 374 Web Applications Service Setup 376 Server Setup 377 Other Settings 378 Web Browser Setup 379 Setup 381 Create Folder 381 Stored Programming 383 Create Job Flow Sheet 383 Create Job Flow Sheet Keyword 390 Add Address Book Entry 390 Create Fax Group Recipients 396 Add Fax Comment 397 Paper Tray Attributes 397 A...

Page 10: ...ion on the Computer 432 Dell Printer Configuration Web Tool Setting Items 432 Installation When Using NetWare 434 Step 1 Preparations 434 Step 2 Configuration on the Machine 434 Step 3 Configuration on the Computer 435 Dell Printer Configuration Web Tool Setting Items 436 Installation When Using Microsoft Network SMB 437 Step 1 Preparations 437 Step 2 Configuration on the Machine 437 Step 3 Config...

Page 11: ...on on the Computer 460 Configuration of Store Send Link 461 Step 1 Configuring E mail 461 Step 2 Enabling Authentication 461 Step 3 Other Settings 461 Step 4 Dell Printer Configuration Web Tool Setting Items 462 20 Encryption and Digital Signature Settings 463 Encryption and Digital Signature Overview 464 Types of Certificate 464 Encryption Features for Communication 464 Encryption and Digital Sig...

Page 12: ... 486 Authentication for Job Flow Sheets and Folders 489 Overview 489 When the Authentication Feature is Disabled 491 When the Authentication Feature is Enabled 494 Jobs Manageable by Account Administration 497 Configuration for Authentication 500 Installation Overview 500 Enabling Authentication 500 Changing the Default Authorization Group Settings 503 Creating an Authorization Group 503 Configura...

Page 13: ...549 Media Print Text Trouble 551 Media Print Photos Trouble 552 Status Code 553 Other Errors 616 Paper Jams 617 Paper Jams in Trays 1 to 4 617 Paper Jams in Tray 5 Bypass 619 Paper Jams in Fusing Unit 620 Paper Jams in Duplex Module 621 Paper Jams in Finisher AB1 622 Paper Jams in H Transport Unit 623 Document Jams 624 Duplex Automatic Document Feeder B1 C 624 Stapler Faults 626 Staple Jams in Sta...

Page 14: ...orms 657 About My Forms 658 Setup 659 Creating Folders on the Machine 659 Storing Files in a Folder on the Machine 659 Using My Forms 660 Printing Forms from the Folders on the Machine 660 Problem Solving 661 Troubleshooting 661 View Detailed Information 661 Notes and Restrictions 662 Index 663 ...

Page 15: ...achine This chapter describes how to use this guide as well as legal notice you should read before using the machine Preface 16 Types of Manuals 17 Using This Guide 18 Technical Support 21 About License 22 Legal Notice 28 ...

Page 16: ...n operating the machine The guide assumes that you are familiar with a personal computer and that you are knowledgeable of computer networks When you need additional information refer to the manuals provided with the personal computer operating system and network products For information on optional components for the print feature also refer to the guide provided with each optional accessory Afte...

Page 17: ...D ROM Driver CD Kit Documentation HTML The documentation describes installation and configuration procedures for print drivers and the printer environment This documentation is included in the Driver CD Kit Print Driver Help The help describes print features and operations Guides for Optional Components Optional components are available for the machine Some of them come with user guides The guides...

Page 18: ...the Copy service 4 Fax Describes the basic operations and features for the Fax services 5 Scan Describes the basic operations and features for the Scan services 6 Job Flow Sheets Describes the operations to use a job flow created on a remote system 7 Stored Programming Describes the Stored Programming service that enables you to store customized job settings 8 Web Applications Describes the operat...

Page 19: ...r Environment Settings Describes the settings to use the Scan services on the machine 20 Encryption and Digital Signature Settings Describes how to configure the machine to use the Encryption and the Digital Signature features with your communications and documents 21 Authentication and Accounting Features The machine has the Authentication feature to restrict the availability of services for each...

Page 20: ...he front of the machine Note Additional information on operations or features A cross reference included in this guide Names of CD ROM features and touch screen messages and input text Folders files applications button or menu names displayed on the touch screen Names of menus commands windows or dialog boxes displayed on the computer screen and their buttons and menu names button Hardware buttons...

Page 21: ...e ReadyWare and Custom Factory Integration CFI DellPlus Online Services You can learn about Dell products and services at dell com You can access Dell Support through dell com support The Dell C5765dn Color Laser Multifunction Printer with High Capacity Feeder is Blue Angel certified for Germany You can access the Blue Angel techsheet at dell com support manuals Warranty and Return Policy Dell Com...

Page 22: ...IAL EXEMPLARY OR CONSEQUENTIAL DAMAGES INCLUDING BUT NOT LIMITED TO PROCUREMENT OF SUBSTITUTE GOODS OR SERVICES LOSS OF USE DATA OR PROFITS OR BUSINESS INTERRUPTION HOWEVER CAUSED AND ON ANY THEORY OF LIABILITY WHETHER IN CONTRACT STRICT LIABILITY OR TORT INCLUDING NEGLIGENCE OR OTHERWISE ARISING IN ANY WAY OUT OF THE USE OF THIS SOFTWARE EVEN IF ADVISED OF THE POSSIBILITY OF SUCH DAMAGE JPEG Code...

Page 23: ...copyright holder FreeBSD This product contains the part of FreeBSD codes The FreeBSD Copyright Copyright 1994 2006 The FreeBSD Project All rights reserved Redistribution and use in source and binary forms with or without modification are permitted provided that the following conditions are met Redistributions of source code must retain the above copyright notice this list of conditions and the fol...

Page 24: ...or contributed packages may be copyright by other parties and or subject to additional restrictions This work is derived from the University of Michigan LDAP v3 3 distribution Information concerning this software is available at http www umich edu dirsvcs ldap ldap html This work also contains materials derived from public sources Additional information about OpenLDAP can be obtained at http www o...

Page 25: ...AND ITS CONTRIBUTORS AS IS AND ANY EXPRESSED OR IMPLIED WARRANTIES INCLUDING BUT NOT LIMITED TO THE IMPLIED WARRANTIES OF MERCHANTABILITY AND FITNESS FOR A PARTICULAR PURPOSE ARE DISCLAIMED IN NO EVENT SHALL THE OPENLDAP FOUNDATION ITS CONTRIBUTORS OR THE AUTHOR S OR OWNER S OF THE SOFTWARE BE LIABLE FOR ANY DIRECT INDIRECT INCIDENTAL SPECIAL EXEMPLARY OR CONSEQUENTIAL DAMAGES INCLUDING BUT NOT LI...

Page 26: ...ensing such intellectual property may be found at http go microsoft com fwlink LinkId 52369 Cyrus SASL Copyright c 1998 2003 Carnegie Mellon University All rights reserved Redistribution and use in source and binary forms with or without modification are permitted provided that the following conditions are met 1 Redistributions of source code must retain the above copyright notice this list of con...

Page 27: ...IAL DAMAGES OR ANY DAMAGES WHATSOEVER RESULTING FROM LOSS OF USE DATA OR PROFITS WHETHER IN AN ACTION OF CONTRACT NEGLIGENCE OR OTHER TORTIOUS ACTION ARISING OUT OF OR IN CONNECTION WITH THE USE OR PERFORMANCE OF THIS SOFTWARE tech transfer andrew cmu edu 4 Redistributions of any form whatsoever must retain the following acknowledgment This product includes software developed by Computing Services...

Page 28: ...tems that may be illegal to copy or print in your country Currency Banknotes and checks Bank and government bonds and securities Passports and identification cards Copyright material or trademarks without the consent of the owner Postage stamps and other negotiable instruments This list is not inclusive and no liability is assumed for either its completeness or accuracy In case of doubt contact yo...

Page 29: ...the machine such as machine components how to switch the machine on and off and how to use the touch screen Machine Components 30 Power Source 34 Ground Fault Interrupter 37 Power Saver Mode 38 Control Panel 40 About the Home Screen 43 Entering Text 46 Paper Output 47 ...

Page 30: ...s or clear paper jams 3 Waste toner container Collects waste toner 4 Inner cover Open this cover to replace the consumables 5 550 sheet feeder optional Load paper here Note The machine allows for a maximum of 4 trays Standard tray 550 sheet feeder and 1100 sheet feeder 2 trays 6 1100 sheet feeder optional Load paper here Note The machine allows for a maximum of 4 trays Standard tray 550 sheet feed...

Page 31: ...s follow the instructions by the system administrator Note Always switch the power off before switching the main power off Refer to Power Source P 34 5 Multiple sheet inserter Bypass Used for loading non standard paper such as thick stock paper and other special media that cannot be loaded in trays 6 Right hand cover handle Use this handle to open the right hand cover 7 Power switch Switches the p...

Page 32: ...smart card reader 3 USB connector device Connects to the cable of the PC 4 USB connector host Connects to a USB cable 5 Fax kit optional Enables you to connect the machine to a telephone device 6 Test button Used for checking if the Reset button works properly 7 RESET button Automatically switches the machine off when a current leakage is detected 8 Power connector for the machine Connects to the ...

Page 33: ...aded correctly 2 Left cover Open this cover to clear paper jams 3 Inner cover Open this cover to clear paper jams 4 Knob Rotate this knob to clear paper jams 5 Document guides Use these guides to align the edges of documents 6 Document input tray Load documents here 7 Document output tray Scanned documents are delivered here 8 Document stopper Prevents outputs from falling off 9 Constant velocity ...

Page 34: ...the hard disk and the memory or cause a machine malfunction 1 Make sure that the power cord is plugged in correctly 2 Press the main power switch to the position to switch the main power on The Main Power indicator lights up on the control panel Switching the Power On The following describes how to switch the power on The machine takes approximately 35 seconds to warm up and to be ready to copy or...

Page 35: ...Note Do not switch the power off in the following situations If the power is switched off the data being processed may be erased While data is being received While a job is being printed While a job is being copied While a job is being scanned When switching the power off wait 5 seconds after outputs have been delivered 2 Press the power switch to the position Note Power off processing is performe...

Page 36: ...age the hard disk and the memory or cause a machine malfunction Switch the main power off first when unplugging the power cord Unplugging the power cord with the main power on may damage the hard disk and the memory or cause a machine malfunction 1 Make sure that the power is switched off 2 Make sure that the touch screen is blank and the Power Saver button is not lit 3 Press the main power switch...

Page 37: ...fault interrupter contact Customer Support at dell com contactdell The following describes how to check the ground fault interrupter 1 Press the power switch to the position to switch the power off 2 Make sure that the touch screen is blank and the Power Saver button does not light up 3 Press the main power switch to the position to switch the main power off 4 Press the RESET button The button wil...

Page 38: ...he machine press the Power Saver button The Power Saver button goes out to indicate that the Low Power mode is exited Sleep Mode In this mode the power is lowered more than in the Low Power mode The touch screen goes out and the Power Saver button on the control panel lights up To use the machine press the Power Saver button The Power Saver button goes out to indicate that the Sleep mode is exited...

Page 39: ...s connected to the machine and a user performs the following operation the Low Power mode can be deactivated without pressing the Power Saver button Placing a smart card on the smart card reader Note If the machine is in the Sleep mode however the Sleep mode will not be deactivated by the operation above To take full advantage of the feature that deactivate the Low Power mode without pressing the ...

Page 40: ... while it enters the Power Saver mode to reduce power consumption When the Power Saver mode is active the Power Saver button lights up Press this button to enter or exit the Power Saver mode 7 Interrupt button Press this button to suspend a copy or print job in progress to have the machine process another job During the Interrupt mode the Interrupt button lights up Pressing the Interrupt button ag...

Page 41: ...lear button Press this button to cancel a numerical value you have entered with the numeric keypad 16 Dial Pause button Press this button to insert a pause into a destination number 17 Numeric keypad Use the numeric buttons on the keypad to enter the number of copies passcodes and other numerical values 18 Custom Button 1 Copy Copy is assigned to this button by default Press this button to display...

Page 42: ...n Displayed after Auto Clear You can select Last Selection Screen or Home for the screen to be displayed after Auto Clear Assigning Services to the Custom Buttons You can assign services to the Custom buttons on the control panel Custom 1 to Custom 3 By assigning frequently used services to the Custom buttons you can switch to the services without returning to the Home screen Note By default Copy ...

Page 43: ...o enter the Authentication mode To exit the Authentication mode press the Log In Out button on the control panel You can also select the login information field in the upper right corner of the touch screen For information on the Authentication or Accounting mode refer to Authentication and Accounting Features P 477 Service Buttons Allows you to set the features for each service Copy You can set t...

Page 44: ...nd Link After you scan documents the machine temporarily saves the scanned data and sends you e mail attached with two URLs one is for the location to retrieve the scanned data and the other is for the location to delete the data Note This service appears when using the Authentication feature Store to USB You can scan documents and save the scanned data to a USB memory device Media Print Text You ...

Page 45: ...tandard language displayed on the touch screen when the power is switched on For more information on how to set Default Language refer to Default Language P 300 Screen Brightness You can adjust the screen brightness of the touch screen Lock Out Printer Release Printer You can set the machine to temporarily enable printing during the printer lockout period or to temporarily disable printing while R...

Page 46: ...tering alphabets and numerals To enter uppercase letters select Shift To return to the lowercase letters select Shift again Entering symbols Select More Characters Note Depending on the keyboard you can select a symbol from the pull up options displayed on the bottom left of the screen Entering a space Select Space Deleting characters Select Backspace to delete one character at a time Select Delet...

Page 47: ...capacity to prevent paper jams the following error message is displayed and the machine stops outputting paper Removing the output paper clears the error message and the machine resumes outputting paper automatically Note The output tray capacity is 500 sheets when 80 gsm paper is used ...

Page 48: ...2 Product Overview 48 ...

Page 49: ...hapter describes the basic operation and features for the Copy service Copying Procedure 50 Operations during Copying 56 Simple Copy 59 Copy 64 Image Quality 76 Layout Adjustment 83 Output Format 99 Job Assembly 113 ...

Page 50: ...r 2 sided copying 125 x 110mm Standard size A5 A5 For information on document sizes that can be detected automatically and how to enter a non standard document size refer to Original Size Specifying the Scan Size for the Document P 88 The standard document sizes that can be detected automatically depend on Paper Size Settings in the System Administration mode For information on Paper Size Settings...

Page 51: ...ose the document cover after using the document glass The document glass automatically detects standard size documents For non standard size documents enter the size on the Original Size screen For information on document sizes that can be detected automatically and how to enter a non standard document size refer to Original Size Specifying the Scan Size for the Document P 88 The standard document...

Page 52: ...imple Copy Allows you to only select basic features to copy documents Copy Allows you to make detailed settings to copy documents The following describes how to select features on the Copy screen For information on Simple Copy refer to Simple Copy P 59 Note The features displayed on the screen depend on the configuration of your machine When the Authentication or Accounting feature is enabled a us...

Page 53: ...ment P 83 Output Format P 99 Job Assembly P 113 Step 3 Entering a Quantity The following describes how to enter the number of copy sets You can enter up to 999 sets 1 Enter the number of copies using the numeric keypad The number of copies entered appears on the upper right of the touch screen 2 If you have entered an incorrect value press the C Clear button and then enter the correct value Clear ...

Page 54: ...r message appears on the touch screen Solve the problem according to the message You can set the next job during copying If you have more documents If you have more documents to copy select Next Original on the touch screen while the current document is being scanned This allows you to scan the documents as a single set of data 2 Select Next Original while scanning is in progress Note When using t...

Page 55: ...y Job in Job Status If copies are not output after you start the copy job the job may be in pending status Use the following procedure to confirm the job status 1 Press the Job Status button 2 Confirm the job status Note Select to return to the previous screen or to move to the next screen Job Status button ...

Page 56: ...ing the Copy Job 56 Changing the Number of Copies 57 Interrupting the Copy Job 58 Stopping the Copy Job To cancel a copy job in progress use the following procedure 1 Press either the Stop button on the control panel or Delete on the touch screen 2 Select Delete If Delete does not appear on the screen 1 Press the Job Status button Stop button Job Status button ...

Page 57: ...evious screen or to move to the next screen 3 Select Delete 4 Select Delete Changing the Number of Copies To change the number of copy sets during scanning or copying use the following procedure 1 Press either the Stop button on the control panel or Delete on the touch screen Stop button ...

Page 58: ...ress the Interrupt button only after all the documents have been scanned The machine does not accept another job while it is scanning the documents or when Next Original has been selected 1 Press the Interrupt button The Interrupt button lights up to indicate that the machine is in the Interrupt mode 2 Load a document and set features if necessary 3 Specify the number of copy sets with the numeric...

Page 59: ...ing the Paper for Copying 59 Reduce Enlarge Making Enlarged Reduced Copies 60 2 Sided Copying Making 2 Sided Copies 61 Black White Color Selecting the Color for Copying 62 Lighten Darken Adjusting the Copy Density 62 2 Pages per Side Copying Two Pages onto One Sheet 62 Original Orientation Specifying the Orientation of Loaded Documents 63 1 Select Simple Copy on the Home screen 2 Select a feature ...

Page 60: ...aining Amount of Paper in the Paper Tray The icon displayed beside the tray number indicates the amount of paper remaining in the paper tray Reduce Enlarge Making Enlarged Reduced Copies This feature allows you to select a copy ratio to enlarge or reduce the size of copies 1 Select Reduce Enlarge Indicates that the remaining amount of paper is 25 to 100 Indicates that the remaining amount of paper...

Page 61: ...be selected together with Auto Select under Paper Supply Ratios Allows you to select from preset copy ratios 2 Sided Copying Making 2 Sided Copies This feature allows you to copy 1 sided and 2 sided documents on one side or both sides of paper 1 Select any option 1J1 Sided Makes a copy of a 1 sided document on one side of the paper 1J2 Sided Makes a copy of a 1 sided document on both sides of the ...

Page 62: ...ent on one side of a single sheet of paper When you select 2 Pages per Side Auto is automatically selected in Reduce Enlarge The machine automatically sets the copy ratio and makes copies of the images so that they fit on the selected paper Note When you deselect Auto in Reduce Enlarge when you select another copy ratio image loss may occur depending on the image size of the document Select a tray...

Page 63: ... Original Orientation setting differs from the actual document orientation the machine may not detect the top of the document correctly 1 Select Original Orientation Sideways Images Select this option when placing the top edge of the document against the left side of the document glass or document feeder Upright Images Select this option when placing the top edge of the document against the top si...

Page 64: ...n Darken Adjusting the Copy Density 75 You can customize the layout of the features displayed on the Copy screen For more information refer to Copy Tab Features Allocation P 316 1 Select Copy on the Home screen 2 Select a feature on the Copy screen Reduce Enlarge Making Enlarged Reduced Copies This feature allows you to select a copy ratio to enlarge or reduce the size of copies 1 Specify a copy r...

Page 65: ...ted You can select a ratio from the standard copy ratios or can enter a ratio directly 1 Select a copy ratio or specify a value Variable Specify a ratio in the range from 25 to 400 in 1 increments To specify a value use the numeric keypad or and Specifying 100 allows you to make copies at the same image size as the original document When you make enlarged reduced copies from standard sized documen...

Page 66: ... the edges of the document set the amount of edge erase to 0 mm Note that if the amount is set to 0 mm the edges of the copied document may get dirty You can set Edge Erase on the Layout Adjustment screen For more information refer to Edge Erase Erasing Edges and Margin Shadows of the Document P 90 When Independent X Y is Selected You can specify reduction enlargement ratios for the width and leng...

Page 67: ...llows you to select the tray that holds the paper you want to use 1 Select a paper tray Auto Select Automatically determines the tray holding the appropriate paper based on the document size and the specified copy ratio Note This cannot be selected together with Auto under Reduce Enlarge Trays 2nd to 5th buttons on the screen Allows you to directly select the desired tray You can change the paper ...

Page 68: ...ecify a paper type other than plain paper and non standard size paper For more information refer to Tray 5 Screen P 69 Note Trays 2 3 and 4 are optional Full Displays the remaining amounts of paper loaded in trays Size Displays paper sizes Type Displays paper types Color Displays paper colors For information on how to set Paper Color refer to Paper Tray Attributes P 301 Indicates that the remainin...

Page 69: ...cted P 69 or When Custom Size is Selected P 69 respectively Paper Type Select a paper type When Standard Size is Selected Select Standard Size and from the lists displayed select a paper size and then a paper type 1 Select a paper size and a paper type Note Select to return to the previous screen or to move to the next screen When Custom Size is Selected Enter the width and length of the original ...

Page 70: ...rea is too small The colors are too light In that case change a level from the five levels which is used for the machine to recognize color For more information refer to Output Color Recognition P 304 Color Copies in full color Black White Copies in black and white regardless of the colors in the original document Dual Color Copies color documents using two colors You can change the two colors For...

Page 71: ... Separates the colors of your document into the source colors and the other colors and then copies the document using two colors Selecting Dual Color allows you to set the following Source Color Displays the Source Color screen on which you can select one or more colors from your document to define them as source colors Refer to Source Color Screen P 72 Target Area Color Displays the Target Area C...

Page 72: ...ent to define them as source colors 1 Select Dual Color 2 Select Source Color 3 Select Other than Black or Color Other than Black The colors other than black will be the source colors Color Allows you to select one or more source colors from six preset options Target Area Color Screen This screen allows you to select the target color to be used in place of the source colors specified in Source Col...

Page 73: ...you to select the color to be used in place of the colors other than the selected source colors You can select one color from seven preset and six custom options For information on how to set custom colors refer to Custom Colors P 323 1 Select Dual Color 2 Select Non target Area Color 3 Select any color ...

Page 74: ...ded Copying Making 2 Sided Copies This feature is the same as 2 Sided Copying on the Layout Adjustment screen For more information refer to 2 Sided Copying Making 2 Sided Copies P 84 Copy Output Specifying Finishing Options This feature is the same as Copy Output on the Output Format screen For more information refer to Copy Output Specifying Finishing Options P 109 Pages per Side Copying Multiple...

Page 75: ...djusting the Copy Density This feature allows you to select a copy density level from seven levels Note Lighten Darken on the Copy Image Quality and Simple Copy screens is the same 1 Use and to select from seven density levels ...

Page 76: ...s Selecting an Image Quality 79 Color Balance Adjusting Color Balance 80 Color Shift Adjusting the Color Tone 82 1 Select Copy on the Home screen 2 Select a feature on the Image Quality screen Note If the color reproduction is unsatisfactory perform calibration For information on the calibration refer to Executing Calibration P 248 Original Type Selecting the Document Type This feature allows you ...

Page 77: ... machine such as this machine This option prevents the copy from being reproduced faintly Text Select this option to copy text areas of the document sharply This option is suitable for graphs and illustrations Normal Text Select this option for printed documents or for documents written with ink Light Text Select this option for text that requires enhancement such as handwritten pencil text Text o...

Page 78: ...makes darker Sharpness Allows you to select from five sharpness levels between Sharpen and Soften Selecting an upper cell on the bar makes the contours of images sharper and selecting a lower cell makes softer Saturation Allows you to select from five saturation levels between Vivid and Pastel Selecting an upper cell on the bar makes colors brighter and selecting a lower cell makes less bright Ima...

Page 79: ...st Auto Contrast Automatically adjusts the brightness and hue of the original document to sharpen the image Note Auto Contrast is not available when you use the document feeder Manual Contrast Allows you to select from the five levels between More and Less Selecting an upper cell on the bar makes the difference between light and dark areas greater light areas become lighter and dark areas darker I...

Page 80: ...s option is suitable for water and sky images and is also suitable when smoky blue colors are to be reproduced more clearly Shadow Suppression Suppresses the colors on the reverse side of the original document from being reproduced in the copy Color Balance Adjusting Color Balance This feature allows you to adjust the color balance of the four CMYK toner colors cyan magenta yellow and black You ca...

Page 81: ...dtones and Shadows Highlights Allows you to adjust the color strength of low density areas Example If low density yellow is printed darker adjust the color strength in the minus direction under Yellow Balance Highlights Midtones Allows you to adjust the color strength of medium density areas Example If medium density yellow is printed lighter adjust the color strength in the plus direction under Y...

Page 82: ...more reddish and riper looking At the same time the tone of all the other colors changes The red color appears more magentish and the green color appears more yellowish Conversely when the Original Color slider is moved to the right the Y yellow cell on the Original Color slider becomes closer to the G green cell on the Copy Color slider and thus a yellow fruit appears more greenish At the same ti...

Page 83: ... Specifying the Scan Size for the Document 88 Mixed Size Originals Scanning Different Size Documents Simultaneously 89 Edge Erase Erasing Edges and Margin Shadows of the Document 90 Image Shift Adjusting the Image Position 92 Invert Image Making Reversed Copies of Images 95 Original Orientation Specifying the Orientation of Loaded Documents 96 Image Rotation Changing the Orientation of Images 97 1...

Page 84: ... both sides of paper Select this option when you copy 1 sided documents on both sides of paper 2J2 Sided Makes a copy of a 2 sided document on both sides of paper 2J1 Sided Makes a copy of a 2 sided document on one side of paper Originals This option is displayed when you select 2J2 Sided or 2J1 Sided Head to Head Select this option when the front and back sides of the document are in the same ori...

Page 85: ...etect the top of the document correctly Upright Images Select this option when placing the top edge of the document against the top side of the document glass or document feeder Sideways Images Select this option when placing the top edge of the document against the left side of the document glass or document feeder Book Copying Copying Facing Pages onto Separate Sheets This feature allows you to ...

Page 86: ...ight or Right Page then Left is selected Top Page Only Copies the top page only You can select this option when Top Page then Bottom is selected Bottom Page Only Copies the bottom page only You can select this option when Top Page then Bottom is selected Binding Edge Erase Erases the shadow from the center section of the document You can set the binding erase width in the range from 0 to 50 mm in ...

Page 87: ...of facing pages to make 2 sided copies Right Page then Left Scans the right page and then the left page of facing pages to make 2 sided copies Top Page then Bottom Scans the top page and then the bottom page of facing pages to make 2 sided copies Starting Ending Page Displays the Starting Ending Page screen Refer to Starting Ending Page Screen P 88 Binding Edge Erase Erases the shadow from the cen...

Page 88: ...ptions when Left Page then Right or Right Page then Left is selected Top Page Bottom Page You can select these options when Top Page then Bottom is selected Original Size Specifying the Scan Size for the Document This feature allows you to specify the scan size for a document Use this feature when a document is a non standard size or when you want to copy a document at a size different from the or...

Page 89: ...fy values use the scales attached on the upper and left edges of the document glass Note When the document is loaded in the document feeder the base point in the Y length direction is the center of the edge If you specify 100 mm the scan length will be from 50 mm above to 50 mm below the center of the document Mixed Size Originals Scanning Different Size Documents Simultaneously You can scan docum...

Page 90: ...of the document glass or document feeder Edge Erase Erasing Edges and Margin Shadows of the Document When you copy a document with the document cover open or when you copy a book the edges and center margin of the document may be printed as black shadows The Edge Erase feature allows you to erase such shadows Note For 2 sided originals the same edge erase amounts are set for the front and back sid...

Page 91: ...or a booklet You can specify values for Top Bottom Left Right and Center individually Erase Value Allows you to specify values to erase the edges of a document All Edges Erases the shadows of the four edges of the document according to the orientation of the loaded document You can specify the edge width you want to erase in the range from 0 to 50 mm in 1 mm increments Top Bottom Top Bottom Erases...

Page 92: ...me value is set to the edge erase amount of Side 1 and Side 2 Same as Side 1 The same value is set to the edge erase amount of Side 1 and Side 2 Mirror Side 1 The edge erase amounts of Side 1 and Side 2 are set symmetrically Image Shift Adjusting the Image Position This feature allows you to shift the position of document images so that the images are placed on the left right top bottom or center ...

Page 93: ...nt Note If the Original Orientation setting differs from the actual document orientation the machine may not detect the top of the document correctly Upright Images Select this option when placing the top edge of the document against the top side of the document glass or document feeder Sideways Images Select this option when placing the top edge of the document against the left side of the docume...

Page 94: ... You can select from 8 shift directions Specify the amounts of the top and bottom and left and right margins in the range from 0 to 50 mm in 1 mm increments Margin Shift Allows you to specify the amounts of the top and bottom and left and right margins in the range from 0 to 50 mm in 1 mm increments ...

Page 95: ...ft and right margins in the range from 0 to 50 mm in 1 mm increments Margin Shift Allows you to specify the amounts of the top and bottom and left and right margins in the range from 0 to 50 mm in 1 mm increments Invert Image Making Reversed Copies of Images This feature allows you to reverse the left and right sides of the document image or to create a negative image of the document when making c...

Page 96: ...ote If the Original Orientation setting differs from the actual document orientation the machine may not detect the top of the document correctly 1 Select Original Orientation 2 Select Upright Images or Sideways Images according to the orientation of the document loaded Upright Images Select this option when placing the top edge of the document against the top side of the document glass or documen...

Page 97: ...y option Off Copies documents as they are even if the orientation of the images does not match that of the paper Always On Automatically rotates document images so that the orientation of the images matches that of the paper On during Auto Automatically rotates document images so that the orientation of the images matches that of the paper only when Auto is selected in Reduce Enlarge or when Auto ...

Page 98: ...of the Staple feature Portrait Original Left Edge If documents are of mixed orientations the images will be rotated so that the top edge of landscape documents is aligned with the left edge of portrait documents Portrait Original Right Edge If documents are of mixed orientations the images will be rotated so that the top edge of landscape documents is aligned with the right edge of portrait docume...

Page 99: ...Finishing Options 109 ID Card Copy Copying Both Sides of an ID Card 111 1 Select Copy on the Home screen 2 Select a feature on the Output Format screen Note Select to return to the previous screen or to move to the next screen 2 Sided Copying Making 2 Sided Copies This feature is the same as 2 Sided Copying on the Layout Adjustment screen For more information refer to 2 Sided Copying Making 2 Side...

Page 100: ...Format screen 3 Select any option Off Disables this feature Create Left Top Bound Booklet Copies are made to enable left binding or top binding Create Right Bound Booklet Copies are made to enable right binding Covers You can attach covers to a booklet Off No cover is attached Blank Cover A blank sheet of paper is attached as the cover Print on Both The first and second pages of the document are c...

Page 101: ...Displays the Booklet Creation Paper Supply screen Select the tray to be used for body pages from Main Body Tray and the tray for cover pages from Cover Tray Select the same size of paper for Main Body Tray and Cover Tray and also select the trays with paper loaded in landscape orientation When Bypass is selected the Tray 5 screen is displayed For more information refer to Tray 5 Screen P 69 Bookle...

Page 102: ...ages per job 1 Select Covers 2 Select any option Front Cover Attaches a front cover to the copies Off No front cover is attached Blank Cover Blank sheets of paper are attached as front covers Print on Side 1 The first page of the document is copied on the front side of the front cover Print on Side 2 The first page of the document is copied on the back side of the front cover Print on Both The fir...

Page 103: ...r Specify the number of blank sheets to be used as back covers Pages per Side Copying Multiple Pages onto One Sheet This feature allows you to copy two four or eight document pages onto one side of a single sheet of paper When you set Pages per Side Auto is automatically selected in Reduce Enlarge The machine automatically sets the copy ratio and makes copies of the images so that they fit on the ...

Page 104: ...ctly Upright Images Select this option when placing the top edge of the document against the top side of the document glass or document feeder Sideways Images Select this option when placing the top edge of the document against the left side of the document glass or document feeder Poster Making Enlarged Copies Spread over Multiple Sheets An enlarged copy of a document can be made spread over mult...

Page 105: ...on the Paper Supply screen When Bypass is selected the Tray 5 screen is displayed For more information refer to Tray 5 Screen P 69 When Enlargement is Selected This screen allows you to specify a different ratio for the width and length 1 Use and to specify the copy ratios for the width and length Width X Length Y Allows you to specify the copy ratios for the width and length in the range from 100...

Page 106: ...ary For information on Auto Paper Off refer to Auto Paper Off P 321 1 Select Repeat Image 2 Select any option Off Disables this feature Auto Repeat Automatically determines the number of the repeated copies according to the document size paper size and copy ratio and then repeatedly copies the document image onto the paper Note Copies cannot be made when the document image is larger than the speci...

Page 107: ...les this feature 2 Times Makes two copies of the document image on a single sheet of paper 4 Times Makes four copies of the document image on a single sheet of paper 8 Times Makes eight copies of the document image on a single sheet of paper Transparency Options Inserting Blank Sheets between Transparencies This feature allows you to insert blank separators between output transparency sheets At th...

Page 108: ...sed for the transparencies Select More to display the Paper Supply Transparency screen on which you can select a tray Note When you use the bypass tray select Bypass on the Paper Supply Transparency screen When Bypass is selected the Tray 5 screen is displayed For more information refer to Tray 5 Screen P 69 Separator Tray Allows you to select the paper tray to be used for the separators Select Mo...

Page 109: ...t is required to use this feature For more information contact Customer Support at dell com contactdell If the finisher is installed each set of copies can be stapled and then output 1 Select Copy Output 2 Select any option Auto Copies are collated when the originals are loaded in the document feeder Copies are collated when originals are loaded on the document glass and any of the following featu...

Page 110: ...t Note If the Original Orientation setting differs from the actual document orientation the machine may not detect the top of the document correctly Upright Images Select this option when placing the top edge of the document against the top side of the document glass or document feeder Sideways Images Select this option when placing the top edge of the document against the left side of the documen...

Page 111: ...allows you to copy both sides of a small undetectable original such as an ID card onto one side of paper 1 Specify the orientation of the document in Original Orientation on the Layout Adjustment screen 2 Place the document slightly away from the top left corner of the document glass and close the document glass Note Always use the document glass when copying You cannot use the document feeder wit...

Page 112: ...ratio specified For information on the copy magnification ratio for ID Card Copy refer to ID Card Copy Reduce Enlarge P 322 For information on how to specify the orientation of a document refer to Original Orientation Specifying the Orientation of Loaded Documents P 96 3 Select ID Card Copy on the Output Format screen 4 Select On Off Disables ID card copying On Enables ID card copying ...

Page 113: ... Originals 118 Delete Outside Delete Inside Deleting Outside or Inside of the Selected Area 121 Stored Programming Calling a Stored Program for Build Job 122 1 Select Copy on the Home screen 2 Select a feature on the Job Assembly screen Build Job Processing Documents Scanned with Different Settings as One Job This feature allows you to apply different copy settings to each document page or each do...

Page 114: ...t Separators Screen P 116 Copy Screen When Build Job is in Progress The following describes the screen that appears while the Build Job is being executed Chapter Start Displays the Build Job Chapter Start screen Refer to Build Job Chapter Start Screen P 116 Insert Separators Displays the Segment Separators screen Refer to Segment Separators Screen P 116 Change Quantity Displays the Change Quantity...

Page 115: ... to pause scanning Select Start on the touch screen or press the Start button on the control panel to resume scanning Last Original Select this button to end scanning of documents The build job starts Next Original Select this button when you have another document This button is always selected when you use the Build Job feature Start After loading the next document select this button to scan the ...

Page 116: ...r as a separator in between each stack of documents You can specify the number of separators to insert in the range from 1 to 99 as necessary Note You can specify different settings for each stack of documents If you do not specify particular settings for each stack of documents the previously specified settings are applied 1 Select any option 2 Select any option No Separators Does not insert any ...

Page 117: ...oad two sheet documents both sheets are copied onto each side of a separator Note To copy a one page document on Side 1 of a separator and the first page of the next document on Side 2 of the same separator select No Separators under Insert Separators when you load the next document If not the one page document will be copied and printed one sided and the first and the second pages of the next doc...

Page 118: ...e machine will not process the job Change Settings Displays the Change Settings screen To cancel the settings you have made deselect the check box for the feature you want to cancel Delete The remaining copies are canceled Start The remaining copies are made Note You can also press the Start button on the control panel to perform the same operation Combine Original Sets Adding Originals Use this f...

Page 119: ...nables this feature Original Orientation Allows you to specify the orientation of the document so that the machine can identify the top of the document Note If the Original Orientation setting differs from the actual document orientation the machine may not detect the top of the document correctly Upright Images Select this option when placing the top edge of the document against the top side of t...

Page 120: ...r Clear All button on the control panel to perform the same operation Last Original Select this button to end scanning documents Next Original Select this button when you have more documents to copy This button is always selected when the Combine Original Sets feature is used Start After loading the next document select this button to scan the next document Note You can also press the Start button...

Page 121: ...elete Inside Deletes the inside of the selected area Area Settings Displays the Delete Outside Delete Inside Area 1 Area 2 or Area 3 screen You can specify up to three areas Refer to Delete Outside Delete Inside Area 1 Area 2 or Area 3 Screen P 122 Originals When the original document is a 2 sided document specify from which side the specified area is to be deleted Both Sides Applies the settings ...

Page 122: ... in 1 mm increments Note Specify the 2 coordinates from the top right corner of the document When specifying multiple areas the specified areas can overlap each other When Reduce Enlarge is set the specified area will be reduced or enlarged accordingly 1 Select Area 1 Area 2 or Area 3 2 Select the text box for X1 and enter the value for X1 using the numeric keypad 3 Select the text box for Y1 and ...

Page 123: ...r describes the basic operations and features for the Fax services Note An optional component is required to use this feature For more information contact customer support Fax Procedure 124 Operations during Faxing 130 ...

Page 124: ...te The minimum supported paper size for 2 sided copying 125 x 110 mm Standard size A5 A5 The standard document sizes that can be detected automatically depend on Paper Size Settings in the System Administration mode For information on Paper Size Settings refer to Paper Size Settings P 309 The size on the left is detected as the size shown on the right as follows The document feeder accepts the fol...

Page 125: ...t glass supports a single sheet a book or other similar documents with a size from 15 x 15 mm Standard size A5 A5 to 216 x 356 mm Standard size A4 Note Always close the document cover after using the document glass The document glass automatically detects standard size documents The standard document sizes that can be detected automatically depend on Paper Size Settings in the System Administratio...

Page 126: ... the message field Step 2 Selecting Features The following two services are available to send faxes Simple Fax Allows you to only select basic features to send faxes Fax Allows you to make detailed settings to send faxes The following procedure uses Fax to describe how to select features Note The features to be displayed on the screen depend on the configuration of your machine When the Authentica...

Page 127: ...nts with a single phone call This feature is called Batch Send Note that you cannot use Batch Send with Broadcast Send Relay Broadcast Remote Folder and Delay Start when prior to the specified time When using a redial resend or delayed start send transmission job or authentication feature to send to the same address from different users then Batch Send is not possible Note Confirm recipients befor...

Page 128: ...tton In this case re enter the recipient If a problem occurs an error message appears on the touch screen Solve the problem according to the message If you have more documents If you have more documents to fax select Next Original on the touch screen while the current document is being scanned This allows you to send the documents as one set of data 2 While documents are being scanned select Next ...

Page 129: ...firm the status of a fax job 1 Press the Job Status button 2 Confirm the job status Note Select to return to the previous screen or to move to the next screen From the drop down menu you can select Scan Fax Jobs and display the desired job If undelivered faxes exist You can confirm undelivered faxes on the Job Status screen or in an Activity Report For information on how to resend or delete undeli...

Page 130: ...h operation Stopping the Fax Job 130 Changing the Scan Settings 131 Stopping the Fax Job To cancel scanning a fax document use the following procedure 1 Press either the Stop button on the control panel or Delete on the touch screen 2 Select Delete If Delete does not appear on the screen 1 Press the Job Status button Stop button Job Status button ...

Page 131: ...return to the previous screen or to move to the next screen 3 Select Delete 4 Select Delete Changing the Scan Settings You can change the scan settings while scanning a document 1 Select Next Original 2 Select Change Settings 3 Set Resolution Original Size and the density ...

Page 132: ...4 Fax 132 4 Select Save 5 Press the Start button ...

Page 133: ...c operations and features for the Scan services To use the Scan services network settings are required For information on the network settings refer to Scanner Environment Settings P 451 Scanning Procedure 134 Operations during Scanning 141 ...

Page 134: ... 356 mm Standard size A4 8 5 x 11 The document feeder automatically detects standard size documents For non standard size documents enter the size on the Original Size screen The standard document sizes that can be detected automatically depend on Paper Size Settings in the System Administration mode For information on paper size settings refer to Paper Size Settings P 309 The document feeder acce...

Page 135: ...cument stopper Document Glass The document glass supports a single sheet a book or other similar documents with a size from 15 x 15 mm Standard size A5 A5 to 216 x 356 mm Standard size A4 Note Always close the document cover after using the document glass The document glass automatically detects standard size documents For non standard size documents enter the size on the Original Size screen The ...

Page 136: ...the network settings refer to Scanner Environment Settings P 451 E mail Scans a document and sends the scanned data as an e mail attachment after converting the data to TIFF JPEG PDF or XML Paper Specification XPS Store to Folder Scans a document and saves the scanned data in a folder on the machine You need to create a folder in advance For information on how to create a folder refer to Create Fo...

Page 137: ...ed at 12 34 56 on January 23 X Y and Z represent October November and December respectively The following describes how to store scanned data into a folder as an example 1 Press the Home button 2 Select Store to Folder Scan Service File Format can be Selected When File Format PDF XPS 1 TIFF JPEG E mail Using the control panel when scanning O 2 O O O Scan to PC O 2 O O O Store to USB O 2 O O O Stor...

Page 138: ...message appears on the touch screen Solve the problem according to the message You can set the next job during scanning If you have more documents If you have more documents to scan select Next Original on the touch screen while the current document is being scanned This allows you to scan the documents as a single set of data Up to 999 pages can be stored Note If the number of pages scanned by th...

Page 139: ...shown on the right and no operation is performed for a certain period of time the machine automatically assumes that there are no more documents You can change the scan settings of the next document by selecting Change Settings that is displayed after selecting Next Original 3 Load the next document 4 Press the Start button If you have more documents repeat steps 3 and 4 5 When all documents have ...

Page 140: ...down menu you can select Scan Fax Jobs and display the desired job Step 5 Saving the Scanned Data When you used the Store to Folder service you can use the following methods to import the file stored in a folder of the machine to your computer Import using an application Use Network Scanner Driver Import using Stored File Manager 3 Use Stored File Manager 3 Import using Dell Printer Configuration ...

Page 141: ...n Stopping the Scan Job 141 Previewing the Scanned Images during a Scan Job 142 Changing Scan Settings 143 Stopping the Scan Job To cancel scanning a document use the following procedure 1 Press either the Stop button on the control panel or Delete on the touch screen 2 Select Delete If Delete does not appear on the screen 1 Press the Job Status button Stop button Job Status button ...

Page 142: ...b the scanned data stored in the folder will also be deleted Previewing the Scanned Images during a Scan Job You can preview the scanned images while scanning the document 1 Select Next Original 2 Select Preview to display a preview screen The first page of the last scanned document is displayed ...

Page 143: ...age 4 After the confirmation select Close to close the preview screen Changing Scan Settings You can change scan settings while scanning the document 1 Select Next Original 2 Select Change Settings 3 Set Color Scanning Original Type Resolution Lighten Darken Original Orientation 2 Sided Scanning and Original Size 4 Press the Start button ...

Page 144: ...5 Scan 144 ...

Page 145: ...g a job flow sheet registered on the machine Job Flow Sheets is a service that allows you to register transfer settings of scan data such as a transfer method and destination to simplify data transfer tasks Job Flow Procedure 146 Selecting Changing a Job Flow Sheet 148 ...

Page 146: ...ob Flow Sheets Screen 146 Step 2 Selecting a Job Flow Sheet 146 Step 3 Confirming Changing the Job Flow Sheet 147 Step 4 Starting the Job Flow Sheet 147 To create and register a job flow sheet use a computer Note To create a job flow sheet use Job Flow Editor in the Driver CD kit provided with the machine Step 1 Opening the Job Flow Sheets Screen The following describes how to open the Job Flow Sh...

Page 147: ... job flow settings refer to Selecting Changing a Job Flow Sheet P 148 Step 4 Starting the Job Flow Sheet 1 Load a document Note A job flow with an application linked does not require you to load a document 2 Press the Start button Note After executing the job flow be sure to print a Job History Report to check the result For information on the Job History Report refer to Job History Report P 306 ...

Page 148: ... screen You can confirm the details of a job flow such as the name last updated date target owner and save location When you select the button the whole text of the description which was registered when creating the job flow sheet is displayed Change Settings Displays the Change Settings screen You can change the job flow settings Refer to Change Settings Screen P 149 Search by Name Searches for j...

Page 149: ... is registered 3 Select the item to be changed Note A triangle icon appears at the left of each mandatory item 4 Select any option Items Displays the items set for the job flow sheet Current Settings Displays the values set for the job flow sheet Previous Group Displays the items of the previous group Next Group Displays the items of the next group Add E mail Recipient Adds recipients for the e ma...

Page 150: ...s of the Authentication feature For more information refer to Job Flow Sheet Types and Overview P 489 1 Select Sheet Filtering 2 Select the filtering conditions and select Save Owner Select the owner of job flow sheets to filter Target Select the target of job flow sheets to filter Note Job flow sheets whose Target is Folder can be used only from Send from Folder ...

Page 151: ...ing This chapter describes the Stored Programming service that enables you to store customized job settings Stored Programming Overview 152 Registering Deleting Renaming Stored Programs 153 Calling a Stored Program 159 ...

Page 152: ...nfigured on multiple screens For example this service is available when you want to record a procedure starting from pressing the Machine Status button to displaying the screen under Print Reports to print a Job History Report In addition while Build Job is running this service can be used for the remaining document stacks For information on Build Job refer to Build Job Processing Documents Scanne...

Page 153: ...e button 2 Select Setup 3 Select Stored Programming 4 Select a feature Store Register a stored program Refer to Registering Stored Programs P 154 Store Build Job Register a stored program for Build Job Refer to Registering Stored Programs for Build Job P 156 Delete Deletes a stored program Select the stored program number to be deleted Refer to Deleting Stored Programs P 157 Home button ...

Page 154: ...istered The registering procedure for a stored program is canceled when the Interrupt button is pressed the Auto Clear feature causes a time out or a popup window paper jam etc appears 1 Select Store 2 Select a number to register a stored program Note Once a job is stored to a button it cannot be overwritten Select to return to the previous screen or to move to the next screen 3 Set the feature yo...

Page 155: ...k or Job Flow Sheet If any optional components installed on the machine such as a finisher are changed and thereby the associated buttons become no longer available If the measurement unit millimeters or inches is changed If a job is selected from the list of the stored jobs in Secure Print Jobs More under Job Status Selecting items using the scroll bar The following features and operations cannot...

Page 156: ...ritten Select to return to the previous screen or to move to the next screen 3 Set the feature you want to register Note The machine sounds an audible tone while a stored program is being registered Press the Interrupt button to cancel registration You can change the volume of the sound that notifies that a stored program is being registered For information on the settings refer to Stored Programm...

Page 157: ...rogram Note Deleted stored programs cannot be restored Cancel Cancels deleting the stored program Entering Changing a Stored Program Name The following describes how to enter or change the name of a stored program Up to 18 characters are allowed for a stored program s name For information on how to enter characters refer to Entering Text P 46 1 Select Enter Change Name 2 Select the number to regis...

Page 158: ...stored program You can select from 12 icons 1 Select Assign Change Icon 2 Select the number to assign or change an icon Note Select to return to the previous screen or to move to the next screen 3 Select an icon and select Save No Icon No icon is assigned to a registered stored program Icon Select an icon according to the content of the registered stored program ...

Page 159: ...u want to use Note You can only select registered numbers Select to return to the previous screen or to move to the next screen After the stored program has been called the machine sounds an audible tone If a failure occurs the machine sounds a fault tone For information on how to change the volume of the sound that notifies that a stored program has been called refer to Stored Programming Complet...

Page 160: ...t Stored Programming 4 Select a number of a stored program containing the features you want to use Note You can only select registered numbers After the stored program has been called the machine sounds an audible tone If a failure occurs the machine sounds a fault tone For information on how to change the volume of the sound that notifies that a stored program has been called refer to Stored Prog...

Page 161: ...8 Web Applications This chapter describes how to operate web applications Web Applications Overview 162 Accessing Web Applications 163 Accessing Using Buttons Registered on the Home Screen 164 ...

Page 162: ...achine and displaying the web application screen on the machine Storing scanned documents directly in a web application folder Printing a file directly that is stored on a remote server Note The web applications that can be displayed on the machine are those which are compatible with the machine You cannot access website on the Internet To access the web application on the machine prior settings a...

Page 163: ... an access destination refer to Server Setup P 377 1 Press the Home button 2 Select Web Applications Note If Auto Link has been set the machine can access the remote service 3 Select an access destination 4 Select Open from the pop up menu displayed Open Accesses the specified remote service Details Displays the information of the specified remote service Close Menu Hides the pop up menu Home butt...

Page 164: ...g describes how to access the applications by simply selecting the buttons For information on how to register a web application to a button on the Home screen refer to Home P 300 1 Press the Home button 2 Select Head Office registered on the Home screen Note Head Office is registered as an example here You can specify the name and the position of the button Home button ...

Page 165: ...t and Photos This chapter describes the basic procedures and features of Media Print Text and Media Print Photos Overview of Media Print 166 Media Print Text 169 Media Print Photos 171 Selecting the Printing Options 173 ...

Page 166: ...played in thumbnail view and cannot be previewed either XPS stands for XML Paper Specification For using commercially available Memory Card Reader contact Customer Support at dell com contactdell Commercially available Memory Card Reader with single slot 1 can be used for Media Print feature text photo but its safe performance is not guaranteed When a Memory Card Reader with multi slot 2 is used o...

Page 167: ...meras or computers FAT12 FAT16 FAT32 only Use USB 2 0 compliant memory devices with the size up to 128 GB only USB 1 1 compliant memory devices are not supported If a file name contains machine dependent codes the file may not be recognized or displayed on the screen correctly Notes and Restrictions on Media Print The following notes and restrictions apply on the use of the Media Print service Use...

Page 168: ...our USB memory device or via your USB cable as necessary but the operation is not guaranteed Multiple USB memory devices cannot be used simultaneously Use USB 2 0 compliant memory devices only USB 1 1 compliant memory devices are not supported The following USB memory devices are not supported A USB memory device with multiple media partitions that require other utilities to access to the contents...

Page 169: ...sferred Note Index numbers from 001 to 900 are automatically assigned to the files retrieved 3 After the files are retrieved select either Select All or Select From List to specify files 4 After selecting the files to be printed select the printing options For more information on the printing options refer to Selecting the Printing Options P 173 Note On the pop up menu displayed when selecting fil...

Page 170: ...or each file selected To deselect the file select the file again while the file is selected highlighted If a folder or file name has more than 170 characters long the folder or file name is not displayed Folder names which include characters that the machine does not support may not be correctly displayed If you specify the folders as file storage locations an error occurs For more information on ...

Page 171: ...ransferred Note Index numbers from 001 to 900 are automatically assigned to the files retrieved 3 After the files are retrieved select either Select All or Select From List to specify files 4 After selecting the files to be printed select the printing options For more information on the printing options refer to Selecting the Printing Options P 173 Note On the pop up menu displayed when selecting ...

Page 172: ...cted To deselect the file select the file again while the file is selected highlighted List Display a list of files with their names and stored dates and times Note You can sort the list in ascending or descending order by selecting Name or Date Time The number of files selected appears on the top on the screen Thumbnail Displays a list of the images and names of the files Note The thumbnail view ...

Page 173: ...rays 1 5 Note When the desired tray is not displayed select More and select the tray on the displayed screen When you select More and then Bypass you can set Paper Size and Paper Type Paper Size Select the paper size to be used from the list A4 8 5 x 11 B5 100 x 148 mm Paper Type Select the paper type to be used from the list 2 Sided Printing Off Long Edge Flip Short Edge Flip Output Photo Size Fu...

Page 174: ... paper is loaded A4 A5 B5 8 5 x 11 8 5 x 14 When you select Auto Select the machine automatically selects a tray that contains the same size of paper as the document and prints the document at its original size When the desired tray is not displayed select More and on the screen displayed select the tray When you select More and then Bypass you can set Paper Size and Paper Type Paper Size Select t...

Page 175: ...or Media Print Text or Media Print Photos before selecting the Index Print check box will be effective To change these settings deselect the Index Print check box change the print settings and then perform Index Print The setting values return to the defaults if the machine is rebooted The following setting items are restricted when you select Index Print Setting Item Value Output Color In the Med...

Page 176: ...9 Media Print Text and Photos 176 ...

Page 177: ...s how to check the status of jobs and operate the jobs Job Status Overview 178 Checking Current Pending Jobs 179 Checking Completed Jobs 181 Printing and Deleting Stored Jobs 182 Printing Pending Jobs 195 Handling Error Terminations 196 ...

Page 178: ...el current or pending jobs For more information refer to Checking Current Pending Jobs P 179 Checking completed jobs Displays the status of completed jobs and their details For more information refer to Checking Completed Jobs P 181 Checking stored jobs Prints or deletes jobs stored using the Charge Print Secure Print Private Charge Print Sample Set and Delayed Print features For more information ...

Page 179: ...an select and display the desired type of jobs 3 Select Delete or Promote Job Print Waiting Jobs Prints the jobs that are waiting to be output or resumed For more information refer to Printing Pending Jobs P 195 Delete Cancels the current or pending job Promote Job Preferentially executes the selected job If you select this button appears under the Status of the selected job Delete Stops processin...

Page 180: ...10 Job Status 180 Start Resumes the suspended job Change Quantity Displays the Change Quantity screen on which you can change the number of print sets Enter the number using the numeric keypad ...

Page 181: ...te Select to return to the previous screen or to move to the next screen From the drop down menu you can select and display the desired type of jobs 3 Select a job to see the details 4 Select Close after the confirmation Group Parent Jobs Allows you to check the list or history of related jobs such as job flow jobs Show Child Jobs Displays a job list Print this Job History Report Prints the Job Hi...

Page 182: ...emporarily store print data in the machine to print it with the print command from the machine The feature also enables you to set a passcode which is helpful to print confidential documents The following describes how to print or delete jobs stored with the Secure Print feature Note This feature does not appear when Receive Control in Charge Private Print Settings is set to either of the followin...

Page 183: ...the job to be printed or deleted Note You can select up to 100 files simultaneously to print or delete the files If you select multiple files they are printed in the selected order 5 Select any option 6 When printing specify the number of print sets using the numeric keypad Select All Selects all jobs To deselect all the jobs select this button again Delete Deletes the Secure Print job Note If job...

Page 184: ...job After printing the job is deleted Print and Save Starts printing the job After printing the job remains undeleted Cancel Cancels printing the job Sample Set The following describes how to print or delete jobs stored with the Sample Set feature Before printing multiple sets of a document you can first print one set for trial and then print the remaining sets from the machine For information on ...

Page 185: ...ct multiple files they are printed in the selected order 4 Select any option 5 When printing specify the number of print sets using the numeric keypad Select All Selects all jobs To deselect all the jobs select this button again Delete Deletes the Sample Set job Refer to When Delete is Selected P 185 Print Quantity Specify the number of print sets using the numeric keypad Print Prints the Sample S...

Page 186: ...me Up to 100 jobs can be stored queued simultaneously for the Delayed Print feature If the power is switched off when jobs are in queue before the specified print time the jobs whose print time has elapsed will automatically be printed immediately after the power is switched on again The following describes how to print or delete jobs stored with the Delayed Print feature For information on how to...

Page 187: ...ore information refer to Print Job Confirmation Screen P 375 Yes Starts printing the job After printing the job is deleted No Cancels printing the job Charge Print This feature authenticates users on the machine to prevent unauthorized users from operating print jobs When this feature is enabled the machine prints only the jobs of authenticated users You can also configure the machine to store pri...

Page 188: ...ribes how to print and delete a job stored with the Charge Print feature 1 Press the Log In Out button on the control panel or select the login information field on the touch screen 2 Enter the user ID and select Enter Note When the passcode is set enter the user ID and select Next Then enter the passcode and select Enter While a user is authenticated the Log In Out button lights up on the control...

Page 189: ... Cancels deleting the job When Print is Selected 1 Specify how to process the job after printing Note The screen as shown on the right does not appear if Print Job Confirmation Screen is set to Disabled in the System Administration mode If Disabled is selected the machine automatically deletes the job after printing without displaying the confirmation screen For more information refer to Print Job...

Page 190: ... For information of the types of authentication refer to Types of Authentication P 481 To delete a print job instructed with an invalid user ID display the list of print jobs after logging in as a system administrator and then select the job to be deleted For more information refer to Deleting a Private Charge Print Job with an Invalid User ID P 255 For information on how to set a User ID refer to...

Page 191: ...Delete Delete Deletes the job Note Once the job is deleted it cannot be restored Cancel Cancels deleting the job When Print is Selected 1 Specify how to process the job after printing Note The screen as shown on the right does not appear if Print Job Confirmation Screen is set to Disabled in the System Administration mode If Disabled is selected the machine automatically deletes the job after prin...

Page 192: ...Select the job to be printed or deleted Note Select Refresh to display the updated information Select to return to the previous screen or to move to the next screen 3 Select any option Select All Selects all jobs To deselect all the jobs select this button again Delete Deletes the selected job stored in the public folder Refer to When Delete is Selected P 192 Print Prints the selected job stored i...

Page 193: ...tdell 1 Select Undelivered Faxes 2 Select the job to be re sent or deleted Note Select Refresh to display the updated information Select to return to the previous screen or to move to the next screen 3 Select any option To re send to the previously specified fax number press the Start button Delete This Fax Deletes the undelivered fax job Refer to When Delete This Fax is Selected P 193 Change Reci...

Page 194: ...ax job Besides the fax recipient the following features can be changed on the control panel Note If the fax recipient has been changed header information will not be added even if Transmission Header Text is set to Display Header For information on how to specify fax recipients refer to Step 3 Specifying Destinations P 127 Fax type Starting Rate ...

Page 195: ...s pending job without waiting for this time period to elapse If a job is paused by the Stop button and is waiting to be resumed you can also resume the job If there are multiple jobs subsequent jobs are printed after the paused job has been printed Note If there are no pending jobs the Print Waiting Jobs button is disabled For information on how to set Auto Print refer to Auto Print P 296 1 Press ...

Page 196: ...elivered is printed For more information on the Transmission Report Job Undelivered refer to Transmission Report Job Undelivered P 268 For more information on how to print the Transmission Report Job Undelivered automatically refer to Transmission Report Job Undelivered P 306 For a Scan Job A Transmission Report Job Undelivered is printed For more information on the Transmission Report Job Undeliv...

Page 197: ...on your computer Note An optional component is required to use this feature For more information contact Customer Support at dell com contactdell The computer screen images shown in this chapter are as of August 2013 The procedures in this chapter may vary depending on the driver and utility software being used due to the upgrades Features Overview 198 ...

Page 198: ... by sending e mail attached with a document The received e mail is automatically printed from the machine according to the settings on the machine Sending Fax Sends a fax directly from a computer Importing Scanned Data Imports files stored in a folder of the machine to a computer Dell Printer Configuration Web Tool Displays the machine status and job status The feature also allows you to change se...

Page 199: ...her Media This chapter describes the paper that can be used with the machine precautions when handling paper and how to load paper in trays Print Media Guidelines 200 Loading Paper 207 Changing the Paper Settings 214 ...

Page 200: ...ain long paper Curl Curl is the tendency of print media to curve at its edges Excessive curl can cause paper feeding problems Curl usually occurs after the paper passes through the machine where it is exposed to high temperatures Storing paper unwrapped even in the paper tray can contribute to paper curling prior to printing and cause feeding problems regardless of humidity When printing on curled...

Page 201: ...ntaminate the machine Preprinted paper that can be affected by the temperature in the fusing unit Preprinted paper that require a registration the precise print location on the page greater than 0 09 inches such as optical character recognition OCR forms In some cases you can adjust registration with your software program to successfully print on these forms Coated paper erasable bond synthetic pa...

Page 202: ... Pre punched paper brands can differ in the number and placement of holes and in manufacturing techniques However it may not be possible to print on the paper depending on the placement of holes on the paper To select and use pre punched paper Test paper from several manufacturers before ordering and using large quantities of pre punched paper Paper should be punched at the paper manufacturer and ...

Page 203: ...ted Paper Sizes P 205 Envelopes Depending on the choice of envelopes it is possible to expect variable levels of light wrinkling It is recommended that you try a sample first before buying large quantities of any print media See Loading Paper P 207 for instructions on loading an envelope When printing on envelopes Use only high quality envelopes that are designed for use in laser printers Set the ...

Page 204: ...resulting in a jam Partial sheets also contaminate your machine and your cartridge with adhesive and could void your machine and cartridge warranties Use labels that can withstand temperatures of 205 C without sealing excessive curling wrinkling or releasing hazardous emissions Do not print within 1 mm of the edge of the label of the perforations or between die cuts of the label Do not use label s...

Page 205: ...s sorted into sets or jobs and output to the left tray 3 To print envelopes using the Tray 1 you must select the kind of the envelope in the Tray1 settings For details see Paper Tray Attributes P 397 Tray 1 Tray 2 to 4 Tray 5 Duplex Module Finisher AB1 Sheet 1 Finisher AB1 Set 2 A4 210 x 297 mm 0 0 0 0 X 0 A5 148 x 210 mm 0 0 0 0 0 X B5 182 x 257 mm 0 0 0 0 X 0 Letter 8 5 x 11 in 0 0 0 0 X 0 Folio...

Page 206: ...Covers Normal 0 X 0 X 0 0 0 X X X 0 X Thick 0 X 0 X 0 0 X X X X 0 X Coated Normal 0 X X X 0 0 0 X 0 X X X Thick 0 X X X 0 0 X X 0 X X X Label Normal 0 X X X 0 X X X 0 X X X Envelope 0 X X X 0 X X X 0 X X X Recycled 0 X 0 X 0 0 0 X X X 0 X Transparency 0 X X X 0 X X X 0 X X X 0 X Available Not available Paper Type Weight gsm Remarks Plain Paper 60 80 Plain Thick Paper 81 105 Covers 106 162 Covers T...

Page 207: ...ding on the setting of that tray for Auto Paper Select For more information refer to Change Settings P 301 Tray 5 cannot be selected in automatic tray selection When the paper runs out during copying or printing select a tray containing the same sized paper and orientation and the machine continues copying or printing Auto Tray Switching feature The machine cannot switch to a tray containing a pap...

Page 208: ...While pinching the two paper guides move them to the edges of the tray 3 Before loading the paper flex the sheets back and forth and then fan them 4 Load and align the edge of the paper against the paper guides with the side to be copied or printed on facing up 5 While pinching the two paper guides lightly align the edges to the edge of the paper Note When loading standard size paper in the tray m...

Page 209: ...t hand cover to open the cover 2 Press down the lever to set the envelope mode Note If you insert media other than envelopes lift up the lever To load envelopes using the optional Finisher AB1 raise the lever as shown in the illustration To load print media other than envelopes using the optional Finisher AB1 check if the lever is pulled down as shown in the illustration ...

Page 210: ...o the tray When Loading Envelope 10 Monarch or DL When Loading C5 Note Never use envelopes with window coated linings or self stick adhesives These lead to paper jams and can cause damage to the printer Ensure that you load an envelope with the flap completely closed If envelopes are still not fed correctly add some bending to the lead edge of the envelopes as shown in the following illustration T...

Page 211: ...herwise the paper may stick together resulting in paper jams or multiple sheets being fed to the machine simultaneously 1 Open Tray 5 2 Slide the width guides to the edge of the tray The width guides should be fully extended 3 Load paper with the side to be copied or printed on facing down inserting the paper until its edge lightly touches against the paper feed entrance Note Do not force paper in...

Page 212: ...ift up the lever 3 Close the right hand cover Note When closing the right hand cover apply your hand in the vicinity of the handle as shown in the illustration and then press the cover firmly toward the machine 4 Insert the envelopes with the flaps closed and the short edge of the envelopes facing into the printer Orient the print side facing down and slide the envelope into the entry slot Note Yo...

Page 213: ...he Tray 5 If envelopes are still not fed correctly add some bending to the lead edge of the envelopes as shown in the following illustration The amount of the bending should be 5 mm or less Using the Tray 5 Load only one size and type of print media during a single print job Do not add or remove print media when there is still print media in the Tray 5 or when the machine is printing from the Tray...

Page 214: ...om 5 refer to Custom Paper Name Color P 301 You can change the paper type setting without entering to the System Administration mode on the Setup screen which is displayed by selecting Setup in the Home screen if you configure the settings in advance For more information refer to Customize Paper Supply Screen P 302 1 Press the Log In Out button 2 Enter the system administrator s user ID with the n...

Page 215: ... and Auto Paper Select respectively 9 Select Save Confirm or Close repeatedly until the Paper Tray Settings screen is displayed 10 Select Image Quality Note Select to display the previous screen or to display the next screen 11 Select the paper type for changing the image quality settings under Items and then select Change Settings Note Select to display the previous screen or to display the next ...

Page 216: ...lect the image quality and then select Save 13 Make sure that the paper type you selected is displayed under Current Settings of Items and then select Close 14 Select Close repeatedly until the Tools screen is displayed 15 Select Close ...

Page 217: ...lors print a report list and delete a print job with an invalid User ID Replacing Consumables 218 Cleaning the Machine 240 Executing Calibration 248 Adjusting Color Registration 251 Printing a Report List 254 Deleting a Private Charge Print Job with an Invalid User ID 255 Setting Restore Tool 256 ...

Page 218: ...sheet is included in their packages We recommend always keeping spare consumables periodic replacement parts in stock When calling customer support to order consumables periodical replacement parts have your Dell printer Service Tag available The use of consumables periodic replacement parts not recommended by Dell could impair machine quality and performance Use only consumables periodic replacem...

Page 219: ...ges recommended by Dell When the remaining amount of toner is low the machine may stop printing and display a message If this occurs replace the toner cartridge to resume copying or printing Replace toner cartridges while the machine is on Copy or print density may decrease slightly after the message Please order a XXX Toner Cartridge appears on the touch screen If you replace a toner cartridge wi...

Page 220: ...toner cartridge 5 Unpack a new toner cartridge of the desired color 6 Shake the toner cartridge 5 to 6 times to distribute the toner evenly Note Do not touch the area shown in the illustration when you shake the cartridge Be careful not to spill toner when handling the toner cartridge 7 Hold the cartridge with the arrow facing up and push the cartridge in slowly until it stops 8 Close the front co...

Page 221: ...o prevent electric shock always turn off the machine and disconnect the power cable from the grounded outlet before performing maintenance Do not touch the five gray colored sponge parts on the back side of the waste toner container Otherwise your hands may get dirty with toner When replacing the waste toner container toner may spill and soil the floor We recommend laying paper on the floor before...

Page 222: ...o not touch the shutter part as shown in the illustration Toner can dirty and stain your hands Be careful not to spill toner when handling the waste toner container 4 While holding the left side of the waste toner container push the container in until it clicks 5 Close the front cover Note If the front cover is not closed completely a message appears and the machine will remain paused ...

Page 223: ...and disconnect the power cable from the grounded outlet before performing maintenance Do not expose drum cartridges to direct sunlight or strong light from indoor fluorescent lighting Do not touch or scratch the surface of the drum Doing so may result in unsatisfactory printing The remaining page yield is applicable when A4 paper LEF is used The value is an estimate and varies depending on the con...

Page 224: ...the machine Note Do not touch the parts as shown in the illustration Toner can dirty and stain your hands Be careful not to spill toner when handling the drum cartridge 7 Take the new drum cartridge out of the box and insert the used drum cartridge into the supplied plastic bag and place it into the box Note To protect the drum from overexposure to bright light do not remove the orange protective ...

Page 225: ...otective covering of the installed drum cartridge and discard it 11 Close the inner cover 12 Rotate the lock levers to secure the inner cover while pressing the cover with the other hand 13 Remove the cleaning rod from the backside of the front cover ...

Page 226: ...eaning rod fully into one of the four holes until it clicks into the interior of the machine as shown in the illustration and then pull it out 18 Repeat step 17 also on the other three holes One time insertion is enough for each hole 19 Return the cleaning rod to its original location 20 Close the front cover Note If the front cover is not closed completely a message appears and the machine will r...

Page 227: ...tridge 1 Make sure that the machine is not operating and open the finisher front cover 2 Take the staple cartridge out of the finisher 3 After you take out the staple cartridge check inside of the finisher for any remaining staples 4 Pinch both sides of the empty staple case with your fingers 1 and remove the staple case from the cartridge 2 5 Insert the front side of the new staple case into the ...

Page 228: ...ed outlet before performing maintenance To avoid burns do not replace the fusing unit immediately after printing The fusing unit becomes extremely hot during use 1 Make sure that the Data indicator light is off and there are no jobs currently in process 2 Press the power switch to the position to switch the power off and wait for 30 minutes before removing the fusing unit Message Remaining Page Yi...

Page 229: ...e machine Note Hold the fusing unit with both hands so that you do not drop it 7 Close the right hand cover Note When closing the right hand cover apply your hand in the vicinity of the handle as shown in the illustration and then press the cover firmly toward the machine If the front cover is not closed completely a message appears and the machine will remain paused 8 Switch on the main power and...

Page 230: ... overexposure to bright light close the inner cover within five minutes If the front cover remains open for more than five minutes print quality may degrade 1 Make sure that the Data indicator light is off and there are no jobs currently in process 2 Press the power switch to the position to switch the power off and wait for 30 minutes before removing the transfer belt unit 3 Raise the latch of th...

Page 231: ... the inner cover to open it 6 Grasp the handle on the front of the transfer belt unit 7 Pull out the transfer belt unit until the line on the unit becomes completely visible 8 Grasp the handles on the top of the transfer belt unit Pull out the unit to remove it from the machine ...

Page 232: ...blue tab back and forth five times to clean the conductivity temperature depth sensor Note Be careful not to touch the fusing unit It can burn your fingers 10 Unpack a new transfer belt unit and place the unit on a level surface 11 Remove the protective parts shown in the illustration ...

Page 233: ...nsfer belt unit It may degrade print quality 13 Align the arrows on the transfer belt unit with the arrows on the machine 14 Slide the unit into the machine and stop when the visible line reaches the machine 15 Lower the handles 16 Push the front of the transfer belt unit to reinstall it in the machine until it stops ...

Page 234: ... the illustration and then press the cover firmly toward the machine If the front cover is not closed completely a message appears and the machine will remain paused Replacing Transfer Roller Note To prevent electric shock always turn off the machine and disconnect the power cable from the grounded outlet before performing maintenance 1 Make sure that the Data indicator light is off and there are ...

Page 235: ...n the arrows on the transfer roller with the arrows inside the machine 6 Lower the front of the transfer roller to until the roller clicks into place 7 Close the right hand cover Note When closing the right hand cover apply your hand in the vicinity of the handle as shown in the illustration and then press the cover firmly toward the machine If the front cover is not closed completely a message ap...

Page 236: ...d in this section Replacing the Separator Roller in a tray 1 Remove the tray from the machine Note Remove all paper or media from the tray before pulling the tray out of the machine 2 Turn the separator roller cover to the left to open it and then hold the cover 3 Turn the separator roller cartridge to the right 4 Pull out the rear axle then the front axle from the holes of the tray and remove the...

Page 237: ...he cover 7 Slide the front axle then the rear axle of the separator roller cartridge in the holes of the tray 8 Turn the separator roller cartridge to the left to fix it in place 9 Turn the separator roller cover to the right to close it 10 Load paper in the tray and replace the tray in the machine ...

Page 238: ...the separator roller until the roller hook is visible Note The roller is located approximately 165 mm 6 5 inches inside the machine when measured from the face of the proper tray opening 4 Pull the separator roller hook out of the groove on the axle and then slide the separator roller to the front 5 Repeat steps 3 and 4 to remove the other separator rollers 6 Prepare two new separator rollers ...

Page 239: ... Slide the separator roller along the axle so the protrusions fit completely into the slots and the roller hook reseats into the groove on the axle 9 Repeat steps 7 and 8 to install the other separator roller 10 Put the chute upper feed back in place 11 Replace the tray into the machine ...

Page 240: ...nt If you cannot remove the dirt easily gently wipe the machine with a soft cloth moistened with a small amount of neutral detergent 2 Wipe off any excess water with a soft cloth Cleaning the Interior Laser Scanners The following describes how to clean the interior laser scanners or Raster Output Scanner ROS of the machine Normally clean the laser scanners when you replace the drum cartridges or w...

Page 241: ...Temperature Depth CTD Sensor Note To prevent electric shock always turn off the machine and disconnect the power cable from the grounded outlet before performing maintenance Ensure nothing touches or scratches the surface black colored film of the transfer belt unit Scratches dirt or oil from your hands on the film of the transfer belt unit may reduce print quality To protect the drum cartridges f...

Page 242: ...itch to the position to switch the power off 3 Raise the latch of the right hand cover and open the cover 4 Open the front cover 5 Rotate the lock levers of the inner cover to open it 6 Grasp the handle on the front of the transfer belt unit ...

Page 243: ...elt unit Pull out the unit to remove it from the machine Note Do not hold the parts shown in the illustration 9 Slide the blue tab back and forth five times Note Be careful not to touch the fusing unit It can burn your fingers 10 Grasp the handles on top of the transfer belt unit Note Do not hold the sides of the transfer belt unit It may degrade print quality ...

Page 244: ...t unit with the arrows on the machine 12 Slide the unit into the machine and stop when the visible line reaches the machine 13 Lower the handles 14 Push the front of the transfer belt unit to reinstall it in the machine until it stops 15 Close the inner cover ...

Page 245: ...closed completely a message appears and the machine will remain paused Cleaning the Touch Screen This section describes how to clean the touch screen of the machine 1 Wipe the LCD only with a soft cloth moistened with neutral detergent or alcohol Note Do not apply too much neutral detergent or alcohol Squeeze out excess moisture before you wipe the LCD if the fluid drips Do not use volatile solven...

Page 246: ...soft dry cloth Note Do not use cleaning agents other than water or neutral detergent If you cannot remove dirt easily gently wipe the document glass with a soft cloth moistened with a small amount of neutral detergent Cleaning the White Chute and Constant Velocity Transport Glass If the white chute or constant velocity transport glass become soiled smudges may appear on copies faxes or scanned doc...

Page 247: ...parts Cleaning the machine with an excessive amount of water may cause the machine to malfunction or damage documents during copying faxing scanning or printing 1 Pull up the knob on the left cover of the document feeder and open the cover completely Note When you fully open the cover it enters a fixed position Open the cover gently 2 While turning the rollers wipe them with a soft cloth moistened...

Page 248: ...en High Resolution is selected for Image Quality Calibrates the screen when Print Page Mode is selected in the Advanced tab except when High Resolution is selected for Image Quality For PostScript print drivers Calibrates the screen when High Quality or High Resolution of Image Quality and Gradation of Screen in the Color Options tab is selected Calibrates the screen when High Speed of Image Quali...

Page 249: ... Copy Print Jobs Copy Jobs Only Print Jobs Only and None 3 Select Start Note A message saying Outputting the Calibration Chart Copy Job appears and the machine prints the Calibration Chart 4 Place the Calibration Chart face down on the document glass with the magenta marks on corners on your left hand side Note Place the Calibration Chart on the document glass 5 Place at least five sheets of white...

Page 250: ...elect Close 11 Copy to confirm the image quality Note During calibration the machine cannot receive print jobs or faxes After executing the calibration you can manually perform horizontal color calibration For more information refer to Adjusting Color Registration P 251 12 Select Close ...

Page 251: ...ation using this feature Auto Color Registration 1 Press the Log In Out button 2 Enter the System Administrator s user ID with the numeric keypad or the keyboard displayed on the screen and select Enter When a passcode is required select Next and enter the System Administrator s passcode and select Enter Note The default user ID is admin The default passcode is 1111 3 Select Tools on the Home scre...

Page 252: ...13 Maintenance 252 5 Select to display the next screen 6 Select Adjust Color Registration 7 Select Auto Color Registration 8 Select Start ...

Page 253: ...previous section 2 Select Side Color Registration 3 Insert a A4 paper into Tray 5 and press Sample Printout Note An error occurs if any paper other than A4 paper is set to Tray 5 4 Find the values of the straightest lines from the LY left and RY right patterns for yellow 5 Select Yellow and enter the values that you found in the color registration chart to make adjustments 6 Repeat steps 3 to 5 fo...

Page 254: ...ess the Machine Status button 2 Select Print Reports Note If Print Reports Button under Reports is set to Disabled the Print Reports button appears only when the Tools button is displayed on the Home screen For more information on Reports refer to Reports P 305 If you want to print Billing Data List or Acctg Report Fax Jobs insert a card to the machine before instructing print 3 Select the service...

Page 255: ...User ID stored with the Private Charge Print feature For more information on how to set the period of time save jobs refer to Stored File Settings P 374 1 Press the Log In Out button 2 Enter the system administrator s user ID with the numeric keypad or the keyboard displayed on the screen and select Enter When a passcode is required select Next and enter the system administrator s passcode and sel...

Page 256: ...e after the hard disk is replaced For more information on Setting Restore Tool contact Customer Support at dell com contactdell The following data can be backed up on the computer Address Book Folder except for document files User account list Job Flow Stored Programming Job log Error log Accounting log Other information such as user setting data Users cannot replace the hard disk by themselves Wh...

Page 257: ...14 Machine Status This chapter describes the features for checking the machine status Overview of Machine Status 258 Machine Information 259 Faults 273 Supplies 274 Billing Information 275 ...

Page 258: ...ting status You can also change or set print modes and check the number of pages printed per meter or per user You can also print various reports lists to check the job history settings and registered information For more information refer to Machine Information P 259 Faults You can check the information on errors that occurred on the machine For more information refer to Faults P 273 Supplies You...

Page 259: ...the machine status General Information In the General Information area you can check the serial number of the machine machine configuration and software version 1 Check the general information Website Tells you whom to contact when making inquiries about maintenance and operation Machine Serial Number Indicates the serial number of the machine Service Tag Express Code Displays the Service Tag and ...

Page 260: ...eck the software version 1 Select Software Version 2 Check the software versions Paper Tray Status You can check the paper trays set on the machine On the screen you can check the following items Status Full Amount of paper remaining Paper Size Paper Type 1 Select Paper Tray Status 2 Check the status of the paper trays Print Reports The following describes how to print a report and a list Note The...

Page 261: ... to Reports P 305 When you set the machine to print a job history report automatically the machine prints the results of all jobs Error History Report You can print information on errors occurred in the machine The latest 50 errors are printed Activity Report You can check whether transmissions completed successfully or not The remote terminal name and the result and status are recorded by sorting...

Page 262: ...lled 3 Press the Start button Configuration Report You can check the hardware configuration network information and print and copy settings of the machine with the report Note The contents of Configuration Report are identical whether it is printed from Copy Reports Printer Reports Scan Reports or Fax Reports PCL Settings List Prints the settings for the PCL printer PCL Macro List Prints the list ...

Page 263: ... the sample list in 256 colors that can be set with the pen attribute on HP GL and HP GL 2 emulation modes Font List Prints the list of fonts available on the machine Note Information printed varies depending on the options installed PCL Font List Prints the fonts available in PCL PostScript Font List Prints the fonts available in PostScript Scan Reports 1 Select Scan Reports Note To display the S...

Page 264: ... the Fax Reports screen press the Machine Status button and then select Machine Information Print Reports Fax Reports 2 Select a list to print 3 Press the Start button Reports You can print the Configuration Report Scan Fax Configuration Report Folder Selector List Inbound Fax Spam List and Domain Filter List Select a list to print and then press the Start button Configuration Report You can check...

Page 265: ...reate Fax Group Recipients P 396 Selecting Address Book displays the screen for specifying a range of address numbers Select a range of numbers and then press the Start button Fax Group Recipients You can print the list of settings for Fax Group Recipients Select All You can print the lists of settings for all address numbers fax group recipients and relay stations Fax Comments List You can check ...

Page 266: ...b Counter Report appears when the Tools button is displayed on the Home screen 1 Select Job Counter Report Note To display the Job Counter Report screen press the Machine Status button and then select Machine Information Print Reports Job Counter Report 2 Select Job Counter Report 3 Press the Start button Accounting Reports You can print an accounting report by each user Note that the content on t...

Page 267: ...Administration Number assigned when a user is registered under Accounting or Authentication Security Settings Acctg Report Print Jobs You can check the total number of pages printed and sheets of paper used for each client job owner Acctg Report Print Jobs counts pages from the time at which the data is initialized Note When Print Service is set to Disable Accounting in Accounting Mode under Accou...

Page 268: ...Transmission Report Undelivered automatically For information on setting whether to print the report for e mails automatically refer to Scan File Transfer Report P 306 For information on setting whether to print the report for faxes automatically refer to Transmission Report Job Undelivered P 306 Folder Report You can confirm that a document is stored in a folder For information on setting whether...

Page 269: ... Security Settings For more information refer to Overwrite Hard Disk P 415 1 Select Overwrite Hard Disk 2 Check the overwriting status of the hard disk Print Mode You can print the programming settings configured in the ESC P K emulation mode and retrieve the programming Note The items displayed vary depending on the options installed 1 Select Print Mode 2 Select Off line or On line Off line The m...

Page 270: ... numbers stored in the memory Programming You can check or change the value set for the print mode item number 1 Select Programming 2 Enter the item number of the feature to set in Item Number with the numeric keypad 3 Select Confirm 4 Select Change Value 5 Enter New Value with the numeric keypad 6 Select Save Store Delete Programming For ESC P K and HP GL 2 emulations you can register settings in...

Page 271: ...ettings stored in memory as default settings 1 Select Default Programming 2 Select Factory Defaults or Custom Settings Factory Defaults You can use the factory default settings Custom Settings Displays the numbers stored in memory 3 When you select Custom Settings select a memory number to use 4 Select Save Password For PDF Direct Print if a password is set for files set the password here in advan...

Page 272: ...t Fax Receiving Mode 2 Select a fax receiving mode Manual Receive The machine manually receives faxes from a remote machine This mode is convenient to confirm the sender or use an external telephone before receiving faxes Auto Receive The machine automatically receives faxes 3 Select Save ...

Page 273: ...llowing describes how to print the error history report 1 Press the Machine Status button 2 Select the Faults tab 3 Select Error History Report 4 Press the Start button Note You can also access Error History Report under Machine Information Print Reports Job Status Activity Report If Print Reports Button under Reports is set to Disabled the Error History Report button does not appear on the screen...

Page 274: ...ox and then select Other Consumables and confirm the status of the consumables On the Supplies screen you can check the following items Note If you replace a toner cartridge with a partially used toner cartridge such as a toner cartridge removed from another Dell C5765dn Color Laser Multifunction Printer the status displayed may differ from the actual remaining amount When replacing toner cartridg...

Page 275: ...lling Information You can check the total number of copies and pages printed by individual meters 1 Select Billing Information 2 On the screen check each meter Serial Number Displays the serial number of the machine Color Impressions Displays the total number of pages copied or printed in full color Black Impressions Displays the total number of pages copied or printed in black and white and pages...

Page 276: ...illing Information is displayed when the Accounting Type is set to Local Accounting For more information on the Accounting mode refer to Accounting P 398 1 Press the Log In Out button To check the billing meter of a currently authenticated user ID 1 Enter the user ID with the numeric keypad or the keyboard displayed on the screen and select Enter When a password is required select Next and enter t...

Page 277: ...r the features set to Enable Accounting in the Accounting mode Meter Copy Jobs Displays the number of pages copied Meter Scan Jobs Displays the number of pages scanned Meter Print Jobs Displays the number of pages printed Note Meter Print Jobs is not displayed for the system administrator ...

Page 278: ...14 Machine Status 278 ...

Page 279: ...nged and the procedures to change the settings System Settings Procedure 280 Tools Menu List 284 Common Service Settings 295 Copy Service Settings 316 Connectivity Network Setup 324 Print Service Settings 345 Scan Service Settings 352 Fax Service Settings 359 E mail Service Settings 368 Folder Service Settings 371 Job Flow Service Settings 372 Media Print Service Settings 373 Stored File Settings ...

Page 280: ...r the System Administration mode enter the System Administrator s User ID If Passcode Entry from Control Panel is set to On under Tools Authentication Security Settings Authentication Passcode Policy you need to enter the passcode We recommend that you change the System Administrator s User ID and passcode immediately after installing the machine For more information on how to change the passcode ...

Page 281: ...ice Settings P 295 Copy Service Settings Allows you to configure the copy service settings such as copy feature defaults copy operation control and button indications For more information refer to Copy Service Settings P 316 Connectivity Network Setup Allows you to configure the network related settings such as ports and protocols For more information refer to Connectivity Network Setup P 324 Prin...

Page 282: ... Photo For more information refer to Media Print Service Settings P 373 Stored File Settings Allows you to set how to delete files in a folder and print files stored in the machine For more information refer to Stored File Settings P 374 Web Applications Service Setup Allows you to configure a remote access destination server For more information refer to Web Applications Service Setup P 376 Web B...

Page 283: ...machine is required to enable the new settings when you select Close in the Tools screen a message may be displayed Follow the message and reboot the machine After the machine reboots it exits from the System Administration mode and the Log In Out button is unlit Step 6 Exiting System Administration Mode 1 Press the Log In Out button Note You can also log out by pressing the login information fiel...

Page 284: ...98 Auto Clear Alert Tone P 299 Alert Tone P 299 Out of Paper Warning Tone P 299 Low Toner Alert Tone P 299 Stored Programming Tone P 299 Stored Programming Complete Tone P 299 Line Monitor Volume P 299 Ringing Volume P 299 Screen Button Settings P 299 Screen Default P 299 Screen After Auto Clear P 299 Auto Display of Login Screen P 300 Custom Buttons 1 to 3 P 300 Home P 300 Home Additional Feature...

Page 285: ... Message P 308 Plug in Settings P 308 Embedded Plug ins P 308 List of Embedded Plug ins P 308 Other Settings P 308 Offset Stacking Left Tray P 308 Auto Job Promotion P 309 Default Print Paper Size P 309 Odd Page 2 Sided P 309 Paper Size Settings P 309 Millimeters Inches P 311 Keyboard Input Restriction P 311 Operation of Up Down Buttons P 311 Display Consumables Screen P 311 Data Encryption P 311 ...

Page 286: ... Erase P 320 Edge Erase 2 Sided Original Side 2 P 320 Image Shift Side 1 P 320 Image Shift Side 2 P 320 Image Rotation P 320 Image Rotation Rotation Direction P 320 Original Orientation P 320 Pages per Side P 320 Copy Output P 320 Uncollated Default Separator Tray P 320 Sample Job P 320 Booklet Creation Default Cover Tray P 320 Covers Default Front Cover Tray Default Back Cover Tray P 321 Separato...

Page 287: ...30 Manually Configured IPv6 Address Prefix P 331 Manually Configured IPv6 Gateway P 331 IPv6 DNS Server Setup P 331 Automatically Configured IPv6 Address P 331 IPv6 IP Filter P 331 Machine s E mail Address Host Name P 331 E mail Address P 331 Machine Name P 332 Host Name P 332 Domain Name P 332 Proxy Server Settings P 332 Use Proxy Server P 332 Proxy Server Setup P 332 Addresses to Bypass Proxy Se...

Page 288: ...5 PostScript Memory P 345 ART IV ESC P 201H Form Memory P 345 HP GL 2 Auto Layout Memory P 345 Job Ticket Memory P 345 Receiving Buffer USB P 346 Receiving Buffer LPD P 346 Receiving Buffer NetWare P 346 Receiving Buffer SMB P 346 Receiving Buffer IPP P 346 Receiving Buffer EtherTalk P 347 Receiving Buffer Port 9100 P 347 Delete Form P 347 Other Settings P 347 Print Area P 347 Substitute Tray P 34...

Page 289: ...Searchable Text P 354 Language of the Original P 355 Searchable Text Compression P 355 Scan to PC Defaults P 355 Transfer Protocol P 355 Login Credential to Access Destination P 355 User Name for FTP Scan P 355 Original Size Defaults P 355 Output Size Defaults P 356 Reduce Enlarge Presets P 356 Other Settings P 356 Memory Full Procedure P 356 Maximum Stored Pages P 357 Saturation P 357 Background ...

Page 290: ...nterval P 362 Batch Send P 362 Manual Send Receive Default P 362 Fax Receiving Mode P 362 Border Limit P 362 Auto Reduce On Receipt P 363 Receiving Paper Size P 363 2 Pages Up On Receipt P 363 2 Sided Printing P 363 Edge Erase Top Bottom Edges P 363 Edge Erase Left Right Edges P 363 Reduce 8 5 x 11 Original to A4 P 363 Pseudo Photo Gradation Mode P 364 Folder Selector Setup P 364 Memory Full Proce...

Page 291: ... edit From if Search Failed P 370 E mail Sending When Search Failed P 370 Add Me to To Field P 370 Add Me to Cc Field P 370 Edit E mail Recipients P 370 Folder Service Settings P 371 Files Retrieved By Client P 371 Print Delete Confirmation Screen P 371 Convert Custom Size to Standard Size P 371 Standard Size Threshold Value P 371 Quality File Size for Retrieval P 371 Job Flow Service Settings P 3...

Page 292: ...P 379 Use TLS1 0 P 379 Use SSL3 0 P 379 When SSL Certificate Verification Fails P 379 Enable File Printing P 380 Create Folder P 381 Folder Name P 382 Check Folder Passcode P 382 Delete Files After Retrieval P 382 Delete Expired Files P 382 Link Job Flow Sheet to Folder P 383 When the Delete Folder Button is Selected P 383 Stored Programming P 383 Create Job Flow Sheet P 383 Restrictions on Using ...

Page 293: ...lder P 395 F Code P 395 Relay Broadcast P 395 Billing Day Time Billing Night Time Billing Midnight P 396 When the Delete Entry Button is Selected P 396 Create Fax Group Recipients P 396 Add Fax Comment P 397 Paper Tray Attributes P 397 Create View User Accounts P 398 User ID P 399 User Name P 399 Passcode P 399 E mail Address P 399 Account Limit P 399 User Role P 400 Reset Account P 400 Reset Tota...

Page 294: ...nt Credit P 406 Charge Print Jobs P 406 Track with Cumulative Device P 406 Scan Ahead for Copy Job P 406 System Administrator Settings P 407 System Administrator s Login ID P 407 System Administrator s Passcode P 407 Authentication P 408 Login Type P 408 Access Control P 408 Create View User Accounts P 410 Reset User Accounts P 410 Create Authorization Groups P 410 User Details Setup P 411 Maximum...

Page 295: ...ettings For information on how to display the Tools screen refer to System Settings Procedure P 280 2 Select an item to set or change Machine Clock Timers You can set the machine clock or the time intervals of the machine to enter the Power Saver mode or to reset settings Date Set the date in the system clock of the machine The date set here will be printed on all lists and reports 1 Select Date a...

Page 296: ...ncrements To disable this feature select Off Note When Off is selected the machine will cancel the standby status and begin processing a document after one minute has elapsed in anticipation of a job command Auto Job Release Specify the time lapsed until the machine cancels the active job and starts the next job if an error such as document or paper jams and running out of paper occurs during copy...

Page 297: ... mode The machine starts printing in accordance with the setting in Auto Print when Release Printer is selected Thus the printing may not start just after Release Printer is selected You can also print during the printer lockout duration by selecting a job in Active Jobs on the Job Status screen and then selecting Promote Job When the Allow User to Lock Out check box is deselected Disable Auto Pri...

Page 298: ...und an alarm when a job ends or a fault occurs Control Panel Select Tone Set the volume to be sounded when a button on the control panel is correctly selected You can select from Soft Normal and Loud To disable the sound select Off Control Panel Alert Tone Set the volume to be sounded when a button that cannot be selected is selected or an error occurs You can select from Soft Normal or Loud To di...

Page 299: ...f Stored Programming Tone Set the volume to be sounded while a stored program is being registered You can select from Soft Normal and Loud This tone cannot be disabled Stored Programming Complete Tone Set the volume to be sounded when the call of a stored programming registered is completed You can select from Soft Normal and Loud To disable the sound select Off Line Monitor Volume When sending a ...

Page 300: ... button on the control panel is pressed Select from All Jobs Printer Print from Folder Jobs Scan Fax Jobs or Job Flow File Transfer Jobs Default Language You can select the language displayed on the machine There are two ways of selecting the language set in the System Administration mode and set by local users Setting in the System Administration mode The language set here is the standard languag...

Page 301: ... more information refer to Changing the Paper Settings P 214 Change Settings Select this button if you change the paper size for the tray or the setting of auto paper selection When you load non standard size paper in a tray select Custom Size and specify the width and length When you load standard size paper in a tray select Auto Detect Note Align the paper guides against the paper to prevent pap...

Page 302: ...trays or print data does not include the paper tray information for automatic tray selection Auto Paper selection means that a tray containing the appropriate paper is automatically selected by the machine for copying or printing This setting applies to Trays 1 and 2 to 4 optional You cannot apply this setting to Tray 5 Note When a logical printer is used and if you specify the paper tray with the...

Page 303: ...nd Enable for Same Paper Type Color When Enable during Auto Select is selected the machine switches the tray when Auto Select is selected in the Copy screen or Paper Select of the print driver Note The machine does not switch the tray automatically in the following cases Tray 5 is selected The tray containing paper that is set as Auto Paper Off in Paper Type Priority is selected Targeted Paper Typ...

Page 304: ... machine to easily recognize color documents Photo Reproduction Level When copying with Original Type in the Image Quality screen set to Photo Text you can adjust the color reproduction level in the areas determined by the machine as photos Selecting More Text yields a bold copy effect emphasizing the dense parts of an image Selecting More Photo soften the image gradation of the photo aspects of a...

Page 305: ...e detects density and deletes the background color Select High Speed to sample a section of the document and detect the background color Select High Quality to conduct a pre scan and sample the whole document to detect the background color Image Enhancement Allows you to select whether to carry out image enhancement If you select On the machine gives the image a smoother appearance when printed Ca...

Page 306: ...smission Report Job Undelivered Transmission Report Job Deleted Select whether or not to automatically print a Transmission Report Job Deleted for a cancelled document Folder Report Select whether or not to automatically print a Folder Report Broadcast Multi Poll Report Select whether or not to automatically print a Broadcast Multi Poll Report Scan File Transfer Report Select whether or not to pri...

Page 307: ...ion is found during the program diagnosis the machine stops starting up and records the information in the audit log Note The information may not be recorded in the audit log depending on the status of program malfunction If the machine does not start contact Customer Support at dell com contactdell Adjust Color Registration Allows you to calibrate the colors automatically or manually Auto Color R...

Page 308: ...nd of Job or Notify when Error Only E mail Addresses 1 to 5 Specify the e mail addresses to notify the result of the jobs Note When you select Save to exit this screen without specifying an e mail address the setting of Targeted Jobs or E mail Message is deleted E mail Message Enter a comment attached to the e mail Plug in Settings When you use custom services you can set whether to enable embedde...

Page 309: ...assed can be processed after you take proper measures by following the instruction of the message Or you can cancel the job by pressing the Clear All button When multiple jobs are bypassed a screen that lists the bypassed jobs appears This screen allows you to display the details screen and to delete the jobs Default Print Paper Size You can set the most commonly used paper size A4 or 8 5 x 11 to ...

Page 310: ... O X X A4 O O O O O O O O O O O O B6 O X X O X X O X X O X X B6 X X X O X X O X X X X X B5 X X O O O O O O O O X O 5 5 8 5 X X X X X X X X X X X X 5 5 8 5 X X X X X X X X X O X X 7 25 10 5 X X O X X O X X O X X O 8 10 X X X X X X X X X X X X 8 5 11 X O O X O O X O O O O O 8 5 13 O O O X X O X X O O O O 8 5 14 X X O X O O X O O X X O Postcard 5 7 X X X X X X X X X X X X Postcard 5 7 X X X X X X X X...

Page 311: ...equired Off Does not display the consumables status screen When power is switched on Displays the consumables status screen at startup When Auto Clear is activated Displays the consumables status screen when Auto Clear is executed Data Encryption Allows you to select whether or not to encrypt data recorded on the hard disk of the machine When you enable data encryption the machine encrypts automat...

Page 312: ...tores the following data Spooled print data Print data including Secure Print and Sample Set Forms for the Form Overlay feature Folder and job flow sheet settings folder name passcode etc Files in folders Address book data Note Be sure to save all necessary settings and files before using data encryption or changing any settings Make sure that the hard disk and encryption settings match Otherwise ...

Page 313: ...ryption Key 4 Enter the same encryption key and then select Save 5 Select Save to display a confirmation screen Select Yes on the screen to save the setting Service Rep Restricted Operation Allows you to select whether or not to restrict the operation by our service representative to protect the security settings from being altered by someone impersonating our service representative Off The operat...

Page 314: ...tall the device Restrict Recipient Selection Method Allows you to select whether or not to restrict a fax or an e mail transmissions to addresses not registered on the Address Book Selecting Only From Address Book disables address entry using the keyboard or numeric keypad and permits only transmission to addresses registered on the Address Book Note You can also give users authority to deactivate...

Page 315: ...s 315 Pattern 2 Lights up when a fax document is in a print queue or a fax received with the Store Fax Local Folder feature is stored in the folder Pattern 3 Lights up for 30 seconds after a job in the print queue is printed ...

Page 316: ... features displayed on the Copy screen 5 Features The following features are shown on the screen Output Color Reduce Enlarge Paper Supply 2 Sided Copying and Copy Output Features and positions displayed cannot be changed 7 Features Allows you to set features appearing in the fourth column from the left of the Copy screen Note Output Color Reduce Enlarge and Paper Supply cannot be specified 10 Feat...

Page 317: ...t Format screen Separator Handout Tray Button 1 3 Set the default value of the separator handout tray displayed in Transparency Options on the Output Format screen Copy Defaults You can set the default settings of the Copy feature When the machine is turned on or the machine exits the Power Saver mode or when the Clear All button is pressed the machine resets to the default values set here Setting...

Page 318: ...s refer to Custom Colors P 323 Dual Color Non target Area Color Set the default value for Non target Area Color that appears when Dual Color is selected for More of Output Color in the Copy screen You can select a color from seven preset colors and six custom colors For information about custom colors refer to Custom Colors P 323 Original Type Set the default value for Original Type on the Image Q...

Page 319: ...ce in the Image Quality screen is set to Advanced Color Color Shift Set the default value for Color Shift in the Image Quality screen 2 Sided Copying Set the default value for 2 Sided Copying in the Copy screen Layout Adjustment and Output Format screens Mixed Size Originals Set the default value for Mixed Size Originals in the Layout Adjustment screen Edge Erase Top Edge Set the default value for...

Page 320: ... Layout Adjustment screen Image Rotation Set the default value for Image Rotation in the Layout Adjustment screen Image Rotation Rotation Direction Set the default value for Image Rotation Rotation Direction of Image Rotation in the Layout Adjustment screen Original Orientation Set the default value for Original Orientation in the Layout Adjustment screen Pages per Side Set the default value for P...

Page 321: ...reats the read in data as valid and start copying the document partially stored Maximum Stored Pages Set the maximum number of pages stored for a copy document You can set from 1 to 999 pages Auto Paper Off Select the tray used when Auto Select of Paper Supply in the Copy screen is cancelled Auto Select of Paper Supply is cancelled when Auto Auto X Y for Independent X Y or Slight Reduction Improve...

Page 322: ...alue the stronger the effect of removing background noise Photo Text Printed Original Set the type of document when Printed Original of Photo Text is selected for Original Type in the Image Quality screen Normal Copies with standard image quality Inkjet Originals Select Inkjet Originals when copying a document printed with an inkjet printer This improves the recognition of inkjet colors Highlighte...

Page 323: ... from 15 to 432 mm and the height Y from 15 to 297 mm in 1 mm increments Reduce Enlarge Presets Set the magnifications displayed as Preset which are displayed when Proportional is selected under Reduce Enlarge in the Copy screen You can assign any magnification to the R E Preset buttons other than 100 and Auto Custom Colors Set the custom colors used for Single Color and Dual Color in the Output C...

Page 324: ...hange Port Settings Set the interface of the machine connected to a client In Port Settings you can configure the following settings Note For LPD Port9100 and HTTP SSL TLS do not use a number that is the same as a port number of another port For a port that uses HTTP IPP Internet Services HTTP UPnP Discovery SOAP WebDAV and Web Services on Devices WSD do not use a number that is the same as a port...

Page 325: ...ommunication protocol PostScript Wait Timeout The machine automatically terminates a connection when the machine does not receive data for a certain period of time When data is being printed with RAW is selected for Adobe Communication Protocol select Disabled if you want to use the time period set in Auto Eject Time or select Enabled if you want to use the timeout period of PostScript LPD Port St...

Page 326: ...d To configure Added Port Number enable port status and reboot the machine and then configure Added Port Number EtherTalk Port Status Select Enabled to use EtherTalk Bonjour Port Status Select Enabled to use Bonjour Note To print from a printer detected by Bonjour the LPD port must be activated in advance Port 9100 Port Status Select Enabled to use Port9100 Select this option when the communicatio...

Page 327: ... Configuration Web Tool WSD Note WSD stands for Web Services on Devices WSD Print Port Status Select Enabled to use WSD Print Set this when you search a device on a network from Windows Vista Windows 7 and Windows 8 Port Number Enter a port number from 1 to 65535 The default value is 80 Note If the default port number is used it may conflict with other ports Make sure to set up the port number tha...

Page 328: ...alue is 80 Note If the default port number is used it may conflict with other ports Make sure to set up the port number that is not in use Operation Time Out You can enter an operation time out period between 1 and 65535 seconds in 1 second increments ThinPrint Port Status You can use the machine for print in the ThinPrint print environment The machine decompresses and prints the compressed print ...

Page 329: ...v4 and IPv6 IPv4 IP Address Resolution Allows you to select a method for obtaining the IP address subnet mask and gateway address DHCP The address subnet mask and gateway address will automatically be set via DHCP BOOTP The address subnet mask and gateway address will automatically be set via BOOTP RARP The address subnet mask and gateway address will automatically be set via RARP DHCP Autonet The...

Page 330: ...to 9 and periods If you mistyped a character on the screen select Backspace to delete the character IPv4 DNS Server Setup Set the DNS server Get IP Address from DHCP Set whether or not to automatically obtain the address of the DNS server from the DHCP server DNS Server IP Address When Get IP Address from DHCP is set to Disabled manually set the DNS server address IPv4 IP Filter Select whether or ...

Page 331: ...k local Address Auto Stateless Address 1 Auto Stateless Address 2 Auto Stateless Address 3 Auto Gateway Address IPv6 IP Filter Select whether or not to limit IPv6 addresses that can access the machine Note IPv6 IP Filter applies to all features using TCP IP such as the Print Store to Folder Web Applications services and Dell Printer Configuration Web Tool To set the IPv6 addresses that the machine...

Page 332: ...y server Configure a proxy server when inbound outbound access is used Note Do not set this item unless you use services requiring proxy server settings Use Proxy Server Select whether or not to use a proxy server Proxy Server Setup Select the proxy server specification from Same Proxy for All Protocols or Different Proxy for Each Protocol Addresses to Bypass Proxy Server Enter addresses not using...

Page 333: ...oxy Server Login Name Enter a login name of the HTTPS proxy server Up to 31 characters are allowed HTTPS Proxy Server Password Enter a password of the HTTPS proxy server Up to 31 characters are allowed Outgoing Incoming E mail Settings Set e mail transmission and reception settings POP3 Server Settings Set the POP3 server In POP3 Server Settings you can set the following items Note For IPv4 enter ...

Page 334: ...er ports E mail Send Authentication Select one from Off POP before SMTP or SMTP AUTH Note If POP before SMTP is selected the POP3 settings must be set AUTH PLAIN AUTH LOGIN or AUTH CRAM MD5 can be used as an authentication method Login Credentials for E mail Send Select the login user name when sending e mails from Remotely Authenticated User or System When Remotely Authenticated User is selected ...

Page 335: ...ter the primary server name or IP address Note For IPv4 enter the address in the format xxx xxx xxx xxx where xxx is a numeric value from 0 to 255 For IPv6 enter the address in the format xxxx xxxx xxxx xxxx xxxx xxxx xxxx xxxx where xxxx is a hexadecimal value Primary Server Port Number Set the primary server port number from 1 to 65535 The default value is 88 Note Do not use the numbers assigned...

Page 336: ...orts Authentication Method Select a method to perform LDAP authentication from Direct Authentication and Authentication of User Attributes Direct Authentication User ID and password entered by a user are used for LDAP authentication Authentication of User Attributes The user ID entered is used as an attribute specified in Attribute of Typed User Name to perform a search on the LDAP server Attribut...

Page 337: ...mart card is used for LDAP authentication set the attribute of the user name to be used for a smart card ID search The user name is given to the remote service as the authentication information Up to 32 characters are allowed Note This item is displayed when Smart Card Link Mode under Tools Authentication Security Settings Authentication User Details Setup is set to No Passcode Required Login Cred...

Page 338: ...ute name to be used as a recipient name from user information registered on the LDAP server Up to 32 characters are allowed For Windows enter cn for an attribute name used as a recipient name Attribute Type of Surname Set the sender s family name attribute type Up to 32 characters are allowed Attribute Type of Given Name Set the sender s first name attribute type Up to 32 characters are allowed At...

Page 339: ...onds in 1 second increments Directory Service for Address Book Select whether or not to use an address book stored on the directory server Even when Enabled is selected the address book for the directory server will not be started unless the following conditions are satisfied The IP address of the machine must be set The IP address or Internet address of the directory server primary must be set Th...

Page 340: ...r Directory Service Settings The port number for SSL TLS communications of the LDAP directory server is normally set to 636 SMTP SSL TLS Communication Configure the SSL TLS communications Disabled The machine does not communicate in SSL TLS STARTTLS If Available The machine verifies the certificate and communicates in SSL TLS If the verification fails the machine does not communicate in SSL TLS ST...

Page 341: ...hether or not to split an outgoing encrypted e mail for each recipient Digital Signature Outgoing E mail Select whether or not to always add a digital signature to outgoing e mails You can also select the setting in which the machine asks to add a digital signature to the e mail whenever you send Signing Certificate for E mail Attachment Select the certificate to use for attaching a signature to e...

Page 342: ...tion Method is set to Authenticate by Digital Signature A self signed certificate created by Dell Printer Configuration Web Tool cannot be used For more information on a certificate refer to Types of Certificate P 464 IPSec Communication Select whether or not to enable IPSec communications IKE SA Life Time Specify IKE SA lifetime from 5 to 28800 minutes in 1 minute increments Note The value must b...

Page 343: ...oes not verify the validity of certificates Selecting Medium verifies the validity of certificates If a certificate cannot be verified because of a network error or any other problems the certificate is determined as valid Selecting High verifies the validity of certificates and determines only certificates that have not been revoked as valid Retrieval of Certificate Status Select the method to ve...

Page 344: ...Select from SMTP or POP3 depending on your environment Add Domain Name to User Name Select whether or not to add domain names to user names Domain Filtering Set the domain filtering settings for the E mail feature Domain Filtering When Allow Domains is selected you can specify domains to permit transmissions When Block Domains is selected you can specify domains to prohibit transmissions Domains 1...

Page 345: ...ory the memory is reset thus all data stored in memory area is erased You cannot allocate more memory beyond its memory capacity When you turn the machine on and the size set exceeds the total memory size the system automatically adjusts the memory size When a port is set to Disabled the corresponding items to the port do not appear Depending on the amount of data sent from the client increasing t...

Page 346: ...k Carries out spooling The receiving buffer for spooling uses the hard disk Receiving Buffer NetWare Set the NetWare receiving buffer Specify a value from 64 to 1024 KB in 32 KB increments Receiving Buffer SMB No Spooling Does not use spooling While SMB printing is performed for one client data cannot be received over the same interface from another client Specify a value for the dedicated SMB rec...

Page 347: ... enter the form number Form Name After you enter the form number and select Confirm the form name matching the form number entered appears 3 Enter the form number with the numeric keypad and select Confirm 4 Check the form name and then select Delete Data Other Settings You can configure other settings related to the paper used in the printer Print Area Set whether or not to expand the print area ...

Page 348: ...formation refer to Automatic Tray Selection P 207 Display Paper Supply Screen Load another type of paper in the selected tray by following the message displayed on the touch screen and then press the Start button The machine changes the paper type setting for the tray and prints the job Note The machine keeps the changed paper type setting after the printing Even if you press the Start button with...

Page 349: ...64 letters of the user ID are printed Select a position to print from Top Left Top Right Bottom Left and Bottom Right Note To use the Print User ID feature the user ID must be set in the print driver beforehand For more information refer to the help of the print driver When user ID set in the print driver is not available Unknown User is printed Banner Sheet You can output a banner sheet to separa...

Page 350: ... changed to Select Paper Tray when Use Larger Size or Use Closest Size is selected for Substitute Tray and print PostScript data PostScript Font Absence Set an action to take when a PostScript font specified in a job is not present Cancel Printing Cancels printing Substitute Font and Print Prints using a substitute font Courier is used as the substitute font PostScript Font Substitution Set whethe...

Page 351: ...rint a smaller size job first even when a larger size job is sent first Job Submission Order Prints jobs in the order of lpr print submission Note This setting is valid only when Receiving Buffer LPD is set to Spool to Hard Disk When any other setting printing is performed in Data Processing Order OCR Font Glyphs 0 x 5C Allows you to select Backslash or Japanese Yen Sign to print 0x5C character wh...

Page 352: ...u can set the items that appear in the First Tab screen The First Tab means the screen displayed when you select the following tabs in the E mail Store to Folder Scan to PC Store Send Link and Store to USB screens The E mail tab of the E mail service The Store to Folder tab of the Store to Folder service The Scan to PC tab of the Scan to PC service The Store Send Link tab of the Store Send Link se...

Page 353: ...e E mail feature set the default value for Add Thumbnail when XPS is selected for File Format in the First Tab Note XPS stands for XML Paper Specification Thumbnail Scan to PC For the Scan to PC feature set the default value for Add Thumbnail when XPS is selected for File Format in the First Tab Note XPS stands for XML Paper Specification Lighten Darken Set the default value for Lighten Darken of ...

Page 354: ...ecify a value from 0 to 50 mm in 1 mm increments Center Erase Binding Edge Erase Set the default value for Center in Edge Erase in the Layout Adjustment screen Specify a value from 0 to 50 mm in 1 mm increments Quality File Size Set the default value for Quality File Size in the Filing Options screen Select from Quality Normal File Size Small Quality Higher 1 File Size Larger 1 Quality Higher 2 Fi...

Page 355: ...ser for login User Name for FTP Scan When the remotely authenticated user name is used as a login user name for FTP transfers for the Scan to PC service specify whether or not to include the domain part of the credentials User Name Only Uses only the user name part before of the login credential for the login name The domain part is not used Add Domain Name Uses the full login credential name incl...

Page 356: ...s photo and postcard Reduce Enlarge Presets Set the magnifications displayed as Preset which are displayed when Proportional is selected under Reduce Enlarge in the Layout Adjustment screen You can assign any magnification to the R E Preset buttons other than 100 Preset Select a ratio from standard magnification ratios Variable You can specify a magnification from 25 to 400 in 1 increments Other S...

Page 357: ...lor Space button is displayed on the Advanced Settings screen for the E mail Store to Folder and Scan to PC Note When Disabled is selected as default and Color Space is set to Device Color Space Auto Detect of Color Scanning in the First Tab E mail Store to Folder Scan to PC does not appear For more information on Color Space refer to Color Space P 353 TIFF Format Set the TIFF format for scanned d...

Page 358: ...ink feature Select either Use IP Address or Use FQDN The following are examples of URLs If Use IP Address is selected http 192 0 2 1 scanUrl doc1 get htm If Use FQDN is selected http pc1 mycompany co jp scanUrl doc1 get htm Store Send Link Maximum File Size Set the maximum data size of files that can be stored for the Store Send Link feature You can specify the value from 1 to 200 MB in 1 MB incre...

Page 359: ...System Settings Procedure P 280 2 Select an item to set or change Screen Defaults You can set items displayed on the Fax screen Fax Screen Default Set the default screen that appears when the Fax screen is selected in the Home screen Select from Fax Tab or Address Book Fax Tab 2nd Column You can set the features that appear in the second column of the lower part in the Fax screen You can select fr...

Page 360: ...ions screen when Specific Time is selected for Delay Start Transmission Header Text Set the default value for Transmission Header Text in the Fax Options screen Confirmation Options Set the default value for Confirmation Options in the Fax Options screen Fax Control You can configure the settings related to fax control Re enter Recipients Set whether to re enter the recipient after once specifying...

Page 361: ...ab Specify whether or not to show the Enable Broadcast checkbox in the Fax screen to explicitly express broadcast directions Manual Redial List Saved Entries Specify the number of redial destinations saved Manual Redial List Dial Mode Specify the destination type saved as a redial destination number When you deselect all the check boxes the Redial feature becomes disabled Transmission Header Text ...

Page 362: ...addressed to a destination enabling the Batch Send feature allows you to send them all at the same time in a single fax transmission By using this feature you can reduce your communication costs Select whether or not to enable the Batch Send feature Note that a batch send is not available for manual transmissions broadcasts relay broadcasts remote folder and delayed start transmission with a speci...

Page 363: ...he specified size paper is used for printing When you select User Mode select paper sizes from A4 A5 8 5 x 11 and Select All You can select one or more paper sizes 2 Pages Up On Receipt Set whether or not to print two pages of a fax document on one side of a sheet This is convenient for saving paper For example when two A5 pages are received they are printed on a single A4 sheet However if paper o...

Page 364: ... Treats the read in data as valid and start scanning the document partially stored Maximum Stored Pages Set the maximum number of pages stored for a fax document You can specify from 1 to 999 pages Mixed Size Originals Scan Mode Set the scan mode when the machine scans documents of various sizes simultaneously with the document feeder If only documents of standard sizes are to be scanned we recomm...

Page 365: ...lders Folder Selector Setup If you set the classification by line type the machine classifies the received documents by line type and store them in the folders specified 1 Select Folder Selector Setup 2 Select the line to register and then select Change Settings Note The displayed items may vary depending on the options installed 3 Select On 4 Enter the folder number three digits where you want to...

Page 366: ...y a local name with up to 20 single byte characters using the keyboard displayed or the numeric keypad Company Logo Register the sender name company logo The company logo is printed in the Transmission Header Text or Cover Page Specify a company log with up to 60 single byte characters using the keyboard displayed or the numeric keypad Note If Line 1 Company Logo is not registered the company logo...

Page 367: ... Service Settings 367 G3 Line 1 Dial Type Set the dial type Tone Tone dialing line 10pps Pulse dialing line G3 Line 1 Line Type Set the line type PSTN Subscriber telephone line PBX Private branch exchange ...

Page 368: ...u can select the print operation Print Attachment Only Only prints the attached documents Attachment Full Headers Message Prints the e mail headers and body of e mails When you select Attachment Full Headers Message with S MIME Info S MIME Information is also printed Attachment Basic Headers Message Prints the part of headers From To Subject Date and the contents of e mails When you select Do not ...

Page 369: ...Send Method Set the default value for the mail split method Split into Pages Splits into pages Split by Data Size Splits by the data size set in Maximum Data Size per E mail Maximum Data Size per E mail Set the upper limit of the data size for splitting mail Specify a value from 512 to 20480 KB in 1 KB increments The default value is 10240 KB Maximum Total Data Size Set the upper limit of the data...

Page 370: ...rom on the E mail tab when a login user fails to retrieve an e mail address E mail Sending When Search Failed Set whether or not to disable the E mail service when a login user fails to retrieve an e mail address Add Me to To Field Set whether or not to automatically add the sender s address to the To field Add Me to Cc Field Set whether or not to automatically add the sender s address to the CC f...

Page 371: ... when a file is retrieved by a client the retrieved file is forcibly deleted Print Delete Confirmation Screen Set whether or not to display a confirmation screen for automatically deleting files after printing the files stored in a folder Convert Custom Size to Standard Size Set whether or not to convert custom size to standard size when transferring a fax received or a file for Secure Polling in ...

Page 372: ...lt setting unchanged Pool Server Login Method Leave the default setting unchanged Job Flow Sheet List Default Leave the default setting unchanged Fax Transfer Resolution Select the resolution setting when you send a color document as a fax using the Job Flow feature Same Resolution High Quality Converts color images to black and white images on a document with the same resolution when the document...

Page 373: ...JPEG TIFF files from a digital camera and document files PDF TIFF XML Paper Specification XPS or JPEG JFIF This feature is called the Media Print feature 1 On the Tools screen select Media Print Service Settings For the method of displaying the Tools screen refer to System Settings Procedure P 280 2 Select an item to set or change Text Paper Supply Button 2 to 5 Select the paper tray displayed in ...

Page 374: ... expired files from 1 to 12 hours for AM or PM and 0 to 59 minutes To automatically delete files at the time specified here you need to set Delete Expired Files to Yes For more information refer to Delete Expired Files P 382 Stored Job Expiration Date You can set whether or not to automatically delete print files Charge Print Private Charge Print Secure Print or Sample Print stored in the machine ...

Page 375: ...ed passcode digits between 0 and 12 digits A passcode is required when Secure Print or Private Charge Print files are to be stored or printed A passcode must be a string consisting of the number of digits that is equal to or larger than the value specified here Note Specify 0 if you do not set passcodes or the minimum number of digits Print Order for All Selected Files Specify the printing order w...

Page 376: ...en scanned on the machine to the web applications and to directly select and print a document that is stored in the remote server It also allows you to directly upload and print a file without going through another computer Note To use this feature any web application purchased separately is required 1 On the Tools screen select Web Applications Service Setup For the method of displaying the Tools...

Page 377: ...ications Version in Web Browser Setup P 379 For example http www example com http 192 0 2 1 IPv4 http 2001 DB8 1234 IPv6 https www example com https 192 0 2 1 IPv4 https 2001 DB8 1234 IPv6 When specified with V2 old version http v2 www example com http v2 192 0 2 1 IPv4 http v2 2001 DB8 1234 IPv6 When specified with V3 http v3 www example com http v3 192 0 2 1 IPv4 http v3 2001 DB8 1234 IPv6 When ...

Page 378: ... requires other than a user ID and its password for authentication Password Enter the password for the User ID with up to 128 characters Machine Authentication Notification Set whether or not to notify the remote server of machine information and user authentication information every time the machine connects to the remote service Note The remote service determines whether to use the information N...

Page 379: ...e Web applications service from V2 Old Version and V4 New Version Note If V2 Old Version is selected the following settings become invalid Delete Persistent Cookie Upon Closing Clear Cache Upon Closing Use Cache Accept Cookies Use TLS1 0 Use SSL3 0 When SSL Certificate Verification Fails and Enable File Printing When you use V3 of the web application version select V4 New Version Delete Persistent...

Page 380: ...15 Tools 380 Enable File Printing Specify whether to use the File Printing feature The File Printing feature allows you to directly print the printable files obtained from the remote Web server ...

Page 381: ... folder via e mail or retrieve a file stored in a computer on a network You can create a private folder and a public folder in the machine and use them separately depending on your purpose You can create up to 200 folders You can check the current folders in a Folder List For more information refer to Folder List P 266 1 Select Create Folder 2 Select the folder to create Note Select to display the...

Page 382: ...red when a folder is selected Print Delete Read A passcode entry is required when printing or deleting the file in the folder Delete Files After Retrieval When a file stored in a folder is printed or is retrieved from a remote server set whether the file should be deleted No The file is left stored Yes After the file is printed or is retrieved by an external source it is automatically deleted Note...

Page 383: ... files stored in the folder are also deleted If Login Type is set to No Login Required all the job flow sheets including a local user created on the Create Folder screen or job flow sheets created on the Send from Folder screen are deleted as well Note Once files or job flow sheets are deleted they cannot be restored Stored Programming The Stored Programming feature enables you to register frequen...

Page 384: ...a e mail FTP or SMB the transferred document cannot be opened on the destination machine if JPEG is set for File Format for the job flow Restrictions on Using Job Flow A job flow can be used by single or multiple users or can be used by linking to a specific folder The Authentication feature restricts the use of the job flows For information on the available Job Flow features and restrictions on u...

Page 385: ...ntry The machine searches through keywords that were registered upon each job flow creation Select Keyword Displays the Select Keyword screen Select a keyword registered in the System Settings to search for job flows Job flows that fully match the entry are searched The machine searches through keywords that were registered upon each job flow creation For information on the keyword registry refer ...

Page 386: ...reen New Recipient Specify a new address The address specified appears in Name Fax Number in the Send Fax screen Name Fax Number Displays the recipient name or fax number specified Delete Recipient Deletes all information for the selected recipient Edit Displays the Edit Recipient screen which allows you to check or change the recipient selected Cancel Deselect the selected item Send as E mail Spe...

Page 387: ...ficate is required To enable encryption select On before specifying an address On will be disabled after an address is specified Digital Signature Select whether or not to add digital signature Note To add digital signature the configuration of S MIME is required To add digital signature a certificate is required Transfer via FTP 1 Transfer via FTP 2 Specify where FTP forwarding is to be stored Tr...

Page 388: ...egistered on the Address Book you can specify the address from the Address Book The specified address appears in the Transfer via SMB 1 or Transfer via SMB 2 screen For more information on the Address Book refer to Add Address Book Entry P 390 File Format Specify an output file format Resend Attempts Set whether or not to try sending again if a transmission fails If you select On set the number of...

Page 389: ... same paper size as the document size is used Auto Select A suitable paper tray is automatically selected Trays 1 and 2 to 4 optional Select paper from four trays Bypass Prints on paper loaded in Tray 5 2 Sided Printing Set the 2 sided printing option Staple Configure the stapling Off Set the output destination 1Staple Set the stapling position to top left 1Staple Set the stapling position to bott...

Page 390: ...ayed under Select Keyword and can be used for searching job flow sheets The keywords are also available from a list under Keyword that is displayed when you create a new job flow sheet Up to 12 single byte characters are allowed for a job flow search keyword Add Address Book Entry You can register frequently used addresses on the Address Book Select an address type from Fax E mail and Server FTP S...

Page 391: ...ous screen or to display the next screen Entering a speed dial number with the numeric keypad displays the specified number at the top of the column 3 Select Address Type 4 Select the address type and then select Save 5 Select an item to set and set 6 When the settings are completed select Save When selecting E mail as the address type The following items appear When selecting Server as the addres...

Page 392: ...characters Office Enter a recipient office with up to 32 single byte characters Department Enter a recipient department with up to 32 single byte characters S MIME Certificate Allows you to link an S MIME certificate The S MIME certificate must be registered in advance To link a certificate select Attach Change Link and select a certificate in a screen displayed To remove a link select Remove Cert...

Page 393: ...use the mark at the top of a shared name Save in Enter the directory for storing files When SMB is selected use a UNC format Transferring via FTP For example aaa bbb When you save files in the bbb directory under the aaa directory in the root directory Transferring via SMB For example aaa bbb When you save files in the bbb directory under the aaa directory in a specified volume User Name Set the u...

Page 394: ...Resolution Set image quality for transmission Select from Panel image quality selected on the control panel Standard 200x100 dpi Fine 200 dpi Superfine 400 dpi or Superfine 600 dpi Cover Page Select whether or not to send a fax with a cover note attached If attached specify comments on the sender and a recipient to be printed in the cover pages Comments must be registered in advance For informatio...

Page 395: ...pan and is the T 30 communication protocol method for using sub addresses that are standardized by the ITU T For F code sub address and password you can use up to 20 digits 0 to 9 and 1 Select On 2 Enter the F code with the numeric keypad Note The F code consists of 0 folder number For example if the folder number is 123 the F code will be 0123 3 Enter the password as required with the numeric key...

Page 396: ...me Billing Night Time and Billing Midnight 2 Select Billing 3 Enter the time for one unit charge from 0 1 to 255 9 seconds in 0 1 second increments with the numeric keypad 4 Select Save When the Delete Entry Button is Selected Selecting this button deletes all the information registered for the address selected To delete all information registered select Delete Note Deleted information cannot be r...

Page 397: ...register the address numbers 6 Select Save Delete this group Deletes all information registered on a group Delete from this group Deletes a registered address Select the speed dial or enter the speed dial number to delete with the numeric keypad and then select Delete from this group Add Fax Comment You can register comments to be printed on cover sheets A maximum of 50 comments can be registered ...

Page 398: ...ered users You can set a limit on the number of pages for each user of the machine You can also check the cumulative number of pages for each user registered Up to 1 000 user data can be registered The settings described here are identical with Create View User Accounts under Authentication of Authentication Security Settings Note Before registering users refer to Accounting Type P 402 and set the...

Page 399: ...code later refer to Changing Passcode P 508 E mail Address Enter an e mail address with up to 128 characters The address set here will be set as From under E mail Account Limit You can place restrictions on the use and the maximum number of allowed pages for each of the Copy Fax Scan and Print features 1 Select Account Limit 2 Select a feature to restrict 3 To set account limits select Change Acco...

Page 400: ...n the Print service for each user Permission to use Free Access Black White Only or No Access to Print Service Maximum number of color pages allowed 1 to 9 999 999 Maximum number of black and white pages allowed 1 to 9 999 999 User Role User Role Allows you to select a user role for a user User No special authority is given to this user role System Administrator The same authority as a system admi...

Page 401: ...elect User Account or Group Account If you select User Account select also the User ID to check 3 Click Account Details Reset User Accounts You can delete all registered information for all registered users in a single operation or reset the accounting data It is also available to print contents for confirmation before resetting The settings described here are identical with Reset User Accounts un...

Page 402: ...or delete them Note Meter Print Jobs is displayed when Disable Accounting is selected for Print Service in the Accounting Mode screen under Accounting Type Reset Deletes or resets the data for the selected item System Administrator s Meter Copy Jobs You can check or reset the total impression copied using the System Administration mode on the screen The total impressions are counted up to 9 999 99...

Page 403: ...mation used for authentication Note Account ID is used for accounting Display User ID Account ID Prompts Prompts users to enter both their user ID and Account ID Display User ID Prompt Only Prompts users to enter their user ID only Display Account ID Prompt Only Prompts users to enter their Account ID only Display No Prompts Does not prompt users to enter their user ID or Account ID Accounting Log...

Page 404: ...you enter the Account ID the characters are echoed on the screen in the normal way Hide As you enter the Account ID the character string is hidden as a row of asterisks Store User Details You can set the destination to save authentication information Select NVM or Hard Disk Note This item is displayed when Network Accounting is selected in Accounting Type NVM stands for nonvolatile memory and the ...

Page 405: ...t change the setting Accounting Billing Device Select the type of the accounting billing device connected to the machine Note If a device connected does not match the device selected in Accounting Billing Device an error occurs Jobs related to the accounting billing device cannot be performed until the error is resolved For information on how to resolve the error refer to Status Code P 553 Track P...

Page 406: ...Number This feature is available for Card Activated Cumulative and Card Activated Subtractive Track with Cumulative Device The feature is effective for the Copy and Print services Select the timing that the amount for copy or print job is charged Select from Track with Accounting Device and High Speed Printing This feature is available for Card Activated Cumulative Scan Ahead for Copy Job The feat...

Page 407: ...or s Login ID Set the system administrator s user ID Enter the ID from 1 to 32 single byte characters Note The default of the system administrator s user ID is admin 1 Select System Administrator s Login ID 2 Select On 3 Select Keyboard 4 Enter the system administrator s ID with up to 32 characters and then select Save 5 Repeat steps 3 and 4 to re enter the same system administrator s ID in Re ent...

Page 408: ...lows you to select a type of authentication No Login Required Does not use the Authentication feature Login to Local Accounts Authenticates users based on the user information registered on the machine Note When Login to Local Accounts is selected the machine enters the Login mode and Login is displayed at the lower left of the Home screen Login to Remote Accounts Authenticates users based on the ...

Page 409: ...g contains steps to use the Copy service the use of the store programming is also restricted Fax Restricts access to the Fax Direct Fax service on the machine If a stored programming contains steps to use the Fax service the use of the store programming is also restricted Scan Restricts access to the E mail Store to Folder Scan to PC Store to USB and Store Send Link services and features on the ma...

Page 410: ...s under Accounting Refer to Create View User Accounts P 398 Reset User Accounts You can delete all registered information for all registered users in a single operation or reset the accounting data It is also available to print contents for confirmation before resetting The settings described here are identical with Reset User Accounts under Accounting Refer to Reset User Accounts P 401 Create Aut...

Page 411: ...he User ID as registered including upper and lower cases When you select Non Case Sensitive authentication is performed with case ignored even if the User ID has both upper and lower cases Note Do not change the setting while a file is stored for the Private Charge Print Otherwise you may encounter problems such as being unable to print Change the setting after the machine prints all the files sto...

Page 412: ...in attempt count from 1 to 10 Note The failure count is reset when the machine is restarted To cancel the access rejection state restart the machine by switching off and on the power Passcode Policy Passcode Entry from Control Panel You can set whether a passcode is required when the system administrator or a user uses the machine Selecting On enables System Administrator s Passcode setting and Pa...

Page 413: ...and then select Change Settings 2 Select any item 3 According to the selected item set the processing to apply to jobs 4 Select Save after the setting is completed According to Print Accounting Specifies how print jobs should be handled when the Authentication and Accounting features are enabled and Print under Service Access is set to Locked Note When the Authentication and Accounting features ar...

Page 414: ...e Folder and Delayed Print settings specified in the print driver will be ignored When Save as Private Charge Print Job is selected Job Without User ID is displayed Job Without User ID Set how to process jobs with no user ID attached To print jobs select Print Job To save jobs as Charge Print job select Save as Charge Print Job To delete jobs select Delete Job Note Job without User ID is automatic...

Page 415: ...ch the deleted data was stored is automatically overwritten with blank data This feature prevents unauthorized retrieval or restoration of the data recorded on the hard disk It also applies to copy document and other information stored temporarily by the system The following option can be configured Number of Overwrites You can select the number of overwrites either once or three times Note If the...

Page 416: ...Passcode Policy P 412 For more information on how to set the system administrator s user ID refer to System Administrator s Login ID P 407 The manager of the organization that this machine is used for must follow the instructions below Assign an appropriate person as a system administrator and manage and train the person properly When turning off the machine make sure no operation is running Train...

Page 417: ...his chapter describes how to set up Dell Printer Configuration Web Tool Installation of Dell Printer Configuration Web Tool 418 Starting Dell Printer Configuration Web Tool 420 Configuring Machine Settings Using Dell Printer Configuration Web Tool 421 ...

Page 418: ...b Tool supports the following browsers For Windows 8 Microsoft Internet Explorer 10 0 For Windows 7 Microsoft Internet Explorer 8 0 For Windows Vista Microsoft Internet Explorer 7 0 For Windows XP Mozilla Firefox 3 0 Microsoft Internet Explorer 6 0 Service Pack 2 For Windows 2000 Microsoft Internet Explorer 6 0 Service Pack 2 For OS X 10 8 Safari 5 For Mac OS X 10 7 Safari 5 For Mac OS X 10 6 Safa...

Page 419: ...screen is displayed 3 Set an IP address If an IP address is already set you can skip this step For an environment with DHCP or BOOTP configure the method for obtaining the address If an IP address cannot be obtained automatically or manual configuration is preferred confirm the settings of an IP address a subnet mask and a gateway address For information on how to set an IP address refer to Protoc...

Page 420: ...ain name For example if the host name is myhost and the domain name is example com then the Internet address is myhost example com When specifying a port number add and the port number after the Internet address If using the Authentication feature on the machine enter a user ID and passcode in the User Name and Password fields If you are not sure about the user ID and passcode consult your system ...

Page 421: ...code into the User Name and Password fields The default user ID is admin and passcode is 1111 You can configure the following settings with Dell Printer Configuration Web Tool Item How to Select Overview Reference Usage Counters Select from Status tab Counters Displays the total number of pages printed for each service Total Runtime Select from Status tab Displays the cumulative time of runtime pr...

Page 422: ...ettings Select from Properties tab Connectivity Refer to Port Settings P 324 Physical Connections Refer to Port Settings P 324 Protocols Refer to Protocol Settings P 328 Language Emulations Select from Properties tab Services Printing Refer to Print Mode P 269 E mail Select from Properties tab Services Refer to E mail Service Settings P 368 Fax Refer to Fax Service Settings P 359 Scan to PC Refer ...

Page 423: ...efer to Certificate Revocation Retrieval Settings P 343 IEEE 802 1x Refer to IEEE 802 1x Settings P 343 SSL TLS Settings Refer to SSL TLS Settings P 340 S MIME Settings Refer to S MIME Settings P 341 PDF XPS Signature Settings Refer to PDF XPS Signature Settings P 341 Job Status Default Allows you to configure the display hide settings for completed and active jobs Plug in Settings Allows you to c...

Page 424: ...16 Dell Printer Configuration Web Tool Settings 424 ...

Page 425: ...he machine Print Overview 426 Installation When Using USB Port 429 Installation When Using TCP IP LPD Port 9100 431 Installation When Using NetWare 434 Installation When Using Microsoft Network SMB 437 Installation When Using Internet Printing Protocol IPP 439 Installation When Using EtherTalk 441 ...

Page 426: ...ation on how to set up the machine using USB connection refer to Installation When Using USB Port P 429 Using the Machine as a Network Printer To set up the machine as a network printer the following protocols are available to connect the machine LPD Use LPD when direct communication between the machine and a computer via TCP IP is available For more information on how to set up the machine using ...

Page 427: ...twork equipment such as hubs may not be compatible with the automatic frame type detection If a data link indicator corresponding to the port of the network equipment connected with the machine is not lit up change the frame type settings of the machine accordingly with that of the file server Use Dell Printer Configuration Web Tool to change these settings For more information on how to set up th...

Page 428: ...USB 2 0 LPD NetWare SMB IPP Port 9100 Ether Talk Bon jour Protocol TCP IP TCP IP IPX SPX Net BEUI TCP IP TCP IP TCP IP Apple Talk Bon jour OS Windows 2000 O O O O O O O O Windows XP O O O O O O O Windows Server 2003 O O O O O O O Windows Server 2008 O O O O O O O Windows Vista O O O O O O O Windows 7 O O O O O O O Windows 8 O O O O O O O Windows 8 1 O O O O O O O Windows Server 2012 O O O O O O O ...

Page 429: ...configure the settings using Dell Printer Configuration Web Tool For items that can be configured using Dell Printer Configuration Web Tool refer to Dell Printer Configuration Web Tool Setting Items P 430 1 Display the Tools screen 1 Press the Log In Out button 2 Enter the system administrator s user ID with the numeric keypad or the keyboard displayed on the screen and select Enter When a passcod...

Page 430: ...on the driver installation procedures refer to the manual contained in the Driver CD Kit You can print via USB from a Macintosh computer for Mac OS X 10 5 10 6 10 7 10 8 For information on the installation procedures of the print driver for Mac OS X refer to the manual contained in the CD ROM provided with the driver Dell Printer Configuration Web Tool Setting Items You can configure the following...

Page 431: ...ter Configuration Web Tool Setting Items P 432 1 Display the Tools screen 1 Press the Log In Out button 2 Enter the system administrator s user ID with the numeric keypad or the keyboard displayed on the screen and select Enter When a passcode is required select Next and enter the system administrator s passcode and select Enter Note The default user ID is admin The default passcode is 1111 3 Sele...

Page 432: ... up the LPD port or Port 9100 refer to Dell Printer Configuration Web Tool Setting Items P 432 Step 3 Configuration on the Computer To print from the machine you need to install a print driver on your computer For information on the supported operating systems refer to Supported Operating Systems P 428 For information on the driver installation procedures refer to the manual contained in the Drive...

Page 433: ...ddress Gateway Address Domain Name DNS Configuration IPv4 IPv6 DHCP DDNS WINS Server Port Number TBCP Filter Connection Time Out Maximum Number of Sessions Note The Maximum Number of Sessions can be configured when the LPD port is enabled TCP MSS Mode IPv4 Subnet Mask when TCP MSS Mode is enabled IP Filtering IPv4 Filtering IPv6 Filtering ...

Page 434: ...configured using Dell Printer Configuration Web Tool refer to Dell Printer Configuration Web Tool Setting Items P 436 Using IPX SPX 1 Display the Tools screen 1 Press the Log In Out button 2 Enter the system administrator s user ID with the numeric keypad or the keyboard displayed on the screen and select Enter When a passcode is required select Next and enter the system administrator s passcode a...

Page 435: ...If DHCP or BOOTP is available in your environment configure the method for obtaining the address The configuration of an IP address a subnet mask and a gateway address is not required For information on how to set an IP address refer to Protocol Settings P 328 4 Select Close repeatedly until the Tools screen is displayed 5 Select Close Note Rebooting the machine may be required depending on the se...

Page 436: ...ze for the NetWare interface Properties General Setup Memory Settings NetWare Port Settings Transport Protocol IPX SPX Frame Type Queue Poll Interval Printer Server Name Password Active Mode Number of Searches TBCP Filter File Server Name Note The File Server Name can be configured when the operation mode is in Bindery Service NDS Tree NDS Context Note The DNS Tree NDS Context can be configured on...

Page 437: ...an configure the settings using Dell Printer Configuration Web Tool or the Driver CD Kit For the items that can be configured using Dell Printer Configuration Web Tool refer to Dell Printer Configuration Web Tool Setting Items P 438 For information on how to configure the setting using the Driver CD Kit refer to the manual contained in the Driver CD Kit 1 Display the Tools screen 1 Press the Log I...

Page 438: ...s screen for SMB in Dell Printer Configuration Web Tool 7 Configure the other SMB settings as necessary For information on the SMB settings refer to Dell Printer Configuration Web Tool Setting Items P 438 Step 3 Configuration on the Computer To print from the machine you need to install a print driver on your computer For information on the supported operating systems refer to Supported Operating ...

Page 439: ...tion on the Machine The following describes the configuration procedures to use Internet Printing Protocol IPP on the machine Enable the IPP port and then configure TCP IP settings Note You can configure the settings using Dell Printer Configuration Web Tool For the items that can be configured using Dell Printer Configuration Web Tool refer to Dell Printer Configuration Web Tool Setting Items P 4...

Page 440: ... information on how to print a configuration report refer to Print Reports P 260 7 Configure other IPP settings as necessary Refer to Dell Printer Configuration Web Tool Setting Items P 440 Step 3 Configuration on the Computer To print from the machine you need to install a print driver on your computer For information on the supported operating systems refer to Supported Operating Systems P 428 F...

Page 441: ... Enter the system administrator s user ID with the numeric keypad or the keyboard displayed on the screen and select Enter When a passcode is required select Next and enter the system administrator s passcode and select Enter Note The default user ID is admin The default passcode is 1111 3 Select Tools on the Home screen 2 Enable the EtherTalk port 1 Select Connectivity Network Setup 2 Select Port...

Page 442: ...erating Systems P 428 Dell Printer Configuration Web Tool Setting Items You can configure the following setting items using Dell Printer Configuration Web Tool For information on how to start Dell Printer Configuration Web Tool refer to Starting Dell Printer Configuration Web Tool P 420 Receiving buffer size for the AppleTalk interface Properties General Setup Memory Settings EtherTalk Port Settin...

Page 443: ...18 E mail Environment Settings This chapter describes the settings to use various services via e mail on the machine E mail Overview 444 Preparations 445 Installation Procedures 447 ...

Page 444: ...s information such as consumable status parts status and paper tray status that is set in E mail Notification for Machine Status of Dell Printer Configuration Web Tool to a specified recipient By receiving the statuses of consumables periodically you can properly determine when to replace the toner and drum cartridges It is recommended that you register the address of the system administrator or a...

Page 445: ...ail address of the machine O O O O O O DNS server address Required when the addresses for a POP3 server and an SMTP server are set with a domain name format instead of their IP addresses You can also acquire this from DHCP SMTPserver address The machine uses an SMTP server to send e mails The SMTP server can also be used for receiving e mails O O O O O SMTP AUTH login name and password If an SMTP ...

Page 446: ...ystem Administrator O Required to be set Set as required Not required to be set X Not supported Item Description E mail Store Send Link Print E mail E mail Notification Job Completion Notice via SMTP via POP3 Machine e mail address When using the E mail feature on the machine an e mail account of the machine must be registered on a mail server in advance O O O O O O Host name Set the host name and...

Page 447: ...1111 3 Select Tools on the Home screen 2 Enable ports to use for the E mail feature 1 Select Connectivity Network Setup 2 Select Port Settings 3 Select Send E mail and then select Change Settings 4 Select Port Status and then select Change Settings 5 Select Enabled and then select Save 6 Select Close 7 Select Enabled on the Receive E mail Port Status screen under Receive E mail as described above ...

Page 448: ...Log In Out button 2 Enter the system administrator s user ID with the numeric keypad or the keyboard displayed on the screen and select Enter When a passcode is required select Next and enter the system administrator s passcode and select Enter Note The default user ID is admin The default passcode is 1111 3 Select Tools on the Home screen 2 Set up the e mail address of the machine 1 Select Connec...

Page 449: ...eive E mail configure the SMTP server in Outgoing Incoming E mail Settings For information on how to configure the e mail transmission refer to SMTP Server Settings P 334 6 Select Close repeatedly until the Tools screen is displayed 7 Configure the domain filtering for receiving e mails as necessary For information on how to configure the domain filtering refer to Domain Filtering P 344 8 Set up t...

Page 450: ...s using Dell Printer Configuration Web Tool For information on how to start Dell Printer Configuration Web Tool refer to Starting Dell Printer Configuration Web Tool P 420 Machine s E mail Address Setup E mail Notification Port Settings SMTP Server Settings POP3 Server Settings Receiving Protocol Domain Filtering S MIME Settings ...

Page 451: ... the settings to use the Scan services on the machine Scan Service Overview 452 Configuration of Store to Folder 453 Configuration of Scan to PC 455 Configuration of Store to USB 458 Configuration of Job Flow Sheets 459 Configuration of Store Send Link 461 ...

Page 452: ...retrieve as electronic data and store it on a computer connected to a network For information on the Scan to PC service refer to Configuration of Scan to PC P 455 Store to USB You can store the scanned data to a USB memory device when you insert the USB 2 0 memory device into the USB memory slot of the control panel of the machine You can also select data stored in the USB memory device and print ...

Page 453: ...ol P 421 1 Display the Tools screen 1 Press the Log In Out button 2 Enter the system administrator s user ID with the numeric keypad or the keyboard displayed on the screen and select Enter When a passcode is required select Next and enter the system administrator s passcode and select Enter Note The default user ID is admin The default passcode is 1111 3 Select Tools on the Home screen 2 Enable t...

Page 454: ...equired depending on the settings When a message displayed on the screen follow the message and reboot the machine 6 Print a configuration report to confirm that the WebDAV port is enabled and that TCP IP is set up correctly For information on how to print a configuration report refer to Print Reports P 260 Step 2 Registering a Folder Register a folder to store scanned data For information on regi...

Page 455: ... service of Microsoft Internet Information Server 6 0 Microsoft Windows 2000 Server Microsoft Windows 2000 Professional or Microsoft Windows XP FTP service of Microsoft Internet Information Server 3 0 or later Mac OS X FTP service of Mac OS X 10 2 X 10 3 8 10 3 9 10 4 2 10 4 4 10 4 8 10 4 9 10 4 10 10 4 11 10 5 10 6 Novell NetWare FTP service of NetWare 5 11 or 5 12 For information on how to confi...

Page 456: ...ect SMB and then select Change Settings 4 Select Port Status and then select Change Settings 5 Select Enabled and then select Save 6 Select Close repeatedly until the Tools screen is displayed Using FTP Enable the FTP port 1 Select Connectivity Network Setup 2 Select Port Settings 3 Select FTP Client and then select Change Settings 4 Select Port Status and then select Change Settings 5 Select Enab...

Page 457: ...r to Print Reports P 260 Step 3 Configuration on the Computer Create a destination folder on your computer Using FTP Create a destination folder on the server where you login and set write rights on the folder Using SMB Create a shared folder on your computer and set the write rights on the shared folder Note To use SMB on Mac OS X set Windows Sharing to On in the Service tab of Sharing under Syst...

Page 458: ... of the machine USB 2 0 memory devices USB memory devices with the capacity of up to 128 GB USB memory devices that support FAT12 FAT16 FAT32 or VFAT long name Note USB memory devices that are encrypted with software cannot be used with the machine Step 2 Dell Printer Configuration Web Tool Setting Items You can enable disable the Store to USB service using Dell Printer Configuration Web Tool When...

Page 459: ...e Tools screen 1 Press the Log In Out button 2 Enter the system administrator s user ID with the numeric keypad or the keyboard displayed on the screen and select Enter When a passcode is required select Next and enter the system administrator s passcode and select Enter Note The default user ID is admin The default passcode is 1111 3 Select Tools on the Home screen 2 Enable the SOAP port 1 Select...

Page 460: ...SNMP and Internet Services HTTP ports are enabled and that TCP IP is set up correctly For information on how to print a configuration report refer to Print Reports P 260 Step 2 Configuring the SNMP Port Configure the transport protocol for the SNMP port using Dell Printer Configuration Web Tool 1 Start Dell Printer Configuration Web Tool For information on how to start Dell Printer Configuration W...

Page 461: ...ail 461 Step 2 Enabling Authentication 461 Step 3 Other Settings 461 Step 4 Dell Printer Configuration Web Tool Setting Items 462 Step 1 Configuring E mail Configure the e mail settings on the machine For information on how to configure e mail settings refer to E mail Environment Settings P 443 Step 2 Enabling Authentication Configure the authentication settings on the machine For information on h...

Page 462: ...he following items using Dell Printer Configuration Web Tool URL File Expiration Generation of URL Link Maximum File Size Subject Message Attachment Device Information Authenticated User For information on how to start Dell Printer Configuration Web Tool refer to Starting Dell Printer Configuration Web Tool P 420 ...

Page 463: ...tion feature and the Digital Signature feature on the machine Encryption and Digital Signature Overview 464 Configuration of HTTP Communications Encryption 466 Configuration of Encryption using IPSec 468 Configuration of E mail Encryption Digital Signature 471 Configuration of PDF XPS Signature 475 ...

Page 464: ...n a network can be encrypted Encrypting HTTP Communications from a Client to the Machine SSL TLS Server The SOAP Internet Services HTTP IPP and WebDAV ports use the HTTP server of the machine The SSL TLS protocol is used to encrypt the HTTP communications between a client and the machine To encrypt communications either one of the device certificate is required a self signed certificate or a certi...

Page 465: ...fer to IKE Authentication Method P 342 To verify the certificate of the remote device you must register a root certificate created by a CA of the remote device on the machine Note To use certificates that have already been created import them with Dell Printer Configuration Web Tool E mail Encryption Digital Signature S MIME is used for E mail Encryption Digital Signature To use S MIME on the mach...

Page 466: ...gistered to the machine by factory default Configure certificates for an SSL server as needed The following describes the procedures to set up a certificate by Dell Printer Configuration Web Tool Setting up a Certificate using Dell Printer Configuration Web Tool To set up a certificate using Dell Printer Configuration Web Tool you can have the machine create a self signed certificate for SSL serve...

Page 467: ...ote Do not use the numbers of any other ports 5 Click Apply 6 When the right frame of the web browser changes to the machine reboot display click Reboot Machine The machine reboots and the settings are enabled Step2 Configuration on the Computer To encrypt communications between a web browser and the machine enter an address beginning with https instead of http in the address box of the web browse...

Page 468: ...tes by Dell Printer Configuration Web Tool Enable HTTPS and then import a certificate issued by another CA to the machine Note If a certificate to be imported as an IPSec certificate contains V3 extension KeyUsage digitalSignature bit must be asserted Configuration on the Computer Configure the following settings to encrypt communications between a computer and the machine Create an IP security po...

Page 469: ...nt 3 Select Local Device for Category and IPSec for Certificate Purpose and then click the Display the list button 4 Select the check box next to the certificate to set 5 Click the Certificate Details button 6 Click the Use this certificate button 7 Click Reboot Machine The machine reboots and the settings are enabled Step2 Configuration on the Machine Configuration of IPSec The following describe...

Page 470: ...3 Configuration on the Computer The following describes the configuration procedures on the computer Configure the following settings on the computer Create an IP security policy Assign the IP security policy For details on the settings refer to the help of the computer ...

Page 471: ...registered on the machine by factory default Configure the following settings to set up a certificate on the machine Configuring certificates by Dell Printer Configuration Web Tool Set up HTTPS communications encryption settings and then configure a certificate on the machine Configuration on Sender and Recipient To transmit e mails encrypted by S MIME and with digital signatures attached register...

Page 472: ...MIME for Certificate Purpose and then click the Display the list button 4 Select the check box next to the certificate to set 5 Click the Certificate Details button 6 Click the Use this certificate button 7 Click Reboot Machine The machine reboots and the settings are enabled 8 Refresh the web browser 4 Enable S MIME Communication 1 Click Security to display the items in the folder 2 Click SSL TLS...

Page 473: ...he machine and register it to the certificate store of an e mail application in the computer To send an e mail with S MIME digital signature select Always add signature or Select during send for Digital Signature Outgoing E mail under Tools System Settings Connectivity Network Setup Security Settings S MIME Settings in advance Export the certificate of the machine to a computer using Dell Printer ...

Page 474: ...mputer using Dell Printer Configuration Web Tool and register it to the certificate store of an e mail application in the computer For information on how to import and export a certificate using Dell Printer Configuration Web Tool refer to Importing exporting a certificate using Dell Printer Configuration Web Tool P 474 For information on how to register a certificate to the certificate store of e...

Page 475: ...the machine Configuration on the Computer Sending a PDF or XPS signature file from the machine to a computer Make sure that the root certificate of the certificate to be used for the scan file signature of the machine is registered on the recipient s computer Step1 Configuration on the Machine This section describes configuration procedures to set up a certificate with Dell Printer Configuration W...

Page 476: ...rtificate button 7 Click Reboot Machine The machine reboots and the settings are enabled 4 Configure the settings for PDF Signature XPS Signature Note XPS stands for XML Paper Specification 1 Refresh the web browser 2 Click Security to display the items in the folder 3 Click PDF XPS Security Settings and configure the following settings PDF Signature Select the setting for PDF signature from Do no...

Page 477: ...is chapter describes the settings to restrict the availability of services and to manage account usage on the machine Overview of Authentication and Accounting Feature 478 Authentication 480 Services Controlled by Authentication 484 Authentication for Job Flow Sheets and Folders 489 Jobs Manageable by Account Administration 497 Configuration for Authentication 500 Configuration for Account Adminis...

Page 478: ... user information registered on the machine and Login to Remote Accounts that authenticates users based on the user information registered on a remote server For more information about the feature refer to Types of Authentication P 481 Note The available remote servers are LDAP Kerberos and SMB servers Access Control Allows you to prohibit the operation of the control panel buttons For more inform...

Page 479: ...istration Local Accounting Network Accounting and ColorTrack For more information refer to Types of Account Administration P 482 Available Combinations of Login and Accounting Types You can select the Login and Accounting Types individually but some combinations are not available For more information refer to Authentication and Accounting Relationship P 483 ...

Page 480: ...entry field on the screen Login User A Login User is a user registered on the machine or a remote server To use restricted services enter the user ID and passcode on the screen Note Users who are assigned as System Administrator in User Role have almost the same privileges as the system administrator For more information refer to User Roles and Authorization Groups P 480 Unregistered User Unregist...

Page 481: ...or not to permit the group members to specify recipients when Restrict Recipient Selection Method is set to Only From Address Book For details on the Restrict Recipient Selection Method setting refer to Restrict Recipient Selection Method P 314 Restrict User to Edit Address Book Allows you to set whether or not to permit the group members to edit the Address Book in the machine when editing the Ad...

Page 482: ...authentication password Smart Card Authentication Authentication is performed using the smart card For more information on how to use and manage your smart card reader refer to the manual provided with the device Combined Use of Smart Card Authentication and User ID Authentication Authentication is performed using the user ID of the card pre registered on the machine or the remote server Note When...

Page 483: ...on the machine Also accounting information is counted using various counters automatically created for each user Accounting reports are created in CSV format using Dell Printer Configuration Web Tool For information on driver settings refer to the help of the driver Note When setting the user information or account information for another machine we recommend that you use the Cloning feature of De...

Page 484: ... user refer to Change Account Limit P 400 and for information on the restrictions that can be set for the machine as a whole refer to Service Access P 409 Services Restricted by User ID Authentication For User ID Authentication the services restricted by authentication and account administration differ depending on the combination of the Authentication and Accounting modes When Login Type is Login...

Page 485: ...The following services are controlled 1 This column shows whether authentication is required for each service O indicates that authentication is required 2 When Login Type is set to Login to Remote Accounts the Print feature cannot be restricted To restrict print operations use the Charge Print or Private Charge Print feature 3 When Login Type is Login to Remote Accounts the Direct Fax feature can...

Page 486: ...stricted by authentication and account administration differ depending on the combination of the Authentication local machine authentication or remote authentication and Accounting modes When Login Type is Login to Local Accounts and Accounting Type is Local Accounting The following services are controlled Services Authentication 1 Restrictions per user Per user Usage Count User ID Feature restric...

Page 487: ...es available for each user The settings can be configured with the remote service 4 This feature stops machine operation when the number of pages specified in the account limit is processed The settings can be configured with the remote service 5 Report and List can be printed using a smart card not registered on the machine For more information on Network Accounting refer to Network Accounting P ...

Page 488: ...ou use Charge Print or Private Charge Print to avoid unintended printing 4 The user ID of the card is checked against the user ID registered on the machine 5 When Login Type is Login to Remote Accounts the Direct Fax feature cannot be restricted To disable the Direct Fax feature refer to Direct Fax P 364 Note Authentication is not performed when Verify User Details is set to No under Tools Account...

Page 489: ...led When the Authentication feature is disabled this type of job flow sheet can be shared and its settings can be changed by any machine user When the Authentication feature is enabled this type of job flow sheet can be operated only by the system administrator Folder Job Flow Sheets This is a job flow sheet created by a Local User or the System Administrator on the Create Folder or Send from Fold...

Page 490: ...the Authentication feature is enabled this folder can be operated only by the system administrator Personal Folder This is a folder created by a login user when the Authentication feature is enabled The login user who created it and the system administrator can use it When the Authentication feature is not enabled this folder can be operated only by the system administrator The methods you can use...

Page 491: ... setting from enabled to disabled delete all existing personal job flow sheets and create general shared and folder job flow sheets When the Authentication feature is disabled the relationships between users and job flows are as follows The available job flow sheet operations differ between the job flow sheets created on the Create Folder under Setup or Send from Folder screens and those created o...

Page 492: ...splayed and will be unavailable Create Job Flow Sheet under Setup The following table describes the operations that can be performed on the Create Job Flow Sheet screen under Setup The owner of a copied job flow sheet is the user who copied the document Available Folder Operations If you change the Authentication feature from enabled to disabled delete all existing personal folders and create gene...

Page 493: ...s they cannot be edited or copied but still can be used If you cancel the links however the job flow sheets will no longer be displayed and will be unavailable When the Authentication feature is disabled the relationships between users and folders are as follows Folder operation General Users System Administrators General shared Admin shared Personal General shared Admin shared Personal Create Reg...

Page 494: ... is set to Yes in Network Accounting and Customize User Prompts is set to Display User ID Account ID Prompts or Display User ID Prompt Only or when authenticated as a user other than a guest user in Login to Remote Accounts Note If authenticated as a guest user in Login to Remote Accounts you are treated as an unregistered user local user and cannot operate job flow sheets The owner of a copied jo...

Page 495: ...lders 1 Available only when the folder operations are permitted in the Authentication feature settings of the System Administration mode 2 You can perform display auto run and manual run operations for job flow sheets linked to folders Note If job flow sheets which are no longer available for use as a result of a change in the Login Type are linked to folders they cannot be edited or copied but st...

Page 496: ... ID Account ID Prompts or Display User ID Prompt Only or when authenticated as a user other than a guest user in Login to Remote Accounts Note If authenticated as a guest user in Login to Remote Accounts you are treated as an unregistered user local user and cannot operate job flow sheets or folders Folder Job Flow Unregistered Users Local Users Login Users System Administrators General shared Adm...

Page 497: ...Login user Pages sheets Other than machine s print driver 1 Unregistered user Pages sheets Secure Print Store Files Required Print Files Not required 2 Login user Pages sheets Sample Set Store Files Print first set Required Login user Pages sheets Print remaining sets Not required 2 Login user Pages sheets Print Stored File Store Files Required Print Files Required Not required 3 Login user Pages ...

Page 498: ...ess number in which the billing data is not registered When a phone conversation took place including the one before a transmission Services Jobs Authentic ation Target User Managed Items Send as Fax Automatic Send Required Login user Transmissions pages charging units Manual Send Call in Call out Required Login user Transmissions pages charging units Receive Fax Print Fax Automatic Reception Prin...

Page 499: ...wing communications When dialing a fax number using the numeric keypad or the On hook Off hook feature When using an address number in which the billing data is not registered Manual Receive Manual Send or Manual Polling is used When a phone conversation took place including the one before a transmission ...

Page 500: ...s control and then create a user Login to Remote Accounts Specify the Login Type access control and remote authentication server Change the default authorization group settings and add an authorization group as necessary Enabling Authentication This section describes the procedures for Login to Local Accounts and Login to Remote Accounts respectively When Login to Local Accounts is Selected Perfor...

Page 501: ...ote Rebooting the machine may be required depending on the settings When a message displayed on the screen follow the message and reboot the machine The machine enters the Login mode and Login is displayed at the lower left of the Home screen When Locked Show Icon is selected for a service under Service Access is displayed on the button of the applicable service on the Home screen Also Requires Lo...

Page 502: ...19 Select Close Note Rebooting the machine may be required depending on the settings When a message displayed on the screen follow the message and reboot the machine The machine enters the Login mode and Login is displayed at the lower left of the Home screen When Locked Show Icon is selected for a service under Service Access is displayed on the button of the applicable service on the Home screen...

Page 503: ...yed as DefaultGroup Default and then select Create Delete 8 Set each item For more information refer to Create Authorization Groups P 410 9 Select Close repeatedly until the Tools screen is displayed 10 Select Close Creating an Authorization Group Perform the following procedures to add authorization groups if necessary 1 Press the Log In Out button 2 Enter the system administrator s user ID with ...

Page 504: ...21 Authentication and Accounting Features 504 10 Select Close repeatedly until the Tools screen is displayed 11 Select Close ...

Page 505: ...select Next and enter the system administrator s passcode and select Enter Note The default user ID is admin The default passcode is 1111 3 Select Tools on the Home screen 4 Select Accounting 5 Select Accounting Type 6 Select an accounting type and then select Save Note You can select the accounting type from Local Accounting Network Accounting and ColorTrack For information on the accounting type...

Page 506: ...or each service and then select Save For more information refer to Change Account Limit P 400 10 If necessary select a user role and an authorization group for the user under User Role and then select Save Note User Role is displayed only when Login Type is set to Login to Local Accounts For more information refer to User Role P 400 11 Select Close repeatedly until the Tools screen is displayed 12...

Page 507: ...se this feature For more information contact Customer Support at dell com contactdell Log In Log Out from the Operator Panel User Authentication 1 Press the Log In Out button or the login information field on the touch screen 2 Enter the user ID with the numeric keypad or the keyboard displayed on the screen and select Enter When a passcode is required select Next and enter the passcode and select...

Page 508: ...ct New Passcode and enter a new passcode and then select Save 6 Select Retype Passcode and re enter the new passcode and then select Save 7 Select Close Setting or Changing Passcode by System Administrator The system administrator can set or change passcodes using Dell Printer Configuration Web Tool For more information on setting or changing passcodes from the touch screen refer to Create View Us...

Page 509: ...g 510 Machine Trouble 511 Image Quality Trouble 516 Trouble during Copying 521 Trouble during Printing 525 Trouble during Faxing 528 Trouble during Scanning 532 Network related Problems 537 Media Print Text Trouble 551 Media Print Photos Trouble 552 Status Code 553 Paper Jams 617 Document Jams 624 Stapler Faults 626 ...

Page 510: ...cument jams refer to Document Jams P 624 No Cause Is a status code displayed Action Refer to Status Code P 553 The image quality is poor Action Refer to Image Quality Trouble P 516 No Yes Trouble during copying Action Refer to Trouble during Copying P 521 No Yes Trouble during printing Action Refer to Trouble during Printing P 525 No Yes Trouble during faxing Action Refer to Trouble during Faxing ...

Page 511: ...on If the error still is not resolved contact Customer Support at dell com contactdell The Error indicator is lit Is paper or a document jammed Remove the jammed paper or document If paper is jammed refer to Paper Jams P 617 and a document is jammed refer to Document Jams P 624 Is the front cover or top cover open Solve the problem by following the message displayed Is a message displayed on the t...

Page 512: ...tion Is the computer s environment correctly set Check the computer environment such as print driver settings Is the required port status set to Enabled Check the status of the port to use and then set the port status to Enabled Refer to Port Settings P 324 Paper is not fed from Tray 5 Is the specified size paper loaded in the tray Follow the instructions displayed to load paper of correct size an...

Page 513: ...white sheet on top of the document when copying Is the document in the correct position Load the document correctly Refer to Copying Procedure P 50 Is the document loaded correctly Are the document guides on the document feeder set in the correct positions Adjust the document guide positions Refer to Copying Procedure P 50 Is the document folded Unfold and correctly load the document Refer to Copy...

Page 514: ...meets machine specifications Refer to Print Media Guidelines P 200 or Loading Paper P 207 Is paper exceeding the maximum fill line in the tray Load paper in the paper tray so that it does not exceed the maximum fill line Refer to Loading Paper P 207 Are the paper guides set correctly Load the paper correctly and align the paper guides to the paper Refer to Loading Paper P 207 Is the image nearly t...

Page 515: ... P 89 Is an A5 document loaded in landscape orientation on the document feeder when Mixed Size Originals is set to On Load the A5 document in portrait orientation An edge of the document is folded Is the document curled Flatten the curl and load the document again Cannot copy in color Is Output Color set to Black White Set Output Color to Color Refer to Output Color Selecting the Color for Copying...

Page 516: ...ent feeder dirty Clean the constant velocity transport glass Refer to Cleaning the White Chute and Constant Velocity Transport Glass P 246 The copy is too dark Is the copy density set to Darken Adjust the copy density Refer to Image Quality P 76 The copy is too light Is the document faint Is the copy density set to Lighten The copy is slightly misaligned Are the paper edges aligned and the leading...

Page 517: ...esulting in unsatisfactory image quality Is the color calibration incorrect Execute auto calibration Refer to Executing Calibration P 248 Is the machine set where it is exposed to direct sunlight If the document glass is exposed to strong light when you turn the machine on or cancel the Power Saver mode color shift may occur Close the document cover and turn the machine on and when the machine bec...

Page 518: ...per feed direction The paper path is dirty Print a few pages to remove the dirt The drum cartridge has deteriorated or is damaged Replace the drum cartridge with a new one Refer to Replacing Drum Cartridges C M Y or K P 223 White dots appear in black filled areas The paper is unsuitable Load suitable paper Refer to Loading Paper P 207 The drum cartridge has deteriorated or is damaged Replace the d...

Page 519: ...wer supply may have malfunctioned Contact Customer Support at dell com contactdell White areas or white or colored stripes appear The paper is damp Replace the paper with new one Refer to Loading Paper P 207 The paper is unsuitable Load suitable paper Refer to Loading Paper P 207 The entire output is faint When Tray 5 is used the size and type of the loaded paper are different from the settings on...

Page 520: ...ne Refer to Replacing Drum Cartridges C M Y or K P 223 No toner remains in the toner cartridge Replace the toner cartridge with a new one Refer to Replacing Toner Cartridges P 219 The machine interior laser scanners may be soiled Clean the interior Refer to Cleaning the Interior Laser Scanners P 240 Text or images are printed at an angle The paper guides in the paper tray are not set in the correc...

Page 521: ...er does not feed irregular sized documents business cards transparencies or thin documents In addition the document feeder does not feed documents with sticky tags paper clips or adhesive tape Refer to Copying Procedure P 50 The document guides are set in incorrect positions Adjust the document guides to the document Refer to Copying Procedure P 50 A piece of torn paper remains in the document fee...

Page 522: ... the image Place a transparency film under the document when copying The copy is too dark or light The copy density is set to Darken or Lighten Adjust the copy density Refer to Image Quality P 76 The document density is too light Adjust the copy density Refer to Copy P 49 The setting for Original Type is inappropriate for the document Copy black text If the printout is too light select Text for Or...

Page 523: ...the document correctly and align the document guides to the document Refer to Copying Procedure P 50 The paper tray is not inserted correctly Firmly push in the tray until it stops to set it properly Refer to Loading Paper P 207 The paper guides in Tray 5 are not set in the correct positions Load the paper correctly and align the paper guides to the paper edges Refer to Loading Paper in Tray 5 Byp...

Page 524: ...document is larger than the printable area Adjust Reduce Enlarge to copy the document smaller Outputs are not stapled The Finisher is not attached The Finisher is required to staple Install the Finisher or change the print option settings to cancel stapling The number of pages to be stapled exceeds the maximum number for stapling You cannot staple more than 50 pages Reduce the number of pages to 5...

Page 525: ...ropriate action The IP address or SMB network path is not correctly set Set the correct IP address or SMB network path Refer to Printer Environment Settings P 425 The network between the computer and machine is abnormal Check with your network administrator The port is not enabled Enable the port Refer to Port Settings P 324 The hard disk space of the machine is insufficient Delete unnecessary dat...

Page 526: ...e print driver Check the font replacement table The printout is not offset The machine does not offer the Offset feature To output offset the Offset Stacking Module or the Finisher is required Printing is slow High Resolution is selected for Image Quality When image data such as photos is printed with the high resolution the print speed becomes slow Select Standard for Image Quality The specified ...

Page 527: ...color calibration is incorrect Execute auto calibration Refer to Executing Calibration P 248 Black lines are printed The job is output from a print driver for another machine Output the job from a print driver for the machine to be used for printing Symptom Cause Remedy ...

Page 528: ...u to call via general lines The phone dialing method is not available Specify the same dialing method as the one Tone 10pps subscribed for the machine An error occurred with the phone line Use a telephone near the machine to check whether you can make a phone call If the phone call is disabled the problem is in the phone line not in the machine The destination machine is abnormal The data cannot b...

Page 529: ...ccounting feature is being used and the fax is being sent directly from the computer When the Authentication Accounting feature is used and you send a fax directly from the computer you must set the user ID and passcode registered on the machine to the fax driver For details on the Authentication Accounting feature refer to Authentication and Accounting Features P 477 The image quality is poor The...

Page 530: ...er is set Load paper in the machine to receive faxes Paper is jammed Follow the instructions displayed on the control panel to remove the jammed paper Refer to Paper Jams P 617 The machine is in the System Administration mode The machine cannot receive a fax in the System Administration mode Exit the System Administration mode A machine password has been set When a machine password has been set th...

Page 531: ...limit value for page splitting According to the setting combination specified the received document is printed as follows Refer to Border Limit P 362 or Auto Reduce On Receipt P 363 Although the Folder Selector feature is set however the received document is printed and cannot be stored in the folder An unregistered folder is specified on the Folder Selector feature When using the Folder Selector ...

Page 532: ...hin documents In addition the document feeder does not feed documents with sticky tags paper clips or adhesive tape Refer to Scanning Procedure P 134 The document guides are set in incorrect positions Adjust the document guides to the document Refer to Scanning Procedure P 134 A piece of torn paper remains in the document feeder Open the document feeder cover and remove the piece Refer to Document...

Page 533: ... passcode cannot be retrieved Set the passcode to Off and then set the passcode again Refer to Create Folder P 381 Unable to import data from the scanner because of a TWAIN transmission error The scan driver is not installed Install the scan driver Operation terminates during scanning The file size is too large Lower the resolution and import again Symptom Cause Remedy ...

Page 534: ... correctly specified Correctly specify the save destination The login name is not entered correctly Correctly enter the login name The password is not correctly entered Correctly enter the password The time set on the machine does not agree with that of Windows when SMB transmission is performed to Windows Server 2003 or Windows Server 2008 Synchronize the time settings of the machine and Windows ...

Page 535: ...the document glass or the document cover Refer to Cleaning Document Cover and Document Glass P 246 The document is a transparent type such as a transparency film If the document is transparent dirt on the document cover may be copied on the image Place a white sheet of paper on top of the document when scanning The document is colored rough or a blueprint Adjust the copy density or image quality w...

Page 536: ...document correctly and align the document guides to the document Refer to Scanning Procedure P 134 The document is a non standard size Specify the document size Refer to Scanning Procedure P 134 The document is folded Flatten the curl and load the document again Refer to Scanning Procedure P 134 The image is not scanned in color Color Scanning is set to Black White or Grayscale Set Color Scanning ...

Page 537: ... SMB status information Use Dell Printer Configuration Web Tool to change the host name to a unique name or restore the machine settings to the default settings Cause Check point Remedy If Auto Master Mode of SMB is set to On the number of machines whose information can be stored is limited The number depends on the network environment The machine or other SMB machines cannot be searched from the ...

Page 538: ...data to delete and delete from the Document menu in the Print window Select Cancel The print data has a different owner Confirm whether the name displayed as the owner for the selected print data and the user s login name to Windows are the same Login to Windows using the name displayed as the owner of the print data and then delete the print data Symptom Remedy The message Unknown document name i...

Page 539: ...egister job sender user or group name to User of Print Queue Job transmission to the print queue is prohibited Use PCONSOLE to confirm whether User can register to the queue is set to Yes under Current Queue Status of Print Queue Use PCONSOLE to set the item to Yes Use NWADMIN on the computer to confirm whether the operator flag is being confirmed with Recognition of the print queue Use NWADMIN on...

Page 540: ...inter do not match Use NWADMIN on a computer to select the machine and confirm whether the start number of the form in the environment settings matches the number in the print data Use NWADMIN from a computer to match the Start Form number in the machine s environment settings to the number in the print data The level settings for the IPX checksum do not match Use the set command from the console ...

Page 541: ...erver on Network Neighborhood Start the file server There is another device on the network with an identical device name Turn off the machine and use NWADMIN from a computer to confirm whether the status of the relevant printer object is Standby Use the Driver CD Kit from a computer to set a different device name The NetWare port is not activated Print Configuration Report to confirm whether the n...

Page 542: ...NSOLE on the computer to confirm whether the job user or user s group is registered under Print Server Information Printer Printer xxx Environment Settings Notify Add the name of the job user or the name of the user s group to Notify Cause Check point Remedy The Notify option was not specified when the computer transmitted the print data Confirm whether the Notify option is specified when transmit...

Page 543: ... the printing process Confirm whether any error messages are displayed on the control panel Restart the machine Wait until the screen completely goes out to switch on the machine power The machine is not set to the transport protocol corresponding to the computer Confirm the transport protocol selected on the machine Select the transport protocol corresponding to the computer The machine is trying...

Page 544: ...r names is automatically changed when starting the machine Therefore depending on the timing of starting the printer the machine may be started with a different name and documents are printed by another machine A machine that is assigned the same printer name may exist on the network Confirm the printer name and change the name if it is duplicated The printer cannot be browsed from clients If the ...

Page 545: ...ation of Dell Printer Configuration Web Tool P 418 to confirm whether your browser is supported Selecting the menu on the left frame does not update the right frame contents The screen display is distorted Change the window size for the browser The latest information is not displayed Click the Refresh button Characters are not correctly displayed Use Western European language command Pressing Appl...

Page 546: ...whether your own domain is set to Allow Domains on Dell Printer Configuration Web Tool Are the SMTP server and or POP server operating properly Consult your network administrator Cannot transmit e mail E mail Notification Service and E mail Is the E mail address for the machine configured Is E mail Notification Service set to Enabled For E mail Notification Service Is Send E mail set to Enabled Is...

Page 547: ... proxy server Set the IP address of a DNS server that can resolve the address of the proxy server When not connecting via the proxy server Set the IP address of a DNS server that can resolve the destination address The address that does not use a proxy server is incorrect Confirm whether only addresses that do not use a proxy server are set Even if addresses not through a proxy server are specifie...

Page 548: ... the proxy server you must configure the machine to use the proxy server to connect to a desired Web server Make sure that you configure the settings to use the proxy server The setting to use a proxy server is configured even though the environment does not use a proxy server In an environment that does not use a proxy server such as when connecting to an intranet do not make the settings to use ...

Page 549: ...ne cannot connect to a computer running Windows OS that supports IPv6 Assign a static IPv6 address to the computer running Windows OS that supports IPv6 Then register the IPv6 address on the machine as host address to allow communication A device outside the router cannot be searched When searching for a device outside the router via SMB directly specify the address Multicasting is supported only ...

Page 550: ...dress literal format Example csw ipv6 2001 db8 1 In an IPv6 environment use a DNS server and specify an e mail address using the FQDN Symptom Remedy Unable to search devices with IPv6 addresses in UPnP In an IPv6 environment use Function Discovery of Web Services on Devices WSD In an IPv6 network with no DNS server installed authentication fails if an SMB authentication server is specified using t...

Page 551: ...nd remedies for problems when using Media Print Text are as follows Symptom Cause Remedy Media Print Text is not displayed on the Home screen Media Print in Dell Printer Configuration Web Tool is not checked Check Media Print in Dell Printer Configuration Web Tool to enable the service ...

Page 552: ...that cannot be printed image files in other than DCF1 0 format are included among the files specified for printing Files that cannot be printed image files in other than DCF1 0 format are not printed with index printing Specify printing again excluding the images not displayed for index printing Note Note that editing or saving DCF1 0 format image files on a computer makes those files format other...

Page 553: ...cannot resolve an error despite following the instructions described in the table contact Customer Support at dell com contactdell Status Code Cause and Remedy 003 311 003 318 003 319 003 320 003 321 003 322 003 323 003 324 003 325 003 326 003 327 003 328 003 329 003 330 003 331 003 332 003 333 003 334 003 335 003 336 003 337 003 338 003 339 003 340 003 341 003 342 003 343 003 344 003 345 003 346 ...

Page 554: ...ture is specified for document scan conditions Remedy Confirm the selected options 003 761 Cause The paper size of the tray selected for auto tray differs from the paper size of the tray selected for Auto Paper selection Remedy Change the paper size for the tray or change the Paper Type Priority settings 003 763 Cause An error occurred when reading the Calibration Chart Remedy Place the Calibratio...

Page 555: ... 010 398 Cause An error occurred in the machine Remedy Switch off the machine power make sure that the touch screen is blank and then switch on the machine power If the error still is not resolved contact Customer Support at dell com contactdell 012 210 012 211 012 212 012 213 012 221 012 223 012 224 Cause Finisher malfunction Remedy Switch off the machine power make sure that the touch screen is ...

Page 556: ... the machine power make sure that the touch screen is blank and then switch on the machine power If the error still is not resolved contact Customer Support at dell com contactdell 016 229 016 230 Cause An error occurred in the software Remedy Switch off the machine power make sure that the touch screen is blank and then switch on the machine power If the error still is not resolved contact Custom...

Page 557: ...ne Remedy Switch off the machine power make sure that the touch screen is blank and then switch on the machine power If the same message is displayed again contact Customer Support at dell com contactdell 016 335 016 336 016 337 016 338 016 339 016 340 016 341 016 342 Cause An error occurred Remedy Switch off the machine power make sure that the touch screen is blank and then switch on the machine...

Page 558: ...y Confirm the authentication server and store the root certificate of the server certificate of the authentication server into the machine If you cannot acquire the root certificate of the server certificate set Server Certificate Verification of IEEE 802 1x Settings to Disabled on the touch screen 016 404 Cause An internal error occurred Remedy Execute the operation again If the error still is no...

Page 559: ...mail Remedy Check on Dell Printer Configuration Web Tool whether the SMTP server settings are correct Also confirm whether the DNS server settings are correct 016 504 Cause Unable to resolve the POP3 server name when sending e mail Remedy Check on Dell Printer Configuration Web Tool whether the POP3 server settings are correct Also confirm whether the DNS server settings are correct 016 505 Cause ...

Page 560: ...wer 016 522 Cause LDAP server SSL authentication error Unable to acquire an SSL client certificate Remedy The LDAP server is requesting an SSL client certificate Set an SSL client certificate on the machine 016 523 Cause LDAP server SSL authentication error The server certificate data is incorrect Remedy The machine cannot trust the SSL certificate of the LDAP server Register the root certificate ...

Page 561: ...sing the DNS prior to connecting to the Remote Download server Remedy Confirm the connection with the DNS Also check whether the Remote Download server name is registered to the DNS 016 537 Cause Could not connect to the Remote Download server The port of the destination Remote Download server is not open Remedy Confirm the port in the network settings 016 538 Cause An error occurred when writing ...

Page 562: ...orrectly registered on the machine 016 578 Cause The machine failed to transfer data using FTP of the Scan to PC service because of unsuccessful login to the FTP server Remedy Check whether the login name user name and password are correct 016 579 Cause The machine failed to transfer data using FTP of the Scan to PC service because the scanned image could not be saved in the FTP server after conne...

Page 563: ...erver If the lock directory LCK exists in the destination delete it manually and then execute the operation again 016 587 Cause The machine failed to transfer data using FTP of the Scan to PC service because folders could not be deleted on the FTP server after connection Remedy Confirm the access privilege for the FTP server 016 588 Cause The machine failed to transfer data using FTP of the Scan t...

Page 564: ...measures Set Image Quality to Standard Increase the print page buffer size For more information on the Image Quality refer to the help of the print driver For more information about memory refer to Allocate Memory P 345 016 703 Cause The machine received an e mail specified with an invalid folder number Remedy For errors occurring during fax transmission Contact Customer Support at dell com contac...

Page 565: ...nd Deleting Stored Jobs P 182 016 717 Cause Unable to create a Transmission Report Job Undelivered or a Transmission Report because the transmission result information required for creating the report is not stored in the machine s memory Remedy Take one of the following measures If many scan documents are being processed wait until the jobs are completed to execute a new job After completing the ...

Page 566: ...016 732 Cause The form specified by emulation has not been registered at the host side Remedy Resend the form data 016 733 Cause Probable causes are as follows 1 Unable to obtain the IP address the string after in the destination e mail address when e mail is sent 2 DNS server was unable to resolve the Internet address the string after by the DNS server when e mail is sent Remedy For 1 confirm the...

Page 567: ...g the PDF Bridge processing a syntax or parameter error occurred an undefined command was used and a PDF file was damaged 2 When Print Processing Mode 408 for the PDF Direct Print feature has been set to PS 1 memory is insufficient 3 When Print Processing Mode 408 for the PDF Direct Print feature has been set to PS 1 a PDF file including OpenType fonts is processed Remedy For 1 use the print drive...

Page 568: ...s full Remedy Consult the SMTP server administrator 016 766 Cause An error occurred on the SMTP server Remedy Consult the SMTP server administrator 016 767 Cause Unable to send the e mail because the address is not correct Remedy Confirm the address and try sending again 016 768 Cause Unable to connect to the SMTP server because the machine s mail address is incorrect Remedy Confirm the machine s ...

Page 569: ...t dell com contactdell 016 780 Cause A hard disk error occurred during scanned image conversion processing Remedy The hard disk may be defective To replace the hard disk contact Customer Support at dell com contactdell 016 781 Cause Probable causes are as follows 1 The mail server cannot be found during e mail sending TCP IP session establishment failed 2 The machine received an SMTP server error ...

Page 570: ...ation or the print data and the Print Setup settings may not match Remedy Check the print data of the application and the Print Setup settings and try printing again 017 700 Cause ThinPrint Engine connection timed out Remedy Confirm the connection to the ThinPrint Engine 017 701 Cause An error occurred while connecting to ThinPrint Engine Remedy Confirm the connection to the ThinPrint Engine 017 7...

Page 571: ...TLS Settings to Disabled however the validity of the server cannot be warranted 017 719 Cause SMTP server SSL authentication error SSL authentication internal error Remedy Execute the operation again If the error still is not resolved contact Customer Support at dell com contactdell 018 400 Cause Although IPSec is enabled the IPSec settings are inconsistent Although Authenticate by Preshared Key i...

Page 572: ...ple of a procedure for Mac OS X 10 6 It is recommended that users create a dedicated account for data transfer You can create and set the account on the dialog box that appears by choosing Apple menu System Preferences and then clicking Accounts icon 1 From Apple menu choose System Preferences and then click Sharing 2 Make sure that File Sharing check box is selected and then click Options 3 Selec...

Page 573: ...at File Sharing check box is selected 3 Select the folder being shared from folders listed in the Shared Folders field 4 Choose Read Write as privilege option for the user listed in the Users field For information on how to change the access privilege settings on other version of Mac OS consult your system administrator or the official website of Apple Inc 018 547 Cause The machine failed to trans...

Page 574: ...is accessible by PC The server settings 018 564 Cause DNS resolution for the specified hostname failed Remedy Check the followings The destination HTTP server for the scanned document is registered on the DNS server The machine is connected to the DNS server The address of the DNS server is set on the machine 018 565 Cause DNS resolution for the proxy server name set on the machine failed Remedy C...

Page 575: ...egistered on the machine The device certificate is correctly registered on the HTTP server 018 571 Cause An internal error occurred Remedy Perform the same operation again If the problem persists contact Customer Support at dell com contactdell 018 572 Cause The specified context name contains invalid characters Remedy Check whether the specified context name is correct 018 573 Cause The specified...

Page 576: ...e login user does not have Write rights to the file The login user does not have Delete rights of the directory or file Made a delete request to the directories or files but all of them are read only Made a delete request to the directories or files but some of them are read only Remedy 1 Check whether the NetWare server is accessible by PC 2 Check the user has the following rights Open rights to ...

Page 577: ...hat the file format is not multi page 018 589 Cause Failed to access the NEXTNAME DAT file Remedy When Rename New File is set as the process to be executed in case of a file name duplication check the NEXTNAME DAT file is correct 018 590 Cause A file or folder of the same name was detected on the server Remedy Take one of the following measures 1 Execute the operation again by not accessing the sa...

Page 578: ... again If the error still is not resolved consult your network administrator 018 704 Cause An LDAP server protocol error occurred as a result of the Address Book operation The server returned RFC2251 Result Message No 4 size limit exceeded for Address Book query Remedy Change the search conditions start position to narrow the search range and execute the operation again If the error still is not r...

Page 579: ...dministrator confirm the operational status of the server 018 713 Cause An LDAP server protocol error occurred as a result of the Address Book operation The server returned RFC2251 Result Message No 13 confidentiality required for Address Book query Remedy Have your network administrator confirm the operational status of the server 018 714 Cause An LDAP server protocol error occurred as a result o...

Page 580: ...d register the root CA certificate When the KDC certificate is revoked update the KDC certificate of the server Confirm that the address of the Kerberos server set in the machine and the address on the KDC certificate of the server match 018 732 Cause An LDAP server protocol error occurred as a result of the Address Book operation The server returned RFC2251 Result Message No 32 no such object for...

Page 581: ...he access rights for the LDAP server 018 751 Cause An LDAP server protocol error occurred as a result of the Address Book operation The server returned RFC2251 Result Message No 51 busy for Address Book query Remedy The service has a problem Retry after waiting for a while If the error still is not resolved consult your network administrator 018 752 Cause An LDAP server protocol error occurred as ...

Page 582: ...o object class modifications for Address Book query Remedy The LDAP server has an update problem Have your network administrator confirm the LDAP server status 018 770 Cause An LDAP server protocol error occurred as a result of the Address Book operation The server returned RFC2251 Result Message No 70 results too large for Address Book query Remedy Change the search conditions start position to n...

Page 583: ...18 787 Cause An LDAP server protocol error occurred as a result of the Address Book operation The server returned RFC2251 Result Message No 87 search filter error for Address Book query Remedy Confirm the search conditions set on Address Book If the error still is not resolved consult your network administrator 018 788 Cause An LDAP server protocol error occurred as a result of the Address Book op...

Page 584: ...DAP server status 021 210 021 211 021 212 Cause An error occurred in the smart card reader Remedy Check the connection between the smart card reader and the machine Switch off the machine power make sure that the touch screen is blank and then switch on the machine power If the error still is not resolved the smart card reader may be defective Connect an unbroken smart card reader and execute the ...

Page 585: ...e job finishes and start the next job 021 731 Cause While the EP system is available you attempted to make color copies when the use of color is restricted Remedy Contact Customer Support at dell com contactdell 021 732 Cause The EP system is not available Remedy Contact Customer Support at dell com contactdell 021 733 Cause The EP system is not available because the use of color is restricted or ...

Page 586: ... with the Face Up Down Output setting selected Remedy Specify a paper type that is compatible with the Face Up Down setting 024 702 Cause Paper jam occurred while When Paper Jam Occurs is set to Delete Job in Print Service Settings Remedy Remove the jammed paper and then try printing again 024 742 Cause Booklet printing was specified for printer properties but the number of print pages for the job...

Page 587: ...uery is being submitted to the Address Book the machine s software may be defective Contact customer support 026 702 Cause The number of accesses from the LDAP server to the machine by Address Book operation exceeded the machine s processing capability Remedy Wait for a while and execute the operation again If the error still is not resolved contact Customer Support at dell com contactdell 026 703...

Page 588: ...e Remedy Check the following conditions The USB memory device is inserted into the USB memory slot The USB memory device is accessible from your computer The unencrypted USB memory device is used 026 722 Cause The USB memory device is not initialized Remedy Initialize the USB memory device on a computer with the following file format and then execute the operation again Supported file formats FAT1...

Page 589: ...dress of IPv6 set manually already exists Remedy Change the Manually Configured IPv6 Address on the machine or the IP address of IPv6 on the network device to remove the duplication of addresses 027 447 Cause The IP address of IPv6 already exists Remedy Change the Link local Address for IPv6 on the machine or the IP address of IPv6 on the network device to remove the duplication of addresses 027 4...

Page 590: ...on to transfer data using SMB of the Scan to PC service Remedy Take one of the following measures 1 Confirm the connection of the network cable For communications over subnet confirm the WINS server settings and check whether the server address can be resolved correctly File Sharing service communicating via port 137 UDP port 138 UDP and port 139 TCP is authorized for the Firewall settings of the ...

Page 591: ...e to the SMB server 027 521 Cause The machine failed to transfer data using SMB of the Scan to PC service because the suffix of the name of the file or folder exceeded the limit value Remedy Change the file name or forwarding destination folder of the scan server Or try moving or deleting the files within the forwarding destination folder 027 522 Cause During forwarding using SMB of the Scan to PC...

Page 592: ...ransfer data using SMB of the Scan to PC service because an unexpected error has been received from the SMB server or an unexpected internal error has occurred on the machine Remedy Log into the server from another computer using the same user name to confirm whether a file can be written into the same save location on the server If the error still is not resolved it may be an internal error Conta...

Page 593: ...or An invalid character has been detected in the specified user name Remedy Ask your network administrator to set the user name with valid characters To confirm the user name on the server execute the following procedures 1 Select Start Programs Administrative Tools Active Directory Users and Computers on the Active Directory domain controller where the user information is set 2 Select Active Dire...

Page 594: ... you do not need to change the login password next time 027 588 Cause SMB protocol error The user is invalid Remedy Ask your system administrator to validate the user 027 589 Cause SMB protocol error The user was locked out Remedy Ask your system administrator to cancel the lockout status 027 590 Cause SMB protocol error The user account has expired Remedy Obtain a valid user account from your sys...

Page 595: ...MIME certificate has expired or is an unreliable certificate Remedy Ask the sender to send the e mail with a valid S MIME certificate attached 027 713 Cause The received e mail has been discarded because it may have been altered on its transmission route Remedy Inform this error to the sender and ask the sender to send the e mail again 027 714 Cause The received e mail has been discarded because t...

Page 596: ...rt necessary for the job flow is either deactivated or disabled 2 Attempted to execute a job flow to send e mail using the Encryption or Digital Signature feature while S MIME communication is disabled Remedy For 1 have your system administrator confirm the port status For 2 enable S MIME communication or modify the job flow so that e mail is sent by not using the Encryption or Digital Signature f...

Page 597: ... your network administrator whether the SMTP server supports the HELO command 027 773 Cause An error occurred during communication with the SMTP server Remedy Wait for a while and then execute the operation again 027 774 Cause The specified e mail address contains unsupported characters Remedy Specify the e mail address using only ASCII characters 027 775 Cause Too many destination addresses have ...

Page 598: ...5 033 326 033 327 033 328 033 329 033 330 033 331 033 332 033 333 033 334 033 335 033 336 033 338 033 339 Cause An error occurred Remedy Switch off the machine power make sure that the touch screen is blank and then switch on the machine power If the same message is displayed again contact Customer Support at dell com contactdell 033 500 033 501 Cause An error occurred during fax transmission Reme...

Page 599: ...r a polling document exists at the other machine Whether a document is jammed at the other machine Whether the passwords match 033 512 Cause The other party cannot execute Relay Broadcast Remedy Confirm whether the other party can execute Relay Broadcast 033 513 Cause The other machine does not have the Folder feature Remedy Confirm whether the other machine has the Folder feature 033 514 Cause An...

Page 600: ...in If the error still is not resolved contact Customer Support at dell com contactdell 033 531 Cause Received a command rejection signal Remedy Confirm the condition of the other machine memory is full paper has run out or other conditions and execute the operation again 033 532 033 533 Cause An error occurred during fax transmission Remedy Execute the operation again If receiving ask the sender t...

Page 601: ...e does not have confidential or relay function The F code sent from the other machine contains an instruction for a function not supported by the machine Remedy If necessary check whether the sender entered an invalid F code 033 554 Cause The password was omitted or did not match in fax communication Remedy No measure is required 033 555 Cause The password received from the other machine did not m...

Page 602: ... during communication Remedy Wait for a while confirm the Fax service settings and the fax number and then send again if sending If the error still is not resolved contact Customer Support at dell com contactdell 033 571 Cause The Fax service is not available from a reason such as insufficient memory Remedy Cancel the fax data in the queue or wait for a while and execute the operation again 033 57...

Page 603: ... a manual print operation Remedy No measure is required The machine will automatically start the auto print job after manual printing completes 033 731 Cause The printing of the received fax document was interrupted Remedy The auto print processing of the received fax document was interrupted by a manual print operation No measure is required 033 733 Cause An error occurred during fax transmission...

Page 604: ...f the machine power make sure that the touch screen is blank and then switch on the machine power Try again If the error still is not resolved contact Customer Support at dell com contactdell 033 751 Cause An activity report output occurred during the printer lockout duration Outputting the activity report was suspended because the machine was in the Sleep mode Remedy No measure is required becaus...

Page 605: ...ayed again contact Customer Support at dell com contactdell 073 310 073 311 Cause An error occurred in Tray 3 Remedy Switch off the machine power make sure that the touch screen is blank and then switch on the machine power If the same message is displayed again contact Customer Support at dell com contactdell 074 310 074 311 Cause An error occurred in Tray 4 Remedy Switch off the machine power ma...

Page 606: ...ouch screen is blank and then switch on the machine power If the same message is displayed again pull out the drum cartridge K and the toner cartridge C cyan and then insert them again If the error still is not resolved contact Customer Support at dell com contactdell 092 321 Cause Density of Black color is low Drum cartridge or toner cartridge may not be set properly Remedy Switch off the machine...

Page 607: ...ch off the machine power make sure that the touch screen is blank and then switch on the machine power If the same message is displayed again contact Customer Support at dell com contactdell 116 340 116 341 Cause An error occurred in the machine Remedy Switch off the machine power make sure that the touch screen is blank and then switch on the machine power If the same message is displayed again c...

Page 608: ... 116 385 Cause An error occurred Remedy Switch off the machine power make sure that the touch screen is blank and then switch on the machine power If the same message is displayed again contact Customer Support at dell com contactdell 116 386 Cause The fax cable is not connected correctly Remedy Connect the cable securely and then switch off the machine power make sure that the touch screen is bla...

Page 609: ...hen reading data on the media Remedy Check whether the media is inserted correctly 116 710 Cause The correct document size could not be judged because the receive data exceeded the HP GL 2 spool size Remedy Increase the size assigned to HP GL 2 auto layout memory 116 713 Cause The data has been divided into a number of jobs because of insufficient disk space Remedy Delete unnecessary data from the...

Page 610: ...ormal condition or change the Banner sheet tray 116 751 Cause The process has been canceled because the hard disk is full Remedy Delete stored data in the hard disk If the error still is not resolved split the file and send the job again 116 752 Cause The descriptions of the PDF or XPS printing job ticket have a problem Remedy Execute the operation again If the error still is not resolved contact ...

Page 611: ... and the device connected Remedy Switch off the machine power make sure that the touch screen is blank and then switch on the machine power If the same message is displayed again contact Customer Support at dell com contactdell 121 333 Cause An error occurred between the machine and the device connected Remedy Confirm that the device is switched on and then switch off the machine power make sure t...

Page 612: ...3 377 123 379 123 380 123 381 123 382 123 383 123 384 123 389 123 390 123 392 123 393 123 395 123 396 123 397 123 398 123 399 Cause An error occurred in the machine Remedy Switch off the machine power make sure that the touch screen is blank and then switch on the machine power If the same message is displayed again contact Customer Support at dell com contactdell Status Code Cause and Remedy ...

Page 613: ...1 124 342 124 343 124 344 124 345 124 346 124 347 124 348 124 349 124 350 124 351 124 352 124 353 124 360 124 361 124 362 124 363 124 372 124 373 124 374 124 380 124 381 Cause An error occurred in the machine Remedy Switch off the machine power make sure that the touch screen is blank and then switch on the machine power If the same message is displayed again contact Customer Support at dell com c...

Page 614: ...edy Disconnect the print server cable and then securely insert the cable into the connector Switch off the machine power make sure that the touch screen is blank and then switch on the machine power 127 213 Cause A communication error occurred between the machine and the Print Server Remedy Update the machine and the Print Server software to the latest versions 127 220 127 221 Cause A communicatio...

Page 615: ...n the machine power If the error still is not resolved contact Customer Support at dell com contactdell 133 710 Cause When printing the received fax document the paper loaded on the bypass tray was used for printing because the specified tray could not be used Remedy Take one of the following measures Load paper available for printing the received fax document B5 LEF A4 SEF A5 SEF B5 SEF 8 5 x 11 ...

Page 616: ...en immediately switch the main power and power off make sure that the touch screen is blank and then contact Customer Support at dell com contactdell Completed with an error xxx yyy Cause An error occurred and the operation terminated abnormally Remedy Execute the operation again A fault has occurred The machine has rebooted Select Close If the problem persists call for service xxx yyy Cause An au...

Page 617: ...erence section for the procedures to clear a paper jam in each location Paper Jams in Trays 1 to 4 617 Paper Jams in Tray 5 Bypass 619 Paper Jams in Fusing Unit 620 Paper Jams in Duplex Module 621 Paper Jams in Finisher AB1 622 Paper Jams in H Transport Unit 623 Note When a paper jam occurred if you pull out a paper tray without checking the paper jam location the jammed paper may be torn and the ...

Page 618: ...ng pieces of paper 5 Close the right hand cover Note When closing the right hand cover apply your hand in the vicinity of the handle as shown in the illustration and then press the cover firmly toward the printer 6 Pull out the tray where the paper jam occurred 7 Removed the jammed paper ...

Page 619: ...ypass The following describes how to clear paper jams occurring in Tray 5 1 Remove any paper loaded on or jammed in the Tray 5 2 Close the Tray 5 3 Raise the latch on the handle of the right hand cover to open the cover 4 Remove any remaining pieces of paper jammed in the Tray 5 ...

Page 620: ... cover firmly toward the printer Paper Jams in Fusing Unit The following describes how to clear paper jams occurring in the fusing unit Note To prevent electric shock always turn off the printer and disconnect the power cable from the grounded outlet before performing maintenance To avoid burns do not clear paper jams immediately after printing The fusing unit becomes extremely hot during use 1 Ri...

Page 621: ...per 4 Replace the inner part 5 Close the right hand cover Note When closing the right hand cover apply your hand in the vicinity of the handle as shown in the illustration and then press the cover firmly toward the printer Paper Jams in Duplex Module The following describes how to clear paper jams occurring in the duplex module 1 Open the right hand cover ...

Page 622: ...n the vicinity of the handle as shown in the illustration and then press the cover firmly toward the printer Paper Jams in Finisher AB1 The following describes how to clear paper jams occurring in the Finisher AB1 optional 1 Make sure that the machine is not operating and open the finisher front cover 2 Rotate the knob clockwise and remove the jammed paper from the paper exit of the finisher ...

Page 623: ...5 Close the finisher front cover Paper Jams in H Transport Unit The following describes how to clear paper jams occurring in the H Transport Unit accessory for optional Finisher AB1 1 Grasp the top cover handle of the finisher and open the cover 2 Remove the jammed paper 3 Close the top cover of the finisher ...

Page 624: ...the document feeder and then open the cover until it stops Note When you fully open the cover it enters a fixed position Open the cover gently 2 If the document is not caught in the entry of the document feeder pull out the document 3 If the massage on the screen instructs you to turn the knob turn the knob to eject the document upward Note If the document is caught do not pull it out forcibly The...

Page 625: ...e and then close the document feeder 9 If you still cannot find the document in step 8 lift the document feeder tray and remove the document 10 Return the document feeder tray gently 11 Make sure that the document is not torn wrinkled or folded and then load the document again following the instructions displayed on the touch screen Note After removing the jammed document reload the entire documen...

Page 626: ...d or staples are bent Contact Customer Support at dell com contactdell if the problem persists after you have tried the following solutions If copies are stapled as shown in the figures below contact Customer Support at dell com contactdell Unstapled Bent Staple One side of staple rising up Staple bent in reverse direction Flattened staple Entire staple rising up Staple rising up with center press...

Page 627: ...t cover 2 Take the staple cartridge out of the machine Note The staple cartridge is firmly inserted A slight force is required to pull the cartridge out of the finisher 3 After you take out the staple cartridge check inside of the finisher for any remaining staples 4 Pull up the metal part of the staple cartridge as shown in the illustration 5 Remove the jammed staples 1 and then return the metal ...

Page 628: ...into place 7 Close the finisher front cover Note If the finisher front cover is not completely closed a message will appear and the machine remains paused If you cannot remove jammed staples even after you perform the above procedure contact our Customer Support at dell com contactdell ...

Page 629: ...23 Install Operation for Eco copy My Forms This chapter describes how to install Eco copy and My Forms to the machine Before Installation 630 Installation Procedures 634 About License 638 ...

Page 630: ...nel 2 Enter the system administrator s user ID with the numeric keypad or the keyboard displayed on the screen and select Enter Note The default user ID is admin The default passcode is 1111 3 Select Tools on the Home screen Items Required Settings Refer to SOAP Port Port Status Enabled Port Number 80 SOAP Port P 631 Protocol Settings IP address subnet mask and gateway address settings for the use...

Page 631: ...ings for the use in TCP IP network environment 2 Select Close 3 To exit Tools select Close Web Browser Setup 1 Select Web Applications Version in Web Browser Setup under System Settings and then select Change Settings 2 Select V4 New Version and then select Save 3 Select Close 4 To exit Tools select Close Login Type 1 Select Login Type in Authentication under Authentication Security Settings 2 Sel...

Page 632: ...y Forms require HTTP SSL TLS communication between a network connected computer and the machine Follow the below steps to enable HTTP SSL TLS communication 1 Start a web browser 2 Enter the machine s IP address into the address box on the browser and then press the Enter key Connection to Dell Printer Configuration Web Tool is established Note During connection operation a pop up screen for user I...

Page 633: ...wser 7 Select the Properties tab to click Security SSL TLS Settings and then select the Enabled check box for HTTP SSL TLS Communication 8 Click Apply 9 When the web browser shows the machine reboot message click Reboot Machine 10 Click OK on the confirmation pop up The machine reboots and the settings are enabled ...

Page 634: ...erprise x64 Service Pack 1 Microsoft Windows 8 Pro Microsoft Windows 8 Pro x64 Microsoft Windows 8 Enterprise Microsoft Windows 8 Enterprise x64 Installation Install Eco copy My Forms to your machine Note During machine operation or jobs in progress installation process cannot be started In this case wait for a while and then start installation During installation process machine operation is out ...

Page 635: ...1 5 Enter the system administrator s user ID and password and then click Next 6 Click Next 7 Click Finish Note Several minutes may take before the installation process completes To install the feature to another machine in succession select the check box on the screen and then click Finish You can start from step 3 ...

Page 636: ...e installation tool 2 Click Next 3 Enter the IP address or hostname of your machine and then click Next Example 192 0 2 1 4 Enter the system administrator s user ID and password and then click Next 5 Select Reinstall for version upgrade or Remove for uninstallation and then click Next Note Settings you made for using the My Forms service will not be reset by reinstalling or uninstalling the servic...

Page 637: ...tribution if any must include the following acknowledgment This product includes software developed by the Apache Software Foundation http www apache org Alternately this acknowledgment may appear in the software itself if and wherever such third party acknowledgments normally appear 4 The names Xerces and Apache Software Foundation must not be used to endorse or promote products derived from this...

Page 638: ...OF ANY KIND either express or implied See the License for the specific language governing permissions and limitations under the License Apache License Version 2 0 January 2004 http www apache org licenses TERMS AND CONDITIONS FOR USE REPRODUCTION AND DISTRIBUTION 1 Definitions License shall mean the terms and conditions for use reproduction and distribution as defined by Sections 1 through 9 of th...

Page 639: ...cuously marked or otherwise designated in writing by the copyright owner as Not a Contribution Contributor shall mean Licensor and any individual or Legal Entity on behalf of whom a Contribution has been received by Licensor and subsequently incorporated within the Work 2 Grant of Copyright License Subject to the terms and conditions of this License each Contributor hereby grants to You a perpetua...

Page 640: ...Unless You explicitly state otherwise any Contribution intentionally submitted for inclusion in the Work by You to the Licensor shall be under the terms and conditions of this License without any additional terms or conditions Notwithstanding the above nothing herein shall supersede or modify the terms of any separate license agreement you may have executed with Licensor regarding such Contributio...

Page 641: ...nt syntax for the file format We also recommend that a file or class name and description of purpose be included on the same printed page as the copyright notice for easier identification within third party archives Copyright yyyy name of copyright owner Licensed under the Apache License Version 2 0 the License you may not use this file except in compliance with the License You may obtain a copy o...

Page 642: ...L Project 6 Redistributions of any form whatsoever must retain the following acknowledgment This product includes software developed by the OpenSSL Project for use in the OpenSSL Toolkit http www openssl org THIS SOFTWARE IS PROVIDED BY THE OpenSSL PROJECT AS IS AND ANY EXPRESSED OR IMPLIED WARRANTIES INCLUDING BUT NOT LIMITED TO THE IMPLIED WARRANTIES OF MERCHANTABILITY AND FITNESS FOR A PARTICUL...

Page 643: ...th the distribution 3 All advertising materials mentioning features or use of this software must display the following acknowledgement This product includes cryptographic software written by Eric Young eay cryptsoft com The word cryptographic can be left out if the rouines from the library being used are not cryptographic related 4 If you include any Windows specific code or a derivative thereof f...

Page 644: ...laimer and this list of conditions 2 Redistributions in binary form must reproduce the above copyright notice definition disclaimer and this list of conditions in documentation and or other materials provided with the distribution 3 Altered versions including but not limited to ports to new operating systems existing ports with new graphical interfaces and dynamic shared or static library versions...

Page 645: ...sed by the zlib library is described by RFCs Request for Comments 1950 to 1952 in the files ftp ds internic net rfc rfc1950 txt zlib format rfc1951 txt deflate format and rfc1952 txt gzip format The zlib compression library provides in memory compression and decompression functions including integrity checks of the uncompressed data This version of the library supports only one compression method ...

Page 646: ...ed to compiled object code generated documentation and conversions to other media types Work shall mean the work of authorship whether in Source or Object form made available under the License as indicated by a copyright notice that is included in or attached to the work an example is provided in the Appendix below Derivative Works shall mean any work whether in Source or Object form that is based...

Page 647: ... such litigation is filed 4 Redistribution You may reproduce and distributecopies of the Work or Derivative Works thereof in any medium with or without modifications and in Source or Object form provided that You meet the following conditions a You must give any other recipients of the Work or Derivative Works a copy of this License and b You must cause any modified files to carry prominent notice...

Page 648: ...ing negligence contract or otherwise unless required by applicable law such as deliberate and grossly negligent acts or agreed to in writing shall any Contributor be liable to You for damages including any direct indirect special incidental or consequential damages of any character arising as a result of this License or out of the use or inability to use the Work including but not limited to damag...

Page 649: ... You may obtain a copy of the License at http www apache org licenses LICENSE 2 0 Unless required by applicable law or agreed to in writing software distributed under the License is distributed on an AS IS BASIS WITHOUT WARRANTIES OR CONDITIONS OF ANY KIND either express or implied See the License for the specific language governing permissions and limitations under the License ...

Page 650: ...23 Install Operation for Eco copy My Forms 650 ...

Page 651: ...24 Using Eco copy This chapter describes the basic operations and features for the Eco copy service About Eco copy 652 Eco copy Procedure 653 Problem Solving 655 Notes and Restrictions 656 ...

Page 652: ...quired Eco copy also allows you to copy to the reverse side of the paper This will reduce the number of sheets of paper required by half By selecting both 4 copies per sheet and printing on both sides of the paper it will allow you to save up to 7 of 8 pieces of paper normally required At the end of each copy job Eco copy will generate a report of the estimated number of pages you have saved Eco c...

Page 653: ...nd select OK 4 Select the number of pages per sheet or select Next Note Choosing 2 pages per sheet saves up to half the number of the pages used Choosing 4 pages per sheet can further save up to 75 of the paper normally required The more pages you put on a sheet the more paper you can save 5 Select Start Copy To change other settings select Edit When Edit is selected Change other settings and sele...

Page 654: ...24 Using Eco copy 654 6 Select Close Note When paper is saved from printing the number of sheets of paper saved will be displayed ...

Page 655: ...he detailed information 1 Select Eco copy on the Home screen 2 Press the Dial Pause button on the control panel for over five seconds 3 View the information on the screen 4 Note the information 5 Select Close Symptom Cause and Remedy Text is too small to be readable Select a larger paper size or print fewer pages per sheet The original is printed on both sides but only the front side of the origin...

Page 656: ...re not supported in conjunction with Eco copy even when the finisher is installed Priority on Scratch Paper When you specify 1 sided print and scratch paper is loaded on a tray scratch paper will be used for printing Paper Size The paper size is restricted to 8 5 x 11 letter A series such as A4 and B series such as B4 Paper Size Default The default paper size is based on the contents of Tray 1 ...

Page 657: ...25 Using My Forms This chapter describes the basic operations and features for the My Forms service About My Forms 658 Setup 659 Using My Forms 660 Problem Solving 661 Notes and Restrictions 662 ...

Page 658: ...can be organized into eight folders No 191 to 198 for easy access Storing forms in the machine simplifies location and retrieval without the trouble of looking them up on a drive personal or shared computer each time you need to print If a file server is unavailable due to a network failure you can still print forms stored on the machine In addition the machine allows you to temporarily store prin...

Page 659: ...er on the Machine You can store files in a folder on the machine in the following ways Storing to a folder using a print driver You can store files using the print driver 1 Click the Properties button on the print driver 2 Click the Paper Output tab 3 Select Store in Remote Folder from Job Type 4 Click the Setup button 5 Enter a value from 191 to 198 in Folder Number Note Do not enter any value in...

Page 660: ...on the machine 1 Select My Forms 2 Select a folder on the Home screen of My Forms 3 Select a file and select Print Note To check the details of the file select To go back to the Home screen of My Forms select Home When is selected Check the details of the file and change the quantity if necessary Then select Confirm Note To delete the file select Delete This File To return to the previous screen s...

Page 661: ...rmation on the screen 4 Note the information 5 Select Close Symptom Remedy An authentication popup is shown when a folder is selected Check the following administrator level settings If Check Folder Passcode is On Select Tools Setup Create Folder and make sure that Check Folder Passcode are all set to Off under Folder 191 to 198 If Retrieve Files from Folder is Locked Select Tools Authentication S...

Page 662: ...ng this period if the user tries to print the file again there will be a warning message displayed When the file is deleted and the user selects the File Details of that file a warning message will also be displayed The file will not be shown on the list after this warning message is closed To confirm that the file is deleted select Home and then select that folder The file will not be shown on th...

Page 663: ...405 Accounting Billing Device Settings 405 Activity Report 45 261 306 Add Address Book Entry 390 Add Domain Name to User Name 344 Add Fax Comment 397 Add Me to CC Field 370 Add Me to To Field 370 adding originals 118 additional feature buttons 45 Address Book 264 265 Address Type 392 Adjust Color Registration 307 Adjust Paper Registration 307 adjusting color balance 80 adjusting contrast 78 adjust...

Page 664: ...for Build Job 160 Center Erase Binding Edge Erase 320 center output tray 30 Certificate Revocation Retrieval Settings 343 344 Change Quantity 180 changing a job flow sheet 148 changing a stored program name 157 changing the orientation of images 97 changing the paper type 214 Chapter Start 116 Charge Print 187 Charge Print Jobs 406 Charge Rate Per Unit 405 Charge Private Print Settings 412 Check F...

Page 665: ...deleting a job flow sheet 390 deleting Charge Print jobs 189 deleting Delayed Print jobs 187 deleting outside or inside of the selected area 121 deleting Private Charge Print jobs 191 deleting Sample Set jobs 185 deleting Secure Print jobs 183 deleting stored jobs 182 deleting stored programs 157 Dell Printer Configuration Web Tool 418 430 Device Access 409 Digital Signature 464 471 Direct Fax 364...

Page 666: ...n Default 359 Fax Service Settings 359 Feature Access 399 File Format 353 Files Retrieved By Client 371 Fine tune 100 321 Finisher AB1 31 227 622 627 First Tab 352 Folder List 266 Folder Name 382 Folder Report 306 Folder Selector List 264 Folder Selector Setup 364 365 Folder Service Settings 371 Font List 263 front cover 30 FTP 326 455 FTP client port 456 fusing unit 31 620 G G3 366 G3 Line 1 Dial...

Page 667: ...th Insufficient Credit 406 jobs manageable by Account Administration 497 K Kerberos Server Settings 335 Keyboard Input Restriction 311 knob 31 33 L Language 45 300 Language of the Original 355 laser scanner 240 Last Original 179 Layout Adjustment 83 LDAP Server Directory Service 336 left cover 33 left tray 32 license 22 Lighten Darken 75 78 318 360 Lighten Darken default value 353 Lighten Darken S...

Page 668: ...Media Print Service Settings 373 media print trouble 551 552 Memory Full Procedure 321 356 364 message field 43 messages 553 Microsoft Network 437 Minimum Passcode Length 412 Mirror Image 96 Mixed Size Originals 89 319 354 360 Mixed Sized Originals 2 Sided Copy 321 Mixed Sized Originals Scan Mode 364 Multiple sheet inserter Bypass 31 Multi poll Report 268 N Negative Image 96 NetWare 325 434 networ...

Page 669: ...38 Power Saver Timers 297 power switch 31 Preset Repeat Image 107 Print Delete Confirmation Screen 371 Print Area 347 Print Delivery Confirmation Mail 369 Print Error Notification E mail 368 Print Job Confirmation Screen 375 Print Login Name on PDF Files 358 Print Mode 45 269 Print Order for All Selected Files 375 Print Reports 260 305 Print Service Settings 345 Print User ID 349 Printer Lockout 2...

Page 670: ... MIME 449 S MIME certificate 392 S MIME Settings 341 Sample Job 117 320 Sample Set 184 Saturation 78 319 357 Save as Charge Print 414 Save as Private Charge Print 414 Save Deleted Faxes 362 Save Undelivered Faxes 362 Saved Faxes Auto Delete 362 saving the scanned data 140 Scan Ahead for Copy Job 406 Scan Defaults 353 Scan File Transfer Report 306 Scan Reports 263 Scan Service Settings 352 Scan to ...

Page 671: ...nd Link 452 461 Store Send Link Subject 354 Store to Folder 452 Store to USB 452 458 Store User Details 404 Stored File List 261 Stored File Manager 3 140 Stored File Settings 374 Stored Job Expiration Date 374 Stored Programming Tone 299 Subnet mask 445 Substitute Tray 347 Supplies 274 supported frame types 427 supported interfaces 427 supported operating systems 428 System Administration mode 28...

Page 672: ...D STATES GOVERNMENT RESTRICTED RIGHTS 2 Unregistered Forms 348 UPnP Discovery 324 URL File Expiration 358 USB 324 429 USB connector device 32 USB connector host 32 Use of Smart Card 411 User Account Billing Information 276 User Authentication 507 User Details Setup 411 User ID 280 User ID for Login 411 User Name 393 399 User Name for FTP Scan 355 User Role 400 V Verify User Details 403 W waste ton...

Page 673: ...www dell com dell com support KB3211EN0 4 ...

Reviews: