(3)
Repeat the procedures of (1) and (2) to specify the number of copies for each
photo.
Note
Other options
To change the display of photos, see
Changing the Display
.
To crop a part of photo (Trimming), see
Cropping a Part of Photo / Searching Photos by a
Specified Date
.
To search photos by a specified date (Search), see
Cropping a Part of Photo / Searching
Photos by a Specified Date
.
(4)
Press the
OK
button.
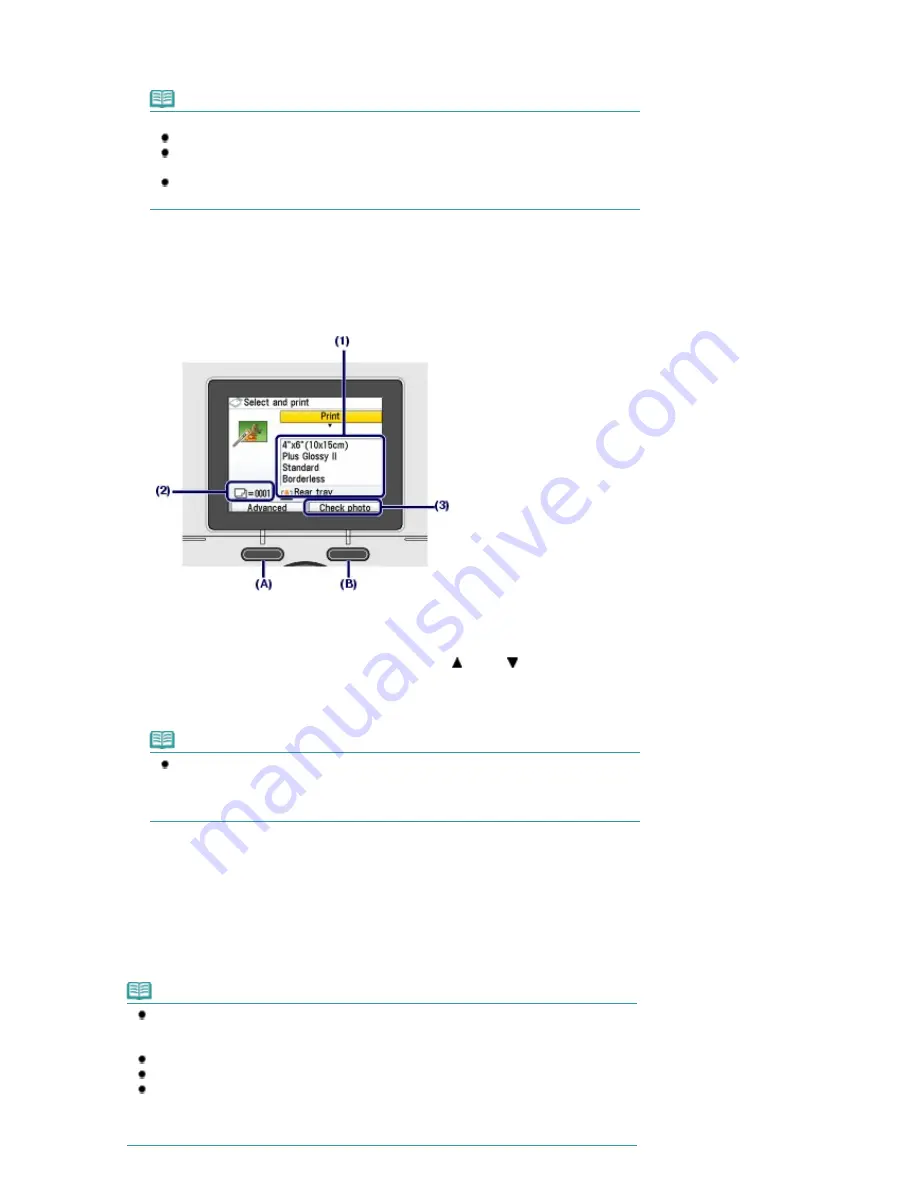
The print confirmation screen appears.
4.
Start printing.
(1)
Confirm the page size, media type, print quality, etc.
Here we confirm that 4"x6"(10x15cm) is selected for Page size and the type of loaded photo paper for
Media type.
To change the settings, use the
Easy-Scroll Wheel
or the
(Up) or
(Down) button to select the item to
change, and press the
OK
button.
See
Selecting Setting Items
and
Setting Items
.
Note
When Plain paper is selected for Media type and A4 or 8.5"x11"(LTR) for Page size,
Cassette appears for Paper source.
When other sizes or types of paper are selected, Rear tray appears.
Confirm that the selected paper is loaded in the correct paper source.
(2)
Confirm the number of sheets to be used for printing the selected photos.
(3)
Press the right
Function
button (B) to select Check photo, and confirm the
selected photos and number of copies for each photo.
Press the
OK
button to return to the print confirmation screen.
(4)
Press the
Color
button.
The machine starts printing photos.
Note
You can correct photos automatically or manually, if you press the left
Function
button (A) to
select Advanced. By default, the machine is set to correct photos automatically.
See
Using Various Functions
.
Press the
Stop
button to cancel printing.
Printing does not start if you press the
Black
button.
You can display the Memory card menu and select other useful printing functions, if you press
the
Back
button after printing is completed.
If you press the
HOME
button or remove the memory card, the
HOME
screen appears.
To remove the memory card, see
Removing the Memory Card
.
Page 16 of 947 pages
Printing Photos Saved on the Memory Card
Summary of Contents for MP980 series
Page 18: ...Page top Page 18 of 947 pages Printing Photos Saved on the Memory Card ...
Page 29: ...Page top Page 29 of 947 pages Making Copies ...
Page 62: ...Page top Page 62 of 947 pages Printing Documents Macintosh ...
Page 75: ...Page top Page 75 of 947 pages Loading Paper ...
Page 100: ...Page top Page 100 of 947 pages When Printing Becomes Faint or Colors Are Incorrect ...
Page 103: ...Page top Page 103 of 947 pages Examining the Nozzle Check Pattern ...
Page 105: ...Page top Page 105 of 947 pages Cleaning the Print Head ...
Page 107: ...Page top Page 107 of 947 pages Cleaning the Print Head Deeply ...
Page 159: ...Page top Page 159 of 947 pages Selecting a Photo ...
Page 161: ...Page top Page 161 of 947 pages Editing ...
Page 163: ...Page top Page 163 of 947 pages Printing ...
Page 240: ...Page top Page 240 of 947 pages Attaching Comments to Photos ...
Page 244: ...See Help for details on each dialog box Page top Page 244 of 947 pages Setting Holidays ...
Page 317: ...Page top Page 317 of 947 pages Setting Paper Dimensions Custom Size ...
Page 332: ...Page top Page 332 of 947 pages Printing with ICC Profiles ...
Page 468: ...Printing Photos Sending via E mail Editing Files Page top Page 468 of 947 pages Saving ...
Page 520: ...taskbar and click Cancel Printing Page top Page 520 of 947 pages Print Document Dialog Box ...
Page 746: ...Page top Page 746 of 947 pages Printing with Computers ...
Page 780: ...Page top Page 780 of 947 pages If an Error Occurs ...
Page 870: ...Page top Page 870 of 947 pages Before Printing on Art Paper ...
Page 882: ...Before Installing the MP Drivers Page top Page 882 of 947 pages Installing the MP Drivers ...


