Chapter 1
1-117
1.1.7.1.34 Specifications for Copy Card Reader-F1
0031-5633
[ Manual-related ]
Description
Please explain specifications of the Copy Card Reader-F1.
Field Remedy
Copy Card Reader-F1
[Caution]
- If the Copy Card Reader-F1 is attached to the machine, a control card must be inserted in advance to operate it. The control card is used for the Device ID Man-
agement. If the control card is removed, the machine cannot be operated until the control card is inserted again.
- If a login service other than Department ID Management is used, the Limit Functions mode will not be available.
- If the Server Authentication user authentication system of SSO-H is set as the login service (including when performing Server Authentication with the "Server
Authenti Local Device Authentication" user authentication system), you cannot use the Copy Card Reader-F1.
[Reference]
- If the Status Monitor/Cancel screen does not appear on the touch panel display when the control card is inserted, check following points.
Is the control card inserted in the correct direction?
Is the control card inserted as far as it can go?
Is an unusable control card inserted?
(For example, a damaged card or card prohibited from use.)
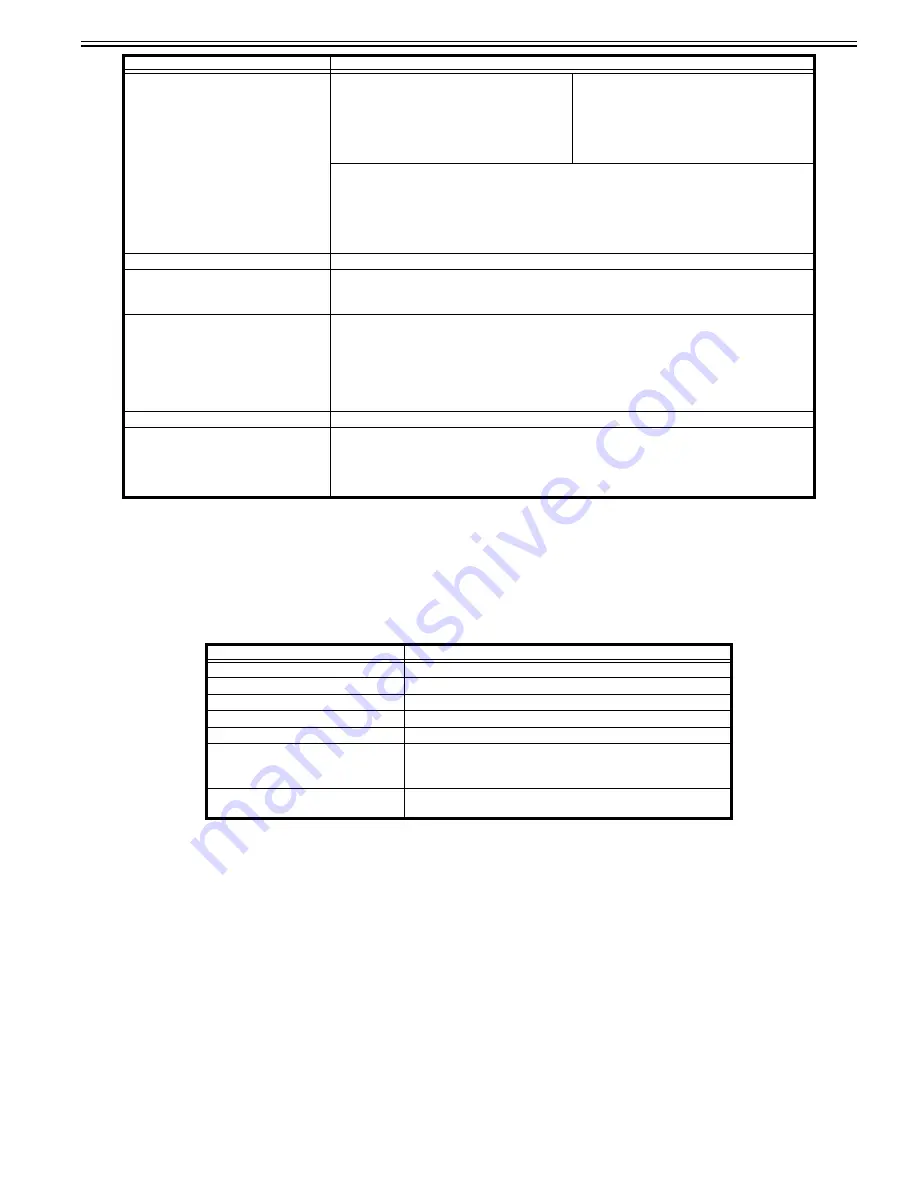
- If the Copy Card Reader-F1 is attached, the cards shown here can be used. They can manage up to 1,000 departments.
Power Consumption
Maximum Power Consumption:
3,520W or less
Power Consumption:
When in the Sleep mode:
1Wh
Maximum Power Consumption:
1,560W + 2,500W or less
Power Consumption:
When in the Sleep mode:
1.5Wh
When the main power switch is turned OFF:
"Quick Startup Settings for Main Power" is set to "OFF" : 0.5 Wh
"Quick Startup Settings for Main Power" is set to "ON" : 1.0 Wh
* The power consumption may vary, depending on the environment and conditions under which the machine is
being used.
Memory Capacity
Standard: 3.5 GB (1.5+2 GB)
Hard Disk Capacity
Standard: 1TB (Used space: 1TB)
* The hard disk capacity is subject to change in future release.
Dimensions (H x W x D)
1,424mm *1 x 1,530mm *2 x 934mm (56 1/8" *1 x 60 1/4" *2 x 36 3/4")
(when the Duplex Color Image Reader Unit-H1 and the Upright Control Panel-D1 are attached.)
*1 To the top of the Upright Control Panel-D1 in the standard position.
*2 To the right edge of the Upright Control Panel-D1 in the standard position.
Weight (Including the toner bottle)
Approximately 316kg (697 lb)
Installation Space (W x D)
1,952mm x 934mm (76 7/8" x 36 3/4")
(When the Output Tray-A1, the Duplex Color Image Reader Unit-H1 and the Upright Control
Panel-D1 are attached)
Item
Specifications
Available Cards
Magnetic
Card Readout Method
Magnetic readout
Magnetic Card Reading Direction
Inserting Direction
Store/Replay
Replay
Power Source
From the main unit
Dimensions (H x W x D)
40mm x 88mm x 96mm (1 5/8" x 3 1/2" x 3 3/4")
(excluding the attachment kit and cable)
Weight
Approximately 200g (7.1 oz )
(including the attachment kit and cable)
Item
Specifications
Summary of Contents for imagePRESS C800 Series
Page 1: ...Dec 2 2014 Troubleshooting Guide imagePRESS C800 Series...
Page 2: ......
Page 6: ......
Page 8: ......
Page 9: ...Chapter 1 Correcting Faulty Images...
Page 10: ......
Page 14: ......
Page 114: ...Chapter 1 1 100 7 2 Select the envelope type press OK...
Page 165: ...Chapter 1 1 151 3 Pull the Tray all the way out...
Page 167: ...Chapter 1 1 153 5 Remove the Waste Toner Container...
Page 172: ...Chapter 1 1 158 2 Pull out the staple cartridge holding it by the green tab...
Page 180: ...Chapter 1 1 166 5 Push in the new staple case until it clicks to insert it...
Page 181: ...Chapter 1 1 167 6 Close the Cover for the saddle stitch staple cartridge...
Page 199: ...Chapter 1 1 185 b 1 Take out the Waste Toner Container 1...
Page 201: ...Chapter 1 1 187 b 2 Install the Waste Toner Joint 1 to the Waste Toner Container 2...
Page 206: ...Chapter 1 1 192 b 9 Remove the Prism 1 1 Screw 2 1 Hook 3...
Page 207: ...Chapter 1 1 193 b 10 Clean the toner adhered to the 2 A parts on the prism...
Page 208: ...Chapter 1 1 194 b 11 Clean the toner adhered to the A part of the Waste Toner Container...
Page 210: ...Chapter 1 1 196 2 Pull out the punch waste tray...
Page 217: ...Chapter 1 1 203 3 Discard the staple waste...
Page 239: ...Chapter 1 1 225 3 Press Memory Media 4 Select the target memory media...
Page 250: ...Chapter 1 1 236 Select Share files and folders using SMB Windows Select the account to be used...
Page 255: ...Dec 2 2014...
Page 256: ......


