Chapter 1
1-102
- Use only Transparencies intended for use with this machine. If you use other Transparencies, you may cause damage to the machine.
- It is recommended that output Transparencies are immediately removed from the output tray to avoid folding of the Transparencies and paper jams.
- Return the remaining Transparencies to their original package for storage, avoiding locations subject to high temperatures and humidity. Leaving Transparencies
loaded for an extended period of time may cause the sheets to stick together and result in a paper jam.
- Leaving transparencies loaded for an extended period of time may cause the sheets to stick together and result in difficulties feeding the transparencies. In this
case, fan the loaded transparency sheets, or if you have loaded 100 or more sheets, reduce the number of sheets or use new Transparencies.
- When printing on Transparencies, depending on the type of image, the image may become dense. When this happens, adjust the density for the output image.
[Reference]
- You can load up to 250 sheets of Transparencies in a paper source other than the Stack Bypass-B1.
- If a paper jam occurs, fan the loaded transparency sheets well.
1.1.7.1.20 How to load tab paper
0031-5494
[ Manual-related ]
Description
Please explain how to load tab paper.
Field Remedy
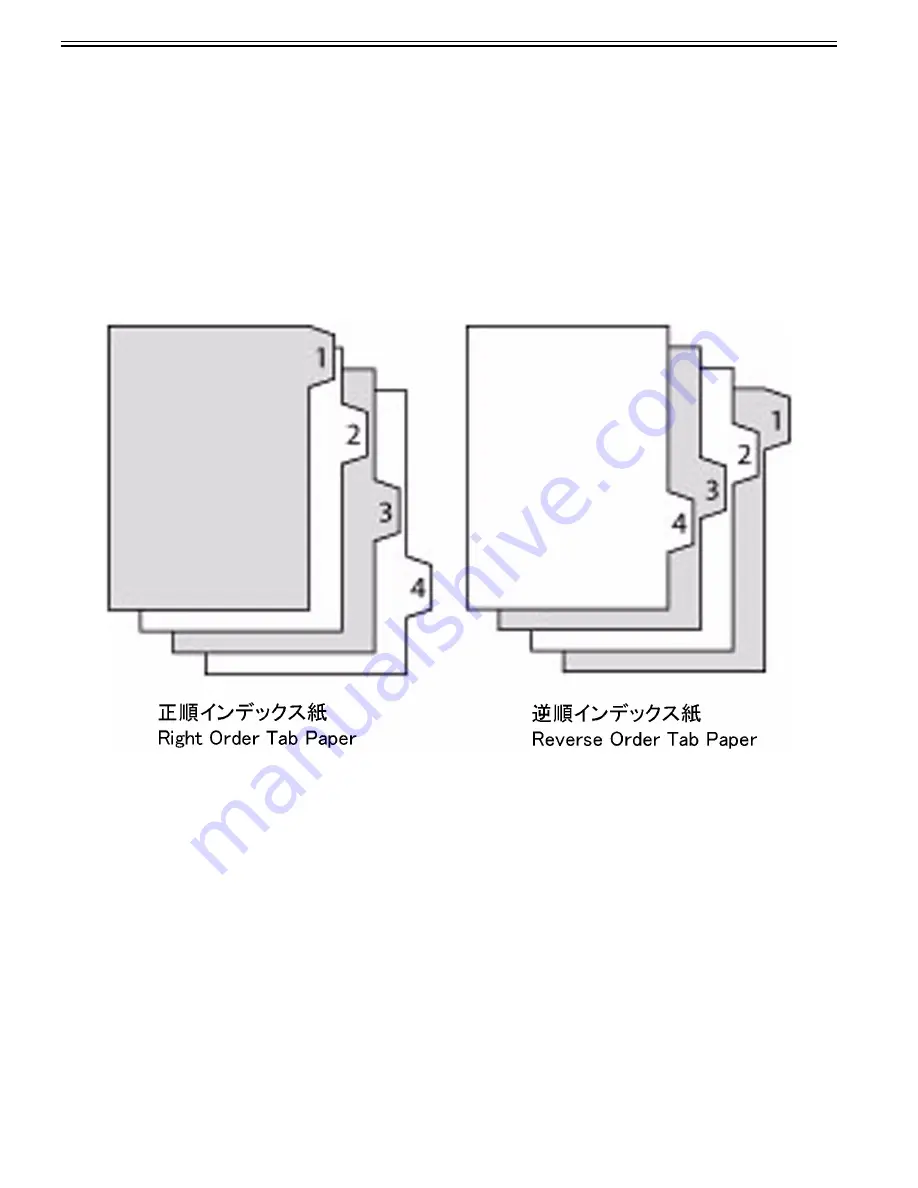
[Reference] There are two kinds of tab paper: right order tab paper and reverse order tab paper. Use these types as necessary.
The direction to load tab paper is different depending on the pickup location.
- Paper Drawer/Document Insertion Unit-M1: [A] Load reverse order tab paper face down with the tabs to the left side.
[Caution]
- When loading tab paper into the paper drawer, the tab feeding Attachment-F1 is required.
- You can use tab paper set in the Document Insertion Unit-M1 for Add Cover, Insert sheets or Job Separator. You cannot make copies or prints on tab paper that
is loaded in the Document Insertion Unit-M1.
- Stack Bypass-B1/POD Deck Lite-B1/Multi-drawer Paper Deck-B1: [B] Load right order tab paper face up with the tabs to the right side.
Summary of Contents for imagePRESS C800 Series
Page 1: ...Dec 2 2014 Troubleshooting Guide imagePRESS C800 Series...
Page 2: ......
Page 6: ......
Page 8: ......
Page 9: ...Chapter 1 Correcting Faulty Images...
Page 10: ......
Page 14: ......
Page 114: ...Chapter 1 1 100 7 2 Select the envelope type press OK...
Page 165: ...Chapter 1 1 151 3 Pull the Tray all the way out...
Page 167: ...Chapter 1 1 153 5 Remove the Waste Toner Container...
Page 172: ...Chapter 1 1 158 2 Pull out the staple cartridge holding it by the green tab...
Page 180: ...Chapter 1 1 166 5 Push in the new staple case until it clicks to insert it...
Page 181: ...Chapter 1 1 167 6 Close the Cover for the saddle stitch staple cartridge...
Page 199: ...Chapter 1 1 185 b 1 Take out the Waste Toner Container 1...
Page 201: ...Chapter 1 1 187 b 2 Install the Waste Toner Joint 1 to the Waste Toner Container 2...
Page 206: ...Chapter 1 1 192 b 9 Remove the Prism 1 1 Screw 2 1 Hook 3...
Page 207: ...Chapter 1 1 193 b 10 Clean the toner adhered to the 2 A parts on the prism...
Page 208: ...Chapter 1 1 194 b 11 Clean the toner adhered to the A part of the Waste Toner Container...
Page 210: ...Chapter 1 1 196 2 Pull out the punch waste tray...
Page 217: ...Chapter 1 1 203 3 Discard the staple waste...
Page 239: ...Chapter 1 1 225 3 Press Memory Media 4 Select the target memory media...
Page 250: ...Chapter 1 1 236 Select Share files and folders using SMB Windows Select the account to be used...
Page 255: ...Dec 2 2014...
Page 256: ......


