Chapter 1
1-110
1) Press Settings/Registration > Adjustment/Maintenance > Adjust Action > "Fine Adjust Perfect Binding Finishing Size".
2) Press "-" or "+" to adjust the trimming width > press OK.
You can switch between positive and negative values by pressing "±".
If you are making an adjustment in either the horizontal or vertical (top + bottom) direction, press "-" or "+" to enter a value for that direction only.
1.1.7.1.26 Adjusting the Amount of Glue for Perfect Binding (Perfect Binder-D1)
0031-5510
[ Manual-related ]
Description
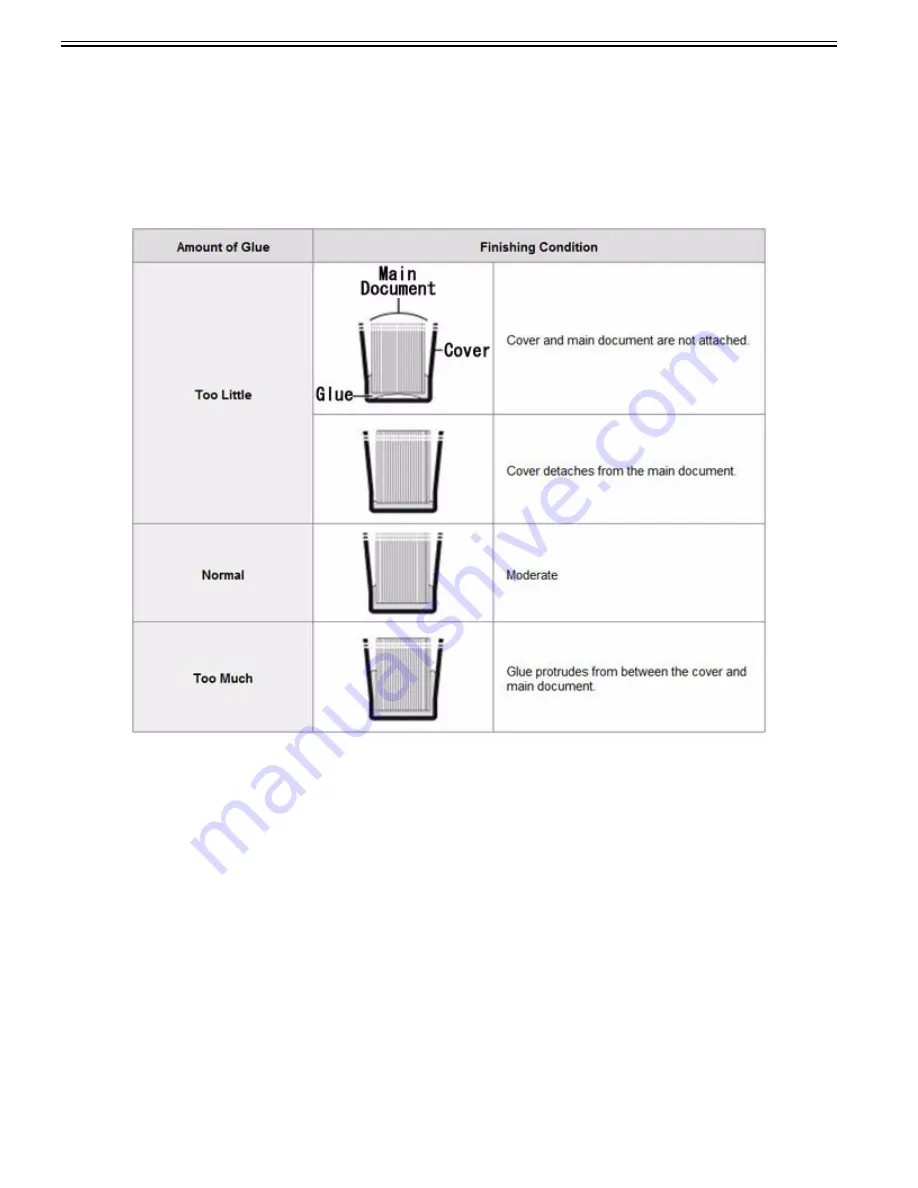
When you make a booklet in the Perfect Binding mode, you must use the correct amount of glue or the bound booklet may be poorly finished, as shown the illus-
tration below. In this case, adjust the amount of glue to improve the finishing condition of the booklet.
Field Remedy
1) Press Settings/Registration > Adjustment/Maintenance > Adjust Action > "Adjust Perfect Binding Glue Application".
2) Select the paper type and number of sheets of the main document > press "-" or "+" to adjust the amount of glue.
Details of each item are shown below.
"-6" to "-1": Decreases the amount of glue. Depending on the paper type, if you decrease the amount of glue by too much, the cover and main document may not
be attached firmly.
"0": This is the default value.
"+1" to "+6": Increases the amount of glue. Depending on the paper type, if you increase the amount of glue by too much, the glue may protrude from the booklet,
and remain inside the Perfect Binder-D1. If the glue remains in the Perfect Binder-D1, it may cause booklet jams.
[Reference]
- If you make a booklet containing both plain paper and other paper for the main document, press "-" or "+" under <Non-Coated> even if the number of sheets for
plain paper is one.
- Changing the settings in small increments is recommended.
3) Press OK.
Make a sample booklet every time you change the settings, and check the bound booklet. If the finishing condition has not improved, change the settings again.
[Reference]
If you make a booklet containing both plain paper and coated paper, it is recommended to make a sample booklet beforehand. Check the bound booklet, adjust the
amount of glue, if necessary, and make booklets continuously.
1.1.7.1.27 Setting method for printed images with both smooth gradation and outlines (change the gradation pattern of a
printed image)
0031-5511
[ Manual-related ]
Description
If you want to change the gradation pattern of a printed image, specify the dither settings.
If you select the proper setting value for printing, you can make printed images with both smooth gradation and outlines.
The dither settings can be selected for each of the following:
- "Gradation"
You can select [Gradation], [Resolution], or [Error Diffusion] independently for texts, graphics, and images for the halftone settings of the printer. This mode en-
Summary of Contents for imagePRESS C800 Series
Page 1: ...Dec 2 2014 Troubleshooting Guide imagePRESS C800 Series...
Page 2: ......
Page 6: ......
Page 8: ......
Page 9: ...Chapter 1 Correcting Faulty Images...
Page 10: ......
Page 14: ......
Page 114: ...Chapter 1 1 100 7 2 Select the envelope type press OK...
Page 165: ...Chapter 1 1 151 3 Pull the Tray all the way out...
Page 167: ...Chapter 1 1 153 5 Remove the Waste Toner Container...
Page 172: ...Chapter 1 1 158 2 Pull out the staple cartridge holding it by the green tab...
Page 180: ...Chapter 1 1 166 5 Push in the new staple case until it clicks to insert it...
Page 181: ...Chapter 1 1 167 6 Close the Cover for the saddle stitch staple cartridge...
Page 199: ...Chapter 1 1 185 b 1 Take out the Waste Toner Container 1...
Page 201: ...Chapter 1 1 187 b 2 Install the Waste Toner Joint 1 to the Waste Toner Container 2...
Page 206: ...Chapter 1 1 192 b 9 Remove the Prism 1 1 Screw 2 1 Hook 3...
Page 207: ...Chapter 1 1 193 b 10 Clean the toner adhered to the 2 A parts on the prism...
Page 208: ...Chapter 1 1 194 b 11 Clean the toner adhered to the A part of the Waste Toner Container...
Page 210: ...Chapter 1 1 196 2 Pull out the punch waste tray...
Page 217: ...Chapter 1 1 203 3 Discard the staple waste...
Page 239: ...Chapter 1 1 225 3 Press Memory Media 4 Select the target memory media...
Page 250: ...Chapter 1 1 236 Select Share files and folders using SMB Windows Select the account to be used...
Page 255: ...Dec 2 2014...
Page 256: ......


