Chapter 1
1-39
[Caution] Adjusting side registration changes the position of the deck cover. Adjust the position of the deck cover and the cassette pull-in as needed.
b-3)Set 13x19 paper in the relevant deck and output with the setting below to confirm that the symptom does not occur.
-Service Mode > Mode List > COPIER > TEST > PG > TYPE > "5"
-Service Mode > Mode List > COPIER > TEST > PG > Set M of "COLOR-x" to "1" and set Y, C and K to "0".
-Service Mode > Mode List > COPIER > TEST > PG > In "PG-PICK", set the upper deck to "17", the middle deck to "18" and the lower deck to "19".
b-4)Service Mode > Mode List > COPIER > Option > FEED-SW > Revert CIS-OFF back to "0".
c)When POD DECK LITE-B1 is used
c-1) Service Mode > Mode List > COPIER > Option > FEED-SW > Set CIS-OFF to "1". ("0" by default)
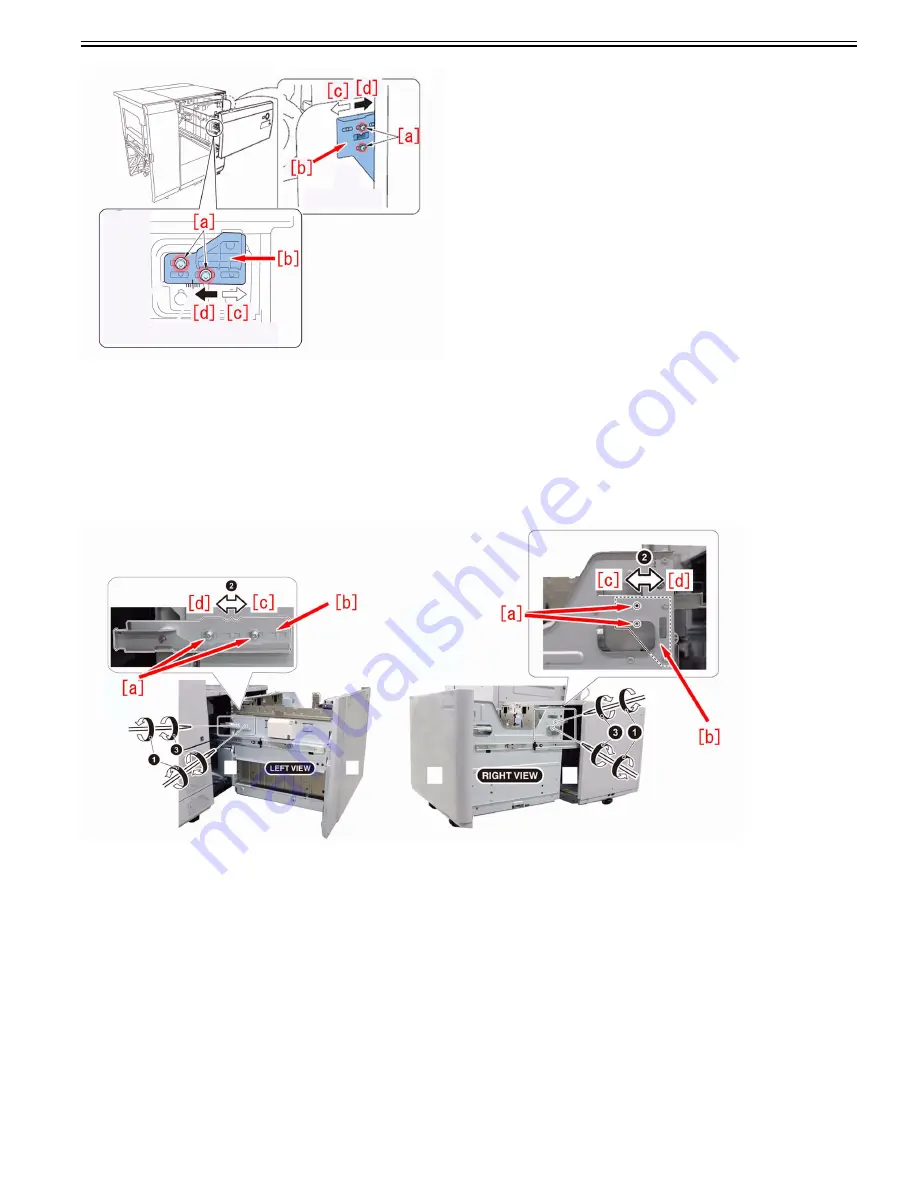
c-2) Loosen the 4 screws [a] of the deck and adjust the image margin at the right/left sides within 2.5 divisions (1 division: 1mm).
When the symptom occurs at the front side, move the parts on both right/left sides [b] toward the front [c] to lessen the image margin at the front side.
When the symptom occurs at the rear side, move the parts on both right/left sides [b] toward the rear [d] to lessen the image margin at the rear side.
[Caution] Adjusting side registration changes the position of the deck cover. Adjust the position of the deck cover and the cassette pull-in as needed.
c-3) Set 13x19 paper in the relevant deck and output with the setting below to confirm that the symptom does not occur.
-Service Mode > Mode List > COPIER > TEST > PG > TYPE > "5"
-Service Mode > Mode List > COPIER > TEST > PG > Set M of "COLOR-x" to "1" and set Y, C and K to "0".
-Service Mode > Mode List > COPIER > TEST > PG > PG-PICK > "7"
c-4) Service Mode > Mode List > COPIER > Option > FEED-SW > Revert CIS-OFF back to "0".
B)Change the settings of adjust image quality
B-1)Have the customer log in to System Management Mode in user mode.
B-2)Select Settings/Registration > Adjustment/Maintenance > Adjust Image Quality > In "Auto Correct Color Mismatch" select the color to which the symptom
occurs, push "+" button twice, confirm that the correction value [a] is set to "2" and push "OK".
Summary of Contents for imagePRESS C800 Series
Page 1: ...Dec 2 2014 Troubleshooting Guide imagePRESS C800 Series...
Page 2: ......
Page 6: ......
Page 8: ......
Page 9: ...Chapter 1 Correcting Faulty Images...
Page 10: ......
Page 14: ......
Page 114: ...Chapter 1 1 100 7 2 Select the envelope type press OK...
Page 165: ...Chapter 1 1 151 3 Pull the Tray all the way out...
Page 167: ...Chapter 1 1 153 5 Remove the Waste Toner Container...
Page 172: ...Chapter 1 1 158 2 Pull out the staple cartridge holding it by the green tab...
Page 180: ...Chapter 1 1 166 5 Push in the new staple case until it clicks to insert it...
Page 181: ...Chapter 1 1 167 6 Close the Cover for the saddle stitch staple cartridge...
Page 199: ...Chapter 1 1 185 b 1 Take out the Waste Toner Container 1...
Page 201: ...Chapter 1 1 187 b 2 Install the Waste Toner Joint 1 to the Waste Toner Container 2...
Page 206: ...Chapter 1 1 192 b 9 Remove the Prism 1 1 Screw 2 1 Hook 3...
Page 207: ...Chapter 1 1 193 b 10 Clean the toner adhered to the 2 A parts on the prism...
Page 208: ...Chapter 1 1 194 b 11 Clean the toner adhered to the A part of the Waste Toner Container...
Page 210: ...Chapter 1 1 196 2 Pull out the punch waste tray...
Page 217: ...Chapter 1 1 203 3 Discard the staple waste...
Page 239: ...Chapter 1 1 225 3 Press Memory Media 4 Select the target memory media...
Page 250: ...Chapter 1 1 236 Select Share files and folders using SMB Windows Select the account to be used...
Page 255: ...Dec 2 2014...
Page 256: ......


