Chapter 1
1-22
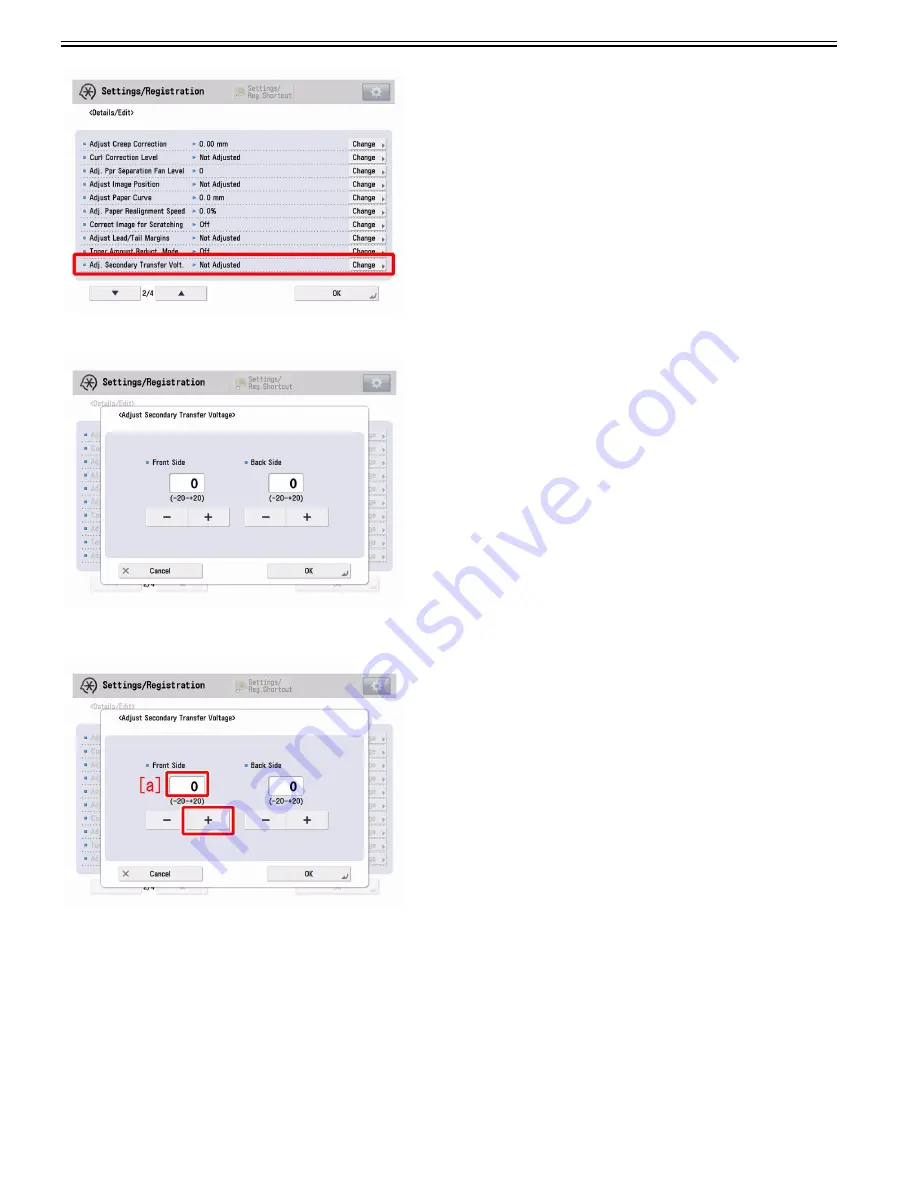
6) If the adjust secondary transfer voltage screen is displayed, the presetting is completed.
7) Select Front Side in the adjust secondary transfer voltage screen, press "+" button five times and if the corrected value[a] is confirmed to be "+5", then press "OK".
The range of setting is from "-20" to "+20" ("0" by default). Changing this value changes the secondary transfer voltage.
[Caution] Changing this setting may increase the secondary transfer voltage and lead to poor image (coarse image/poor transfer with high density original, etc.).
8) Output the image having shown the symptom, and check that the symptom does not occur. If the symptom no longer occurs, the work is completed.
If the symptom does not show an improvement, go back to the step 7) and change the value by one at a time up to "+7".
1.1.1.5.3 White spots by drum pitch due to soiling fused on drum in specific environment (H/H)
0031-7947
[ Case in the field ]
Description
If the Process Unit (Y)/(M)/(C) or Drum Unit (Bk) is used in a specific environment, white spots on images by the drum pitch may occur. The cause is considered
to be the fusing on the drum. The following field remedy explains the cleaning step for the drum with fusing separately for the color drum and black drum.
Field Remedy
[Caution]
Following is a list of cautions when working.
- Do not clean unless fusing occurred due to the possibility of image failure occurring from the deterioration of the drum by light.
Summary of Contents for imagePRESS C800 Series
Page 1: ...Dec 2 2014 Troubleshooting Guide imagePRESS C800 Series...
Page 2: ......
Page 6: ......
Page 8: ......
Page 9: ...Chapter 1 Correcting Faulty Images...
Page 10: ......
Page 14: ......
Page 114: ...Chapter 1 1 100 7 2 Select the envelope type press OK...
Page 165: ...Chapter 1 1 151 3 Pull the Tray all the way out...
Page 167: ...Chapter 1 1 153 5 Remove the Waste Toner Container...
Page 172: ...Chapter 1 1 158 2 Pull out the staple cartridge holding it by the green tab...
Page 180: ...Chapter 1 1 166 5 Push in the new staple case until it clicks to insert it...
Page 181: ...Chapter 1 1 167 6 Close the Cover for the saddle stitch staple cartridge...
Page 199: ...Chapter 1 1 185 b 1 Take out the Waste Toner Container 1...
Page 201: ...Chapter 1 1 187 b 2 Install the Waste Toner Joint 1 to the Waste Toner Container 2...
Page 206: ...Chapter 1 1 192 b 9 Remove the Prism 1 1 Screw 2 1 Hook 3...
Page 207: ...Chapter 1 1 193 b 10 Clean the toner adhered to the 2 A parts on the prism...
Page 208: ...Chapter 1 1 194 b 11 Clean the toner adhered to the A part of the Waste Toner Container...
Page 210: ...Chapter 1 1 196 2 Pull out the punch waste tray...
Page 217: ...Chapter 1 1 203 3 Discard the staple waste...
Page 239: ...Chapter 1 1 225 3 Press Memory Media 4 Select the target memory media...
Page 250: ...Chapter 1 1 236 Select Share files and folders using SMB Windows Select the account to be used...
Page 255: ...Dec 2 2014...
Page 256: ......


