Chapter 1
1-24
[Caution]
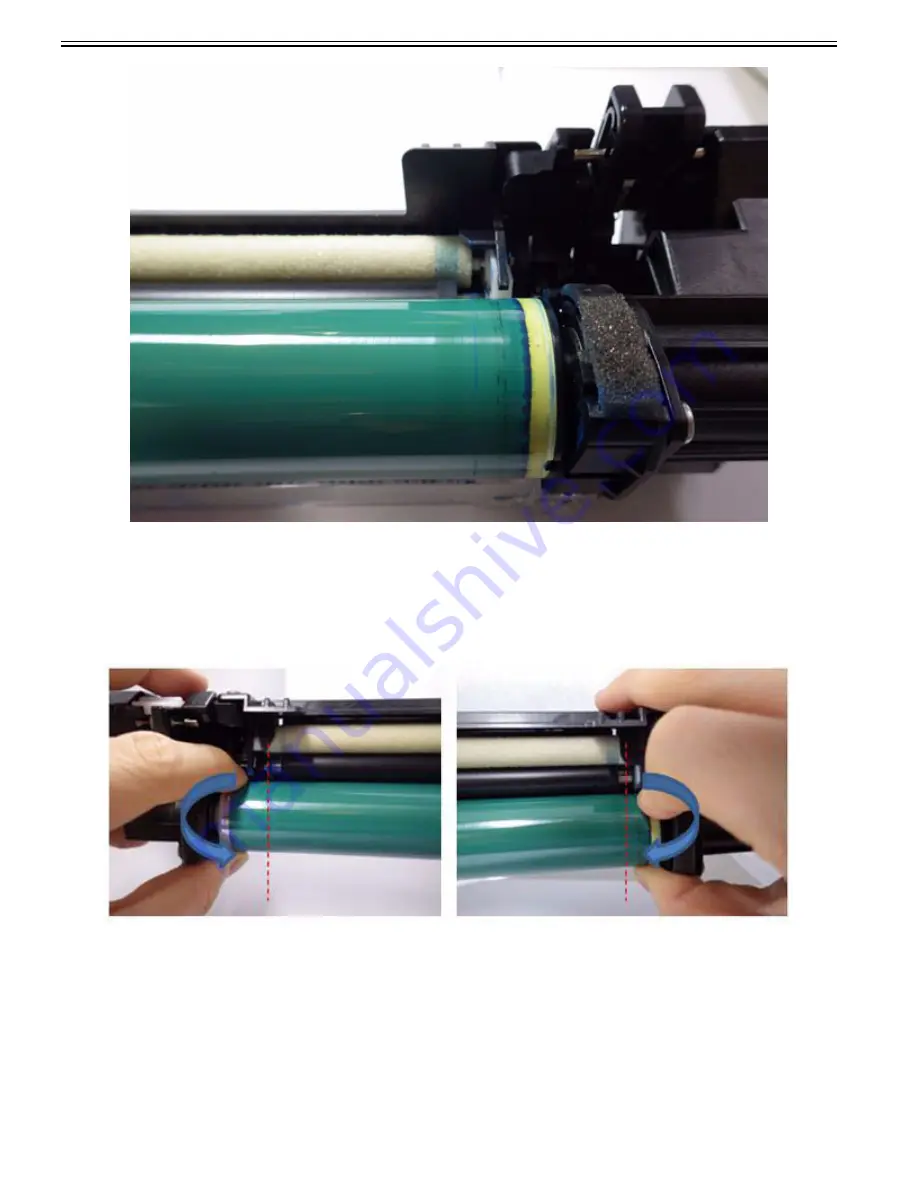
If the drum is cleaned in a horizontal direction to the rotation direction, scratches on the drum may occur.
5) Rotate the drum in its rotation direction to clean another location and then repeat step 3 and 4. Clean the drum for at least one rotation and confirm visually that
foreign matters are removed.
[Caution]
To rotate the drum after wiping, place a finger on the location shown in the diagram and then rotate in its rotation direction. Do not contact a finger on the Primary
Charging Roller or the drum surface on the drum contact area.
6) After completing the cleaning, install the Process Unit to the Developing Assembly Unit and then install to the machine.
7) Turn ON the main power switch of the machine and when it can copy, perform following modes.
- INIT-ITB: Select service mode > COPIER > FUNCTION > INSTALL > INIT-ITB (Creation of ITB edge profile) > press OK key. During operation, "ACTIVE"
is displayed, and "OK!" is displayed after the completion.
- Auto Adjust Gradation: Settings/Registration > Adjustment/Maintenance > Adjust Image Quality > Auto Adjust Gradation > Full Adjust
- Auto Correct Color Mismatch: Settings/Registration > Adjustment/Maintenance > Adjust Image Quality > Auto Correct Color Mismatch
- Correct Shading: Settings/Registration > Adjustment/Maintenance > Adjust Image Quality > Correct Shading
[Cleaning Procedure for the Drum (Bk)]
1) Turn OFF the main power switch.
5) Remove the P-kit. Use the lightproof sheet to lightproof the drum.
3) Use lint-free paper (NOT moistened by ethanol) to clean toner on the drum in the same direction as the drum rotation direction.
[Caution]
If the drum is cleaned in a horizontal direction to the rotation direction, scratches on the drum may occur.
Summary of Contents for imagePRESS C800 Series
Page 1: ...Dec 2 2014 Troubleshooting Guide imagePRESS C800 Series...
Page 2: ......
Page 6: ......
Page 8: ......
Page 9: ...Chapter 1 Correcting Faulty Images...
Page 10: ......
Page 14: ......
Page 114: ...Chapter 1 1 100 7 2 Select the envelope type press OK...
Page 165: ...Chapter 1 1 151 3 Pull the Tray all the way out...
Page 167: ...Chapter 1 1 153 5 Remove the Waste Toner Container...
Page 172: ...Chapter 1 1 158 2 Pull out the staple cartridge holding it by the green tab...
Page 180: ...Chapter 1 1 166 5 Push in the new staple case until it clicks to insert it...
Page 181: ...Chapter 1 1 167 6 Close the Cover for the saddle stitch staple cartridge...
Page 199: ...Chapter 1 1 185 b 1 Take out the Waste Toner Container 1...
Page 201: ...Chapter 1 1 187 b 2 Install the Waste Toner Joint 1 to the Waste Toner Container 2...
Page 206: ...Chapter 1 1 192 b 9 Remove the Prism 1 1 Screw 2 1 Hook 3...
Page 207: ...Chapter 1 1 193 b 10 Clean the toner adhered to the 2 A parts on the prism...
Page 208: ...Chapter 1 1 194 b 11 Clean the toner adhered to the A part of the Waste Toner Container...
Page 210: ...Chapter 1 1 196 2 Pull out the punch waste tray...
Page 217: ...Chapter 1 1 203 3 Discard the staple waste...
Page 239: ...Chapter 1 1 225 3 Press Memory Media 4 Select the target memory media...
Page 250: ...Chapter 1 1 236 Select Share files and folders using SMB Windows Select the account to be used...
Page 255: ...Dec 2 2014...
Page 256: ......


