Chapter 1
1-38
Cause
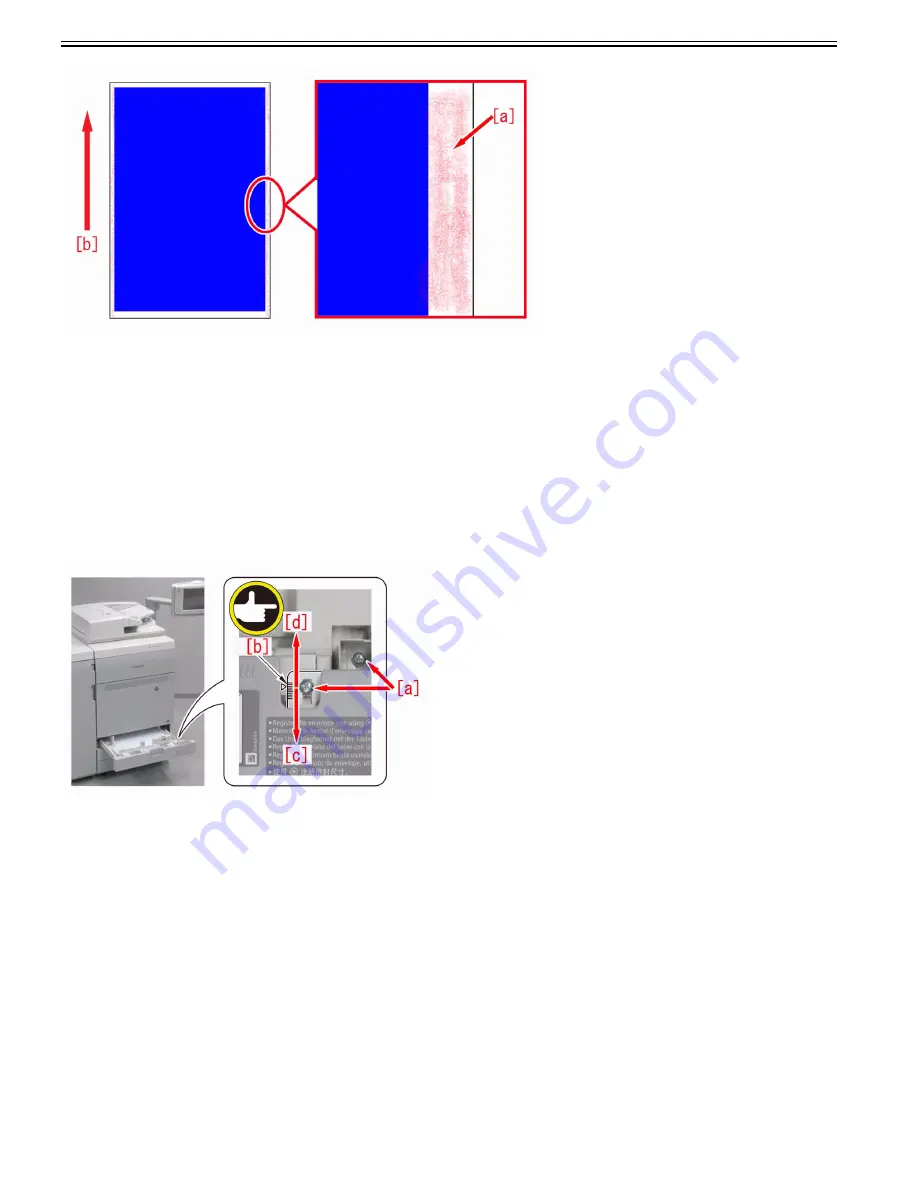
The ends of the drum cleaning blade continue to contact with the drum without toner, so that it gets abraded with progression of endurance time.
As toner passes through the abraded part, the charging roller gets soiled with toner and generates charging failure.
Excess toner attaches on the part with charging failure and this causes the above mentioned symptom.
Service work
When the symptom occurs at the front or rear side only, the symptom will improve by adjusting the side registration following the step A).
When the symptom occurs at both front and rear sides, the symptom will improve by adjusting the image quality following the step B).
According to the situation of occurrence or the situation of use by the customer, choose the appropriate remedial action between A) and B).
A)Adjust the side registration of the paper source of 13x19 paper
[Caution] If the side registration is moved excessively, paper passes outside of the developable area and generates an image with void at the edge.
a)When a cassette inside the host machine is used
a-1)Go to Service Mode > Mode List > COPIER > Option > FEED-SW > and change CIS-OFF to "1". ("0" by default)
a-2)Loosen the 2 screws [a] of the relevant cassette and adjust the image margin at the right/left sides within 2.5 divisions (1 division: 1mm).
When the symptom occurs at the front side, move the scale [b] toward the front [c] to lessen the image margin at the front side.
When the symptom occurs at the rear side, move the scale [b] toward the rear [d] to lessen the image margin at the rear side.
[Caution] Adjusting side registration changes the position of the cassette cover. Adjust the position of the cassette cover and the cassette pull-in as needed.
a-3)Set 13x19 paper in the relevant cassette and output with the setting below to confirm that the symptom does not occur.
-Service Mode > Mode List > COPIER > TEST > PG > TYPE > "5"
-Service Mode > Mode List > COPIER > TEST > PG > Set M of "COLOR-x" to "1" and set Y, C and K to "0".
-Service Mode > Mode List > COPIER > TEST > PG > In "PG-PICK", set the cassette 1 to "1", the cassette2 to "2" and the cassette 3 to "3".
a-4)Service Mode > Mode List > COPIER > Option > FEED-SW > Revert CIS-OFF back to "0".
b)When MULTI DRAWER PD-B1 is used
b-1)Service Mode > Mode List > COPIER > Option > FEED-SW > Set CIS-OFF to "1". ("0" by default)
b-2)Loosen the 4 screws [a] of the relevant deck and adjust the image margin at the right/left sides within 2.5 divisions (1 division: 1mm).
When the symptom occurs at the front side, move the parts on both right/left sides [b] toward the front [c] to lessen the image margin at the front side.
When the symptom occurs at the rear side, move the parts on both right/left sides [b] toward the rear [d] to lessen the image margin at the rear side.
Summary of Contents for imagePRESS C800 Series
Page 1: ...Dec 2 2014 Troubleshooting Guide imagePRESS C800 Series...
Page 2: ......
Page 6: ......
Page 8: ......
Page 9: ...Chapter 1 Correcting Faulty Images...
Page 10: ......
Page 14: ......
Page 114: ...Chapter 1 1 100 7 2 Select the envelope type press OK...
Page 165: ...Chapter 1 1 151 3 Pull the Tray all the way out...
Page 167: ...Chapter 1 1 153 5 Remove the Waste Toner Container...
Page 172: ...Chapter 1 1 158 2 Pull out the staple cartridge holding it by the green tab...
Page 180: ...Chapter 1 1 166 5 Push in the new staple case until it clicks to insert it...
Page 181: ...Chapter 1 1 167 6 Close the Cover for the saddle stitch staple cartridge...
Page 199: ...Chapter 1 1 185 b 1 Take out the Waste Toner Container 1...
Page 201: ...Chapter 1 1 187 b 2 Install the Waste Toner Joint 1 to the Waste Toner Container 2...
Page 206: ...Chapter 1 1 192 b 9 Remove the Prism 1 1 Screw 2 1 Hook 3...
Page 207: ...Chapter 1 1 193 b 10 Clean the toner adhered to the 2 A parts on the prism...
Page 208: ...Chapter 1 1 194 b 11 Clean the toner adhered to the A part of the Waste Toner Container...
Page 210: ...Chapter 1 1 196 2 Pull out the punch waste tray...
Page 217: ...Chapter 1 1 203 3 Discard the staple waste...
Page 239: ...Chapter 1 1 225 3 Press Memory Media 4 Select the target memory media...
Page 250: ...Chapter 1 1 236 Select Share files and folders using SMB Windows Select the account to be used...
Page 255: ...Dec 2 2014...
Page 256: ......


